
Popular categories
Looking for a yarn?


Comments / Questions (43)
![]() Regina wrote:
Regina wrote:
Ich habe ein problem mit den Raglan aufnahmen. Für grösse Xl habe ich zu viele maschen. Ich habe 3mal 8 maschen zugenommen in den verkürtzten reihen=24 Dan habe ich 6× 8 maschen zugenommen in jeder 2 reihe nach der halsenbende 48 maschen. Dan sagt es noch 33 mal am rumpfteil =132 maschen und 15 mal an den ärmel = 60 maschen. Ich habe Dan 416 maschen und nicht 392 maschen. Können sie mir helfen und erklären wer ich den fehler gemacht habe. Vielen dank.
04.02.2026 - 05:27DROPS Design answered:
Liebe Regina, die Zunahmen am Halsausschnitt (3 x 8 Maschen) sind in die Gesamtzahl der Zunahmen mit eingerechnet, daher kommen die 24 Maschen, die bei Ihnen zu viel sind. Das ist in der Anleitung vielleicht nicht deutlich genug gesagt und wird noch einmal überarbeitet. Trotzdem viel Spaß beim Weiterstricken!
05.02.2026 - 00:30
![]() Rebecka wrote:
Rebecka wrote:
Jag förstår inte ökningarna på oket (xl). Det anges \\\"antal ökningar\\\" det måste väl vara antal varv? Tex ska man fortsätta ökmingarna tills man ökat 6 gånger. Men det är väl inte ens ett helt varv iom att man ökar 8g/varv. Är det antal ökningsvarv som menas?
19.01.2026 - 17:59DROPS Design answered:
Hei Rebecka. På halskanten/forkortede pinner strikkes det 6 varv og det økes på 3 av de (8 økte masker pr øke varv). På oket økes det først på hver 2. varv til det er økt 6 ganger ( = 12 varv). Deretter økes det ulik på oket og ermene. mvh DROPS Design
30.01.2026 - 09:15
![]() Roussignol wrote:
Roussignol wrote:
Bonjour, pour la première taille donc S. On demande de monter 140 m. Sauf que quand on fait les marquage pour le col, il y 3 m en plus?
07.01.2026 - 18:23DROPS Design answered:
Bonjour Mme Roussignol, placez vos marqueurs ainsi: comptez 15 m (demi-dos), mettez 1 marqueur dans la m suivante, comptez 38 m (manche), mettez 1 marqueur dans la m suivante, comptez 30 m (devant), mettez 1 marqueur dans la m suivante, comptez 38 m (manche), mettez 1 marqueur dans la m suivante, il vous reste 15 m après ce dernier marqueur (demi-dos) soit: 15+1+38+1+30+1+38+1+15=140. Bon tricot!
08.01.2026 - 09:27
![]() Ebba wrote:
Ebba wrote:
Hej! Jag hittar ingen storleksguide, vad är måtten på de olika storlekarna? Hur vet jag vilken storlek jag ska välja? Tack på förhand!
02.01.2026 - 16:10DROPS Design answered:
Hi Ebba, please see the lesson DROPS HERE. Happy knitting!
05.01.2026 - 08:26
![]() CP wrote:
CP wrote:
Hi! I've finished the short rows as explained, but have 16 stitches still on hold left to work (size S). I'm wondering if I should continue working short rows until all of those get knitted and then start the yoke, even if the instructions don't say so, or if I did something wrong along the way. Thanks so much in advance.
14.08.2025 - 07:00DROPS Design answered:
Dear CP, after you have worked all short rows, cut the yarn at the end of last row, slip all stitches from left needle onto right needle without working them until mid back, then join yarn and work YOKE increasing for raglan on every other round on body + on every 4th round on sleeves. Happy knitting!
14.08.2025 - 12:50
![]() CP wrote:
CP wrote:
Ho I, I have a question when starting short rows: I can't figure out if I start 2 stitches before 3rd marker after working the stitches leading up to that, or if I just cut the yarn and attach it to begin working without having knit all those stitches. I find the instructions really confusing at this point.
13.08.2025 - 04:10DROPS Design answered:
Dear CP, in this video we show how to work this kind of short rows, ie how to cut the yarn and how to start 2 sts before 1st marker and how to continue. Hope it will help. Happy knitting!
13.08.2025 - 08:39
![]() Florence wrote:
Florence wrote:
Merci
08.04.2025 - 13:35
![]() Florence wrote:
Florence wrote:
Bonjour, Je ne comprends pas pourquoi doit-on couper le fil après les rangs du col? Et je ne vois aucune explication pour faire la suite. Merci
07.04.2025 - 18:04DROPS Design answered:
Bonjour Florence, on doit couper le fil après le col pour tricoter les rangs raccourcis cf ENCOLURE en commençant au bon endroit, à la fin de ces mêmes rangs, on coupe le fil pour reprendre l'empiècement au milieu dos. Dans cette vidéo, nous montrons comment tricoter ce type de rangs raccourcis en augmentant en même temps pour le raglan, notez de bien suivre les indications de ce modèle, la façon de faire peut différer dans la vidéo car elle montre juste le principe de ce type d'encolure. Bon tricot!
08.04.2025 - 09:24
![]() Jennifer wrote:
Jennifer wrote:
Ønsker gratis oppskrift med den fine genser.
03.04.2025 - 20:25
![]() Yas wrote:
Yas wrote:
Vad menas med kkipp av tråden? vilken tråd?
28.02.2025 - 10:38DROPS Design answered:
Hej Yas, hvis du klipper tråden du strikker med, så kan du fortsætter fra midt bagpå ifølge opskriften :)
06.03.2025 - 12:00
|
|
Moody Judy#moodyjudysweater |
|
 |
 |
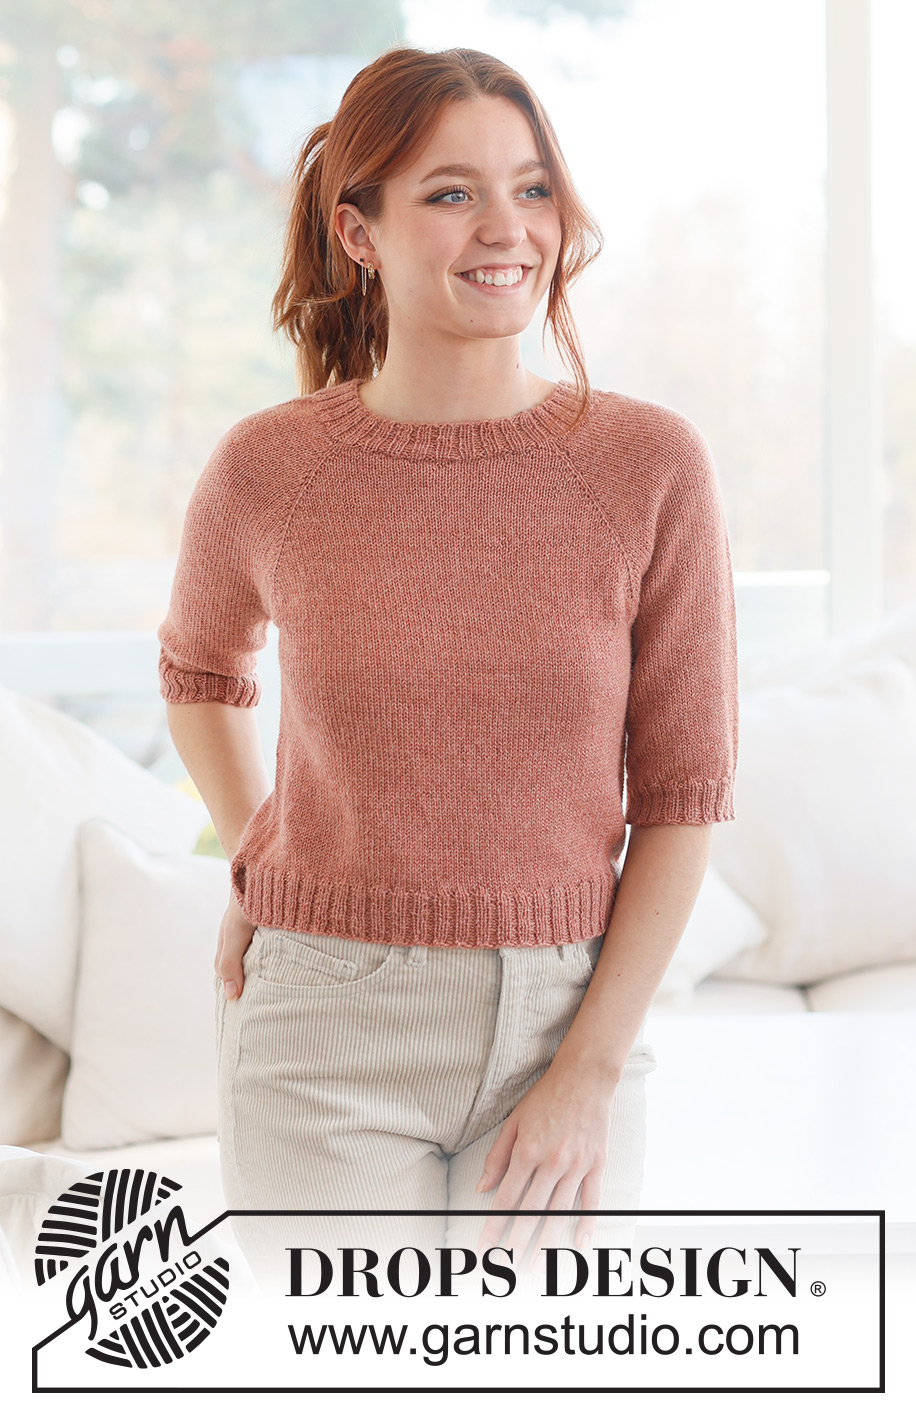
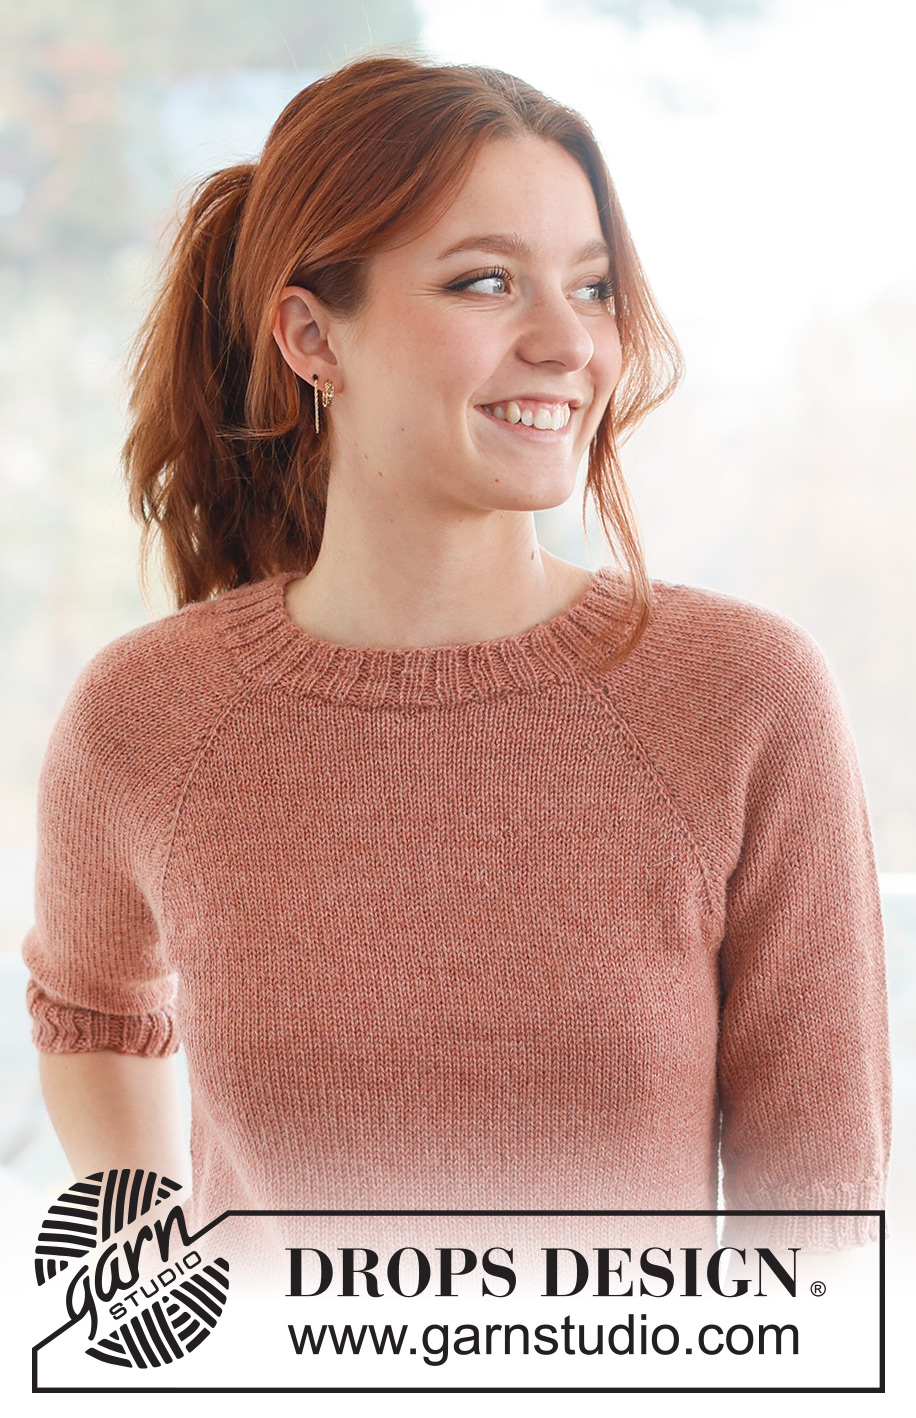
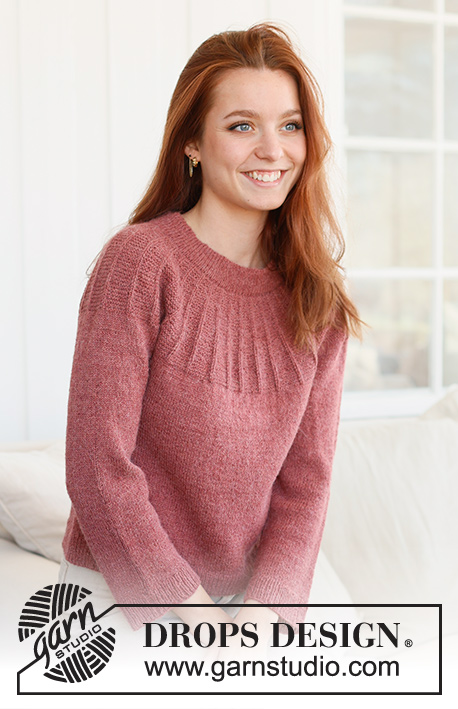
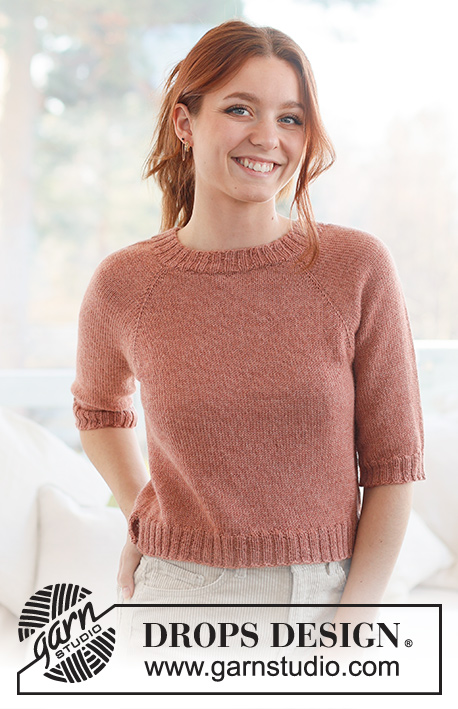
Knitted jumper in DROPS Alpaca. Piece is knitted top down with raglan, stocking stitch and short sleeves. Size: S - XXXL
DROPS 236-18 |
|
|
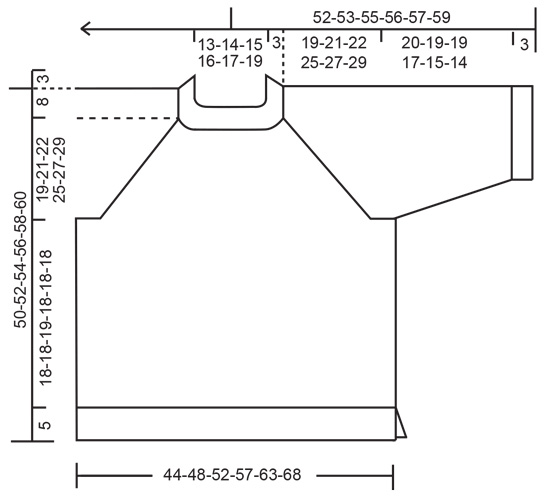
---------------------------------------------------------- EXPLANATION FOR THE PATTERN: ---------------------------------------------------------- RAGLAN: Increase differently on body and sleeves in the different sizes. Increase for body before 3rd and 1st marker and after 2nd and 4th marker. Increase for sleeves after 3rd and 1st marker and before 4th and 2nd marker. Increase 1 stitch on each side of stitch with marker. Increase 1 stitch by making 1 yarn over. When working back and forth, work yarn overs from wrong side as follows before and after marker: BEFORE MARKER: Purl yarn over in back loop of stitch. It should not make a hole. AFTER MARKER: Slip stitch off left needle and put it back on left needle but the opposite way (insert left needle in from behind when slipping it back on needle). Purl yarn over in front loop of stitch. It should not make a hole. When working in the round, work yarn overs on next round as follows before and after marker: BEFORE MARKER: Slip stitch off left needle and put it back on left needle but the opposite way (insert left needle in from behind when slipping it back on needle). Knit yarn over in front loop of stitch (yarn over is twisted towards the right). It should not make a hole. AFTER MARKER: Knit yarn over in back loop of stitch (yarn over is twisted towards the left). It should not make a hole. DECREASE TIP (applies to mid under sleeves): Decrease 1 stitch on each side of marker thread as follows: Work until 3 stitches remain before marker thread and knit 2 together, knit 2 (marker thread is between these 2 stitches), slip 1 stitch knitwise, knit 1, pass slipped stitch over stitch worked. GARTER STITCH (back and forth): Knit all rows. 1 ridge vertically = knit 2 rows. ---------------------------------------------------------- START THE PIECE HERE: ---------------------------------------------------------- JUMPER - SHORT OVERVIEW OF THE PIECE: Work neck edge and yoke in the round on circular needle from mid back, top down. Now divide yoke for body and sleeves. Work body in the round on circular needle, before dividing the piece and work back and forth for vents. Work sleeves in the round on double pointed needles/a short circular needle. NECK EDGE: Cast on 140-144-148-152-160-168 stitches on circular needle size 2.5 mm with DROPS Alpaca. Work rib in the round (knit 2/purl 2) until rib measures 3 cm. Now insert 4 markers in piece as explained below (without working the round). Use markers when increasing for raglan. Count 15-16-17-18-20-22 stitches (half back piece), insert 1st marker in next stitch, count 38 stitches (sleeve), insert 2nd marker in next stitch, count 30-32-34-36-40-44 stitches (front piece), insert 3rd marker in next stitch, count 38 stitches (sleeve), insert 4th marker in next stitch, 15-16-17-18-20-22 stitches remain on round (half back piece). Cut the yarn. NECK LINE: Now work neck line with short rows as explained below. AT THE SAME TIME as increasing differently on body and sleeves in the different sizes as follows: SIZE S, M and L: Increase every other round on body and increase every 4ht round on sleeves. Switch to circular needle size 3.5 mm. Begin from right side, 2 stitches before 3rd marker (i.e. in left side of neck if wearing the garment). Work in stocking stitch and increase for RAGLAN - read explanation above, until 2 stitches past 2nd marker have been worked (right side of neck at the front - 8 stitches have been increased for raglan). Turn piece, tighten yarn and work from wrong side until 2 stitches have been worked past where the short rows began at 3rd marker. Turn piece and work back from right side until 2 stitches have been worked past where the last turn was at 2nd marker - remember increase for raglan, NOTE! Increase only on body, increase before 3rd marker and 1st marker and after 2nd and 4th marker (4 stitches have been increased for raglan). Turn piece, tighten yarn and work from wrong side until 2 stitches have been worked past last turn was at 3rd marker. Turn piece and work back from right side until 2 stitches have been worked past last turn at 2nd marker - remember increase for raglan, now increase both on body and sleeve - i.e. on each side of all 4 markers (8 stitches have been increased for raglan). Turn piece, tighten yarn and work from wrong side until 2 stitches have been worked past last turn was at 3rd marker. Cut the yarn. Work yoke as explained below. SIZE XL, XXL and XXXL: Increase every other round on body, on sleeves increase first every other round, then every 4th round. Switch to circular needle size 3.5 mm. Begin from right side, 2 stitches before 3rd marker (i.e. in left side of neck if wearing the garment). Work in stocking stitch and increase for RAGLAN - read explanation above, until 2 stitches past 2nd marker have been worked (right side of neck at the front - 8 stitches have been increased for raglan). Turn piece, tighten yarn and work from wrong side until 2 stitches have been worked past where the short rows began at 3rd marker. Turn piece and work back from right side until 2 stitches have been worked past where the last turn was at 2nd marker - remember increase for raglan (8 stitches have been increased for raglan). Turn piece, tighten yarn and work from wrong side until 2 stitches have been worked past last turn was at 3rd marker. Turn piece and work back from right side until 2 stitches have been worked past last turn at 2nd marker - remember increase for raglan (8 stitches have been increased for raglan). Turn piece, tighten yarn and work from wrong side until 2 stitches have been worked past last turn was at 3rd marker. Cut the yarn. Work yoke as explained below. YOKE: SIZE S, M and L: Begin mid back and continue increases for raglan every other round for body and every 4th round for sleeves until increase has been done 11-14-17 times in total for sleeves after neck edge (increases on sleeves are done but increase on front piece/back piece continues). REMEMBER THE KNITTING TENSION! Continue increase on body until increase has been done 29-33-34 times on body. There are 300-332-352 stitches on round (60-66-72 stitches for each sleeve and 90-100-104 stitches for front pieces/back piece including stitches with markers). SIZE XL, XXL and XXXL: Begin mid back and continue increases for raglan every other round on body and sleeves until increase has been done 6-5-8 times after neck edge. REMEMBER THE KNITTING TENSION! Now increases on sleeves change, increase as follows: Continue increase on body every other round until increase has been done 33-38-39 more times (39-43-47 times in total on body). At the same time increase for sleeves every 4th round 15-17-16 times (21-22-24 increases in total for sleeve). There are 392-420-452 stitches on round (80-82-86 stitches for each sleeve and 116-128-140 stitches for front pieces/back piece). ALL SIZES: = 300-332-352-392-420-452 stitches. Work without increases until piece measures 19-21-22-25-27-29 cm mid front (measured after neck edge). Now divide yoke for body and sleeves as follows from beginning of round: Work the first 45-50-52-58-64-70 stitches as before (half back piece), slip the next 60-66-72-80-82-86 stitches on a thread for sleeve, cast on 16-16-20-20-24-24 new stitches on row (in the side under sleeve), work the next 90-100-104-116-128-140 stitches (front piece), slip the next 60-66-72-80-82-86 stitches on a thread for sleeve, cast on 16-16-20-20-24-24 new stitches on needle (in the side under sleeve) and work the remaining 45-50-52-58-64-70 stitches as before (half back piece). BODY: = 212-232-248-272-304-328 stitches. Insert 1 marker thread in each side on body, in the middle of the 16-16-20-20-24-24 stitches that were cast on under each sleeve. Move the marker threads upwards when working; they should be used for dividing for vents in each side. Begin round at one of the marker threads, and work stocking stitch in the round until piece measures 18-18-19-18-18-18 cm from division. Keep the first 106-116-124-136-152-164 stitches on needle and slip the last 106-118-124-136-152-164 on a thread. Switch to circular needle size 2.5 mm. Knit 1 row from right side while increasing 20-18-22-26-30-30 stitches evenly = 126-134-146-162-182-194 stitches. Work next row from wrong side: 2 stitches in GARTER STITCH - read explanation above, * purl 2, knit 2 *, repeat from *-* until 4 stitches remain, purl 2 and 2 stitches in garter stitch. Continue rib like this for 5 cm. Cast off stitches with knit over knit and purl over purl. Garment measures approx. 50-52-54-56-58-60 cm from shoulder. Slip stitches from thread on to circular needle size 2.5 mm, and work the same way. SLEEVES: Slip the 60-66-72-80-82-86 stitches from stitch holder in one side of piece on a short circular needle/double pointed needles size 3.5 mm and pick in addition up 1 stitch in each of the 16-16-20-20-24-24 stitches cast on under sleeve = 76-82-92-100-106-110 stitches. Insert a marker thread in the middle of the new stitches. Work in stocking stitch in the round. When piece measures 2 cm, decrease 2 stitches mid under sleeve - read DECREASE TIP. Decrease like this approx. every 4-4-3½-2½-3-3½ cm 4-4-5-6-5-4 times in total = 68-74-82-88-96-102 stitches. Work until piece measures 20-19-19-17-15-14 cm, approx. 3 cm remain before finished measurements (try the garment on and work to desired length before rib). Switch to double pointed needles size 2.5 mm. Knit 1 round and increase 12-14-14-16-16-18 stitches evenly = 80-88-96-104-112-120 stitches. Work rib (knit 2/purl 2) for 3 cm. Cast off stitches with knit over knit and purl over purl. Sleeve measures approx. 23-22-22-20-18-17 cm from division. Work the other sleeve the same way. |
|
 |
|
Have you finished this pattern?Tag your pictures with #dropspattern #moodyjudysweater or submit them to the #dropsfan gallery. Do you need help with this pattern?You'll find 32 tutorial videos, a Comments/Questions area and more by visiting the pattern on garnstudio.com. © 1982-2026 DROPS Design A/S. We reserve all rights. This document, including all its sub-sections, has copyrights. Read more about what you can do with our patterns at the bottom of each pattern on our site. |
|


With over 40 years in knitting and crochet design, DROPS Design offers one of the most extensive collections of free patterns on the internet - translated to 17 languages. As of today we count 324 catalogues and 12290 patterns translated into English (UK/cm). 12290
We work hard to bring you the best knitting and crochet have to offer, inspiration and advice as well as great quality yarns at incredible prices! Would you like to use our patterns for other than personal use? You can read what you are allowed to do in the Copyright text at the bottom of all our patterns. Happy crafting!
Post a comment to pattern DROPS 236-18
We would love to hear what you have to say about this pattern!
If you want to leave a question, please make sure you select the correct category in the form below, to speed up the answering process. Required fields are marked *.