
Popular categories
Looking for a yarn?


Comments / Questions (146)
![]() Lise Sauer wrote:
Lise Sauer wrote:
Jeg kan ikke få diagrammet til at passe! Maskerne passer ikke på p 5 i diagrammet. Jeg overser måske noget? Jeg har problemer med A3 på forstykket og er ikke kommet længere. Jeg kan se, at A3 og A4 på bagstykket samt A4 og A5 på forstykket heller ikke passer. Faktisk er det kun A2, der passer. Jeg strikker str 6-9 mdr. Jeg kan ikke finde nogle rettelser til opskriften. Kan I hjælpe mig?
05.09.2025 - 08:51DROPS Design answered:
Hej Lise. Har du sett att första maske på A.3 (pind 5) har tagits ind i slutet av på diagram A.1 (pind 5)? Mvh DROPS Design
05.09.2025 - 10:15
![]() Wilma wrote:
Wilma wrote:
Ik brei dit vestje in maat 80/86 en heb 111 steken opgezet. Na de boord in de eerste naald van het patroon houd ik 4 steken over. Ik heb het een aantal keer op verschillende manieren gecontroleerd, maar blijf steeds 4 steken overhouden. Ik vraag me af of ik iets over het hoofd zie, of dat het patroon misschien niet klopt?
14.08.2025 - 13:40DROPS Design answered:
Dag Wilma,
Heb je de markeerdraden voor de raglan in de steken gezet en niet tussen 2 steken?
18.08.2025 - 20:47
![]() Marieke wrote:
Marieke wrote:
Aan het eind van de pas, waar blijven de raglan steken? Voorpanden en achterpand betreffen enkel patroonsteken. Dan kom ik voor de mouwen + raglan uit op 46 ipv 45 steken.
17.06.2025 - 13:34DROPS Design answered:
Dag Marieke,
De raglansteken gaan naar de mouwen, zodat het patroon (over een meervoud van 6 steken) op het lijf straks doorloopt aan de zijkant.
17.06.2025 - 21:21
![]() Paulinska wrote:
Paulinska wrote:
Wie werden die markierten Maschen gestrickt? Und müssen in den Reihen mit den Raglanzunahmen noch weiter zusätzlich im Ärmel (+4 M.) gleichmäßig verteilt zugenommen werden?
14.06.2025 - 10:19DROPS Design answered:
Liebe Paulinska, die Markierer werden jeweils in einer Masche (und nicht zwischen Maschen) und zwar in die 1. Masche + in die letzte Masche von beiden Ärmeln eingesetzt. Viel Spaß beim Stricken!
16.06.2025 - 07:30
![]() Elena wrote:
Elena wrote:
Buenos dias, estoy teniendo problemas par seguir las instrucciones de este patron (talla pequeña). Para continuar con 6 puntos de la cenefa en punto musgo, A.1 sobre 7 puntos, A.2 3-3-4-5-5 veces, trabajar 37-41-45-49-51 puntos en punto jersey, A.2 9-9-11-12-12 veces, trabajar37-41-45-49-51 puntos en punto jersey, A.2 3-3-4-5-5 veces, A.5 y 6puntos de la cenefa en punto musgo. Las instruccciones dicen que tengo que tener 189 puntos y yo tengo 213 de manera que no puedo continuar. Gracias
09.06.2025 - 11:19DROPS Design answered:
Hola Elena, las instrucciones indicadas son para 189 puntos, que son los mismos que se indican para el patrón cuando hayas terminado los aumentos. Debes de haber fallado en alguno de los puntos anteriores. Comprueba que hayas comenzado con el número correcto de puntos y que hayas trabajado los diagramas correctamente después de trabajar los diagramas 1 vez en vertical.
16.06.2025 - 00:28
![]() Elena wrote:
Elena wrote:
Cada vez que se repita A.3 y A.4 en vertical, hay espacio para 1 repetición más de A.2 en los delanteros y 2 repeticiones más en la espalda. Después de trabajar A.3 y A.4 2-2-3-3-3 veces en vertical, se han terminado los aumentos en el delantero y la espalda; NO SE ENTIENDE QUE HAY QUE HACER. GRACIA S UN SALUDO
04.06.2025 - 23:31DROPS Design answered:
Hola Elena, A.3 y A.4 son patrones de calados que se trabajan en las líneas del raglán, donde se trabajan aumentos. A.2 es un patrón de calados que se trabaja en los delanteros/espalda y se repite sobre estas secciones. Si trabajamos las 8 filas de A.3 y A.4 tendremos 6 pts aumentados por cada repetición del diagrama (2 repeticiones de A.3 y 2 de A.4 = 24 pts). Así que, cuando empieces a trabajar los diagramas de nuevo, desde la fila 1 del diagrama, los 6 pts que sobran de la última fila de A.3 y A.4 se usarán para añadir una repetición más del diagrama A.2, de 6 pts. Tienes que trabajar todas las filas de los diagramas 2-3 veces según la talla para terminar los aumentos.
08.06.2025 - 13:06
![]() Anna Vendruscolo wrote:
Anna Vendruscolo wrote:
Salve, sto facendo il modello 12/18 mesi e mi trovo in difficoltà. Ho finito aumenti davanti e dietro e sto facendo il 5 giro e alla fine del davanti sinistro non ho i due punti per eseguire l’accavallato se non farlo sul punto del segnapunti . Cosa fare ? Grazie
24.05.2025 - 08:53DROPS Design answered:
Buonasera Anna, ci può spiegare meglio il suo problema? Buon lavoro!
01.06.2025 - 14:27
![]() Heike wrote:
Heike wrote:
Hallo, ich habe noch eine Frage. Ich habe A3/A4 insgesamt 3x in der Höhe gestrickt und soll nur noch die Ärmelzunahmen weiterstricken. Muss ich jetzt nicht A3/A4 weiterstricken? Wie mache ich es dann mit den schwarzen Umschlägen, die in der Rückreihe li. verschränkt gestrickt werden? Danke Heike
19.05.2025 - 19:55DROPS Design answered:
Liebe Heike, doch, stricken Sie A.3 und A.4 weiter wie zuvor aber ohne die Zunahmen am Ende A.3/ am Anfang A.4 (= die schwarzen Umschläge machen Sie nicht mehr), so schreiben Sie im Diagram welche Masche ist die letzte in A.3/erste in A.4 und stricken Sie die Maschen wie im Diagram oder einfach rechts wenn Sie nicht genügend Maschen für das Lochmuster (1 Abnahme = 1 Umschlag) haben. Viel Spaß beim Stricken!
20.05.2025 - 10:17
![]() Heike wrote:
Heike wrote:
Ich habe Problem. Ich habe die Zunahmen fertig gestrickt. Nun kommt die 5. Reihe von A2. Ich stricke die 1. Masche des 1. Rapport rechts, habe ich dann 2 rechte Maschen, vor den 2 folgenden Umschlägen? Und die letzte Masche des letzten Rapports sind doch die 3 zusammengestrickten Maschen....? Oder ist die letzte Masche von A2 die Masche mit dem Maschenmarkierer? Hoffe auf Hilfe. Lieben Dank Heike
19.05.2025 - 07:29DROPS Design answered:
Liebe Heike, vor A.2 stricken Sie sowieso entweder A.1 oder A.4 (aber dann ohne weitere Zunahmen), so daß die erste Masche A.2 (schwarzes Quadrat) wurde mit den 2 letzten Maschen A.1/A.4 gestrickt (genauso wie zuvor beim Übergang zwischen den beiden Diagrammen). Viel Spaß beim Stricken!
19.05.2025 - 09:46
![]() Gillian Foster wrote:
Gillian Foster wrote:
Hi when the pattern says insert marker in next stitch do you mean literally and the stich after that is start of next row of pattern as I have 4 stitches left over before the garter stitch and I am not sure why ? This pattern is impossible I have given up. !!!
14.05.2025 - 16:19
|
||||||||||||||||||||||
Cotswolds Cardigan#cotswoldscardigan |
||||||||||||||||||||||
 |
 |
|||||||||||||||||||||
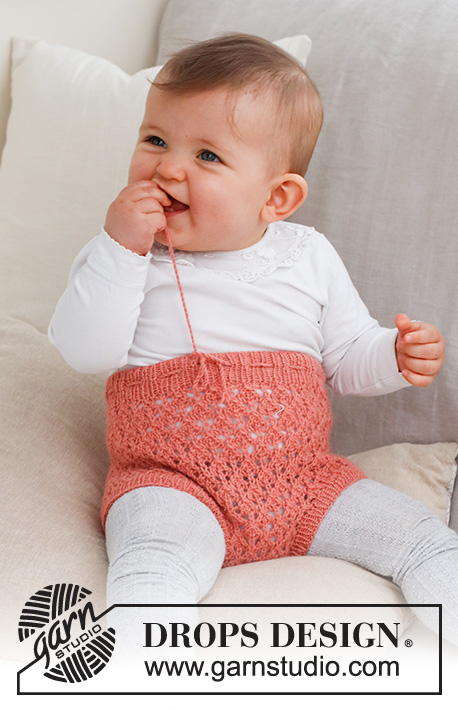
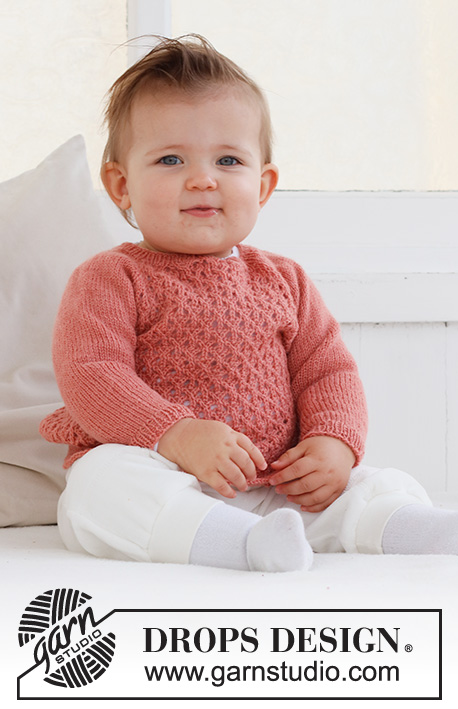
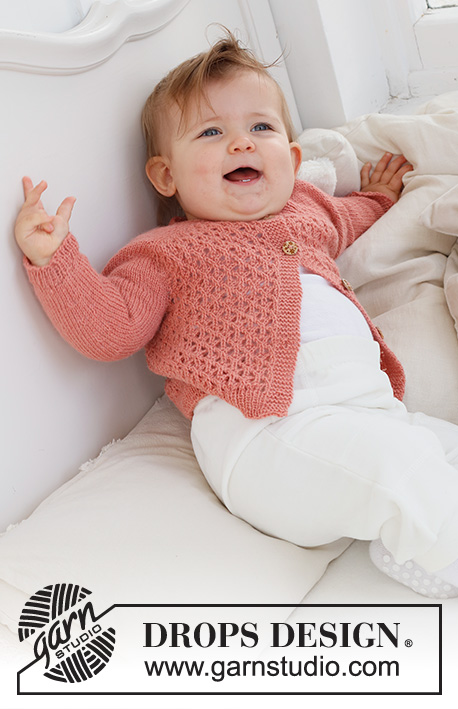
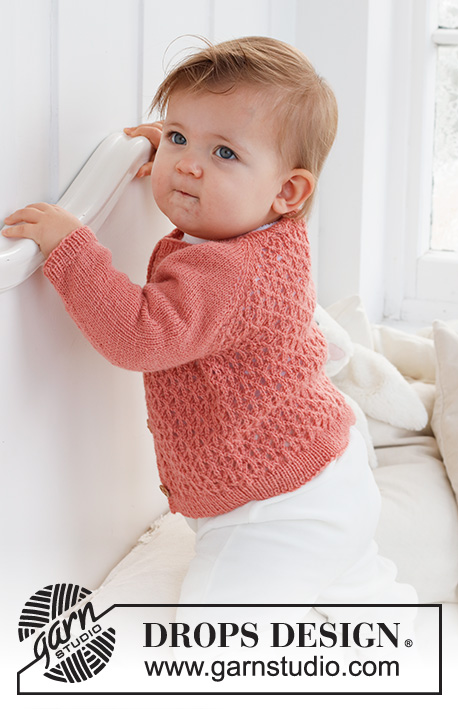
Knitted jacket for baby in DROPS Flora. The piece is worked top down, with raglan and lace pattern. Sizes 0 – 2 years.
DROPS Baby 43-2 |
||||||||||||||||||||||
|
------------------------------------------------------- EXPLANATIONS FOR THE PATTERN: ------------------------------------------------------- RIDGE/GARTER STITCH (worked back and forth): Knit all rows. 1 ridge = knit 2 rows. PATTERN: See diagrams A.1 to A.5. The diagrams show all rows in the pattern from the right side. BUTTONHOLES: Work buttonholes on the right band (when the garment is worn). Work from the right side when there are 4 stitches left on the row as follows: Make 1 yarn over, knit 2 together and knit 2. On the next row (wrong side), knit the yarn over to leave a hole. The first buttonhole is worked right after the neck. Then work the other 4 buttonholes with approx. 4½-4½-5-5½-6 cm between each one. RAGLAN: All increases are worked from the right side! On the front and back pieces the increases are included in the diagram. Increase as follows on the sleeves: Increase 1 stitch after markers 1 and 3. Knit the marker-stitch, make 1 yarn over. Increase 1 stitch before markers 2 and 4. Work as far as the marker-stitch and make 1 yarn over, knit the marker-stitch. On the next row purl the yarn overs twisted to avoid holes! Repeat this increase every row from the right side a total of 10-12-14-16-17 times. DECREASE TIP (for sleeves): Decrease 1 stitch on either side of the marker as follows: Work until there are 3 stitches left before the marker, knit 2 together, knit 2 (marker sits between these 2 stitches), slip 1 stitch as if to knit, knit 1 and pass the slipped stitch over the knitted stitch. ------------------------------------------------------- START THE PIECE HERE: ------------------------------------------------------- JACKET – SHORT OVERVIEW OF THE PIECE. The neck and yoke are worked back and forth with circular needle, top down. The yoke is divided for body and sleeves and the body continued back and forth with circular needle. The sleeves are worked in the round with double pointed needles. NECK: Cast on 93-93-93-111-111 stitches with circular needle size 2.5 mm and DROPS Flora. Purl 1 row from the wrong side with 6 band stitches in GARTER STITCH – read description above, on each side. Then work rib as follows: 6 band stitches in garter stitch, * knit 1, purl 1 *, work from *-* until there are 7 stitches left, knit 1 and 6 band stitches in garter stitch. Work this rib for 2 cm. Change to circular needle size 3 mm. YOKE: Work the BUTTONHOLE on the right band – read description above! On the first row from the right side insert 4 markers and work as follows: Front piece: 6 band stitches in garter stitch, work A.1, then A.2 0-0-0-1-1 time, A.3. Sleeve: Insert marker 1 in the next stitch, work 12 stitches in stocking stitch and increase 4 stitches evenly over these stitches, insert marker 2 in the next stitch. Back piece: Work A.4, A.2 3-3-3-4-4 times, then A.3. Sleeve: Insert marker 3 in the next stitch, work 12 stitches in stocking stitch and increase 4 stitches evenly over these stitches, insert marker 4 in the next stitch. Front piece: Work A.4, A.2 0-0-0-1-1 time, A.5 and 6 band stitches in garter stitch. Continue this pattern on the next row from right side start to increase for sleeve – read description above. REMEMBER THE KNITTING TENSION! When A.1 to A.5 are completed, work the next row from the right side as follows: 6 band stitches in garter stitch, work A.1, A.2 1-1-1-2-2 times, A.3, work stocking stitch and increase as before over the sleeve as far as marker 2, work A.4, A.2 5-5-5-6-6 times, A.3, work stocking stitch and increase as before over the sleeve as far as marker 4, work A.4, A.2 1-1-1-2-2 times, A.5 and 6 band stitches in garter stitch. Repeat this pattern in height. Each time A.3 and A.4 are repeated in height, there is room for 1 more repeat of A.2 on the front pieces and 2 more repeats on the back piece. When A.3 and A.4 have been worked 2-2-3-3-3 times in height, the increases are finished on the front and back pieces; continue increasing only on the sleeves as explained above. Continue the pattern on the front and back pieces, but without further increases. When all the increases are finished there are 189-197-229-255-259 stitches. Now work pattern as follows: 6 band stitches in garter stitch, A.1 over 7 stitches, A.2 3-3-4-5-5 times, work 37-41-45-49-51 stitches in stocking stitch, A.2 9-9-11-12-12 times, work 37-41-45-49-51 stitches in stocking stitch, A.2 3-3-4-5-5 times, A.5 and 6 band stitches in garter stitch. Continue this pattern. When you work round 5 in A.2 on the back piece, knit the first stitch in the first repeat, the last stitch in the last repeat is worked over the first stitch on the sleeve. When the piece measures 12-13-14-15-16 cm from the cast-on edge, divide for the body and sleeves as follows: 6 band stitches in garter stitch, work 25-25-31-37-37 stitches as before, place the next 37-41-45-49-51 stitches on a thread for the sleeve, cast on 6 stitches under the sleeve, work 54-54-66-72-72 stitches, place the next 37-41-45-49-51 stitches on a thread for the sleeve, cast on 6 stitches under the sleeve, work 24-24-30-36-36 stitches as before and 6 band stitches in garter stitch. BODY: = 127-127-151-169-169 stitches. Continue back and forth as follows: 6 band stitches in garter stitch, work A.1, A.2 until there are 12 stitches left, work A.5 and 6 band stitches in garter stitch. When the piece measures 9-12-13-15-17 cm from the division, increase 20-20-22-26-26 stitches evenly spaced on the next row from the right side (do not increase over the bands) = 147-147-173-195-195 stitches. Change to circular needle size 2.5 mm and work rib from the wrong side as follows: 6 band stitches in garter stitch, * purl 1, knit 1 *, work from *-* until there are 7 stitches left, purl 1 and 6 band stitches in garter stitch. Continue this rib for 3 cm. Cast off. The jacket measures approx. 24-28-30-33-36 cm from the shoulder down. SLEEVES: Place the 37-41-45-49-51 stitches from the thread on the one side of the piece on double pointed needles size 3 mm and knit up 1 stitch in each of the 6 stitches cast on under the sleeve = 43-47-51-55-57 stitches. Insert a marker thread in the middle of the new stitches under the sleeve. Start at the marker and work stocking stitch in the round for 1 cm. Now decrease 2 stitches under the sleeve – read DECREASE TIP. Decrease like this every 2½-2-2-2-2½ cm a total of 3-5-6-7-8 times = 37-37-39-41-41 stitches. When the sleeve measures 10-12-15-16-22 cm from the division increase 5 stitches evenly spaced = 42-42-44-46-46 stitches. Change to double pointed needles size 2.5 mm and work rib (knit 1, purl 1) for 3 cm. Cast off with knit over knit and purl over purl. The sleeve measures approx. 13-15-18-19-25 cm from the division. Work the other sleeve in the same way. ASSEMBLY: Sew the buttons onto the left band. |
||||||||||||||||||||||
Diagram explanations |
||||||||||||||||||||||
|
||||||||||||||||||||||
 |
||||||||||||||||||||||
Have you finished this pattern?Tag your pictures with #dropspattern #cotswoldscardigan or submit them to the #dropsfan gallery. Do you need help with this pattern?You'll find 31 tutorial videos, a Comments/Questions area and more by visiting the pattern on garnstudio.com. © 1982-2026 DROPS Design A/S. We reserve all rights. This document, including all its sub-sections, has copyrights. Read more about what you can do with our patterns at the bottom of each pattern on our site. |
||||||||||||||||||||||


With over 40 years in knitting and crochet design, DROPS Design offers one of the most extensive collections of free patterns on the internet - translated to 17 languages. As of today we count 324 catalogues and 12290 patterns translated into English (UK/cm). 12290
We work hard to bring you the best knitting and crochet have to offer, inspiration and advice as well as great quality yarns at incredible prices! Would you like to use our patterns for other than personal use? You can read what you are allowed to do in the Copyright text at the bottom of all our patterns. Happy crafting!
Post a comment to pattern DROPS Baby 43-2
We would love to hear what you have to say about this pattern!
If you want to leave a question, please make sure you select the correct category in the form below, to speed up the answering process. Required fields are marked *.