
Popular categories
Looking for a yarn?


Comments / Questions (17)
![]() Maria Hillebrand wrote:
Maria Hillebrand wrote:
Hallo, ich habe Größe 158/164 gestrickt, mit Nadel 4,5. Wenn man die vorgegebenen Länge strickt, braucht man nur 250 g, ansonsten ein bisschen mehr. 350 g wie angegeben sind eindeutig zuviel. Das Erwachsenen Modell hat in Größe S auch nur 250 g angegeben. Vielleicht die Anleitung anpassen? Gruß aus dem Harz.
11.11.2024 - 11:52
![]() Ann Eccles wrote:
Ann Eccles wrote:
I would like to read the comments but sadly not in English. How can I translate please?
01.11.2024 - 07:43DROPS Design answered:
Dear Mrs Eccles, you can try to use an online translator or just feel free to ask your own question here so that we can try to help you. Happy knitting!
01.11.2024 - 10:01
![]() Maria wrote:
Maria wrote:
Hallo, ich finde die Krausrippe zwischen 3 rechts, 3 links und A3/A4 nicht in der Anleitung, sehe die aber im Bild. Wie ist das zu erklären? Danke für die Antwort.
16.10.2024 - 09:06DROPS Design answered:
Liebe Maria, diese Krausrippe wird durch den 3. und 4. Reihen gestrickt: bei der 3. Reihe strickt man die Maschen rechts bei der Hinreihe und bei der 4. Reihe strickt man diese Maschen rechts bei der Rückreihe. Viel Spaß beim Stricken!
16.10.2024 - 09:28
![]() Maria wrote:
Maria wrote:
Hallo, Anschlag 101 Maschen,einschl. je 5 M. beidseits für die vorderen Blenden, bedeutet ich schlage 110 M. an? Oder nur 101? Und sind die weiteren Maschenangaben nach den Zunahmen mit oder ohne Blende gemeint? Sorry, ich bin da unsicher..... Lieben Gruß
09.10.2024 - 12:42DROPS Design answered:
Liebe Maria, schlagen Sie 101 Maschen (letzte Größe) an, die 5 Blenden-Maschen beidseitig sind schon damit gezählt. Viel Spaß beim Stricken!
09.10.2024 - 15:42
![]() Francesca wrote:
Francesca wrote:
Cosa vuol dire costa in piano? grazie.
18.05.2024 - 18:06DROPS Design answered:
Buonasera Francesca, deve lavorare 2 ferri a maglia legaccio. Buon lavoro!
20.05.2024 - 23:26
![]() Roswitha Frau Krainer wrote:
Roswitha Frau Krainer wrote:
Auf welcher Seite die 6Maschen zunehmen beim Ärmel rechts oder links
02.05.2024 - 14:01DROPS Design answered:
Liebe Frau Krainer, die neue 6 angeschlagenen Maschen sollen wie bei dieser Lektion, ab Bild 10 angeschlagen; alle Maschen werden dann beim Rumfpteil glatt rechts gestrickt (mit Blenden-Maschen wie zuvor). Viel Spaß beim Stricken!
02.05.2024 - 15:38
![]() Denise Andersson wrote:
Denise Andersson wrote:
OK: Byt till rundsticka 4. Nu stickas det 2 varv rätstickning fram och tillbaka över alla maskorna – SAMTIDIGT på första varvet ökas det 1-0-2-5-2-1 maskor jämnt fördelat När det är dags för nästa grupp/ökning så står det inte att man ska sticka 2 räta varv. Men det ser ut som det skall göras om jag tittar på bilden på koftan.
02.05.2023 - 20:02
![]() Denise Andersson wrote:
Denise Andersson wrote:
Det står att jag ska sticka 5 framkantsmaskor och att det är beskrivet ovan hur man gör. Men den beskrivningen hittar jag inte på mönstret. Såå hur gör jag?
28.04.2023 - 16:07DROPS Design answered:
Hei Denise. Jo, det står så her: 5 framkantsmaskor i RÄTSTICKNING - läs förklaring ovan. Scroll opp og helt øvert i oppskriften rett under FÖRKLARING TILL BESKRIVNINGEN, står det: RÄTSTICKNING (stickas fram och tillbaka): Alla varv stickas räta. mvh DROPS Design
02.05.2023 - 09:10
![]() Mimma wrote:
Mimma wrote:
Salve, vorrei un chiarimento sullo schema perché non riesco a proseguire dopo la la 1 costa e il cambio dei ferri 4 cm. Per fare A1 e A2 ed essendo sul dritto del lavoro, si devono alternare 1 m dritta1 m a rovescio per 3 volte e poi 1 m a rovescio e 1 a dr per altre 3 volte fino a 7 m dalla fine? Non capisco poi non essendoci aumenti nel 1 ferro come si arriva, nel mio caso la misura più piccola, da 100 maglie a 145. Grazie mille per la vostra cortese risposta.
14.02.2023 - 23:48DROPS Design answered:
Buonasera Mimma, il 1° giro è identico per entrambi i diagrammi e si lavora con 1 maglia diritto, 1 gettato, 1 maglia diritto, quindi 1 aumento ad ogni ripetizione del diagramma. Da 100 maglie togliendo le 5 maglie per lato per il bordo il diagramma si lavora su 90 maglie, per cui 45 ripetizioni, per un totale di 45 aumenti, passando da 100 a 145 maglie. Buon lavoro!
15.02.2023 - 20:06
![]() Lidi Van Overveld wrote:
Lidi Van Overveld wrote:
Ik zou graag wat meer uitleg over het telpatroon ontvangen. In de beschrijving staat A.1 (=2 steken). In het telpatroon staan 3 hokjes. Moet er dan een steek bijgemaakt worden?
07.02.2023 - 16:24DROPS Design answered:
Dag Lidi,
Je leest de telpatronen van onder naar boven, dus A.1 heeft 2 steken op de eerste toer. (Tussen deze 2 steken zit een omslag.)
08.02.2023 - 11:20
|
||||||||||
Mayan Woods Cardigan#mayanwoodscardigan |
||||||||||
 |
 |
|||||||||
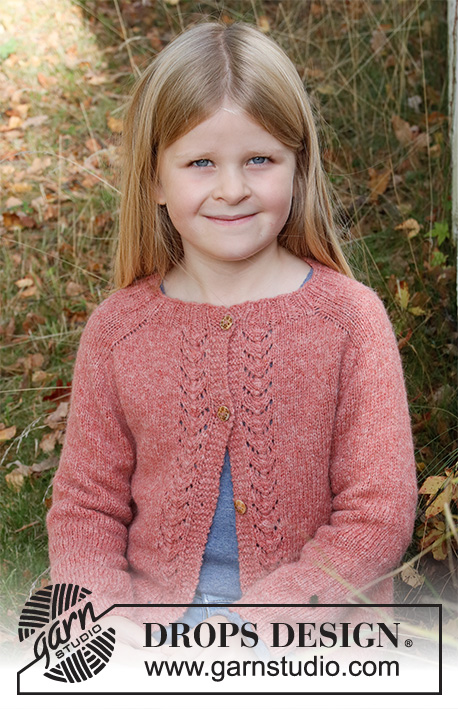
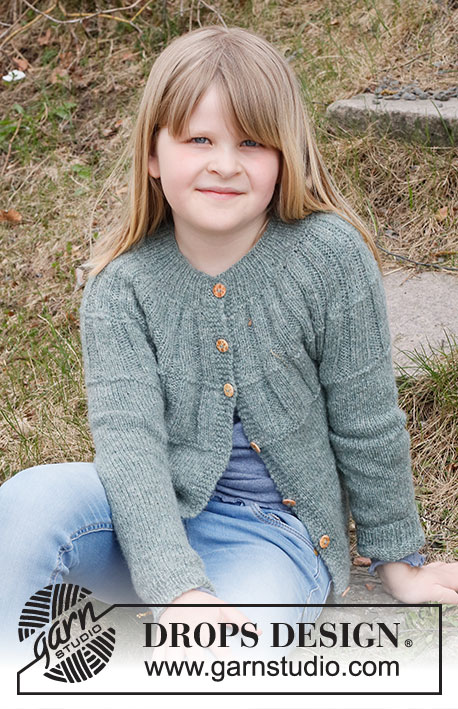
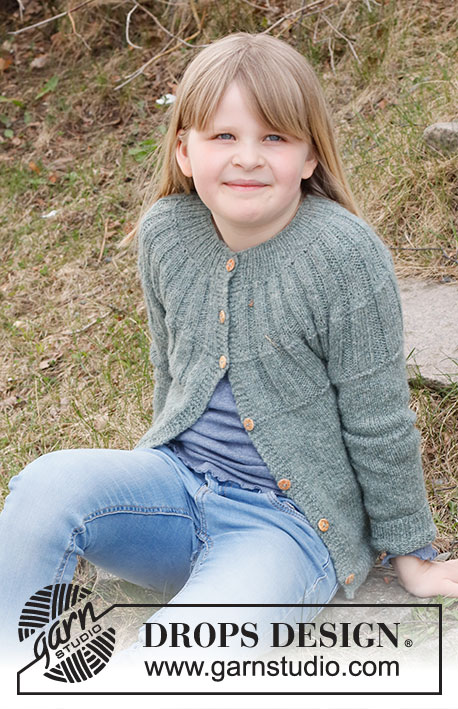
Knitted jacket for children in DROPS Sky. The piece is worked top down with round yoke and rib on the yoke. Sizes 3 to 14 years.
DROPS Children 40-22 |
||||||||||
|
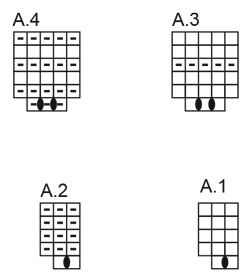
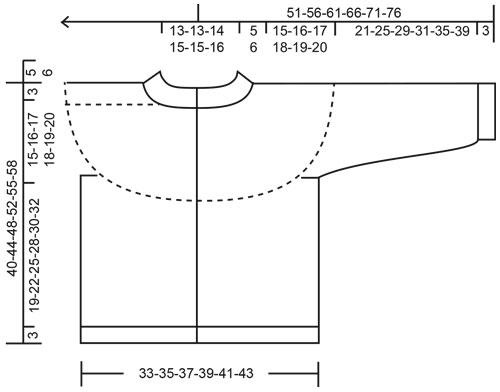
------------------------------------------------------- EXPLANATIONS FOR THE PATTERN: ------------------------------------------------------- RIDGE/GARTER STITCH (worked back and forth): Knit all rows. 1 ridge = knit 2 rows. PATTERN: See diagrams A.1 to A.4. The diagrams show all rows in the pattern from the right side. INCREASE/DECREASE TIP (evenly spaced): To work out how to increase/decrease evenly, count the total number of stitches on needle (e.g. 150 stitches), minus the bands (e.g. 10 stitches) and divide the remaining stitches by the number of increases/decreases to be made (e.g. 21) = 6.7. In this example, increase by making 1 yarn over after alternately each 6th and 7th stitch (approx. Do not increase on the bands). On the next row work the yarn overs twisted to avoid holes. When decreasing, knit together alternately each 5th and 6th stitch and each 6th and 7th stitch (approx.). DECREASE TIP (for sleeves): Start 3 stitches before the marker thread, knit 2 together, knit 2 (marker thread sits between these 2 stitches), slip 1 stitch as if to knit, knit 1 and pass the slipped stitch over the knitted stitch (2 stitches decreased). BUTTONHOLES: Work buttonholes on the right band (when the garment is worn). Work from the right side when there are 3 stitches left on the row as follows: Make 1 yarn over, knit 2 together and knit 1. On the next row (wrong side), knit the yarn over to leave a hole. The first buttonhole is worked when the neck measures 1½-2 cm. Then work the other 5-6-6-7-7-7 buttonholes with 7-6½-7-6½-7-8 cm between each one. CASTING-OFF TIP: To avoid the cast-off edge being tight you can cast off with a larger size needle. If the edge is still tight, make 1 yarn over after approx. each 6th stitch at the same time as casting off; the yarn overs are cast off as normal stitches. ------------------------------------------------------- START THE PIECE HERE: ------------------------------------------------------- JACKET – SHORT OVERVIEW OF THE PIECE. The neck and yoke are worked back and forth with circular needle, from mid front and top down. The yoke is divided for body and sleeves and the body continued back and forth with circular needle. The sleeves are worked in the round with double pointed needles, top down. NECK: Cast on 87-89-93-97-97-101 stitches (including 5 band stitches on each side towards mid-front) with circular needle size 3 mm and DROPS Sky. Purl 1 row (= wrong side). The next row is worked as follows from the right side: 5 band stitches in GARTER STITCH– read description above, * knit 1, purl 1 *, work from *-* until there are 6 stitches left, knit 1 and 5 band stitches in garter stitch. Continue this rib for 3-3-3-4-4-4 cm – remember the BUTTONHOLES on the right band – read description above. On the next row increase the purled sections as follows: SIZES 3/4 - 7/8 - 9/10 YEARS: Work as before but every third purl-1 is increased to purl-2 (seen from the right side) by making 1 yarn over – start in the third purled stitch after the band (these yarn overs are knitted twisted on the next row) = 12-13-14 stitches increased = 99-106-111 stitches. SIZES 5/6 - 11/12 - 13/14 YEARS: Work as before but every second purl-1 is increased to purl-2 (seen from the right side) by making 1 yarn over – start in the second purled stitch after the band (these yarn overs are knitted twisted on the next row) = 19-21-22 stitches increased = 108-118-123 stitches. ALL SIZES: Continue the rib until the piece measures 5-5-5-6-6-6 cm. Insert 1 marker after the band at the beginning of the row; the yoke is measured from this marker. YOKE: Change to circular needle size 4 mm. Work 1 ridge back and forth over all stitches – AT THE SAME TIME on the first row increase 1-0-2-5-2-1 stitches evenly spaced – read INCREASE/DECREASE TIP = 100-108-108-116-120-124 stitches. After the ridge work the next row as follows from the right side: 5 band stitches in garter stitch, * A.1 (= 2 stitches), A.2 (= 2 stitches) *, work from *-* until there are 7 stitches left, work A.1 and 5 band stitches in garter stitch. After the first row there are 145-157-157-169-175-181 stitches. Complete A.1 and A.2, then continue with knit 3, purl 3 until the piece measures 7-7-8-8-9-9 cm from the marker on the neck. REMEMBER THE KNITTING TENSION! The next row is worked as follows from the right side: 5 band stitches in garter stitch, * A.3 (= 3 stitches), A.4 (= 3 stitches) *, work from *-* until there are 8 stitches left, work A.3 and 5 band stitches in garter stitch. After the first row there are 235-255-255-275-285-295 stitches. Complete A.3/A.4 then continue with knit 5, purl 5 until the piece measures 14-14-16-16-18-18 cm from the marker on the neck. Knit 1 row from the right side where the number of stitches is adjusted to 230-242-254-266-278-294 stitches – remember INCREASE/DECREASE TIP. Knit 1 row from the wrong side. Continue with stocking stitch and 5 band stitches in garter stitch on each side until the piece measures 15-16-17-18-19-20 cm from the marker on the neck. On the next row divide the yoke for the body and sleeves as follows: Work as before over the first 37-39-41-43-45-47 stitches (= front piece), place the next 46-48-50-52-54-58 stitches on a thread for the sleeve, cast on 6 stitches (= in side under sleeve), work 64-68-72-76-80-84 stitches (= back piece), place the next 46-48-50-52-54-58 stitches on a thread for the sleeve, cast on 6 stitches (= in side under sleeve), work the last 37-39-41-43-45-47 stitches as before (= front piece). Body and sleeves are finished separately. THE PIECE IS NOW MEASURED FROM HERE! BODY: = 150-158-166-174-182-190 stitches. Continue with stocking stitch back and forth and 5 band stitches in garter stitch on each side until the piece measures 19-22-25-28-30-32 cm from the division. There is approx. 3 cm left to finished length; try the jacket on and work to desired length. To avoid the following rib being tight, increase 21-21-23-25-25-27 stitches evenly spaced on the next row from the right side – remember INCREASE/DECREASE TIP = 171-179-189-199-207-217 stitches. Change to circular needle size 3 mm and work as follows from the wrong side: 5 band stitches in garter stitch, * purl 1, knit 1 *, work from *-* until there are 6 stitches left, purl 1 and 5 band stitches in garter stitch. Work this rib for 3 cm. Cast off with garter stitch over garter stitch, knit over knit and purl over purl – read CASTING-OFF TIP! The jacket measures approx. 40-44-48-52-55-58 cm from the shoulder down. SLEEVES: Place the 46-48-50-52-54-58 stitches from the thread on the one side of the piece on double pointed needles 4 mm and knit up 1 stitch in each of the 6 stitches cast on under the sleeve = 52-54-56-58-60-64 stitches. Insert a marker thread in the middle of the 6 new stitches under the sleeve. Start at the marker thread and work stocking stitch in the round. When the sleeve measures 1 cm from the division, decrease 2 stitches under the sleeve – read DECREASE TIP. Decrease like this every 4th-4th-4th-6th-6th-6th round a total of 4 times = 44-46-48-50-52-56 stitches. Continue working without further increases until the sleeve measures 21-25-29-31-35-39 cm from the division. There is approx. 3 cm left to finished length; try the jacket on and work to desired length. Knit 1 round where you decrease 4 stitches evenly spaced = 40-42-44-46-48-52 stitches. Change to double pointed needles size 3 mm and work rib (knit 1, purl 1) for 3 cm. Cast off with knit over knit and purl over purl – remember CASTING-OFF TIP! The sleeve measures approx. 24-28-32-34-38-42 cm from the division. Work the other sleeve in the same way. ASSEMBLY: Sew the buttons onto the left band. |
||||||||||
Diagram explanations |
||||||||||
|
||||||||||
 |
||||||||||
 |
||||||||||
Have you finished this pattern?Tag your pictures with #dropspattern #mayanwoodscardigan or submit them to the #dropsfan gallery. Do you need help with this pattern?You'll find 31 tutorial videos, a Comments/Questions area and more by visiting the pattern on garnstudio.com. © 1982-2026 DROPS Design A/S. We reserve all rights. This document, including all its sub-sections, has copyrights. Read more about what you can do with our patterns at the bottom of each pattern on our site. |
||||||||||


With over 40 years in knitting and crochet design, DROPS Design offers one of the most extensive collections of free patterns on the internet - translated to 17 languages. As of today we count 324 catalogues and 12290 patterns translated into English (UK/cm). 12290
We work hard to bring you the best knitting and crochet have to offer, inspiration and advice as well as great quality yarns at incredible prices! Would you like to use our patterns for other than personal use? You can read what you are allowed to do in the Copyright text at the bottom of all our patterns. Happy crafting!
Post a comment to pattern DROPS Children 40-22
We would love to hear what you have to say about this pattern!
If you want to leave a question, please make sure you select the correct category in the form below, to speed up the answering process. Required fields are marked *.