
Popular categories
Looking for a yarn?


Comments / Questions (42)
![]() Solveig Bisgaard wrote:
Solveig Bisgaard wrote:
Jeg strikker Sweet Marigold 38-11 størrelse 5-6 år og jeg kan ikke få mønsteret til at gå op med diagrammerne. Jeg har det antal masker, jeg skal have på pinden, men det er flere end diagrammerne bruger. Hvad gør jeg? If des der est et diagram, som sampler hélé opskriften elles bare starten?
30.12.2022 - 15:49DROPS Design answered:
Hei Solveig. I str. 5/6 år har du 109 masker når du begynner på diagrammene. Du strikker først venstre forstykke: 5 stoplemasker + A.1 (14 masker) + A.4 (3 masker) = 22 masker. Så strikker du Venstre erm: 1 + 14 +1 = 16 masker (ikke tell med kastene). Så strikkes Bakstykket: A.5 (2 masker) + A.2 (28 masker av diagram A.2) + A.4 (3 masker). Deretter høyre erme: 1+14+1= 16 masker (ikke tell kastene). Og til slutt: A.5 (2 masker) + A.3 (15 masker) + 5 stolpemasker = 22 masker = 22+16+33+16+22= 109 masker, som du begynte med. Eller var det et annet sted i diagrammene du mente? mvh DROPS Design
05.01.2023 - 12:59
![]() Ann-Britt wrote:
Ann-Britt wrote:
Stickar st.12/18 mån. Oket: har ju 97 m på första mönstervarvet. Men på v.2 stämmer det inte. När jag kommer till slutet av varvet så återstår det 4 m alltså innan framkantsmaskorna. Bli även 93 maskor när jag räknar ut med miniräknare på v.2??
01.11.2022 - 16:21DROPS Design answered:
Hej Ann-Britt, har du talt omslaget med du strikkede på første varv i A.4, sæt gerne et mærke for hver gang du har gentaget diagrammet, så er du sikker på at få alle udtagninger med :)
02.11.2022 - 14:23
![]() Søren Bo Linde Nielsen wrote:
Søren Bo Linde Nielsen wrote:
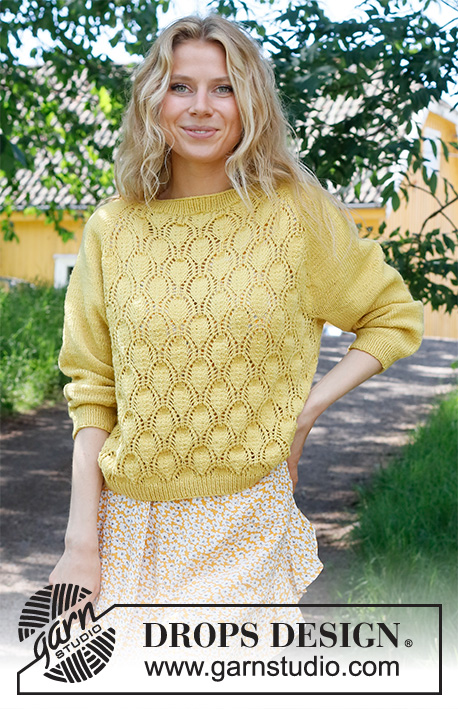
Hi My wife is looking for this pattern, but for adults. Can you help me finde this pattern?
16.07.2022 - 20:03DROPS Design answered:
Dear Søren, you can find this pattern HERE . You can choose your preferred language in the menu below the main photo. May your wife have a fun knitting!
16.07.2022 - 20:14
![]() Mirella Curcio wrote:
Mirella Curcio wrote:
Buongiorno , vorrei eseguire questo modello per una bimba di 8 anni , ma mi trovo in difficoltà con con gli schemi del motivo , non riesco a seguirli ,perchè sono molti e quasi tutti uguali, inoltre sulla pagina degli aiuti ,non trovo il video riguardante il punto da eseguire , perchè ,ripeto non riesco a capire i diagrammi da fare per la tagliadi 8 anni , che devo fare ? help me , grazie
06.06.2022 - 07:06DROPS Design answered:
Buonasera Mirella, deve lavorare i diagrammi nell'ordine indicato nel testo; quando viene richiesta la lavorazione di un diagramma deve cercare quello corrispondente all'età 7/8 anni. Buon lavoro!
06.06.2022 - 22:27
![]() Martine Gidon wrote:
Martine Gidon wrote:
Bonjour, je voulais savoir si A1, A2, A3 se tricotaient 2 fois en hauteur pour atteindre 32 rangs comme A4 et A5 (dans la première partie du tricot). MERCI.
28.04.2022 - 05:26DROPS Design answered:
Bonjour Mme Gidon, tout à fait, quand A.1, A.2 et A.3 sont terminés, reprenez-les au 1er rang et continuer A.4 et A.5 comme dans les diagrammes. Bon tricot!
28.04.2022 - 11:47
![]() Tuula wrote:
Tuula wrote:
Hei, olen aikeissa tehdä koon 12/18 kk. Kaarrokkeen alussa tehdään 5 reunasilmukkaa, sitten kuvion A1 mukaan 10 silmukkaa ja sitten A4 mukaan 2 silmukkaa. Tuossa kuviossa on kuitenkin siinä kohtaa 3 silmukkaa: oikea silmukka, langankierto ja oikea silmukka. Silmukoitten määrä lopussa ei täsmää. Onko tässä virhe, vai enkö osaa tulkita oikein?
08.04.2022 - 22:42
![]() HOUFANI wrote:
HOUFANI wrote:
Bonjour, Je tricote le gilet en taille 2 ans. Je bloque au rang 11 du devant gauche diagramme A1. Au rang 10 j'ai bien 12 mailles. Mais au rang 11 je me retrouve avec 13 mailles au lieu de 11 comme sur le diagramme. Par avance merci pour votre aide.
08.02.2022 - 22:23DROPS Design answered:
Bonjour Mme Houfani, au 11ème rang de A.1, vous allez faire 3 diminutions et 4 jetés, autrement dit, la dernière maille de A.1 va se tricoter avec les 2 premières mailles du 1er A.2, puis la dernière maille de A.2 avec les 2 premières du A.2 suivant et ainsi de suite jusqu'à tricoter la dernière maille du dernier A.2 avec les 2 premières mailles de A.3. Ainsi, vous conservez toujours le bon nombre de mailles dans chaque diagramme, aidez-vous de marqueurs si besoin. Bon tricot!
09.02.2022 - 09:06
![]() Giuliana Mostosi wrote:
Giuliana Mostosi wrote:
Buongiorno, scusate ma non riesco a capire come devo fare al ferro n. 11 del diagramma 4 in cui il lavoro si sposta sulla dx...come faccio, considerando che prima di questo modulo c'è n'è già un altro. Mi sembra che ci sia qualcosa che non torna. Grazie per ogni suggerimento
02.02.2022 - 16:36DROPS Design answered:
Buonasera Giuliana, al 13esimo ferro, lavorando A.1 userà 1 maglia di A.2 e lavorando A.2 userà 1 maglia di A.3. Buon lavoro!
09.02.2022 - 22:13
![]() Kirsten Søe Sørensen wrote:
Kirsten Søe Sørensen wrote:
Jeg vil høre om der er fejl i diagrammerne? Jeg strikker i str. 2 år, når jeg kommer til pind 11 passer maske antallet ikke til de enkelte rapporter. Jeg har sat afmærkninger ved hver rapport.
05.12.2021 - 20:03DROPS Design answered:
Hei Kristen. For å få mønstret til å stemme (i diagram A.1, A.2 og A.3), må man når man strikker A.1 bruke 1 maske av A.2. Og når man strikker A.2, må man bruke 1 maske av A.3. Se på diagrammene. Eller var det noe annet du mente, annet diagram? mvh DROPS Design
07.12.2021 - 14:32
![]() Helen wrote:
Helen wrote:
Jag stickar efter 6/9-12/18. Var ska jag ta den extra maskan som behövs till v 9 i A4.
08.09.2021 - 19:40DROPS Design answered:
Hei Helen. Bruk masken som er før du starter med A.4, altså i A.1 (siste maske "mangler" i A.1, rad 9). mvh DROPS design
15.09.2021 - 14:07
|
|||||||||||||||||||
Sweet Marigold#sweetmarigoldcardigan |
|||||||||||||||||||
 |
 |
||||||||||||||||||
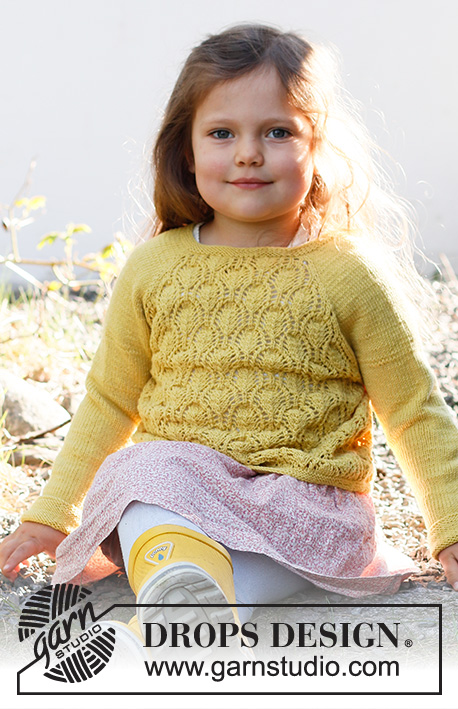
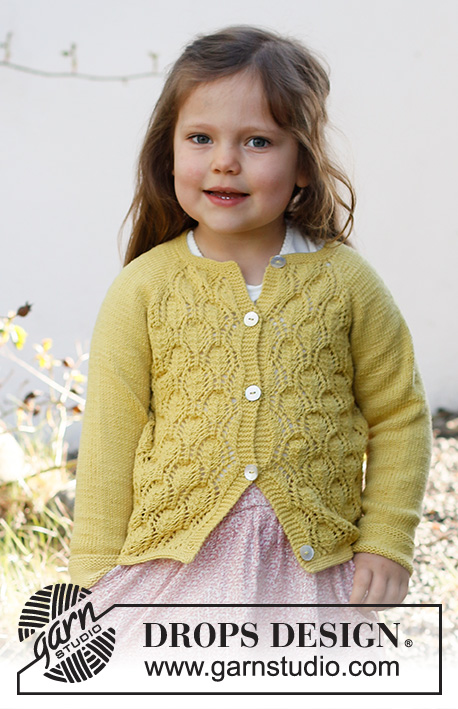
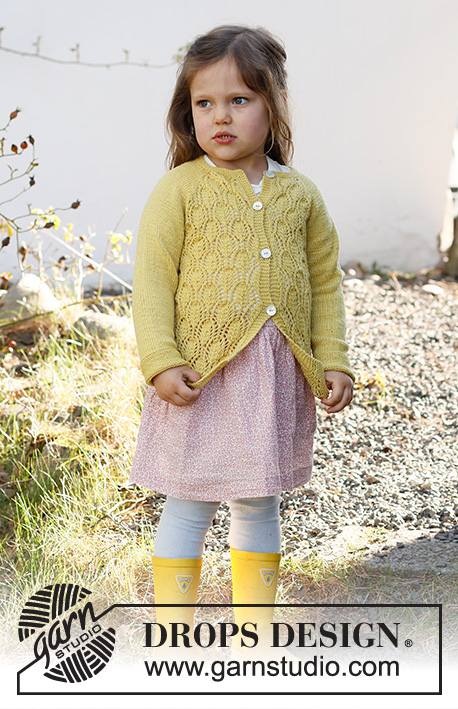
Knitted jacket for baby and kids in DROPS BabyMerino. Piece is knitted top down with raglan pattern and lace pattern. Size 6 month - 8 years
DROPS Baby & Children 38-11 |
|||||||||||||||||||
|
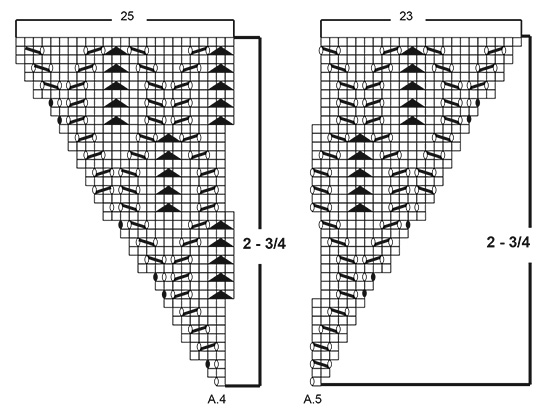
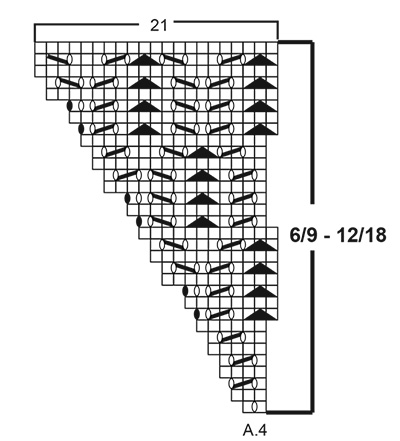
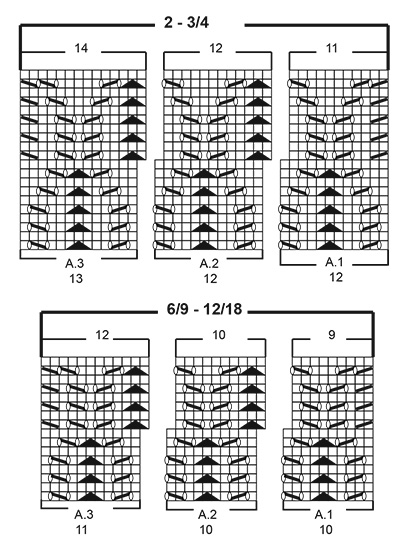
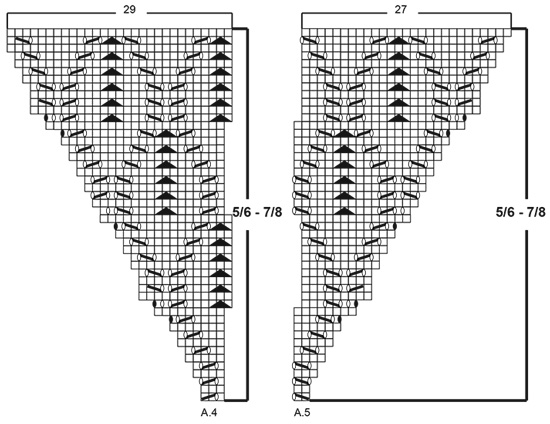
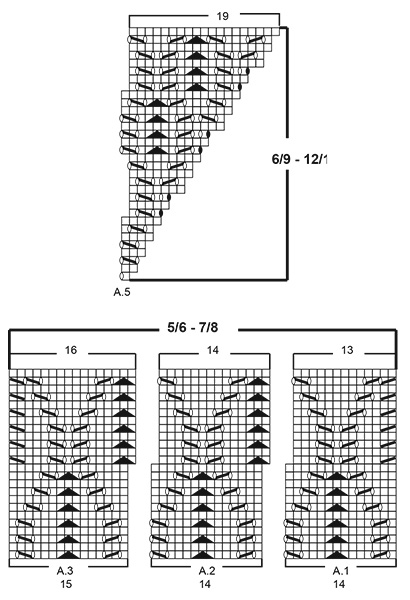
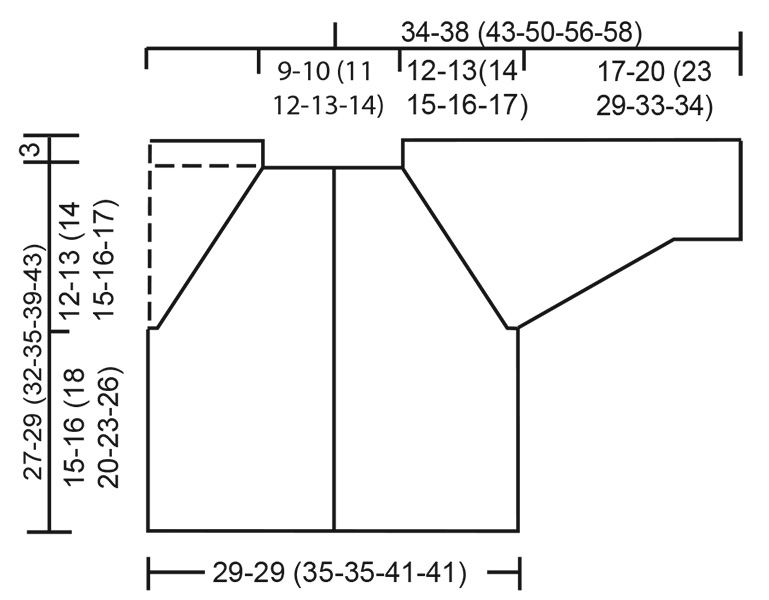
------------------------------------------------------- EXPLANATION FOR THE PATTERN: ------------------------------------------------------- GARTER STITCH (back and forth): 1 ridge = knit 2 rows. GARTER STITCH (in the round - applies to sleeves): 1 ridge = 2 rounds. Knit 1 round and purl 1 round. PATTERN: See diagrams A.1 to A.5. Choose diagram for your size. INCREASE TIP (evenly): To calculate how to increase evenly, use the total number of stitches on row (e.g. 82 stitches), minus bands (e.g. 10 stitches) , and divide the stitches by number of increases to be done (e.g. 7) = 10.3. In this example increase by making 1 yarn over after approx. every 10th stitch. Do not increase over band stitches. On next row knit yarn over twisted to avoid holes. RAGLAN: All increases are done on a row from right side! On front and back piece raglan increase is shown in diagrams. Increase for raglan on each of the sleeves as follows: Increase 1 stitch after 1st and 3rd marker and before 2nd and 4th marker by making a yarn over. Purl yarn overs twisted on next row (= from wrong side). Then work the new stitches in stocking stitch. DECREASE TIP (applies to sleeves): Decrease 1 stitch on each side of marker thread as follows: Work until 3 stitches remain before stitch with marker thread, knit 2 together, knit 3, slip 1 stitch knitwise, knit 1, pass slipped stitch over stitch worked. BUTTONHOLES: Decrease for buttonholes on right band (when garment is worn). Decrease from right side when 3 stitches remain on row as follows: Make 1 yarn over, knit the next 2 stitches together, knit last stitch. On next row knit yarn over to make hole. Decrease for first buttonhole when rib in neck measures approx. 1-1½ cm. Then decrease the next 4-4 (4-4-5-5) buttonholes, approx. 6- 6½ (7-7½-7-7½) cm between each. CAST-OFF TIP: To avoid a tight cast-off edge you may use a larger needle size. If this also is too tight, work a 1 yarn over after approx. every 4th stitch while casting off (cast off yarn overs as regular stitches). ------------------------------------------------------- START THE PIECE HERE: ------------------------------------------------------- JACKET - SHORT OVERVIEW OF THE GARMENT: Work back and forth on circular needle from mid front, work top down. Work sleeves in the round on double pointed needles, top down. NECK EDGE: Cast on 82-86 (92-95-100-104) stitches (including 5 band stitches in each side towards mid front) on circular needle size 2.5 mm with Baby Merino. Work 4 ridges in GARTER STITCH - read explanation above. Decrease for BUTTONHOLES on right band - read explanation above. Knit 1 row from right side while increasing 7-3 (3-0-9-5) stitches evenly - read INCREASE TIP = 89-89 (95-95-109-109) stitches. Purl 1 row from wrong side inside with 5 band stitches in garter stitch towards mid front. Insert 1 marker thread inside 5 band stitches. NOW MEASURE PIECE FROM HERE! Switch to circular needle size 3 mm and work yoke as explained below. REMEMBER THE KNITTING TENSION! YOKE: Work next row as follows from right side: Left front piece: Work 5 band stiches in garter stitch, A.1 (= 10-10 (12-12-14-14) stitches), A.4 (= 2-2 (1-1-3-3) stitches). Left sleeve: Work 1 stitch in stocking stitch, insert 1st marker, make 1 yarn over, work 14 stitches in stocking stitch, make 1 yarn over, insert 2nd marker, 1 stitch in stocking stitch. Back piece: Work A.5 (= 1-1 (1-1-2-2) stitches), A.2 over 20-20 (24-24-28-28) stitches, A.4 over 2-2 (1-1-3-3) stitches. Right sleeve: Work 1 stitch in stocking stitch, insert 3rd marker, make 1 yarn over, work 14 stitches in stocking stitch, make 1 yarn over, insert 4th marker, 1 stitch in stocking stitch. Right front piece: Work A.5 over 1-1 (1-1-2-2) stitches, A.3 (= 11-11 (13-13-15-15) stitches) and finish with 5 band stitches in garter stitch = 97-97 (103-103-113-113) stitches (including all yarn overs). Continue pattern like this and increase for RAGLAN - read explanation above on every row from right side 14-16 (17-18-19-20) times in total (including increases on first row from right side after neck edge). When increase for sleeves are finished, continue in stocking stitch and pattern as before. After last increase for raglan and A.4/A.5 have been worked 1 time vertically, there are 219-227 (255-259-287-291) stitches on needle. Piece measures approx. 10-10 (12-12-15-15) cm from neck edge. Now work pattern as follows (from right side): Left front piece: Work 5 band stitches in garter stitch, A.1 over 10-10 (12-12-14-14) stitches, A.2 over 10-10 (12-12-14-14) stitches, A.3 over 11-11 (13-13-15-15) stitches. Left sleeve: Work 43-47 (49-51-53-55) stitches in stocking stitch. Back piece: Work A.1 over 10-10 (12-12-14-14) stitches, A.2 over 40-40 (48-48-56-56) stitches (= 4 times in width), A.3 over 11-11 (13-13-15-15) stitches. Right sleeve: Work 43-47 (49-51-53-55) stitches in stocking stitch. Right front piece: Work A.1 over 10-10 (12-12-14-14) stitches, A.2 over 10-10 (12-12-14-14) stitches, A.3 over 11-11 (13-13-15-15) stitches and finish with 5 band stitches in garter stitch. Continue pattern like this until piece measures 12-13 (14-15-16-17) cm from marker thread after neck edge - adjust so that last row is from right side. Work next row as follows from wrong side: Continue with band and pattern as before over the first 36-36 (42-42-48-48) stitches (= front piece), slip the next 43-47 (49-51-53-55) stitches on 1 stitch holder for sleeve, cast on 9-9 (11-11-13-13) new stitches on needle (= in the side under sleeve), continue with pattern as before over the next 61-61 (73-73-85-85) stitches (= back piece), slip the next 43-47 (49-51-53-55) stitches on 1 stitch holder for sleeve, cast on 9-9 (11-11-13-13) new stitches on needle (= in the side under sleeve) and continue with pattern as before over the last 36-36 (42-42-48-48) stitches (= front piece). Finish body and sleeves separately. BODY: = 151-151 (179-179-207-207) stitches. On next row as follows from right side (continue on correct row in diagram): Work 5 band stiches in garter stitch, A.1 over 10-10 (12-12-14-14) stitches, A.2 over 120-120 (144-144-168-168) stitches (= 12 times in width), A.3 over 11-11 (13-13-15-15) stitches and 5 band stitches in garter stitch. Continue the pattern like this until piece measures 14-15 (17-19-22-25) cm from division - adjust so that next row is worked from right side. Switch to circular needle size 2.5 mm. Work 3 ridges back and forth over all stitches. Cast off by knitting– read CAST-OFF TIP. SLEEVES: Slip the 43-47 (49-51-53-55) stitches from stitch holder in one side of piece on double pointed needles size 3 mm and pick in addition up 1 stitch in each of the 9-9 (11-11-13-13) new stitches cast on under sleeve = 52-56 (60-62-66-68) stitches. Insert 1 marker thread in the middle stitch under sleeve and begin round here. Work in stocking stitch in the round. When piece measures 2 cm from division, decrease 2 stitches mid under sleeve - read DECREASE TIP. Decrease like this every 1½-1½ (2-3-3-3) cm 8-9 (9-8-9-9) times in total = 36-38 (42-46-48-50) stitches. Work until sleeve measures 16-19 (22-28-32-33) cm. Switch to double pointed needles size 2.5 mm. Work 3 ridges in GARTER STITCH - read explanation above. Cast off by knitting. Sleeve measures approx. 17-20 (23-29-33-34) cm from division. Work the other sleeve the same way. ASSEMBLY: Sew the buttons on to the left band. |
|||||||||||||||||||
Diagram explanations |
|||||||||||||||||||
|
|||||||||||||||||||
 |
|||||||||||||||||||
 |
|||||||||||||||||||
 |
|||||||||||||||||||
 |
|||||||||||||||||||
 |
|||||||||||||||||||
 |
|||||||||||||||||||
Have you finished this pattern?Tag your pictures with #dropspattern #sweetmarigoldcardigan or submit them to the #dropsfan gallery. Do you need help with this pattern?You'll find 28 tutorial videos, a Comments/Questions area and more by visiting the pattern on garnstudio.com. © 1982-2026 DROPS Design A/S. We reserve all rights. This document, including all its sub-sections, has copyrights. Read more about what you can do with our patterns at the bottom of each pattern on our site. |
|||||||||||||||||||


With over 40 years in knitting and crochet design, DROPS Design offers one of the most extensive collections of free patterns on the internet - translated to 17 languages. As of today we count 324 catalogues and 12290 patterns translated into English (UK/cm). 12290
We work hard to bring you the best knitting and crochet have to offer, inspiration and advice as well as great quality yarns at incredible prices! Would you like to use our patterns for other than personal use? You can read what you are allowed to do in the Copyright text at the bottom of all our patterns. Happy crafting!
Post a comment to pattern DROPS Baby & Children 38-11
We would love to hear what you have to say about this pattern!
If you want to leave a question, please make sure you select the correct category in the form below, to speed up the answering process. Required fields are marked *.