
Popular categories
Looking for a yarn?


Comments / Questions (25)
![]() Gaga wrote:
Gaga wrote:
Wie genau werden die Abnahmen vor und hinter der Markierung gemacht, wenn dann nur eine rechte oder eine linke Masche vorhanden ist? Vielen Dank.
24.09.2023 - 13:38
![]() Pascale wrote:
Pascale wrote:
Merci de votre réponse …mais je reste dubitative…si l’on suit le modèle 6/9 mois, j’arrive à 68m’. Avec un échantillon de 24m/ 10 cm, cela fait donc un peu plus de 28cm….beaucoup trop petit pour une tête de bébé ( 40 à 45/cm à cet âge) Cela m’étonne car j’ai fait de très nombreux modèles Drops et tout va toujours bien.. Pascale Dans l’attente de votre réponse…j’ai déjà fait le montage mais crains vraiment de continuer pour rien! Cordialement
03.09.2023 - 11:06DROPS Design answered:
Bonjour Pascale, en Baby Mérino et en côtes, l'ouvrage devrait être suffisamment extensible, mais nous n'avions pas encore eu d'autres retours sur ce modèle, je transmets votre commentaire à nos stylistes, essayez de montrer votre ouvrage à votre magasin (même par mail), peut-être qu'il leur sera plus facile de vous aider en voyant votre ouvrage. Bonne continuation!
04.09.2023 - 08:31
![]() Pascale wrote:
Pascale wrote:
Bonjour Je viens de terminer cette cagoule et suis très déçue…la tête ne passe pas! Effectivement, il y a un tour de cou de 64 m ..alors que pour le modèle Warm Smiles ( que j’ai fait 2 fois et qui est ravissant!) , il y en a 100 par exemple Pouvez-vous m’aider?
01.09.2023 - 08:51DROPS Design answered:
Bonjour Pascale, les deux modèles sont différents, ici vous tricotez en côtes pour bien resserrer la partie du cou, pensez à bien tricoter avec la même tension que l'échantillon (quand on tricote en côtes, on peut parfois resserrer davantage) Baby Merino et les côtes vont permettre ensuite de s'étirer pour passer la tête de bébé, puis rester bien autour du cou. Bon tricot!
01.09.2023 - 09:05
![]() Velma wrote:
Velma wrote:
Your videos is very confusing, I am battling with yarn over purl without creating a hole
13.02.2023 - 20:59
![]() Susa Ne Widmayer wrote:
Susa Ne Widmayer wrote:
Ich habe diese Mütze jetzt 2 mal gestrickt und sie ist immer viel zu klein. Irgendwas stimmt mit der Anleitung nicht. Wenn man die Arbeit zur Runde schliesst hat man 56 Maschen auf der Nadel, das ist weniger als bei einer Socke! Wie soll da ein Babykopf mit 40cm durchgehen ?!
13.03.2022 - 08:29DROPS Design answered:
Liebe Frau Ne Widmayer, Mütze ist sehr elastisch, aber Maschenprobe muss auch stimmen. Die Mütze im Foto ist 1 Monat und hat 56 Maschen rund Hals. Viel Spaß beim stricken!
03.05.2022 - 10:07
![]() Susa Ne Widmayer wrote:
Susa Ne Widmayer wrote:
Ich habe diese Mütze jetzt 2 mal gwtrickt und sie ist immer viel zu klein. Irgendwas stimmt mit der Anleitung nicht. Wenn man die Arbeit zur Runde schliesst hat man 56 Maschen auf der Nadel, das ist weniger als bei einer Socke! Wie soll da ein Babykopf mit 40cm durchgehen ?!
13.03.2022 - 08:27
![]() Ann-Kristin wrote:
Ann-Kristin wrote:
Str 12/18mnd. Står i starten 1 kantm. *2rett,2vrang* til det gjenstår 3 masker, strikk 2 rett og avslutt med 1 kantm. Men da blir det 4 rett på slutten før kantmaske? Feil antall masker i oppskrift? Skal det vere 4 rett midt bak på luen?
31.01.2022 - 20:01DROPS Design answered:
Hei Ann-Kristin, Du har 92, masker - 2 kant masker = 90 masker med vrangbord. Du strikker 2 rett og 2 vrang x 22 = 88 og avslutter med 2 rett og 1 kantmaske. Håper dette hjelper og god fornøyelse!
01.02.2022 - 06:52
![]() Isaline wrote:
Isaline wrote:
Bonjour, pour les augmentations de la bordure, le nombre indiqué souligné, est-ce le nombre total de mailles à obtenir ou le nombres de mailles à ajouter à celles qu’on a déjà? Merci
15.01.2022 - 04:24DROPS Design answered:
Bonjour Isaline, dans la bordure, vous devez augmenter pour avoir 60-68-72-80-88-92 mailles au total - la correction va être faite, merci pour votre retour. Bon tricot!
19.01.2022 - 10:02
![]() Evi wrote:
Evi wrote:
Guten Abend warum kann ich keine Diagramme sehen bzw ausdrucken, obwohl in der Beschreibung darauf hingewiesen wird. MfG Ev
05.11.2021 - 19:30DROPS Design answered:
Liebe Evi, bei diesem Modell gibt es kein Diagram, vielleicht können Sie uns eine Nachricht lassen, beim Modell die Sie stricken möchten - die Druckereinstellungen auch mal prüfen, damit alle Seiten ausgedruckt werden.
08.11.2021 - 07:18
![]() Lene Andersen wrote:
Lene Andersen wrote:
Virkelig sød model. Jeg synes dog den virker meget lille i størrelsen og kan ikke lade være at tænke at den skulle være strikket i en tykkere kvalitet. I str 12/18 mdr ender man med et stykke på 60m=25cm efter de første indtagninger, det virker småt, når en 1 årig har et hovedmål på ca 49 cm. På billedet synes jeg også at garnet virker tykkere Jeg håber, I vil tage mit spørgsmål alvorligt og efterprøve min påstand. På forhånd tak
10.10.2021 - 14:46DROPS Design answered:
Hei Lene. Denne lun er strikket i en tynn kvalitet og den er strikket med rett og vrangmasker, slik at den er meget elastisk. Den kan virke trang, men samtidig er den elastisk slik at man får den over hodet og da vil den sitte godt på et lite hode. mvh DROPS Design
11.10.2021 - 13:03
|
|
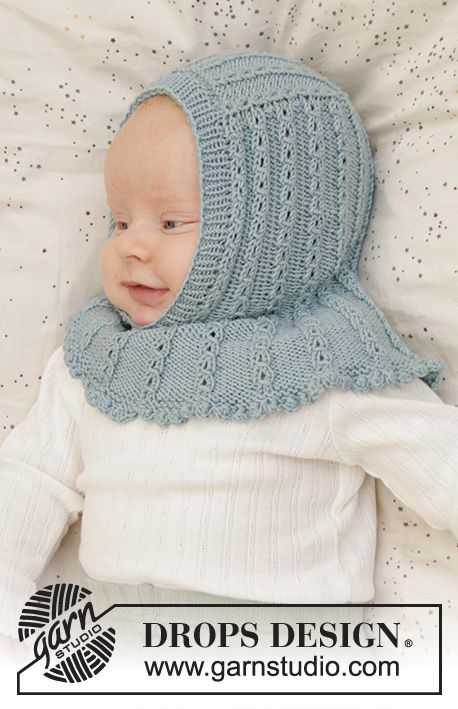
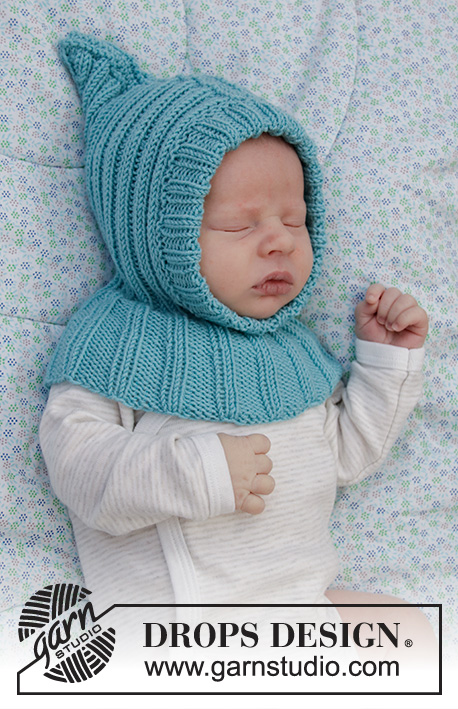
Baby Legolas#babylegolasbalaclava |
|
 |
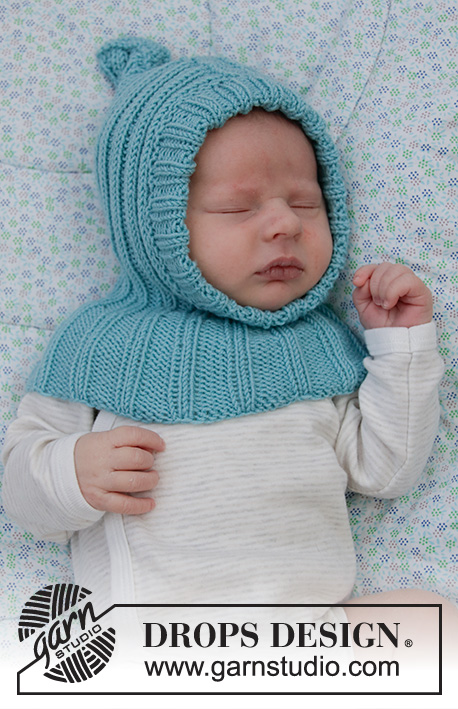 |
Knitted balaclava for babies in DROPS Baby Merino. Sizes Premature – 2 years.
DROPS Baby 33-9 |
|
|
------------------------------------------------------- EXPLANATIONS FOR THE PATTERN: ------------------------------------------------------- RIDGE/GARTER STITCH (worked back and forth): Knit all rows. 1 ridge in height = Knit 2 rows. DECREASE TIP (for mid back): All decreases are worked from the right side! Start 3 stitches before the marker thread, knit 2 twisted together /purl 2 twisted together (according to the rib), knit 2 (marker thread sits between these 2 stitches), knit 2 together/purl 2 together (according to the rib) = 2 stitches decreased. INCREASE TIP-1: Increase 1 stitch at the beginning of the purled section by making 1 yarn over; on the next round purl the yarn over twisted to avoid a hole. The next increase is at the end of the purled section. Continue to increase alternately at the beginning and end of each purled section. INCREASE TIP-2 (evenly spaced): To work out how to increase evenly, count the total number of stitches on the needle (e.g. 60 stitches) and divide by the number of increases to be made (e.g. 8) = 7.5. In this example, increase by making 1 yarn over after alternately each 7th and 8th stitch. On the next round work the yarn overs twisted to avoid holes. ------------------------------------------------------- START THE PIECE HERE: ------------------------------------------------------- BALACLAVA – SHORT OVERVIEW OF THE PIECE: The piece is worked back and forth with circular needle from top of head and down to the neck, then in the round with double pointed needles / short circular needle. An edge is worked around the opening to finish. Cast on 84-84-92-92-100-100 stitches (including 1 edge stitch on each side) with circular needle size 3 mm and Baby Merino. Work 1 RIDGE – read description above. Work 2 rows stocking stitch with 1 edge stitch in garter stitch on each side. The next row is worked as follows from the right side: 1 edge stitch in garter stitch, * knit 2, purl 2 *, work from *-* until there are 3 stitches left on the row, knit 2 and finish with 1 edge stitch in garter stitch. Insert 1 marker thread in the middle of the row so there are 42-42-46-46-50-50 stitches on each side (= mid-back). Continue this rib back and forth. REMEMBER THE KNITTING TENSION! AT THE SAME TIME when the piece measures 1-1-1-2-2-2 cm decrease 2 stitches mid-back – read DECREASE TIP. Decrease like this every 2nd row (i.e. each row from the right side) a total of 16 times = 52-52-60-60-68-68 stitches. Continue working until the piece measures 11-12-13-14-15-16 cm. At the end of the next row from the right side cast on 4-4-4-8-8-8 new stitches (= mid front, under the chin) = 56-56-64-68-76-76 stitches. Insert 1 marker in the piece to measure from. Put the piece together on circular needle and work rib in the round over all stitches (= knit 2 / purl 2– the rib should match neatly all the way round). When the piece measures 2-2½-2½-2½-3-3 cm from the new marker increase all purl 2 to purl 3– read INCREASE TIP-1 = 14-14-16-17-19-19 increased stitches. Increase like this every 2 cm a total of 2-2-2-2-3-3 times = 84-84-96-102-133-133 stitches. When the piece measures 8-9-9-10-11-11 cm from the new marker cast off loosely with knit over knit and purl over purl. ASSEMBLY: Sew the balaclava together at the top, sewing in the outermost loop of the cast-on edge so the seam is flat. EDGE AROUND FRONT OPENING: Knit up approx. 52 to 84 stitches around the opening at the front; i.e. around the face (use a crochet hook when knitting up stitches so there is a neat pick-up edge). Divide the stitches onto double pointed needles. Knit 1 round where you increase evenly to 60-68-72-80-88-92 stitches – NOTE: Do not increase over the middle 6-6-6-6-10-10 stitches under the chin – read INCREASE TIP-2. Purl 1 round and knit 1 round. Then work rib (= knit 2 / purl 2) in the round until the edge measures approx. 4-4½-4½-5-5-5½ cm. Loosely cast off with knit over knit and purl over purl, but to avoid the cast-off edge being tight, make 1 yarn over after each 8th stitch at the same time as casting off (yarn overs cast off as normal stitches). ASSEMBLY: Fold the rib around the opening double to the wrong side and sew down neatly with small stitches. |
|
Have you finished this pattern?Tag your pictures with #dropspattern #babylegolasbalaclava or submit them to the #dropsfan gallery. Do you need help with this pattern?You'll find 26 tutorial videos, a Comments/Questions area and more by visiting the pattern on garnstudio.com. © 1982-2026 DROPS Design A/S. We reserve all rights. This document, including all its sub-sections, has copyrights. Read more about what you can do with our patterns at the bottom of each pattern on our site. |
|


With over 40 years in knitting and crochet design, DROPS Design offers one of the most extensive collections of free patterns on the internet - translated to 17 languages. As of today we count 324 catalogues and 12290 patterns translated into English (UK/cm). 12290
We work hard to bring you the best knitting and crochet have to offer, inspiration and advice as well as great quality yarns at incredible prices! Would you like to use our patterns for other than personal use? You can read what you are allowed to do in the Copyright text at the bottom of all our patterns. Happy crafting!
Post a comment to pattern DROPS Baby 33-9
We would love to hear what you have to say about this pattern!
If you want to leave a question, please make sure you select the correct category in the form below, to speed up the answering process. Required fields are marked *.