
Popular categories
Looking for a yarn?


Comments / Questions (33)
![]() Ann wrote:
Ann wrote:
I’m just about to start this project. My test swatch measures correctly, but it is a very open, lacy looking fabric. It’s pretty! But is it right? Just checking. Thanks
20.09.2021 - 20:45DROPS Design answered:
Dear Ann, if you get the correct tension with Melody, then it's the required fabric for this jacket. You will find other jackets worked with a yarn group D and different tensions here if it can help. Happy knitting!
21.09.2021 - 09:01
![]() Hilary wrote:
Hilary wrote:
I think I ended up missing an M1 somewhere before the yoke, but I can't find where. In the yoke section it says, "There are 14-15-16-16-17-17 stitches after last marker on front piece." However I have one fewer. After increasing right after the ribbing, I had 74 for the size small. How do I get to 75 stitches when placing the markers setting up for raglan? Maybe I am misunderstanding raglan set up. This is my first time knitting a Drops pattern.
22.05.2021 - 18:25DROPS Design answered:
Hi Hilary, you should have: 15 sts for first front piece, 1 st with a marker for the raglan line, 10 sts for first sleeve, 1 st with a marker for the raglan line, 20 sts for back piece, 1 st with a marker for the raglan line, 10 sts for 2nd sleeve, 1 st with a marker for the raglan line , 15 sts for back piece = 15+1+10+1+20+1+10+1+15= 74 sts. Happy knitting!
25.05.2021 - 07:43
![]() Anna wrote:
Anna wrote:
Ok , but I thought that was for an extra small? the casting on of 65 is'nt that extra small? what would the increase be for size small ? is it the same?
04.03.2021 - 14:30DROPS Design answered:
Dear Anna, This lesson explains how to increase evenly, this might be able to help you to calculate how to increase. Happy knitting!
04.03.2021 - 15:57
![]() Anna wrote:
Anna wrote:
I want to make the small size , but i tried to figure out the increase numbers in the beginning after the neck rib ,and its not coming out right . can you please help with this?
03.03.2021 - 20:13DROPS Design answered:
Hi Anna, The first increase is just after the rib, increasing 5 stitches evenly on the row -not on the bands, but after each 11th stitch on the body make 1 yarn over . On the next row, work the yarn overs twisted to avoid holes. Happy knitting!
04.03.2021 - 07:38
![]() Anna Starkey wrote:
Anna Starkey wrote:
This pattern is too chopped up. It shouldnt be so complicated.
23.02.2021 - 19:28
![]() Anna wrote:
Anna wrote:
I would agree this and the similar cardigan pattern are very hard to follow , Its like your writing them harder than the are , most or all I have knitted in the raglan style tell you when and where you increase and placement of markers. Too bad you cant write them that way.
23.02.2021 - 19:19
![]() Sara wrote:
Sara wrote:
Det må være en feil i oppskriften. Jeg strikket størrelse S La opp 67 masker, øker med 7 = 74 (riktig etter oppskriften) Dele til forstykker 15 m x2, ermer 10 m x2 og bakstykke 20 m = 70 m. Dvs 4 masker for lite. Jeg la ikke merke til dette før jeg skulle dele opp til ermer og bol. Da hadde jeg 166 masker istedenfor 170
22.02.2021 - 11:59
![]() Anna Maria Mony De Kerloy wrote:
Anna Maria Mony De Kerloy wrote:
I would love to have knitted this pattern but your instructions are very hard to follow. Why not write the pattern in the style of all other knitting patterns that are easy to follow.
07.10.2020 - 20:53DROPS Design answered:
Dear Mrs Mony De Kerloy; The DROPS patterns are knitted and crocheted by thousands and thousands of people around the world. We understand however that in certain countries, with different knitting/crochet traditions than Scandinavia, our patterns might be written in a way that differs from what some are used to. But of course we want everyone to understand our patterns, so that’s why we have created an extensive library of tutorial videos as well as step by step lessons that explain how to follow the techniques we use and how to read the diagrams in our patterns. Give them a try!
08.10.2020 - 11:08
![]() Kirsti Kleppe wrote:
Kirsti Kleppe wrote:
De ytterste 5 maskene er stolpe masker. Disse strikkes med 1 maske rille, 1 maske glattstrikk osv. j står det i oppskriften. Jeg skjønner ikke hvordan det skal strikke det. Rille strikkes jo rett på alle pinner, så hvordan strikker jeg glatt strikk da?
25.09.2020 - 17:48DROPS Design answered:
Hei Kirsti. Rillemaskene strikkes rett både fra retten og fra vrangen, men de maskene som skal strikkes glattstrikk, strikkes rett fra retten og vrang fra vrangen. Blir nesten som er vrangbord med 1 rett/1 vrang, men annenhver vrangmaske i høyden blir rett, dette skaper en fin struktur. God Fornøyelse!
28.09.2020 - 11:01
![]() Ivonne wrote:
Ivonne wrote:
Je ne suis pas habituée aux aiguilles circulaires, je me suis lancée et le résultat est magnifique. Vos explications sont claires et tous les modèles présentés sur votre site sont très beaux.
28.06.2020 - 09:49
|
|
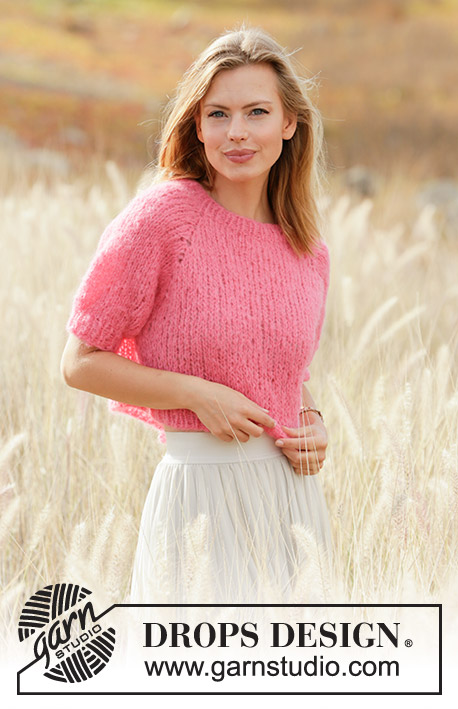
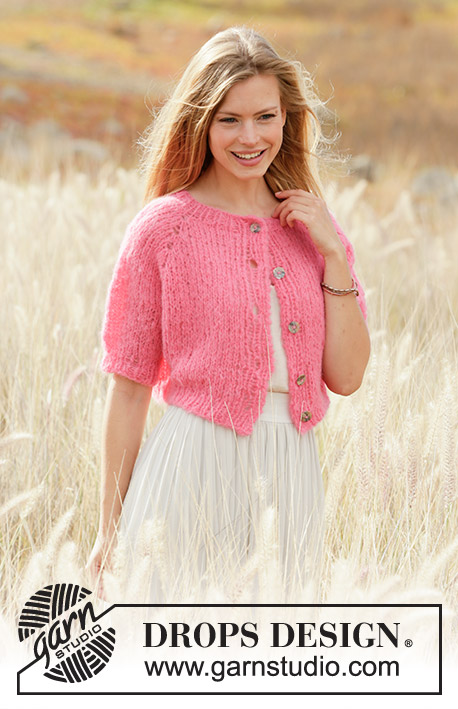
Sweet Melody Cardigan#sweetmelodycardigan |
|
 |
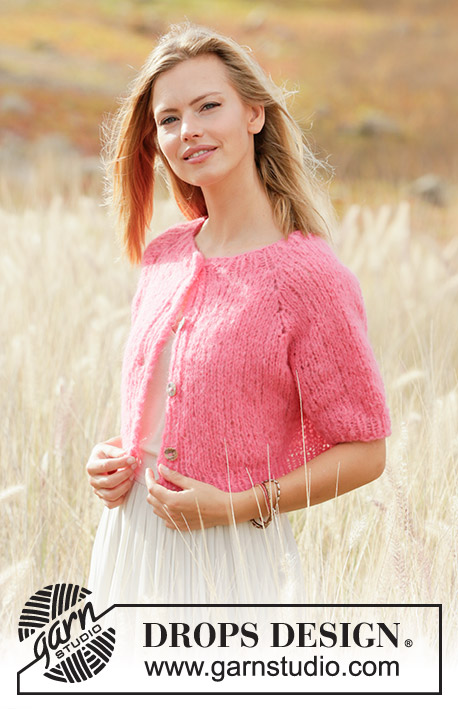 |
Knitted jacket with short sleeves in DROPS Melody. Piece is knitted top down with raglan. Size XS–XXL.
DROPS 212-24 |
|
|
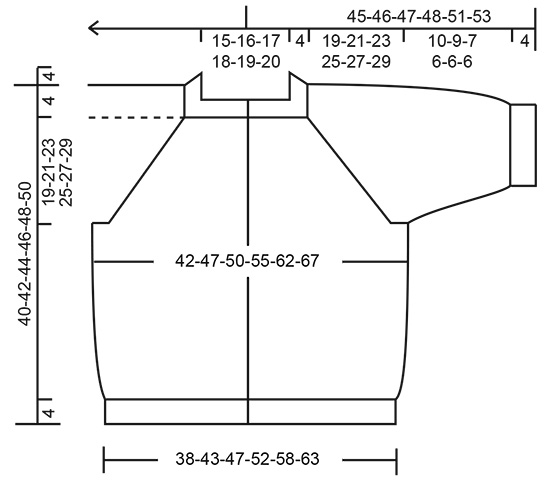
---------------------------------------------------------- EXPLANATION FOR THE PATTERN: ---------------------------------------------------------- GARTER STITCH (back and forth): Knit all rows. 1 ridge vertically = knit 2 rows. BAND STITCHES: The outermost 5 stitches in each side towards mid front are band stitches. Work these as follows from right side: 1 stitch in garter stitch, 1 stitch in stocking stitch, 1 stitch in garter stitch, 1 stitch in stocking stitch, 1 stitch in garter stitch. Continue with garter stitch over garter stitch and stocking stitch over stocking stitch. INCREASE/DECREASE TIP (evenly): To calculate how to increase/decrease evenly, use the total number of stitches on row (e.g. 65 stitches), minus bands (e.g. 10 stitches) and divide the remaining stitches by number of increases/decreases to be done (e.g. 5) = 11. In this example increase by making 1 yarn over after every 11th stitch, and do not increase over bands. On next row work yarn over twisted to avoid holes To decrease in this example knit every 10th and 11th stitch together. RAGLAN: Increase for raglan in every transition between front/back piece and sleeves as explained below. All increases are done from right side and increase every 4th row (i.e. on every other row from right side) as explained in pattern. INCREASE 4 STITCHES AS FOLLOWS: Knit 1 in stitch below stitch with marker (raglan stitch), do not slip stitches off the needle, make 1 yarn over on right needle, knit 1 in same stitch, but wait to slip off the needle, make 1 yarn over on right needle and knit 1 in same stitch, then slip the stitch off the left needle (= 4 stitches increased). Insert 1 marker in the middle of these 5 stitches (for next increase). INCREASE 2 STITCHES AS FOLLOWS: Knit 1 in stitch below stitch with marker (raglan stitch), do not slip stitches off the needle, make 1 yarn over on right needle, knit 1 in same stitch, then slip the stitch off the left needle (= 2 stitches increased). Insert 1 marker in the middle of these 3 stitches (for next increase - only applies to size L). DECREASE TIP (applies to sides on body and mid under sleeves): Decrease 1 stitch on each side of marker thread as follows: Work until 3 stitches remain before marker thread, knit 2 together, knit 2 stitches (marker thread is between these stitches), slip 1 stitch knitwise, knit 1, pass slipped stitch over stitch worked (= 2 stitches decreased by marker). BUTTONHOLES: Decrease for buttonholes on right band (when garment is worn). Decrease from right side when 4 stitches remain on row as follows: Make 1 yarn over, knit the next 2 stitches together, finish with 1 stitch in stocking stitch and finish with 1 stitch in garter stitch. On next row (wrong side), purl the yarn over to make a hole. Decrease first buttonhole when neck edge measures approx. 1½-2 cm. Then cast off the next 4-4-4-5-5-5 buttonholes approx. 9-9½-10-8-9-9 cm apart. CAST-OFF TIP: To avoid a tight cast-off edge you may use a larger needle size. ---------------------------------------------------------- START THE PIECE HERE: ---------------------------------------------------------- JACKET - SHORT OVERVIEW OF THE PIECE: Work neck edge and yoke back and forth on circular needle from mid front, work top down. Now divide yoke for body and sleeves. Work body back and forth on circular needle from mid front, top down. Work sleeves in the round on double pointed needles/short circular needle, top down. NECK EDGE: Cast on 65-67-69-73-75-77 stitches (including 5 band stitches in each side towards mid front) on circular needle size 6 mm with Melody. Purl 1 row (= wrong side). Work next row as follows from right side: Work 5 BAND STITCHES - read explanation above, * knit 1, purl 1 *, work from *-* until 6 stitches remain on row, knit 1 and finish with 5 band stitches as explained above. Continue rib like this for 4 cm – remember BUTTONHOLES on right band – read explanation above. When rib is done, knit 1 row from right side while at the same time increasing 5-7-9-5-7-5 stitches evenly - read DECREASE/INCREASE TIP = 70-74-78-78-82-82 stitches. Insert 1 marker after band, at the beginning of row mid front. Measure yoke from this marker! Switch to circular needle size 8 mm and purl 1 row from wrong side (purl yarn overs in increase twisted and continue bands as before). Then work yoke as explained below. YOKE: Insert 4 markers in the piece as explained below. Use markers when increasing for raglan. Count 14-15-16-16-17-17 stitches (= front piece), insert 1 marker in next stitch, count 10 stitches (= sleeve), insert 1 marker in next stitch, count 18-20-22-22-24-24 stitches (= back piece), insert 1 marker in next stitch, count 10 stitches (= sleeve), insert 1 marker in next stitch. There are 14-15-16-16-17-17 stitches after last marker on front piece. Now work and increase for raglan as explained below: Begin from right side and work in stocking stitch back and forth with 5 band stitches in each side as before. REMEMBER THE KNITTING TENSION! AT THE SAME TIME on first row from right side increase for RAGLAN – read explanation above. I.e. increase first 4 stitches in every stitch with marker (= 16 stitches in total increased on row). Continue like this and increase for raglan on every 4th row (i.e. every other row from right side) 5-6-7-7-9-9 times in total vertically = 150-170-190-190-226-226 stitches. Continue with increase every 4th row, but now increase only 2 stitches in every stitch with marker, as explained above (= 8 stitches in total increased on row). Increase 2 stitches at every marker 1-1-1-2-0-1 times in total vertically. After last increase there are 158-178-198-206-226-234 stitches on needle. Continue with stocking with 5 band stitches in each side as before until piece measures 19-21-23-25-27-29 cm from marker by the neck. Now divide yoke for body and sleeves. I.e. work next row as follows: Work 27-30-32-34-38-40 stitches as before (= front piece), slip the next 30-34-40-40-42-42 stitches on 1 stitch holder for sleeve, cast on 6-6-6-8-8-10 new stitches on row (= in the side under sleeve), work 44-50-54-58-66-70 stitches as before (= back piece), slip the next 30-34-40-40-42-42 stitches on 1 stitch holder for sleeve, cast on 6-6-6-8-8-10 new stitch on needle (= in the side under sleeve), work 27-30-32-34-38-40 stitches as before (= front piece). Finish body and sleeves separately. NOW MEASURE PIECE FROM HERE! BODY: = 110-122-130-142-158-170 stitches. Insert 1 marker thread after 30-33-35-38-42-45 stitches in from each side (= in the side of body). There are 50-56-60-66-74-80 stitches between marker threads on back piece. Move the marker threads upwards when working; they are used when decreasing in the sides later. Continue back and forth in stocking stitch and 5 band stitches in each side towards mid front as before. When piece measures 4 cm from division in all sizes, decrease 1 stitch on each side of both marker threads - read DECREASE TIP (= 4 stitches decreased). Repeat decrease when piece measures 8 cm from division = 102-114-122-134-150-162 stitches. Work until piece measures 13 cm from division (approx. 4 cm remain until finished measurements, try the jacket on and work to desired length). Switch to circular needle size 6 mm. Knit 1 row from right side while increasing 5-5-7-7-7-9 stitches evenly - remember INCREASE/DECREASE TIP = 107-119-129-141-157-171 stitches. Work next row as follows from wrong side: 5 band stitches as before, * purl 1, knit 1 *, work from *-* until 6 stitches remain on needle, purl 1 and finish with 5 band stitches as before. Continue rib like this for 4 cm. Cast off stitches with knit over knit and purl over purl - read CAST OFF TIP! Jacket measures approx. 40-42-44-46-48-50 cm from shoulder and down. SLEEVES: Slip the 30-34-40-40-42-42 stitches from stitch holder in one side of piece on double pointed needles or short circular needle size 8 mm, and pick in addition up 1 stitch in each of the 6-6-6-8-8-10 stitches under sleeve = 36-40-46-48-50-52 stitches. Insert 1 marker thread in the middle of the 6-6-6-8-8-10 stitches under sleeve and move the marker thread upwards when working. Use marker later when decreasing mid under sleeve. Begin round at the marker thread and work stocking stitch in the round. When sleeve measures 2 cm from division in all sizes, decrease 2 stitches mid under sleeve - read DECREASE TIP. Decrease like this every 5-3-½-½-½-½ cm 2-3-5-5-5-5 times in total = 32-34-36-38-40-42 stitches. Work until sleeve measures 10-9-7-6-6-6 cm from division (approx. 4 cm remain until finished measurements, try the jacket on and work to desired length). NOTE! Shorter measurements in the larger sizes because of wider neck and longer yoke. Knit 1 round while decreasing 2 stitches evenly = 30-32-34-36-38-40 stitches. Switch to double pointed needles size 6 mm. Work rib in the round = knit 1/purl 1 for 4 cm. Cast off with knit over knit and purl over purl - remember CAST-OFF TIP. Sleeve measures approx. 14-13-11-10-10-10 cm from division. Work the other sleeve the same way. ASSEMBLY: Sew the buttons on to the left band. |
|
 |
|
Have you finished this pattern?Tag your pictures with #dropspattern #sweetmelodycardigan or submit them to the #dropsfan gallery. Do you need help with this pattern?You'll find 30 tutorial videos, a Comments/Questions area and more by visiting the pattern on garnstudio.com. © 1982-2026 DROPS Design A/S. We reserve all rights. This document, including all its sub-sections, has copyrights. Read more about what you can do with our patterns at the bottom of each pattern on our site. |
|


With over 40 years in knitting and crochet design, DROPS Design offers one of the most extensive collections of free patterns on the internet - translated to 17 languages. As of today we count 324 catalogues and 12290 patterns translated into English (UK/cm). 12290
We work hard to bring you the best knitting and crochet have to offer, inspiration and advice as well as great quality yarns at incredible prices! Would you like to use our patterns for other than personal use? You can read what you are allowed to do in the Copyright text at the bottom of all our patterns. Happy crafting!
Post a comment to pattern DROPS 212-24
We would love to hear what you have to say about this pattern!
If you want to leave a question, please make sure you select the correct category in the form below, to speed up the answering process. Required fields are marked *.