
Popular categories
Looking for a yarn?


Comments / Questions (33)
![]() Lone wrote:
Lone wrote:
Hej Er det på hver 2. eller på hver 4. Pind man tager ud (raglan) Vh Lone
23.08.2025 - 23:34DROPS Design answered:
Hej Lone. Der tages ud på hver 4.pind till raglan. Mvh DROPS Design
26.08.2025 - 12:11
![]() Eva wrote:
Eva wrote:
Det räcker inte med 150 g garn till storlek XXL. Jag har följt mönstret och stickfastheten stämmer. Som tur är har jag fler nystan hemma, annars hade koftan blivit utan ärmar.
08.07.2025 - 19:41
![]() Susanne Holm wrote:
Susanne Holm wrote:
Indsat tekst og svar er jo heller ikke rigtigt. Forkanten strikkes 1r, 1 glat, 1 r, 1 glat, 1 ret. Indsat: ‘Øverst i oppskriften er det forklart hvordan man skal strikke RETSTRIK, og det er de 5 ytterste maskene i forkanten som skal strikkes rettt på alle pinner’
13.05.2025 - 07:29
![]() Susanne Holm wrote:
Susanne Holm wrote:
Hvorfor står der i opskriften, at alle pinde strikkes ret.? Det er jo ikke rillestrik man ser på billedet, men glatstrik! Så hvad er egentlig rigtigt?
09.05.2025 - 03:48DROPS Design answered:
Hei Susanne. Øverst i oppskriften er det forklart hvordan man skal strikke RETSTRIK, og det er de 5 ytterste maskene i forkanten som skal strikkes rettt på alle pinner. Selve jakken strikkes i glattstrikk. mvh DROPS Design
12.05.2025 - 13:44
![]() Julien Martine wrote:
Julien Martine wrote:
Bonjour les 5 mailles de bordure sont-ils compris dans les mailles du début ou faut-il les rajouter en plus ? Merci beaucoup
27.03.2025 - 11:22DROPS Design answered:
Bonjour Mme Julien, elles sont comprises dans le nombre de mailles à monter et ne doivent pas être ajoutées. Bon tricot!
27.03.2025 - 13:15
![]() Ada wrote:
Ada wrote:
Stikkes det med enkel eller dobbel tråd?
27.09.2024 - 10:14DROPS Design answered:
Hej Ada. Den stickas med enkel tråd DROPS Melody. Mvh DROPS Design
01.10.2024 - 09:29
![]() Marte TB wrote:
Marte TB wrote:
Jeg har akkurat strikket ferdig denne jakken, men den har blitt veldig stor, både foran og bak. Jeg strikket en testkamp før jeg begynte og valgte ett hakk mindre pinner, men allikevel ble den altfor stor. Jeg mener at størrelsen er litt misvisende, bare en tilbakemelding. Hva kan jeg gjøre for å redde jakken?
17.06.2024 - 12:12
![]() Maaike De Grande wrote:
Maaike De Grande wrote:
Hi, ik maak momenteel maat M. Bij het uitzetten van de markeerdraden voor de raglan klopt de telling niet. 16+10+22+10+16= 74 en niet 78 Ik neem de extra steken op in het rugpand 👍 Misschien wisten jullie dit al? In elk geval - ik ben grote fan 😜 Groetjes vanuit België
06.06.2023 - 16:25
![]() ALLEMAND GISELE wrote:
ALLEMAND GISELE wrote:
Bonjour, j'ai fini ce sublime gilet les mesures sont toutes bonnes sauf la largeur du bas du gilet, taille xs j'ai 32 cm bord à bord au lieu de 38, j'ai pourtant rajouté les 5 mailles indiqués.je voulais savoir aussi si l'on mesure la largeur d'un gilet une fois boutonné ou bord à bord ?
07.04.2023 - 12:52DROPS Design answered:
Bonjour Mme Allemand, vous devez avoir pour le dos, entre les marqueurs 46 mailles (avant les augmentations des côtes), soit environ 38 cm (si votre tension est juste). Les augmentations avant les côtes viennent légèrement compenser les côtes, toutefois, les côtes vont resserrer un peu le bas du gilet. Mesurez avant les côtes, vous devriez avoir 38 cm (après les diminutions sur les côtés). Bon tricot!
11.04.2023 - 11:59
![]() Monika wrote:
Monika wrote:
Witam. W opisie na wykonanie karczku pisze ze mamy dodać 4 oczka przy każdym markerze i w rzędzie będzie dodane 16 oczek. Natomiast dodając po 4 oczka przy każdym markerze będzie tych oczek 24 w rzędzie a w sumie na koniec 246 oczek zamiast 190. Czy mam dodawać 4 oczka przed każdym marketem czy po 2 oczka? Markerów na karczku jest 4
04.01.2022 - 14:46DROPS Design answered:
Witaj Moniko, w trzecim rozmiarze przed dodawaniem o. na reglany masz 78 o. Dalej przerabiać dżersejem i dodawać oczka na reglan (4 w miejscu każdego markera, czyli 16 o. w 1 rzędzie) w sumie 7 razy co 4 rzędy (tj. co 2 rzędy na prawej stronie robótki) = 78 + (7x16)= 78+112=190. Mam nadzieję, że pomogłam. Pozdrawiam!
04.01.2022 - 17:10
|
|
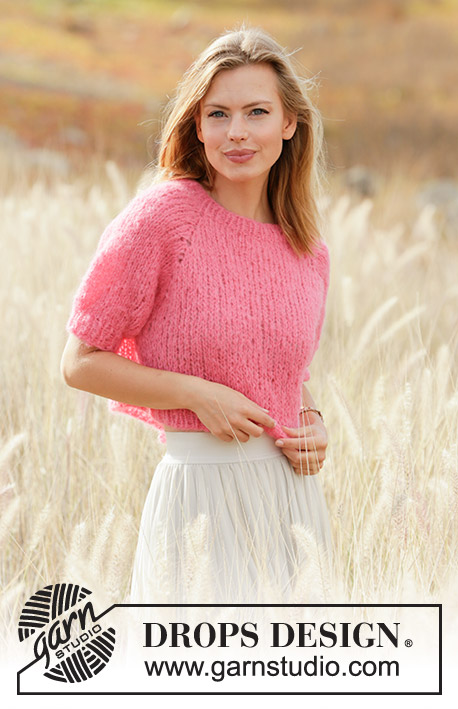
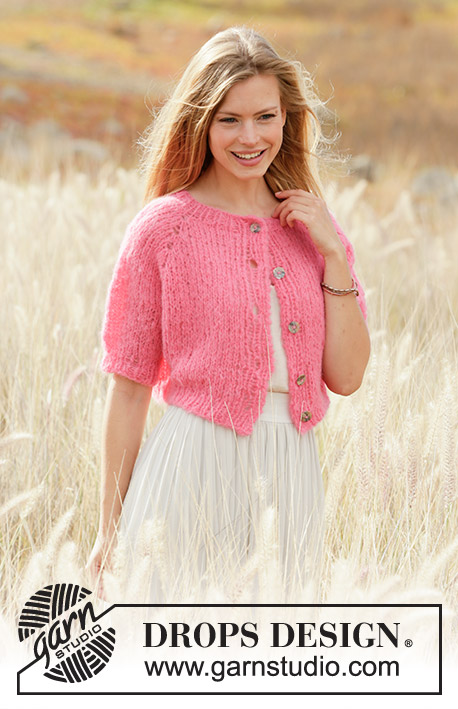
Sweet Melody Cardigan#sweetmelodycardigan |
|
 |
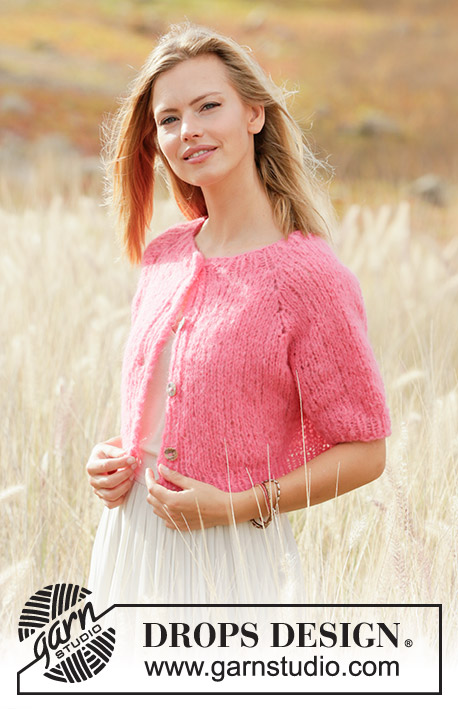 |
Knitted jacket with short sleeves in DROPS Melody. Piece is knitted top down with raglan. Size XS–XXL.
DROPS 212-24 |
|
|
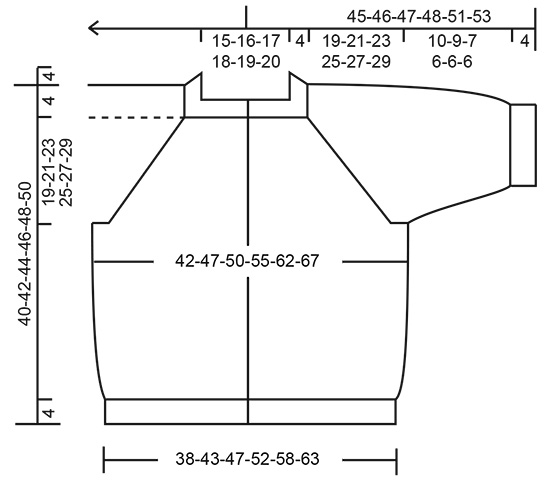
---------------------------------------------------------- EXPLANATION FOR THE PATTERN: ---------------------------------------------------------- GARTER STITCH (back and forth): Knit all rows. 1 ridge vertically = knit 2 rows. BAND STITCHES: The outermost 5 stitches in each side towards mid front are band stitches. Work these as follows from right side: 1 stitch in garter stitch, 1 stitch in stocking stitch, 1 stitch in garter stitch, 1 stitch in stocking stitch, 1 stitch in garter stitch. Continue with garter stitch over garter stitch and stocking stitch over stocking stitch. INCREASE/DECREASE TIP (evenly): To calculate how to increase/decrease evenly, use the total number of stitches on row (e.g. 65 stitches), minus bands (e.g. 10 stitches) and divide the remaining stitches by number of increases/decreases to be done (e.g. 5) = 11. In this example increase by making 1 yarn over after every 11th stitch, and do not increase over bands. On next row work yarn over twisted to avoid holes To decrease in this example knit every 10th and 11th stitch together. RAGLAN: Increase for raglan in every transition between front/back piece and sleeves as explained below. All increases are done from right side and increase every 4th row (i.e. on every other row from right side) as explained in pattern. INCREASE 4 STITCHES AS FOLLOWS: Knit 1 in stitch below stitch with marker (raglan stitch), do not slip stitches off the needle, make 1 yarn over on right needle, knit 1 in same stitch, but wait to slip off the needle, make 1 yarn over on right needle and knit 1 in same stitch, then slip the stitch off the left needle (= 4 stitches increased). Insert 1 marker in the middle of these 5 stitches (for next increase). INCREASE 2 STITCHES AS FOLLOWS: Knit 1 in stitch below stitch with marker (raglan stitch), do not slip stitches off the needle, make 1 yarn over on right needle, knit 1 in same stitch, then slip the stitch off the left needle (= 2 stitches increased). Insert 1 marker in the middle of these 3 stitches (for next increase - only applies to size L). DECREASE TIP (applies to sides on body and mid under sleeves): Decrease 1 stitch on each side of marker thread as follows: Work until 3 stitches remain before marker thread, knit 2 together, knit 2 stitches (marker thread is between these stitches), slip 1 stitch knitwise, knit 1, pass slipped stitch over stitch worked (= 2 stitches decreased by marker). BUTTONHOLES: Decrease for buttonholes on right band (when garment is worn). Decrease from right side when 4 stitches remain on row as follows: Make 1 yarn over, knit the next 2 stitches together, finish with 1 stitch in stocking stitch and finish with 1 stitch in garter stitch. On next row (wrong side), purl the yarn over to make a hole. Decrease first buttonhole when neck edge measures approx. 1½-2 cm. Then cast off the next 4-4-4-5-5-5 buttonholes approx. 9-9½-10-8-9-9 cm apart. CAST-OFF TIP: To avoid a tight cast-off edge you may use a larger needle size. ---------------------------------------------------------- START THE PIECE HERE: ---------------------------------------------------------- JACKET - SHORT OVERVIEW OF THE PIECE: Work neck edge and yoke back and forth on circular needle from mid front, work top down. Now divide yoke for body and sleeves. Work body back and forth on circular needle from mid front, top down. Work sleeves in the round on double pointed needles/short circular needle, top down. NECK EDGE: Cast on 65-67-69-73-75-77 stitches (including 5 band stitches in each side towards mid front) on circular needle size 6 mm with Melody. Purl 1 row (= wrong side). Work next row as follows from right side: Work 5 BAND STITCHES - read explanation above, * knit 1, purl 1 *, work from *-* until 6 stitches remain on row, knit 1 and finish with 5 band stitches as explained above. Continue rib like this for 4 cm – remember BUTTONHOLES on right band – read explanation above. When rib is done, knit 1 row from right side while at the same time increasing 5-7-9-5-7-5 stitches evenly - read DECREASE/INCREASE TIP = 70-74-78-78-82-82 stitches. Insert 1 marker after band, at the beginning of row mid front. Measure yoke from this marker! Switch to circular needle size 8 mm and purl 1 row from wrong side (purl yarn overs in increase twisted and continue bands as before). Then work yoke as explained below. YOKE: Insert 4 markers in the piece as explained below. Use markers when increasing for raglan. Count 14-15-16-16-17-17 stitches (= front piece), insert 1 marker in next stitch, count 10 stitches (= sleeve), insert 1 marker in next stitch, count 18-20-22-22-24-24 stitches (= back piece), insert 1 marker in next stitch, count 10 stitches (= sleeve), insert 1 marker in next stitch. There are 14-15-16-16-17-17 stitches after last marker on front piece. Now work and increase for raglan as explained below: Begin from right side and work in stocking stitch back and forth with 5 band stitches in each side as before. REMEMBER THE KNITTING TENSION! AT THE SAME TIME on first row from right side increase for RAGLAN – read explanation above. I.e. increase first 4 stitches in every stitch with marker (= 16 stitches in total increased on row). Continue like this and increase for raglan on every 4th row (i.e. every other row from right side) 5-6-7-7-9-9 times in total vertically = 150-170-190-190-226-226 stitches. Continue with increase every 4th row, but now increase only 2 stitches in every stitch with marker, as explained above (= 8 stitches in total increased on row). Increase 2 stitches at every marker 1-1-1-2-0-1 times in total vertically. After last increase there are 158-178-198-206-226-234 stitches on needle. Continue with stocking with 5 band stitches in each side as before until piece measures 19-21-23-25-27-29 cm from marker by the neck. Now divide yoke for body and sleeves. I.e. work next row as follows: Work 27-30-32-34-38-40 stitches as before (= front piece), slip the next 30-34-40-40-42-42 stitches on 1 stitch holder for sleeve, cast on 6-6-6-8-8-10 new stitches on row (= in the side under sleeve), work 44-50-54-58-66-70 stitches as before (= back piece), slip the next 30-34-40-40-42-42 stitches on 1 stitch holder for sleeve, cast on 6-6-6-8-8-10 new stitch on needle (= in the side under sleeve), work 27-30-32-34-38-40 stitches as before (= front piece). Finish body and sleeves separately. NOW MEASURE PIECE FROM HERE! BODY: = 110-122-130-142-158-170 stitches. Insert 1 marker thread after 30-33-35-38-42-45 stitches in from each side (= in the side of body). There are 50-56-60-66-74-80 stitches between marker threads on back piece. Move the marker threads upwards when working; they are used when decreasing in the sides later. Continue back and forth in stocking stitch and 5 band stitches in each side towards mid front as before. When piece measures 4 cm from division in all sizes, decrease 1 stitch on each side of both marker threads - read DECREASE TIP (= 4 stitches decreased). Repeat decrease when piece measures 8 cm from division = 102-114-122-134-150-162 stitches. Work until piece measures 13 cm from division (approx. 4 cm remain until finished measurements, try the jacket on and work to desired length). Switch to circular needle size 6 mm. Knit 1 row from right side while increasing 5-5-7-7-7-9 stitches evenly - remember INCREASE/DECREASE TIP = 107-119-129-141-157-171 stitches. Work next row as follows from wrong side: 5 band stitches as before, * purl 1, knit 1 *, work from *-* until 6 stitches remain on needle, purl 1 and finish with 5 band stitches as before. Continue rib like this for 4 cm. Cast off stitches with knit over knit and purl over purl - read CAST OFF TIP! Jacket measures approx. 40-42-44-46-48-50 cm from shoulder and down. SLEEVES: Slip the 30-34-40-40-42-42 stitches from stitch holder in one side of piece on double pointed needles or short circular needle size 8 mm, and pick in addition up 1 stitch in each of the 6-6-6-8-8-10 stitches under sleeve = 36-40-46-48-50-52 stitches. Insert 1 marker thread in the middle of the 6-6-6-8-8-10 stitches under sleeve and move the marker thread upwards when working. Use marker later when decreasing mid under sleeve. Begin round at the marker thread and work stocking stitch in the round. When sleeve measures 2 cm from division in all sizes, decrease 2 stitches mid under sleeve - read DECREASE TIP. Decrease like this every 5-3-½-½-½-½ cm 2-3-5-5-5-5 times in total = 32-34-36-38-40-42 stitches. Work until sleeve measures 10-9-7-6-6-6 cm from division (approx. 4 cm remain until finished measurements, try the jacket on and work to desired length). NOTE! Shorter measurements in the larger sizes because of wider neck and longer yoke. Knit 1 round while decreasing 2 stitches evenly = 30-32-34-36-38-40 stitches. Switch to double pointed needles size 6 mm. Work rib in the round = knit 1/purl 1 for 4 cm. Cast off with knit over knit and purl over purl - remember CAST-OFF TIP. Sleeve measures approx. 14-13-11-10-10-10 cm from division. Work the other sleeve the same way. ASSEMBLY: Sew the buttons on to the left band. |
|
 |
|
Have you finished this pattern?Tag your pictures with #dropspattern #sweetmelodycardigan or submit them to the #dropsfan gallery. Do you need help with this pattern?You'll find 30 tutorial videos, a Comments/Questions area and more by visiting the pattern on garnstudio.com. © 1982-2026 DROPS Design A/S. We reserve all rights. This document, including all its sub-sections, has copyrights. Read more about what you can do with our patterns at the bottom of each pattern on our site. |
|


With over 40 years in knitting and crochet design, DROPS Design offers one of the most extensive collections of free patterns on the internet - translated to 17 languages. As of today we count 324 catalogues and 12290 patterns translated into English (UK/cm). 12290
We work hard to bring you the best knitting and crochet have to offer, inspiration and advice as well as great quality yarns at incredible prices! Would you like to use our patterns for other than personal use? You can read what you are allowed to do in the Copyright text at the bottom of all our patterns. Happy crafting!
Post a comment to pattern DROPS 212-24
We would love to hear what you have to say about this pattern!
If you want to leave a question, please make sure you select the correct category in the form below, to speed up the answering process. Required fields are marked *.