
Popular categories
Looking for a yarn?


Comments / Questions (121)
![]() Fenny wrote:
Fenny wrote:
Volgens patroon is wordt er een ribbelseek gebruikt, maar op de foto is er een andere steek gebruikt. Kan de juiste steek worden aangegeven?
29.01.2022 - 10:45DROPS Design answered:
Dag Fenny,
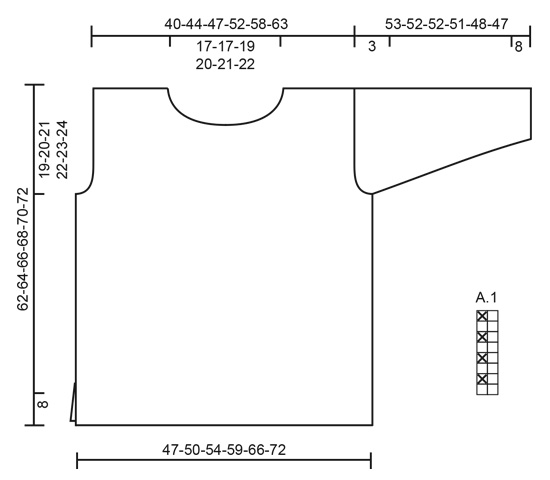
De trui wordt gebreid in patroon A.1, deze vindt je naast de maattekening onderaan de beschrijving. Dit is een combinatie van tricotsteek n ribbelsteek, dus de ene steek in ribbelsteek en de andere steek in tricotsteek.
30.01.2022 - 12:26
![]() Mette Engelbrecht wrote:
Mette Engelbrecht wrote:
Hvor finder jeg diagram 1A? Mvh Mette
19.01.2022 - 08:19
![]() Diane Gagné wrote:
Diane Gagné wrote:
Le pull gris ils disent diminuer en même temps 12 mailles à intervalle régulier ils veulent dire quoi ils parlent à l'endroit mais ils disent 6 et 7 ieme mailles ensembles???
14.01.2022 - 23:23DROPS Design answered:
Bonjour Mme Gagné, cette leçon explique comment diminuer (ou augmenter) à intervalles réguliers et devrait vous aider à comprendre comment calculer où placer vos diminutions. Bon tricot!
19.01.2022 - 10:25
![]() Frances wrote:
Frances wrote:
So in working the body of the sweater it says to work a k over k and p over p. Isn’t this the same as 1x1 rib. I saw a few places where you explained it but it still comes out 1x1 rib. Or have I misunderstood what you are saying?
14.12.2021 - 16:54
![]() IRMA JUNGERSTAM wrote:
IRMA JUNGERSTAM wrote:
Hejsan, nu såg jag det lilla Diagrammet . Mvh Irma Jungerstam
04.12.2021 - 19:53
![]() IRMA JUNGERSTAM wrote:
IRMA JUNGERSTAM wrote:
Hej, var finns diagrammet ? Diagram symbols = rätmaska från rätsidan, avigmaska från avigsidan symbols = avigmaska från rätsidan, rätmaska från avigsidan Jag förstår mig inte på detta diagram. Mvh Irma Jungerstam
04.12.2021 - 19:43DROPS Design answered:
Hej Irma. Du hittar diagrammet till höger om måttskissen, längst ner på mönstret. Mvh DROPS Design
06.12.2021 - 10:32
![]() Christine wrote:
Christine wrote:
Bonjour, je ne comprend pas les diminutions pour le dos : 1-1-1-1-1 fois 3 mailles. je suis habitué à la terminologie 6fs 1m exemple. Donc, est-ce que 1-1-1-1-1-1 fois trois mailles veut dire : 6fs 3 mailles de chaque coté et à chaque rang ?
02.12.2021 - 19:42DROPS Design answered:
Bonjour Christine, la série de nombre s'applique à chaque fois à chaque taille (comme le nombre de mailles à monter par ex. ) autrement dit, dans ce cas précis, c'est 1 fois (3 mailles) pour toutes les tailles, nous avons fait le choix de conserver les 6 tailles pour éviter les erreurs d'interprétation. Bon tricot!
03.12.2021 - 08:08
![]() Gerda wrote:
Gerda wrote:
Verstehe ich das Diagramm richtig?Die Hinreihen werden mit rechten Maschen gestrickt und die Rückreihen eine Masche rechts und eine Masche links im Wechsel?
28.11.2021 - 18:52DROPS Design answered:
Liebe Gerda, ja genau, es handelt sich um ein Rippenmuster mit 1 Masche glatt rechts (= die 1. Masche in A.1) und 1 Masche kraus rechts (= die 2. Masche in A.1). Viel Spaß beim stricken!
29.11.2021 - 08:05
![]() Katharina wrote:
Katharina wrote:
Liebes Drops Team, mit welcher Nadelgröße strickt man denn die Maschenprobe? 4,5 oder 5,5? Danke und schöne Grüße!
17.11.2021 - 09:09DROPS Design answered:
Liebe Katharina, Maschenprobe wird mit den größeren Nadeln gestrickt, dh 5,5 - die kleineren werden nur für das Rippenmuster/Bündchen benutzt. Viel Spaß beim stricken!
17.11.2021 - 16:39
![]() Kate wrote:
Kate wrote:
Hi! I'm about to start decresing on the front piece for the neck. Where it says, 'decrease every row from the right side as follows', does that mean i should decrease EVERY ROW, or just every RIGHT SIDE row (i.e. alternate rows)? Thank you :)
01.10.2021 - 20:21DROPS Design answered:
Dear Kate, if the pattern says do something from "every row from the right side" that means that every RS row (in other words, every 2nd row). Happy Stitching!
03.10.2021 - 12:13
|
|||||||
Rainy Day Sweater#rainydaysweater |
|||||||
 |
 |
||||||
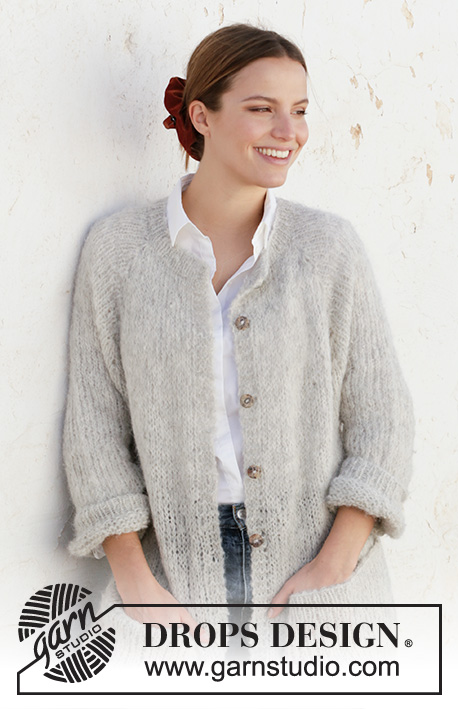
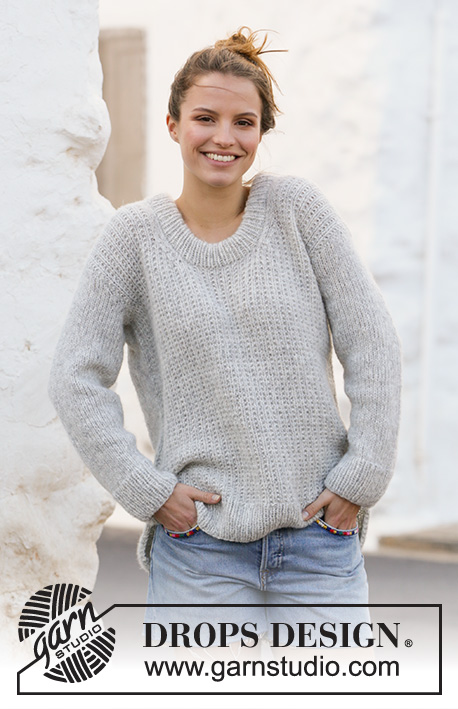
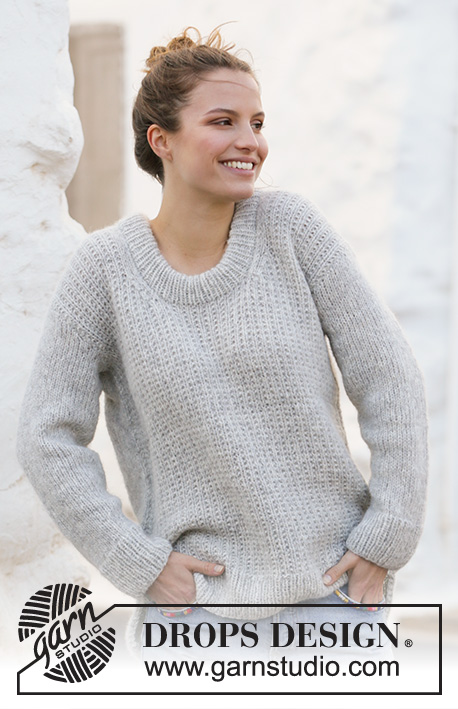
Knitted jumper with textured pattern in DROPS Air. Size: S - XXXL
DROPS 210-5 |
|||||||
|
---------------------------------------------------------- EXPLANATION FOR THE PATTERN: ---------------------------------------------------------- GARTER STITCH (back and forth): Knit all rows. 1 ridge vertically = knit 2 rows. PATTERN: See diagram A.1. DECREASE TIP-1 (evenly): To calculate how to decrease evenly, use the total number of stitches on row (e.g. 89 stitches) and divide stitches by number of decreases to be done (e.g. 12) = 7.4. In this example decrease by knitting approx. every 6th and 7th stitch together. DECREASE TIP-2 (applies to neck decrease front piece): Decrease inside 3 stitches, continue these 3 stitches in stocking stitch up along neck edge. All decreases are done from the right side. Decrease as follows before stitches slipped on a stitch holder for neck (left shoulder). Work until 5 stitches on needle (towards stitches slipped on a stitch holder), knit 2 together, work the last 3 stitches on needle in stocking stitch. Decrease as follows after stitches slipped on a stitch holder for neck (right shoulder). Work 3 stitches in stocking stitch, slip next stitch knitwise, knit next stitch, pass slipped stitch over, work the rest of row. INCREASE TIP (applies to sleeves): Begin 1 stitch before marker thread, make 1 yarn over, 2 stitches (marker thread is in the middle of these stitches), make 1 yarn over. On next round knit yarns over twisted to avoid holes. ---------------------------------------------------------- START THE PIECE HERE: ---------------------------------------------------------- JUMPER - SHORT OVERVIEW OF THE PIECE: Work jumper back and forth in 2 parts that are sewn together when finished. Work sleeves in the round on double pointed needles. BACK PIECE: Cast on 89-97-103-113-125-137 stitches on circular needle size 4.5 mm with Air. Purl 1 row from wrong side, then work as follows from right side: 2 edge stitches in in GARTER STITCH – see explanation above, * knit 1/purl 1 *, repeat from *-* until 3 stitches remain, knit 1 and 2 stitches in garter stitch. Continue like this until piece measures 8 cm. Switch to circular needle size 5.5 mm. Knit 1 row from right side while decreasing 12-14-14-16-18-20 stitches evenly - READ DECREASE TIP-1 = 77-83-89-97-107-117 stitches. Work A.1 with 1 edge stitch in garter stitch in each side. When piece measures 43-44-45-46-47-48 cm, cast off for armholes in each side. Cast off stitches at beginning of every row in each side: Cast off 3 stitches 1-1-1-1-1-1 time, 2 stitches 1-1-1-1-1-1 time and 1 stitch 1-1-2-2-2-3 times = 65-71-75-83-93-101 stitches. Continue in A.1 until piece measures 60-62-64-66-68-70 cm. Now cast off the middle 27-27-29-31-33-35 stitches for neck, and finish each shoulder separately. Then decrease on next row from the neck as follows: 1 stitch 1 time = 18-21-22-25-29-32 stitches remain for shoulder. Continue until piece measures 62-64-66-68-70-72 cm, and cast off. Work the other shoulder the same way. FRONT PIECE: Cast on and work as on back piece until piece measures 54-56-58-60-62-64 cm. Now slip the middle 17-17-19-21-23-25 stitches on 1 stitch holder for neck, and finish each shoulder separately. Then decrease every row from the right side as follows: 1 stitch 6 times - READ DECREASE TIP-2 (applies to neck) = 18-21-22-25-29-32 stitches remain for shoulder. Continue until piece measures 62-64-66-68-70-72 cm , and cast off. Work the other shoulder the same way. SLEEVE: Work sleeves in the round on double pointed needles/ circular needle, bottom up. Divide piece when decreasing for sleeve cap and work back and forth on needle. Cast on 46-48-50-52-52-56 stitches on double pointed needles size 4.5 mm with Air. Knit 1 round, then work rib, knit 1/purl 1. When piece measures 8 cm, switch to double pointed needles size 5.5 mm, and work in stocking stitch On first round in in stocking stitch decrease 8-8-8-8-8-10 stitches evenly = 38-40-42-44-44-46 stitches. Insert a marker thread at beginning of round = mid under sleeve. Continue in stocking stitch, AT THE SAME TIME when piece measures 10-10-10-10-12-12 cm, increase 1 stitch on each side of marker thread - READ INCREASE TIP. Work yarn overs twisted on next round to avoid holes. Increase every 3½-3½-3-3-2-2 cm 11-12-13-13-15-15 times in total = 60-64-68-70-74-76 stitches. When piece measures 50-49-49-48-45-44 cm, cast off 3 stitches on each side of marker thread (= 6 stitches cast off mid under sleeve), then work sleeve back and forth. Cast off for sleeve cap at beginning of every row in each side as follows: 2 stitches 1 time, 3 stitches 1 time, then cast off the remaining stitches. Work another sleeve the same way. ASSEMBLY: Sew the shoulder seams. Sew in sleeves. Sew side seams inside 1 edge stitch until 8 cm remain = vent. NECK EDGE: Pick up approx. 92-106 stitches with circular needle size 4,5 mm around the neck (including stitches on stitch holder and adapt so that the number of stitches is divisible by 2). Work rib knit 1/purl 1 for 9 cm. Cast off. Fold rib at the top of neck down on the inside of garment. Fasten rib to form a folding edge. To avoid a tight neck edge and avoiding the edge to tip outwards, it is important to make the seam elastic. |
|||||||
Diagram explanations |
|||||||
|
|||||||
 |
|||||||
Have you finished this pattern?Tag your pictures with #dropspattern #rainydaysweater or submit them to the #dropsfan gallery. Do you need help with this pattern?You'll find 27 tutorial videos, a Comments/Questions area and more by visiting the pattern on garnstudio.com. © 1982-2026 DROPS Design A/S. We reserve all rights. This document, including all its sub-sections, has copyrights. Read more about what you can do with our patterns at the bottom of each pattern on our site. |
|||||||


With over 40 years in knitting and crochet design, DROPS Design offers one of the most extensive collections of free patterns on the internet - translated to 17 languages. As of today we count 324 catalogues and 12290 patterns translated into English (UK/cm). 12290
We work hard to bring you the best knitting and crochet have to offer, inspiration and advice as well as great quality yarns at incredible prices! Would you like to use our patterns for other than personal use? You can read what you are allowed to do in the Copyright text at the bottom of all our patterns. Happy crafting!
Post a comment to pattern DROPS 210-5
We would love to hear what you have to say about this pattern!
If you want to leave a question, please make sure you select the correct category in the form below, to speed up the answering process. Required fields are marked *.