
Popular categories
Looking for a yarn?


Comments / Questions (227)
![]() Fabienne wrote:
Fabienne wrote:
Je réponds à la réponse J’ai bien compris le droite-gauche par rapport à la façon dont on porte le pull. Tout s’est bien passé pour l’épaule droite (devant) je ne pouvais que commencer sur l’envers. Mais pour l’épaule gauche (devant) mon aiguille est orientée pour commencer sur l’envers alors que le patron nous demande de commencer sur l’endroit Cordialement Ps: bravo et merci pour la rapidité des réponses !
29.04.2026 - 10:22
![]() Fabienne wrote:
Fabienne wrote:
Question déjà posée mais je ne comprends pas les réponses pour l’épaule gauche du devant. On me dit de commencer sur l’endroit mais mon aiguille est orientée pour nouveau rang sur l’envers, le câble et l’autre aiguille soutiennent le dos. Concrètement, faut-il tout mettre sur une ligne de vie ou une épingle retenant les mailles et inverser le sens des aiguilles ? PS: ce serait bien de pouvoir filtrer les questions/réponses selon la langue.
29.04.2026 - 09:02DROPS Design answered:
Bonjour Fabienne, l'épaule droite du devant quand on porte le pull est l'épaule qui se trouve à gauche quand l'ouvrage se présente sur l'endroit, donc vous allez bien la commencer sur l'envers car le rang sur l'endroit précédent est le rang où vous avez rabattu les mailles de l'encolure. Notez qu'ici l'épaule droite/gauche s'entend quand on porte le pull et pas quand on a l'ouvrage sur les aiguilles. À moins que j'ai mal compris votre question? Nous ne pouvons malhreuseument pas proposer ce type de filtre car la langue n'est pas forcément liée à un drapeau. Mais vous avez toujours cette rubrique pour y poser vos questions. Bon tricot!
29.04.2026 - 09:46
![]() Anna wrote:
Anna wrote:
Interessante e semplice
25.04.2026 - 16:35
![]() Anna wrote:
Anna wrote:
Interessante e semplice
25.04.2026 - 16:35
![]() FRANCE wrote:
FRANCE wrote:
Je ne trouve pas combien de pelotes je dois commander en taille S
18.04.2026 - 17:42DROPS Design answered:
Bonjour, 150gr = 3 pelotes du DROPS Air. Bon tricot!
18.04.2026 - 18:06
![]() Rose wrote:
Rose wrote:
Are you to put the back stitches on a holder while you work back and forth on the front. It isn't stated on the pattern.
15.04.2026 - 18:07DROPS Design answered:
Hi Rose, Yes, it is easiest if you place the back piece stitches on a stitch holder while working the front. Regards, Drops team.
16.04.2026 - 06:52
![]() Nancy wrote:
Nancy wrote:
Ik wil graag spencer patroon voor rechte naalden
14.04.2026 - 16:44DROPS Design answered:
Dag Nancy,
Om een patroon aan te passen om op rechte naalden te breien hebben we een instructie gemaakt. Deze vind je hier.
15.04.2026 - 11:36
![]() Margot wrote:
Margot wrote:
Liebe Drops-Mitarbeiter*innen: wieviel "positive ease" hat das Modell? Mein Brustumfang ist 88 cm, ich möchte, dass der Pullunder locker sitzt, welche Größe empfehlt ihr? Danke vielmals für eine Antwort! liebe Grüße:)
01.04.2026 - 22:34DROPS Design answered:
Liebe Margot, das können Sie selber entscheiden, mehr lesen Sie hier. Viel Spaß beim Stricken!
07.04.2026 - 16:43
![]() Alessandra wrote:
Alessandra wrote:
Hi, I'm at the left shoulder on the front piece. The pattern says I should start from the right side, but it looks like a wrong-side row. I read the other comments where you explain to join the yarn on the side and start working on the RS, but I don’t understand how to do that because the outer side of the shoulder is on the cable. Thank you!
24.03.2026 - 16:26DROPS Design answered:
Dear Alessandra, after you have worked the right shoulder you should have only stitches for left shoulder on needle, start from the rigth side, ie from the armhole towards the neckline and cast off stitches for neck at the beg of each row from the wrong side then cast off when left shoulder have same height than right shoulder. Happy knitting!
25.03.2026 - 07:02
![]() Frida wrote:
Frida wrote:
Hi, How many balls of Air Mix yarn would I need to make this in size small please? Thank you
18.03.2026 - 23:28DROPS Design answered:
Hi Frida, Drops Air is sold in 50 g skiens, so you need 3 skiens for this top in your size. Regards, Drops Team.
19.03.2026 - 06:25
|
|
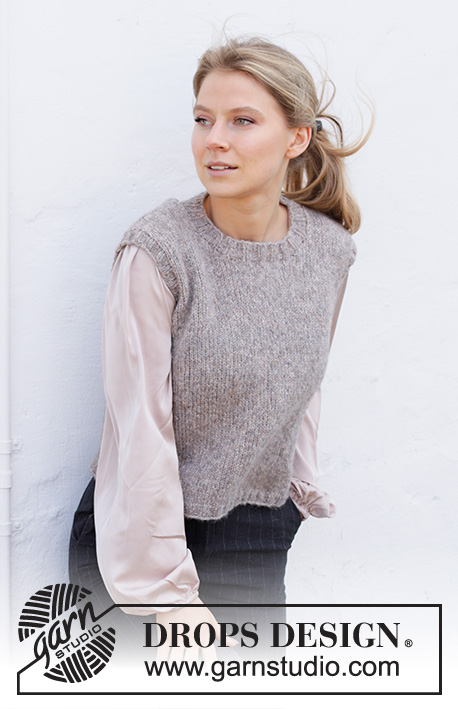
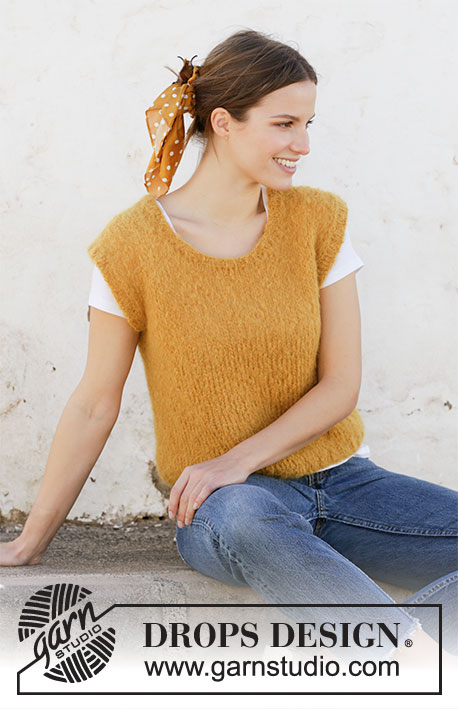
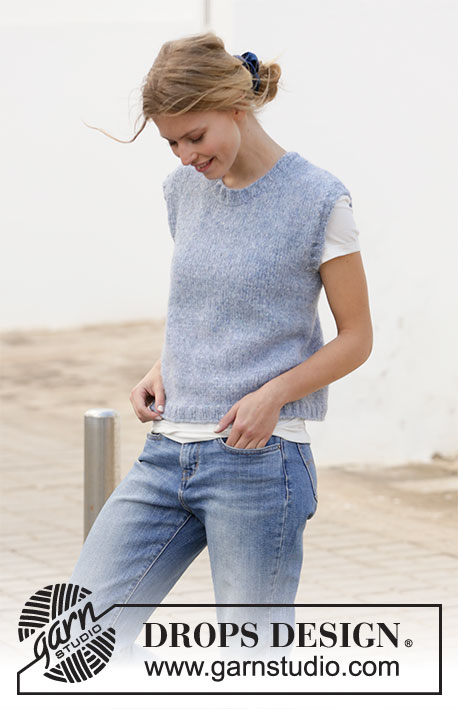
College Days#collegedaysvest |
|
 |
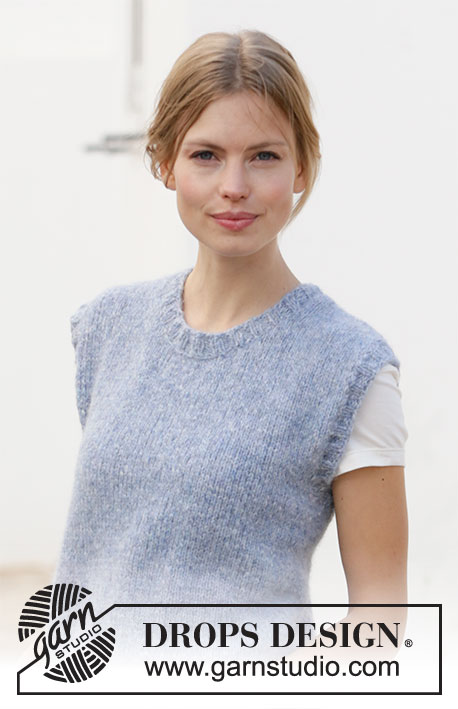 |
Knitted vest / slipover with round neck in DROPS Air. Sizes S – XXXL.
DROPS 210-28 |
|
|
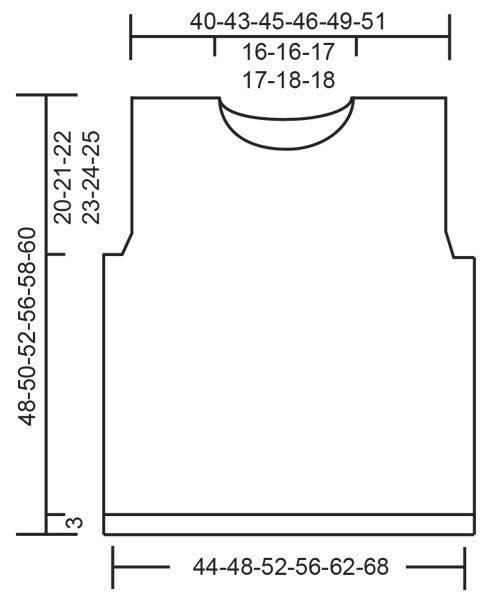
------------------------------------------------------- EXPLANATIONS FOR THE PATTERN: ------------------------------------------------------- DECREASE TIP-1 (evenly spaced): To work out how to decrease evenly, count the total number of stitches on needle (e.g. 156 stitches) and divide by number of decreases to be made (e.g. 8) = 19.5. In this example decrease by knitting alternatively each 18th and 19th stitch and each 19th and 20th stitch together. ------------------------------------------------------- START THE PIECE HERE: ------------------------------------------------------- VEST – SHORT OVERVIEW OF THE PIECE: The piece is worked in the round with circular needle, bottom up as far as the armholes. Front and back pieces are finished separately back and forth. Neck and sleeve edges are worked in the round with circular needle to finish. BODY: Cast on 156-172-184-200-220-240 stitches with circular needle size 4.5 mm and Air. Knit 1 round, then work rib (knit 2, purl 2) for 3 cm. Change to circular needle size 5 mm. Work stocking stitch, decreasing 8 stitches evenly spaced on the first round = 148-164-176-192-212-232 stitches – read DECREASE TIP above. Insert 1 marker at the beginning of the round and 1 marker after the next 74-82-88-96-106-116 stitches. Allow the markers to follow your work onwards; they will be used when casting off for the armholes. Work stocking stitch until the piece measures 28-29-30-33-34-35 cm from the cast-on edge. REMEMBER THE KNITTING TENSION! On the next round cast off for the armholes, starting 3-3-3-4-4-4 stitches before the first marker; cast off 6-6-6-8-8-8 stitches (the marker sits in the middle of these stitches), work as before until there are 3-3-3-4-4-4 stitches left before the next marker, cast off the next 6-6-6-8-8-8 stitches (the marker sits in the middle of these stitches) and work to end of round. Front and back pieces are finished separately, back and forth on the needle. FRONT PIECE: = 68-76-82-88-98-108 stitches. Work stocking stitch and cast off for the armholes on each side at the beginning of each row as follows: Cast off 2 stitches 1 time and 1 stitch 1-3-4-6-9-12 times = 62-66-70-72-76-80 stitches. Continue working until the piece measures 38-40-40-44-44-46 cm (there is approx. 10-10-12-12-14-14 cm left to finished length). On the next row from the right side cast off for the neck as follows: Work the first 25-27-28-29-30-32 stitches, cast off the next 12-12-14-14-16-16 stitches and work the last 25-27-28-29-30-32 stitches. The shoulders are finished separately; do not cut the strand – continue with the right shoulder, from the wrong side. RIGHT SHOULDER ON FRONT PIECE: = 25-27-28-29-30-32 stitches. Work stocking stitch, starting from the wrong side, and cast off stitches for the neck at the beginning of each row from the right side as follows: Cast off 2 stitches 2 times and 1 stitch 4 times = 17-19-20-21-22-24 stitches. Continue working until the piece measures 48-50-52-56-58-60 cm from the cast-on edge. Cast off and cut the strand. LEFT SHOULDER ON FRONT PIECE: = 25-27-28-29-30-32 stitches. Work stocking stitch, starting from the right side and cast off stitches for the neck at the beginning of each row from the wrong side as follows: Cast off 2 stitches 2 times and 1 stitch 4 times = 17-19-20-21-22-24 stitches. Continue working until the piece measures 48-50-52-56-58-60 cm from the cast-on edge (match to the right shoulder). Cast off and cut the strand. BACK PIECE: = 68-76-82-88-98-108 stitches. Work stocking stitch and cast off stitches for the armholes on each side at the beginning of each row as follows: Cast off 2 stitches 1 time and 1 stitch 1-3-4-6-9-12 times = 62-66-70-72-76-80 stitches. Continue working until the piece measures 44-46-48-52-54-56 cm (there is approx. 4 cm left to finished length). On the next row from the right side, cast off for the neck as follows: Work the first 18-20-21-22-23-25 stitches, cast off the next 26-26-28-28-30-30 stitches and work the last 18-20-21-22-23-25 stitches. The shoulders are finished separately; do not cut the strand – continue with the left shoulder from the wrong side. LEFT SHOULDER ON BACK PIECE: = 18-20-21-22-23-25 stitches. Work stocking stitch, starting from the wrong side and cast off 1 stitch at the beginning of the next row from the right side = 17-19-20-21-22-24 stitches. Continue working until the piece measures 48-50-52-56-58-60 cm from the cast-on edge; match the front piece. Cast off and cut the strand. RIGHT SHOULDER ON BACK PIECE: = 18-20-21-22-23-25 stitches. Work stocking stitch, starting from the right side and cast off 1 stitch at the beginning of the next row from the wrong side = 17-19-20-21-22-24 stitches. Continue working until the piece measures 48-50-52-56-58-60 cm from the cast-on edge; match to the front piece. Cast off and cut the strand. ASSEMBLY: Sew the shoulder seams with grafting stitches. NECK: Start from the right side at one of the shoulder seams. Using circular needle size 4.5 mm knit up approx. 76 to 92 stitches inside the 1 stitch around the whole neck-line (number must be divisible by 4). Work rib (knit 2, purl 2) in the round for 2 cm. Cast off with knit over knit and purl over purl. EDGE AROUND ARMHOLES: Start from the right side where the piece was divided for the armhole. Using circular needle size 4.5 mm knit up approx. 84 to 124 stitches around the armhole (number must be divisible by 4). Work rib (knit 2, purl 2) in the round for 2 cm. Cast off with knit over knit and purl over purl. Work an edge around the other armhole in the same way. |
|
 |
|
Have you finished this pattern?Tag your pictures with #dropspattern #collegedaysvest or submit them to the #dropsfan gallery. Do you need help with this pattern?You'll find 22 tutorial videos, a Comments/Questions area and more by visiting the pattern on garnstudio.com. © 1982-2026 DROPS Design A/S. We reserve all rights. This document, including all its sub-sections, has copyrights. Read more about what you can do with our patterns at the bottom of each pattern on our site. |
|


With over 40 years in knitting and crochet design, DROPS Design offers one of the most extensive collections of free patterns on the internet - translated to 17 languages. As of today we count 324 catalogues and 12290 patterns translated into English (UK/cm). 12290
We work hard to bring you the best knitting and crochet have to offer, inspiration and advice as well as great quality yarns at incredible prices! Would you like to use our patterns for other than personal use? You can read what you are allowed to do in the Copyright text at the bottom of all our patterns. Happy crafting!
Post a comment to pattern DROPS 210-28
We would love to hear what you have to say about this pattern!
If you want to leave a question, please make sure you select the correct category in the form below, to speed up the answering process. Required fields are marked *.