
Popular categories
Looking for a yarn?


Comments / Questions (181)
![]() Amira wrote:
Amira wrote:
Hallo, ich bin gerade dabei für die Armausschnitte abzuketten. Ist hier eine bestimmte Technik (z.b. italienisch, mit Umschlag, etc.) gefordert, damit es zb elastisch ist oder einfach die Standard-Abketttechnik, bei der man eine Masche über die andere hebt? Gleiche Frage im weiteren Verlauf beim Abketten. Viele Grüße und Danke für die schöne Anleitung!
08.06.2025 - 17:42DROPS Design answered:
Liebe Amira, gerne können Sie ihre Lieblings-Technik für Abketten hier benutzen - siehe unterschiedliche Technike hier, die Maschen sollen nur (aber wie immer) nicht zu fest sein. Viel Spaß beim Stricken!
09.06.2025 - 10:13
![]() Rahmah Bey wrote:
Rahmah Bey wrote:
Hello and thank you for this beautiful vest. this is my first garment. question: in the cast-on statement, what is AIR? thank you inadvance for your kindness
26.05.2025 - 04:09DROPS Design answered:
Hi Rahmah, This refers to the yarn used in the pattern (Drops Air). Regards, Drops team.
26.05.2025 - 06:41
![]() Hannah wrote:
Hannah wrote:
Hello, Could you please what is meant by this: knit up approx. 76 to 92 stitches inside the 1 stitch around the whole neck-line (number must be divisible by 4). I thought you would pick up the stitches but that doesn't seem to be what the instructions indicate and if I pick up stitches I have way too many. Thank you
24.05.2025 - 22:48DROPS Design answered:
Dear Hannah, you pick up and knit these stitches; choose a number between 76 and 92 that it fits the circunference of your neck. You pick up the cast off stitches and the stitches around the neck from the shoulder rows. Make sure that the number of picked up stitches is divisible by 4, since you will need to work a k2/p2 rib over them. Happy knitting!
25.05.2025 - 13:30
![]() Katie wrote:
Katie wrote:
Hello! I have finished my right shoulder on front piece and bound off. The instructions for the left shoulder on front piece say to start working stockinette on the RS, but the 25 stitches (size SM) to be worked on my needle feel like they need to be knitted from the WS first (since they were last knitted on the RS when doing the 25-16-25 middle bind off for the front neckline). Any assistance here would be appreciated! Thank you!
04.05.2025 - 20:47DROPS Design answered:
Dear Katie, due to having cut the yarn, instead of starting from the neck, from the WS, we join the yarn on the side and start working from the RS. So you skip the WS row and start in stocking stitch from the RS. Happy knitting!
04.05.2025 - 22:09
![]() Lulu wrote:
Lulu wrote:
Bonjour Je souhaite réaliser ce modèle (collège dans)en taille s avec la laine belle 2fils si possible Est ce réalisable ? Et dans quelle mesure ? Merci d’avance pour votre réponse Lulu
02.05.2025 - 09:29DROPS Design answered:
Bonjour Lulu, avec 1 seul fil Belle, vous n'auriez pas la bonne tension et devriez tout recalculer ; mais vous pouvez aussi utiliser 1 autre fil avec Belle, par ex. Kid-Silk, pour avoir la même tension (vérifiez la taille des aiguilles si besoin); Retrouvez des modèle avec 1 fil du groupe de fils B + 1 fil du groupe de fils A et une tension de 17-16 m ici. Bon tricot!
02.05.2025 - 13:27
![]() Karen wrote:
Karen wrote:
Hi, I’m at the armhole bind off point in the pattern & don’t understand the instructions as I am a beginner. If I bind off 3 stitches before the marker & end of the round, do I flip the work over to bind off the other 3 stitches on the purl side at the beginning of the next row ? A video or step by step instructions would be helpful. Thank you
28.04.2025 - 04:24DROPS Design answered:
Hi Karen, After binding off for the armholes, you continue back and forth so, yes, you turn at the end of the round and work back across the front piece, turning again when you reach the second set of bound-off stitches. Regards, Drops Team.
28.04.2025 - 07:20
![]() Karen wrote:
Karen wrote:
Hi, I’ve worked the pattern in Medium size up to the armhole cast off. Could you please confirm if I should start the cast off at the 82 stitch marker or at the beginning of round marker?
26.04.2025 - 17:38DROPS Design answered:
Dear Karen, the first marker is the marker at the beginning of the round. So you start 3 stitches before the beginning of the round and cast off the following 6 stitches. Happy knitting!
27.04.2025 - 12:12
![]() Linda Davidson wrote:
Linda Davidson wrote:
Hi, im up to the point in the pattern, where im starting the front piece in st st. Im at 88 sts on the front part...the pattern state cast off 2 sts ONE TIME then 1 st 6 TIMES.... It doesnt add up to having 72 sts left , it should say , cast off 2 sts x 2 times...not ONE to get the correct outcome. Im pointing this out as Becky wrote earlier with this problem, but the misprint wasnt mentioned...hope this helps...linda
17.04.2025 - 04:49DROPS Design answered:
Dear Mrs Davidson, note that you should cast off the stitches on each side so that youy get: 88 sts - (2 sts x 1 time x 2 sides) - (1 st x 6 times x 2 sides) = 72 sts left. Happy knitting!
23.04.2025 - 09:33
![]() Letteria Cannata wrote:
Letteria Cannata wrote:
Buongiorno, vorrei sapere se nelle taglie e' già calcolato l'aglio. Ad esempio se la mia circonferenza torace e' 88cm devo aggiungere altri cm per l'aglio o nelle vostre misure e' già compreso. Spero di essere stata chiara e grazie per la vostra disponibilità
15.04.2025 - 10:06DROPS Design answered:
Buonasera Letteria, le misure indicate sono quelle finali effettive. Buon lavoro!
16.04.2025 - 22:46
![]() Montillet wrote:
Montillet wrote:
Bonjour Lorsqu’on relève les mailles pour l’encolure en jersey faut il relever 2 mailles sur 3 Merci bien
03.04.2025 - 21:37DROPS Design answered:
Bonjour Mme Montillet, quand on relève les mailles le long d'un ouvrage en jersey, on relève environ 3 mailles sur 4 rangs (cf vidéo à titre d'illustration). Si vous n'avez pas assez de mailles ou si vous en avez finalement relevé trop, ajustez simplement le nombre de mailles au 1er tour des côtes en augmentant/diminuant à intervalles réguliers. Bon tricot!
04.04.2025 - 08:52
|
|
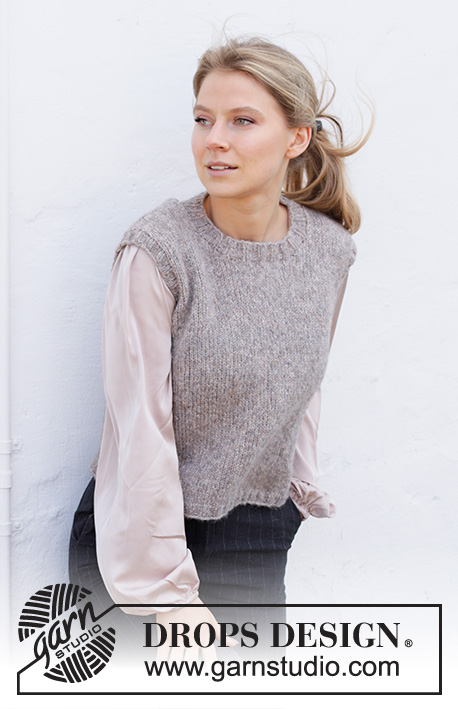
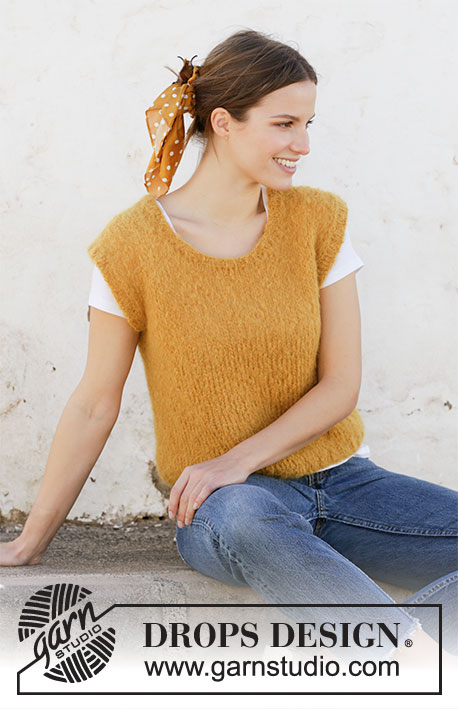
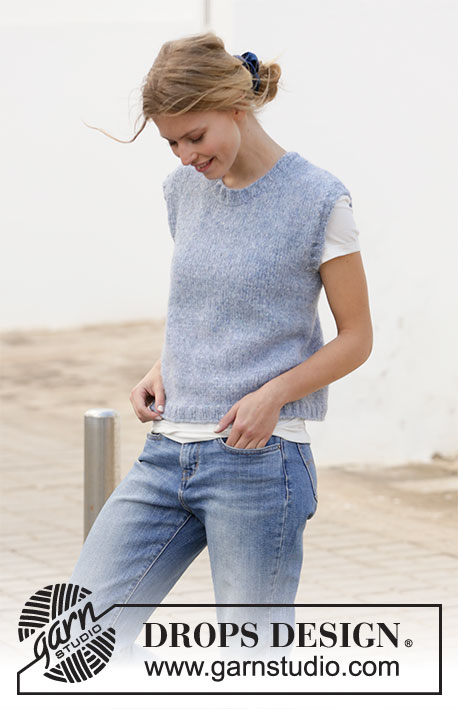
College Days#collegedaysvest |
|
 |
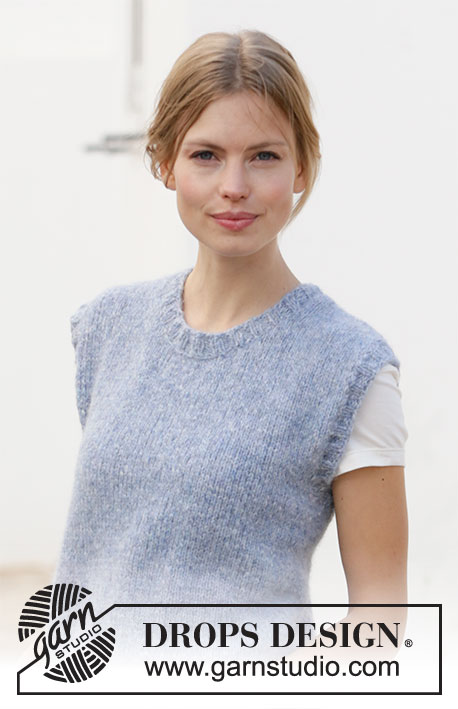 |
Knitted vest / slipover with round neck in DROPS Air. Sizes S – XXXL.
DROPS 210-28 |
|
|
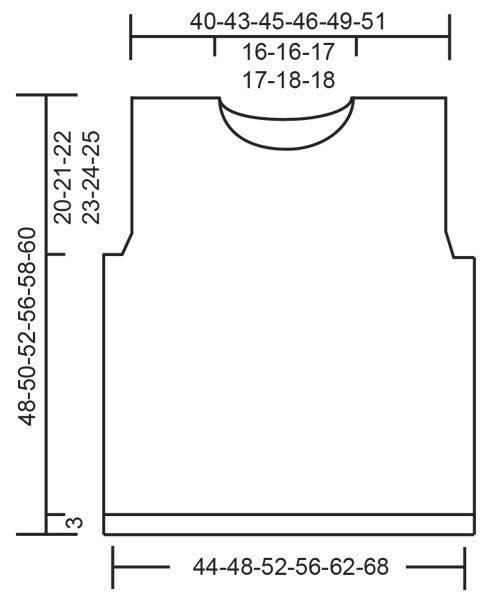
------------------------------------------------------- EXPLANATIONS FOR THE PATTERN: ------------------------------------------------------- DECREASE TIP-1 (evenly spaced): To work out how to decrease evenly, count the total number of stitches on needle (e.g. 156 stitches) and divide by number of decreases to be made (e.g. 8) = 19.5. In this example decrease by knitting alternatively each 18th and 19th stitch and each 19th and 20th stitch together. ------------------------------------------------------- START THE PIECE HERE: ------------------------------------------------------- VEST – SHORT OVERVIEW OF THE PIECE: The piece is worked in the round with circular needle, bottom up as far as the armholes. Front and back pieces are finished separately back and forth. Neck and sleeve edges are worked in the round with circular needle to finish. BODY: Cast on 156-172-184-200-220-240 stitches with circular needle size 4.5 mm and Air. Knit 1 round, then work rib (knit 2, purl 2) for 3 cm. Change to circular needle size 5 mm. Work stocking stitch, decreasing 8 stitches evenly spaced on the first round = 148-164-176-192-212-232 stitches – read DECREASE TIP above. Insert 1 marker at the beginning of the round and 1 marker after the next 74-82-88-96-106-116 stitches. Allow the markers to follow your work onwards; they will be used when casting off for the armholes. Work stocking stitch until the piece measures 28-29-30-33-34-35 cm from the cast-on edge. REMEMBER THE KNITTING TENSION! On the next round cast off for the armholes, starting 3-3-3-4-4-4 stitches before the first marker; cast off 6-6-6-8-8-8 stitches (the marker sits in the middle of these stitches), work as before until there are 3-3-3-4-4-4 stitches left before the next marker, cast off the next 6-6-6-8-8-8 stitches (the marker sits in the middle of these stitches) and work to end of round. Front and back pieces are finished separately, back and forth on the needle. FRONT PIECE: = 68-76-82-88-98-108 stitches. Work stocking stitch and cast off for the armholes on each side at the beginning of each row as follows: Cast off 2 stitches 1 time and 1 stitch 1-3-4-6-9-12 times = 62-66-70-72-76-80 stitches. Continue working until the piece measures 38-40-40-44-44-46 cm (there is approx. 10-10-12-12-14-14 cm left to finished length). On the next row from the right side cast off for the neck as follows: Work the first 25-27-28-29-30-32 stitches, cast off the next 12-12-14-14-16-16 stitches and work the last 25-27-28-29-30-32 stitches. The shoulders are finished separately; do not cut the strand – continue with the right shoulder, from the wrong side. RIGHT SHOULDER ON FRONT PIECE: = 25-27-28-29-30-32 stitches. Work stocking stitch, starting from the wrong side, and cast off stitches for the neck at the beginning of each row from the right side as follows: Cast off 2 stitches 2 times and 1 stitch 4 times = 17-19-20-21-22-24 stitches. Continue working until the piece measures 48-50-52-56-58-60 cm from the cast-on edge. Cast off and cut the strand. LEFT SHOULDER ON FRONT PIECE: = 25-27-28-29-30-32 stitches. Work stocking stitch, starting from the right side and cast off stitches for the neck at the beginning of each row from the wrong side as follows: Cast off 2 stitches 2 times and 1 stitch 4 times = 17-19-20-21-22-24 stitches. Continue working until the piece measures 48-50-52-56-58-60 cm from the cast-on edge (match to the right shoulder). Cast off and cut the strand. BACK PIECE: = 68-76-82-88-98-108 stitches. Work stocking stitch and cast off stitches for the armholes on each side at the beginning of each row as follows: Cast off 2 stitches 1 time and 1 stitch 1-3-4-6-9-12 times = 62-66-70-72-76-80 stitches. Continue working until the piece measures 44-46-48-52-54-56 cm (there is approx. 4 cm left to finished length). On the next row from the right side, cast off for the neck as follows: Work the first 18-20-21-22-23-25 stitches, cast off the next 26-26-28-28-30-30 stitches and work the last 18-20-21-22-23-25 stitches. The shoulders are finished separately; do not cut the strand – continue with the left shoulder from the wrong side. LEFT SHOULDER ON BACK PIECE: = 18-20-21-22-23-25 stitches. Work stocking stitch, starting from the wrong side and cast off 1 stitch at the beginning of the next row from the right side = 17-19-20-21-22-24 stitches. Continue working until the piece measures 48-50-52-56-58-60 cm from the cast-on edge; match the front piece. Cast off and cut the strand. RIGHT SHOULDER ON BACK PIECE: = 18-20-21-22-23-25 stitches. Work stocking stitch, starting from the right side and cast off 1 stitch at the beginning of the next row from the wrong side = 17-19-20-21-22-24 stitches. Continue working until the piece measures 48-50-52-56-58-60 cm from the cast-on edge; match to the front piece. Cast off and cut the strand. ASSEMBLY: Sew the shoulder seams with grafting stitches. NECK: Start from the right side at one of the shoulder seams. Using circular needle size 4.5 mm knit up approx. 76 to 92 stitches inside the 1 stitch around the whole neck-line (number must be divisible by 4). Work rib (knit 2, purl 2) in the round for 2 cm. Cast off with knit over knit and purl over purl. EDGE AROUND ARMHOLES: Start from the right side where the piece was divided for the armhole. Using circular needle size 4.5 mm knit up approx. 84 to 124 stitches around the armhole (number must be divisible by 4). Work rib (knit 2, purl 2) in the round for 2 cm. Cast off with knit over knit and purl over purl. Work an edge around the other armhole in the same way. |
|
|
|
Have you finished this pattern?Tag your pictures with #dropspattern #collegedaysvest or submit them to the #dropsfan gallery. Do you need help with this pattern?You'll find 22 tutorial videos, a Comments/Questions area and more by visiting the pattern on garnstudio.com. © 1982-2025 DROPS Design A/S. We reserve all rights. This document, including all its sub-sections, has copyrights. Read more about what you can do with our patterns at the bottom of each pattern on our site. |
|


With over 40 years in knitting and crochet design, DROPS Design offers one of the most extensive collections of free patterns on the internet - translated to 17 languages. As of today we count 314 catalogues and 11822 patterns translated into English (UK/cm).
We work hard to bring you the best knitting and crochet have to offer, inspiration and advice as well as great quality yarns at incredible prices! Would you like to use our patterns for other than personal use? You can read what you are allowed to do in the Copyright text at the bottom of all our patterns. Happy crafting!
Post a comment to pattern DROPS 210-28
We would love to hear what you have to say about this pattern!
If you want to leave a question, please make sure you select the correct category in the form below, to speed up the answering process. Required fields are marked *.