
Popular categories
Looking for a yarn?


Comments / Questions (50)
![]() Patrizia wrote:
Patrizia wrote:
Buongiorno ho acquistato molti filati LIMA ,NEPAL da marzo ha fatto 4 maglioni ora sto lavorando con il filato PARIS arancio però devo segnala che ho gia trovato 2 nodi nei gomitoli che mi creano disagio .Grazie
05.05.2020 - 14:06
![]() Kate Sander wrote:
Kate Sander wrote:
Yoke instructions, first round says A1 increases 2 stitches on each side of the armhole, so that's 8 stitches right there. The increase on backs and front is 12. On the largest size The cast on is 104 and the final count given is 116. Either you only want to increase 10 stitches total, or your final count is off and should be 124. Some one above has already pointed this out and it wasn't addressed. Is this pattern tech edited? I realize it's free, but lets get this right shall we?
01.05.2020 - 15:56DROPS Design answered:
Dear Mrs Sander, when working first round in A.1 you will increase 6 sts on back piece + 6 sts on front piece + 2 sts in each A.1 = 116 sts at the end of this round. Then increase only as shown in A.1 (= 8 sts on each round). Happy knitting!
04.05.2020 - 14:11
![]() Rossella wrote:
Rossella wrote:
Buongiorno mi scuso per la mia errata segnalazione, la mia vista non è più quella di una volta e mi erano completa mente sfuggiti quelli sul primo ferro
01.05.2020 - 10:20
![]() Rossella wrote:
Rossella wrote:
Il diagramma A.1 non è corretto. Presenta un totale di 4 gettati, in realtà dovrebbero essere 6, come si può intuire dalla foto. Con un totale di 6 gettati i conti tornano, ad esempio per la taglia L si parte con 108 maglie e ripetendo 7 volte in lunghezza, per 4 volte (2 per ogni manica) per 6 gettati si arriva ad avere il totale di 276 maglie. Bel modello, bravi
25.04.2020 - 17:17DROPS Design answered:
Buongiorno Rossella. Il diagramma A1 è corretto. Ci sono in tutto 6 maglie gettate (2 su ogni riga dispari) e corrisponde al motivo della fotografia. Buon lavoro!
26.04.2020 - 15:22
![]() Rossella wrote:
Rossella wrote:
Il diagramma A.1 non è corretto. Presenta un totale di 4 gettati, in realtà dovrebbero essere 6, come si può intuire dalla foto. Con un totale di 6 gettati i conti tornano, ad esempio per la taglia L si parte con 108 maglie e ripetendo 7 volte in lunghezza, per 4 volte (2 per ogni manica) per 6 gettati si arriva ad avere il totale di 276 maglie. Bel modello, bravi
25.04.2020 - 17:03
![]() S P wrote:
S P wrote:
I do not understand the pattern instructions after the 1st A1 and the 1st row increases. Is that 1st row repeated 8 times ? Help!!! Thanks so much.
24.03.2020 - 03:57DROPS Design answered:
Dear SP, after you have worked A.1 one time in height, repeat A.1 in height - make sure to let the markers in A.1 follow so that it will be easier to repeat A.1. After A.1 has been worked one time in height, there are 9 stitches in each A.1, on next round, work A.1 once again over the middle 3 sts of these 9 stitches. Happy knitting!
24.03.2020 - 10:08
![]() Else Kjos wrote:
Else Kjos wrote:
Strikker Mint Tea Sweater . Har strikka mye i mitt liv men hva i alle dager er dei 4 cm i diagrammet ( nr 2 av tall på v side etter dei 3 cm med hals . Står jo ingen plass at det skal strikkes 4 cm før hullmønster der markøren blir satt . Strikker M og da tolker eg lengde fra der halsen slutter og ned til der arm begynner som 22 cm . Mangler eg da 4 cm eller hva er dei 4 cm . Håper på rask tilbakemelding . TAKK
12.03.2020 - 12:24DROPS Design answered:
Hej Else, Jeg kan ikke se hvor du er i opskriften. Hvad mener du med 4 cm i diagrammet? Har du spørgsmål til diagrammet? Eller hvor er du i opskriften?
18.03.2020 - 15:14
![]() Carole Dietrich wrote:
Carole Dietrich wrote:
The answer to my question about the stitch counts for all sizes (80-88-88-108-112-116) at the end of the second round is: The stitch counts are only for the increases and does not include the yarn overs. The stitch count for all sizes, including the yarn overs, would be: 88-96-96-116-120-124
07.03.2020 - 17:03
![]() Carole Dietrich wrote:
Carole Dietrich wrote:
Sorry, I meant at the end of the yoke's first round.
07.03.2020 - 06:35
![]() Carole Dietrich wrote:
Carole Dietrich wrote:
At the end of round 1, the pattern gives the stitch counts as: 80-88-88-108-112-116. Does this count include the increases and the yarn overs? I'm getting this count: 88-96-96-116-120-124.
07.03.2020 - 06:30DROPS Design answered:
Hi Carole, The stitch counts given are for all the sizes, so the first number is for size S, the second for size M and so on. So you use the number which corresponds to the size you are knitting. Happy knitting!
07.03.2020 - 13:37
|
|||||||||||||
Mint Tea Sweater#mintteasweater |
|||||||||||||
 |
 |
||||||||||||
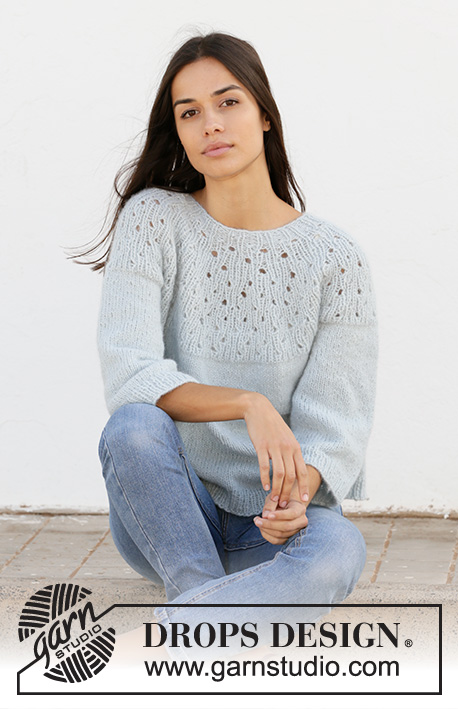
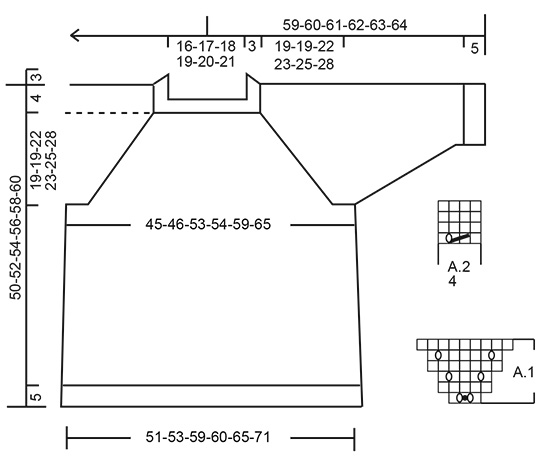
Knitted jumper with raglan in DROPS Paris. The piece is worked top down with lace pattern. Sizes XS - XXL.
DROPS 210-19 |
|||||||||||||
|
------------------------------------------------------- EXPLANATIONS FOR THE PATTERN: ------------------------------------------------------- PATTERN TIP: See diagrams A.1 and A.2. INCREASE TIP-1 (evenly spaced): To work out how to increase evenly, count the total number of stitches on the needle (e.g. 16 stitches) and divide by the number of increases to be made (e.g. 4) = 4. In this example, increase by making 1 yarn over after each 4th stitch. On the next round work the yarn overs twisted to avoid holes. INCREASE TIP-2 (for sides of body): Work until there are 2 stitches left before the marker thread, make 1 yarn over, knit 4 (marker thread sits between these 4 stitches), 1 yarn over. On the next round knit the yarn overs twisted to avoid holes. Then work the new stitches in stocking stitch. DECREASE TIP (for sleeves): Decrease 1 stitch on each side of the marker thread as follows: Work until there are 3 stitches left before the marker thread, knit 2 together, knit 2 (marker thread sits between these 2 stitches), slip 1 stitch as if to knit, knit 1 and pass the slipped stitch over the knitted stitch (= 2 stitches decreased). CASTING-OFF TIP: To avoid the cast-off edge being tight you can cast off with a larger size needle. If the edge is still tight, make 1 yarn over after approx. each 4th stitch at the same time as casting off and the yarn overs are cast off as normal stitches. ------------------------------------------------------- START THE PIECE HERE: ------------------------------------------------------- JUMPER – SHORT OVERVIEW OF THE PIECE: The neck and yoke are worked in the round with circular needle, top down from mid back. The yoke is divided for body and sleeves and the body continued in the round with circular needle. The sleeves are worked in the round with double pointed needles, top down. NECK: Cast on 80-84-88-92-96-104 stitches with circular needle size 4.5 mm and Paris. Knit 1 round. Work rib (= purl 2, knit 2) for 3 cm, then change to circular needle size 5.5 mm. Insert 1 marker at the beginning of the round (= mid back); the yoke will be measured from this marker! YOKE: The next round is worked as follows: Knit 12-12-16-16-16-20 and increase 0-2-0-4-4-3 stitches evenly spaced over these stitches – read INCREASE TIP-1 (= half back piece), work A.1 (= 3 stitches), knit 8, work A.1 over 3 stitches (= right sleeve), knit 26-30-30-34-34-38 and increase 0-0-0-8-8-6 stitches evenly spaced over these stitches (= front piece), A.1 over 3 stitches, knit 8, work A.1 over 3 stitches (= left sleeve), knit 14-14-14-14-18-18 stitches and increase 0-2-0-4-4-3 stitches evenly spaced over these stitches (= half back piece) = 88-96-96-116-120-124 stitches. The markers in A.1 follow your work onwards, to make repeating A.1 in height easier. On round 2 a total of 8 stitches are increased in A.1. REMEMBER THE KNITTING TENSION! When A.1 has been completed 1 time, repeat A.1 in height (the markers mark the middle of A.1 in each repeat). When A.1 has been repeated a total of 6-6-7-7-8-9 times in height there are 224-232-256-276-304-332 stitches on the needle. Continue knitting in the round until the piece measures 19-19-22-23-25-28 cm from the marker. Now divide the piece for body and sleeves as follows: Knit 33-34-39-40-44-49, place the next 46-48-50-58-64-68 stitches on a thread for the sleeve, cast on 6 stitches under the sleeve, knit 66-68-78-80-88-98, place the next 46-48-50-58-64-68 stitches on a thread for the sleeve, cast on 6 stitches under the sleeve and finally knit 33-34-39-40-44-49. BODY: = 144-148-168-172-188-208 stitches. Insert 1 marker thread in the middle of the 6 stitches on each side of the piece (= in sides of body). There are 72-74-84-86-94-104 stitches between the threads on both the front and the back pieces. Allow the threads to follow your work onwards; they will be used when increasing in the sides. Knit. When the piece measures 2 cm from the division, increase 1 stitch on each side of both marker threads – read INCREASE TIP-2 (= 4 stitches increased). Increase like this every 4 cm a total of 5 times = 164-168-188-192-208-228 stitches. When the piece measures 20-22-21-22-22-21 cm work A.2 (= 4 stitches) over all stitches. When A.2 has been worked 1 time in height, change to circular needle size 4.5 ,mm and work rib (= knit 2, purl 2). Cast off when the piece measures 27-29-28-29-29-28 cm from the division – read CASTING-OFF TIP! The jumper measures approx. 50-52-54-56-58-60 cm from the shoulder down. SLEEVE: Place the 46-48-50-58-64-68 stitches from the thread on the one side of the piece on double pointed needles size 5.5 mm and knit up 1 stitch in each of the 6 stitches cast on under the sleeve = 52-54-56-64-70-74 stitches. Insert a marker thread in the middle of the 6 stitches under the sleeve. Allow the thread to follow your work onwards; it will be used when decreasing under the sleeve. Work stocking stitch in the round. When the piece measures 2 cm from the division, decrease 1 stitch on each side of the marker thread – read DECREASE TIP. Decrease like this every 5-7-5-3-1½-1½ cm a total of 4-3-4-6-9-9 times = 44-48-48-52-52-56 stitches. When the piece measures 22-22-20-20-18-16 cm from the division, work A.2 over all stitches. When A.2 has been worked 1 time in height change to double pointed needles size 4.5 mm. Work rib (= knit 2, purl 2). Cast off with knit when the sleeve measures 29-29-27-27-25-23 cm from the division. Work the other sleeve in the same way. |
|||||||||||||
Diagram explanations |
|||||||||||||
|
|||||||||||||
 |
|||||||||||||
Have you finished this pattern?Tag your pictures with #dropspattern #mintteasweater or submit them to the #dropsfan gallery. Do you need help with this pattern?You'll find 25 tutorial videos, a Comments/Questions area and more by visiting the pattern on garnstudio.com. © 1982-2026 DROPS Design A/S. We reserve all rights. This document, including all its sub-sections, has copyrights. Read more about what you can do with our patterns at the bottom of each pattern on our site. |
|||||||||||||


With over 40 years in knitting and crochet design, DROPS Design offers one of the most extensive collections of free patterns on the internet - translated to 17 languages. As of today we count 324 catalogues and 12290 patterns translated into English (UK/cm). 12290
We work hard to bring you the best knitting and crochet have to offer, inspiration and advice as well as great quality yarns at incredible prices! Would you like to use our patterns for other than personal use? You can read what you are allowed to do in the Copyright text at the bottom of all our patterns. Happy crafting!
Post a comment to pattern DROPS 210-19
We would love to hear what you have to say about this pattern!
If you want to leave a question, please make sure you select the correct category in the form below, to speed up the answering process. Required fields are marked *.