
Popular categories
Looking for a yarn?


Comments / Questions (50)
![]() Trine wrote:
Trine wrote:
Er det riktig at det skal være flere masker foran enn bak?
19.05.2021 - 17:29DROPS Design answered:
Hei Trine, Nei, etter du er ferdig med bærestykket, setter du inn merker slik at det er like mange masker foran og bak. God fornøyelse!
20.05.2021 - 07:46
![]() Ivana wrote:
Ivana wrote:
Un'altra domanda. Nel primo giro dello sprone, considerati tutti gli aumenti, nella prima metà dietro abbiamo 20+3=23 maglie e, alla fine , nell'altra metà dietro, abbiamo 18+3 =21 maglie: a questo punto le due metà non sono uguali: è esatto lo stesso?
26.03.2021 - 09:02DROPS Design answered:
Buonasera Ivana, le spiegazioni sono corrette. Buon lavoro!
27.03.2021 - 18:54
![]() Ivana wrote:
Ivana wrote:
Il 1° giro indicato sul grafico del diagramma A1 ( che non capisco se sia il 2° o il 3° giro )è così ? 1 maglia ditta, 1 gettato, 1 maglia diritta (nella quale inserire il segnapunti), 1 gettato, 1 maglia diritta
26.03.2021 - 08:56DROPS Design answered:
Buonasera Ivana, si, la spiegazione della lavorazione del 1° giro di A.1 è corretta come ha scritto. Buon lavoro!
27.03.2021 - 18:51
![]() Pia wrote:
Pia wrote:
Helt utrolig smuk sommerbluse i Paris🌹gerne flere af samme slags🌞
17.03.2021 - 14:09
![]() Annika Eriksson wrote:
Annika Eriksson wrote:
Hej igen, men de 3 i varje A1 blir ju 5, alltså 8 till på varvet. Eller ska man inte följa A1-mönstret?
27.08.2020 - 13:39DROPS Design answered:
Hej Annika, udtagningerne i A.1 er ikke talt med i de 116 masker. Du øger på hver 2.omgang ifølge diagrammet og ja du starter på 1.omgang i A.1. God fornøjelse!
27.08.2020 - 15:14
![]() Annika Eriksson wrote:
Annika Eriksson wrote:
Hej, jag har samma problem som tidigare skrivit om rörande antalet när man gjort första ökningarna. Jag stickar XL och det står att det ska bli 112 maskor men om man räknar enl instruktionen så blir det 120 och det är det jag har på stickorna....Vad är det som inte stämmer?
26.08.2020 - 13:34DROPS Design answered:
Hej Annika. Du ska sticka såhär i din storlek: 16 + öka 4 över dessa, 3, 8, 3, 34 + öka 8 över dessa, 3, 8, 3, 18 + öka 4 över dessa. Detta blir 112 m. Mvh DROPS Design
27.08.2020 - 13:25
![]() Anna wrote:
Anna wrote:
Witam, czy w schemacie A1 narzuty są przerabiane normalnie czy jako oczka przekręcone? Pozdrawiam Anna
05.08.2020 - 09:33DROPS Design answered:
Witaj Aniu, te narzuty są w następnym okrążeniu przerabiane normalnie, tzn. powstaną dziurki, które widzisz na zdjęciu. Pozdrawiamy!
05.08.2020 - 14:33
![]() Karin HEMKE wrote:
Karin HEMKE wrote:
Hallo, Was bedeutet genau folgender Satz in der Anleitung?...In jeder 2. Runde insgesamt 8 Maschen in A.1 zunehmen.Wird immer in der Mitte von A1 zugenommem und dort auch der Markierer gesetzt?Oder wie gehe ich vor? Danke
27.07.2020 - 13:13DROPS Design answered:
Liebe Karin, die Zunahmen sind in A.1 eingezeichnet. Es sind 2 Zunahmen pro A.1, also 8 Zunahmen insgesamt in der ganzen Runde (4 x A.1). Der von Ihnen zitierte Satz wurde gerade umformuliert, damit es etwas eindeutiger ist. Gutes Gelingen weiterhin!
28.07.2020 - 11:25
![]() Christina Johnson wrote:
Christina Johnson wrote:
Hej, Jeg forstår altså heller ikke hvordan man ender på 116 masker efter første runde XXL. Du tager ud total 6 masker ud foran og 6 bagpå, altså 12. Plus man tager 2 ud for hver A1 altså 8. Det giver total 20 masker der er taget ud på runde 1. Hvordan kan det nogensinde blive 116?
09.07.2020 - 10:18
![]() Hanne Østby Granmo wrote:
Hanne Østby Granmo wrote:
"Maskene med merkene i A.1 skal følge med arbeidet videre for å enklere kunne repetere A.1 i høyden. På hver 2.omgang økes det totalt 8 masker i A.1. HUSK PÅ STRIKKEFASTHETEN! Når A.1 er strikket 1 gang i høyden repeters A.1 i høyden, dvs maskene med merket markerer midten av A.1, hver gang den repeters i høyden" Kan dere forklare dette bedre? jeg forstår ikke hvordan jeg skal gjøre dette.
01.06.2020 - 21:03DROPS Design answered:
Hei Hanne. Om du ser på diagram A.1 og diagramforklaringen til den sorte prikken, så skal det settet et merke i den midterste masken i A.1. La dette merke følge denne masken når det strikkes, slik at du alltid vet hvilken maske som er den midterste masken i A.1 selv etter at A.1 er blitt repetert flere ganger i høyden. God Fornøyelse!
08.06.2020 - 08:06
|
|||||||||||||
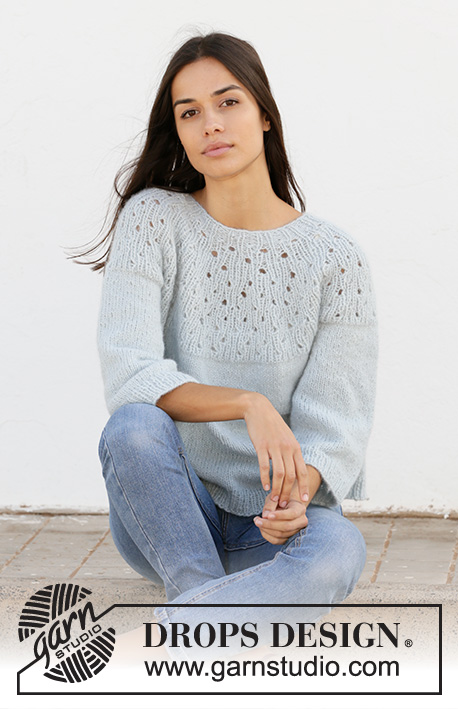
Mint Tea Sweater#mintteasweater |
|||||||||||||
 |
 |
||||||||||||
Knitted jumper with raglan in DROPS Paris. The piece is worked top down with lace pattern. Sizes XS - XXL.
DROPS 210-19 |
|||||||||||||
|
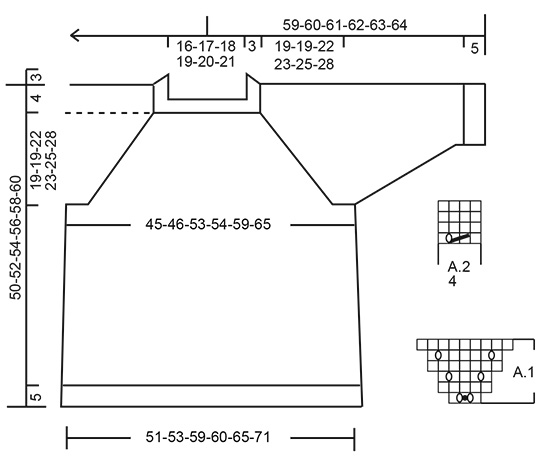
------------------------------------------------------- EXPLANATIONS FOR THE PATTERN: ------------------------------------------------------- PATTERN TIP: See diagrams A.1 and A.2. INCREASE TIP-1 (evenly spaced): To work out how to increase evenly, count the total number of stitches on the needle (e.g. 16 stitches) and divide by the number of increases to be made (e.g. 4) = 4. In this example, increase by making 1 yarn over after each 4th stitch. On the next round work the yarn overs twisted to avoid holes. INCREASE TIP-2 (for sides of body): Work until there are 2 stitches left before the marker thread, make 1 yarn over, knit 4 (marker thread sits between these 4 stitches), 1 yarn over. On the next round knit the yarn overs twisted to avoid holes. Then work the new stitches in stocking stitch. DECREASE TIP (for sleeves): Decrease 1 stitch on each side of the marker thread as follows: Work until there are 3 stitches left before the marker thread, knit 2 together, knit 2 (marker thread sits between these 2 stitches), slip 1 stitch as if to knit, knit 1 and pass the slipped stitch over the knitted stitch (= 2 stitches decreased). CASTING-OFF TIP: To avoid the cast-off edge being tight you can cast off with a larger size needle. If the edge is still tight, make 1 yarn over after approx. each 4th stitch at the same time as casting off and the yarn overs are cast off as normal stitches. ------------------------------------------------------- START THE PIECE HERE: ------------------------------------------------------- JUMPER – SHORT OVERVIEW OF THE PIECE: The neck and yoke are worked in the round with circular needle, top down from mid back. The yoke is divided for body and sleeves and the body continued in the round with circular needle. The sleeves are worked in the round with double pointed needles, top down. NECK: Cast on 80-84-88-92-96-104 stitches with circular needle size 4.5 mm and Paris. Knit 1 round. Work rib (= purl 2, knit 2) for 3 cm, then change to circular needle size 5.5 mm. Insert 1 marker at the beginning of the round (= mid back); the yoke will be measured from this marker! YOKE: The next round is worked as follows: Knit 12-12-16-16-16-20 and increase 0-2-0-4-4-3 stitches evenly spaced over these stitches – read INCREASE TIP-1 (= half back piece), work A.1 (= 3 stitches), knit 8, work A.1 over 3 stitches (= right sleeve), knit 26-30-30-34-34-38 and increase 0-0-0-8-8-6 stitches evenly spaced over these stitches (= front piece), A.1 over 3 stitches, knit 8, work A.1 over 3 stitches (= left sleeve), knit 14-14-14-14-18-18 stitches and increase 0-2-0-4-4-3 stitches evenly spaced over these stitches (= half back piece) = 88-96-96-116-120-124 stitches. The markers in A.1 follow your work onwards, to make repeating A.1 in height easier. On round 2 a total of 8 stitches are increased in A.1. REMEMBER THE KNITTING TENSION! When A.1 has been completed 1 time, repeat A.1 in height (the markers mark the middle of A.1 in each repeat). When A.1 has been repeated a total of 6-6-7-7-8-9 times in height there are 224-232-256-276-304-332 stitches on the needle. Continue knitting in the round until the piece measures 19-19-22-23-25-28 cm from the marker. Now divide the piece for body and sleeves as follows: Knit 33-34-39-40-44-49, place the next 46-48-50-58-64-68 stitches on a thread for the sleeve, cast on 6 stitches under the sleeve, knit 66-68-78-80-88-98, place the next 46-48-50-58-64-68 stitches on a thread for the sleeve, cast on 6 stitches under the sleeve and finally knit 33-34-39-40-44-49. BODY: = 144-148-168-172-188-208 stitches. Insert 1 marker thread in the middle of the 6 stitches on each side of the piece (= in sides of body). There are 72-74-84-86-94-104 stitches between the threads on both the front and the back pieces. Allow the threads to follow your work onwards; they will be used when increasing in the sides. Knit. When the piece measures 2 cm from the division, increase 1 stitch on each side of both marker threads – read INCREASE TIP-2 (= 4 stitches increased). Increase like this every 4 cm a total of 5 times = 164-168-188-192-208-228 stitches. When the piece measures 20-22-21-22-22-21 cm work A.2 (= 4 stitches) over all stitches. When A.2 has been worked 1 time in height, change to circular needle size 4.5 ,mm and work rib (= knit 2, purl 2). Cast off when the piece measures 27-29-28-29-29-28 cm from the division – read CASTING-OFF TIP! The jumper measures approx. 50-52-54-56-58-60 cm from the shoulder down. SLEEVE: Place the 46-48-50-58-64-68 stitches from the thread on the one side of the piece on double pointed needles size 5.5 mm and knit up 1 stitch in each of the 6 stitches cast on under the sleeve = 52-54-56-64-70-74 stitches. Insert a marker thread in the middle of the 6 stitches under the sleeve. Allow the thread to follow your work onwards; it will be used when decreasing under the sleeve. Work stocking stitch in the round. When the piece measures 2 cm from the division, decrease 1 stitch on each side of the marker thread – read DECREASE TIP. Decrease like this every 5-7-5-3-1½-1½ cm a total of 4-3-4-6-9-9 times = 44-48-48-52-52-56 stitches. When the piece measures 22-22-20-20-18-16 cm from the division, work A.2 over all stitches. When A.2 has been worked 1 time in height change to double pointed needles size 4.5 mm. Work rib (= knit 2, purl 2). Cast off with knit when the sleeve measures 29-29-27-27-25-23 cm from the division. Work the other sleeve in the same way. |
|||||||||||||
Diagram explanations |
|||||||||||||
|
|||||||||||||
 |
|||||||||||||
Have you finished this pattern?Tag your pictures with #dropspattern #mintteasweater or submit them to the #dropsfan gallery. Do you need help with this pattern?You'll find 25 tutorial videos, a Comments/Questions area and more by visiting the pattern on garnstudio.com. © 1982-2026 DROPS Design A/S. We reserve all rights. This document, including all its sub-sections, has copyrights. Read more about what you can do with our patterns at the bottom of each pattern on our site. |
|||||||||||||


With over 40 years in knitting and crochet design, DROPS Design offers one of the most extensive collections of free patterns on the internet - translated to 17 languages. As of today we count 324 catalogues and 12290 patterns translated into English (UK/cm). 12290
We work hard to bring you the best knitting and crochet have to offer, inspiration and advice as well as great quality yarns at incredible prices! Would you like to use our patterns for other than personal use? You can read what you are allowed to do in the Copyright text at the bottom of all our patterns. Happy crafting!
Post a comment to pattern DROPS 210-19
We would love to hear what you have to say about this pattern!
If you want to leave a question, please make sure you select the correct category in the form below, to speed up the answering process. Required fields are marked *.