
Popular categories
Looking for a yarn?


Comments / Questions (57)
![]() Laura wrote:
Laura wrote:
Buongiorno, volevo fare notare che c'è un errore nell'inizio bordo del corpo: 1 maglia diritto, 1 maglia rovescio, 2 maglie rovescio *, forse travi due 1 rov e 2 rov ci va 1 diritto. Le maniche si possono fare in tondo? Non capisco bene il passaggio del collo delle diminuzioni , può indicare ad ogni passaggio il totale maglie? Grazie
19.01.2020 - 16:22DROPS Design answered:
Buonasera Laura, abbiamo corretto il testo all'inizio del corpo. Può lavorare la manica in tondo se preferisce, togliendo le maglie di vivagno. Inoltre, quale parte delle diminuzioni non le è chiara? Sul collo deve diminuire solo su un giro lavorando 2 maglie insieme a rovescio ritorto e 2 maglie insieme a rovescio per tutto il giro. Buon lavoro!
19.01.2020 - 23:48
![]() Marian wrote:
Marian wrote:
Kan man strikke den i 2 tråde Drops Kid Silk og stadig fået godt resultat?
15.01.2020 - 13:25DROPS Design answered:
Hej Marian, Ja det kan du, den vil blive dejlig let og blød at have på :)
15.01.2020 - 15:05
![]() Myriam wrote:
Myriam wrote:
Hola, empiezo este proyecto y me surgió una duda: para empezar el resorte del jersey, se recomienda alguna técnica de montar los puntos por ejemplo el método continental? O debería Usar otra técnica para que quede más elástico? Cual? Gracias
08.01.2020 - 13:23DROPS Design answered:
Hola Myriam, puedes montar los puntos al método continental alrededor de dos agujas. Mira el video AQUI. Buen trabajo!
23.05.2020 - 11:32
![]() Marja Witteman wrote:
Marja Witteman wrote:
Als ik na de boord het lijf ga doen in de Engelse patentsteek dan klopt het niet bij mij na de 2 de ronde. Bij het begin van ronde 3 heb ik de 1ste steek over....heb deze 2 rondes al 3x over gedaan maar die steek blijft over en ik heb wel het goede aantal steken. Groeten Marja
28.12.2019 - 07:30DROPS Design answered:
Dag Marja,
Als je een even aantal steken op de naald hebt, dan zou het wel uit moeten komen, want de Engelse patentsteek bestaat uit een meervoud van 2 steken. Controleer even goed of je niet iets over het hoofd hebt gezien en alle steken op de juiste manier hebt gebreid in de voorgaande naalden.
04.01.2020 - 19:22
![]() Maria Monica wrote:
Maria Monica wrote:
Hello. I m Monica from italy. I was following the italian explanation but there is a little mistake just at the beginning of instructions regarding ribbing . Have a look. Ciao Monica
26.12.2019 - 14:51
![]() Marianela wrote:
Marianela wrote:
Me gustaría hacer este modelo en otro color, en delight color 9 ó 12. ¿Con qué color de kid silk creéis que pordría combinarlo? Voy a comprar las lanas online y sin verlas juntas es un poco difícil. Muchas gracias, un saludo!
16.12.2019 - 20:23DROPS Design answered:
Hola Marianela, propongo: para Delight 9, Kid-Silk 08. Para Delight 12, Kid-Silk 05 (para esta segunda combinacion no estoy segura). Buen trabajo!
30.12.2019 - 10:10
![]() Annette Hansen wrote:
Annette Hansen wrote:
Jeg synes at det er meget få masker til ærmet med 40 masker til overarmen i str XXL. Hvis man tager strikkefastheden svarer det kun til 33 cm. Min overarm er 38 cm, så synes at det lyder meget stramt. Vil I tjekke op på det? På forhånd tak Annette
08.12.2019 - 11:42DROPS Design answered:
Hei Annette! Ermet strikkes i patent som er svært tøyelig, derfor kan ermet virke smalt men det vil strekke seg ved bruk. Om du fortsatt synes ermet er for smalt kan du alltids legge til flere masker i omgangen, men husk at disse maskene må også felles når bærestykket strikkes. Lykke til!
10.12.2019 - 09:35
![]() Sofie wrote:
Sofie wrote:
Jeg synes at ærmerne bliver meget smalle og slet ikke som på billedet. Str. M har 34 masker? Det giver ikke de mål der er på tegningen. Er der en fejl i opskriften eller har jeg læst den forkert? Mvh. Sofie
12.11.2019 - 07:24DROPS Design answered:
Hej Sofie, Ærmerne strikkes i patentstrik som strækker sig en del, det vil sige at målene stemmer i måleskitsen. Men hvis du alligevel vil have større ærmer, må du gerne tage flere masker ud. Hvis du gør det skal du huske at du skal tage ind dem igen når du strikker bærestykket. God fornøjelse!
21.11.2019 - 15:48
![]() Katarzyna wrote:
Katarzyna wrote:
Dzień dobry, w opisie ściegu w okrążeniu drugim w polskim tłumaczeniu jest prawdopodobnie błąd, porównałam go z wersją angielską. W polskiej jest "zdjąć 1 oczko lewe" natomiast w angielskiej " slip 1 stitch purlwise, co nie jest jednoznaczne. pozdrawiam Kasia
21.10.2019 - 08:12DROPS Design answered:
Witaj Kasiu. Zgadza się, błąd został poprawiony. A propos, czy już zagłosowałaś na nową kolekcję DROPS Jesień/Zima, zapraszamy serdecznie!
07.06.2020 - 17:12
![]() Lundee wrote:
Lundee wrote:
Bonjour, Comme vous le proposez, je souhaite faire ce modèle, mais avec un fil du group C, au lieu de Delight + Kid Silk: Big Delight ou Air. Comment bien utiliser votre convertisseur ? le poids du fil principal Delight seulement ? Merci !
09.10.2019 - 14:30DROPS Design answered:
Bonjour Lundee, vous devez toujours calculer au métrage et non au poids - retrouvez ici la méthode de calcul ou bien utilisez le convertisseur. Bon tricot!
09.10.2019 - 15:16
|
|
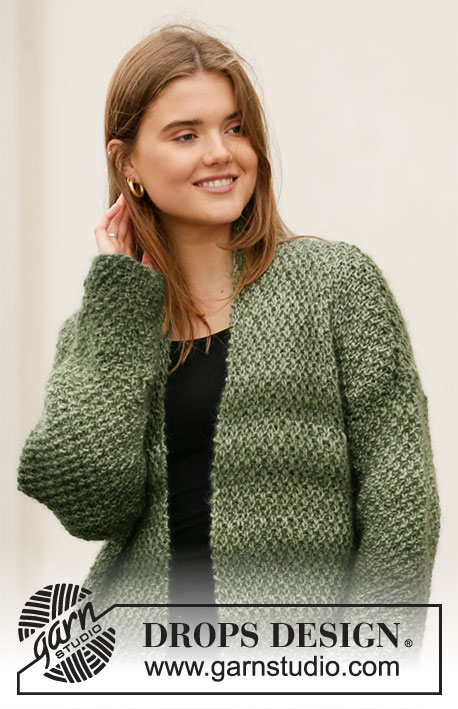
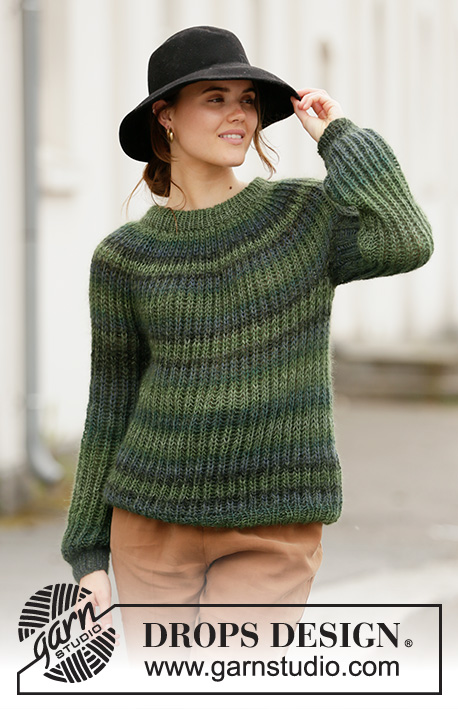
Winter Willow#winterwillowsweater |
|
 |
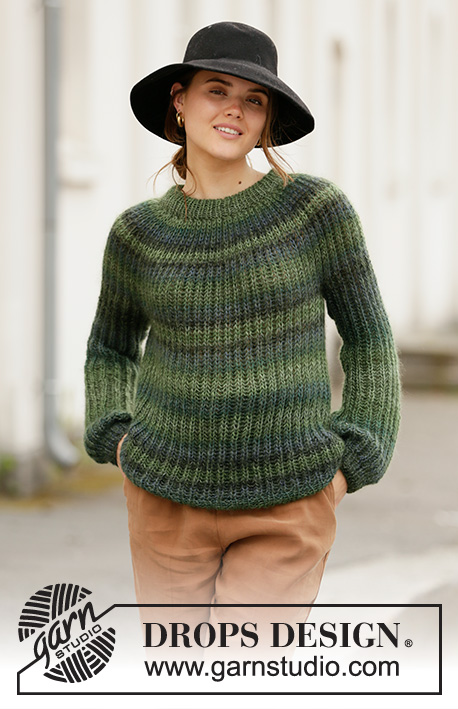 |
Knitted jumper with English rib in DROPS Delight and DROPS Kid-Silk. Size: S - XXXL
DROPS 207-30 |
|
|
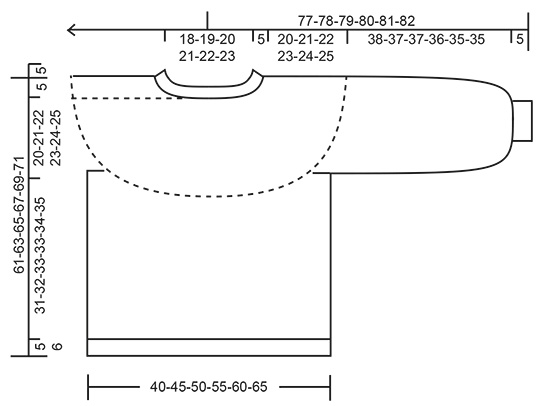
---------------------------------------------------------- EXPLANATION FOR THE PATTERN: ---------------------------------------------------------- ENGLISH RIB BODY (in the round on circular needle): ROUND 1: * 1 yarn over, slip 1 stitch purlwise, knit 1 *, work from *-*. ROUND 2: * Purl yarn over and slipped stitch together, 1 yarn over, slip 1 stitch purlwise *, work from *-*. ROUND 3: * 1 yarn over, slip 1 stitch purlwise, knit yarn over and slipped stitch together*, work from *-*. Repeat rounds 2 and 3. ENGLISH RIB STITCH: When counting the stitches, the yarn overs are not counted as stitches. GARTER STITCH (back and forth on needle): Knit all rows. ENGLISH RIB SLEEVE (back and forth on needle): ROW 1 (= right side): 1 edge stitch in garter stitch, * knit 1, make 1 yarn over, slip 1 stitch purlwise *, work from *-* until 1 stitch remains, finish with 1 edge stitch in garter stitch. ROW 2: 1 edge stitch, * knit yarn over and slipped stitch together, 1 yarn over, slip 1 stitch purlwise *, repeat from *-* until 1 stitch remains and work 1 edge stitch in garter stitch. Repeat 2ND ROW upwards. INCREASE TIP (applies to sleeve): Increase 1 stitch inside 1 edge stitch in each side of piece. Increase 1 stitch by making 1 yarn over, on next row work yarn over twisted i.e. work in back loop of stitch instead front. NOTE! Work the increased stitches in English rib. ---------------------------------------------------------- START THE PIECE HERE: ---------------------------------------------------------- JUMPER - SHORT OVERVIEW OF THE PIECE: Body is worked in the round on circular needle up to armhole. Work sleeves back and forth on circular needle. Then slip sleeves and body onto same circular needle and work yoke up to neck. BODY: Cast on 120-135-150-165-180-195 stitches on circular needle size 6 mm with 1 strand Kid-Silk and 1 strand Delight. Switch to circular needle size 5.5 mm, work rib in the round as follows: * Knit 1, purl 1, knit 1, purl 2 *, repeat from *-* the entire round until piece measures 5-5-5-6-6-6 cm. On next round work and decrease as follows: * Knit 1, purl 1, knit 1, purl 2 together *, work from *-* the entire round = 96-108-120-132-144-156 stitches. Switch to circular needle size 6 mm and continue with English rib in the round - read ENGLISH RIB BODY in explanation above. REMEMBER THE KNITTING TENSION! Work until piece measures approx. 36-37-38-39-40-41 cm (NOTE! Finish with 3rd round in English rib pattern). Insert 1 marker thread in each side of piece as follows: Insert 1 marker thread at beginning of round and 1 marker thread after 48-54-60-66-72-78 stitches (rounds begins in the side) NOTE! Yarn overs are not counted as 1 stitch - read ENGLISH RIB STITCH in explanation above. On next round (= 2nd round in English rib pattern), cast off 3-3-3-4-4-4 stitches on each side of each marker thread for armholes = 42-48-54-58-64-70 stitches on front and back piece. Cut the yarn, put piece aside and knit the sleeves. SLEEVE: Loosely cast on 28-30-30-32-32-34 stitches on circular needle size 6 mm with 1 strand Kid-Silk and 1 strand Delight. Switch to circular needle size 5.5 mm and work back and forth as follows: Work first row (= wrong side) as follows: 1 edge stitch in garter stitch, * knit 1, purl 1 *, repeat from *-* until 1 stitch remains, finish with 1 edge stitch in garter stitch. Continue with rib like this for 5 cm. Switch to needle size 6 mm and continue with English rib - read ENGLISH RIB SLEEVE in explanation above. When piece measures 7 cm, increase 1 stitch in each side- READ INCREASE TIP above. Repeat increase every 2 cm until 2-2-3-3-4-4 increases have been done in total = 32-34-36-38-40-42 stitches. Work until piece measures 42-41-41-40-39-39 cm, cast off stitches in each side as follows: Cast off 3-3-2-3-4-4 stitches at the beginning of the next 2 rows = 26-28-32-32-32-34 stitches. Sleeve measures approx. 43-42-42-41-40-40 cm. Cut the yarn, put piece aside and knit another sleeve the same way. YOKE: Slip sleeves on to same circular needle size 6 mm as body where armholes were cast off = 136-152-172-180-192-208 stitches. Then work English rib in the round. Work until yoke measures 20-21-22-23-24-25 cm from where body and sleeves were put together. Switch to circular needle size 5.5 mm and work 1 round rib with knit 1 and purl 1 (work yarn over together with stitch it belongs to. On next row decrease for neck as follows: * Knit 2 stitches twisted together (work in back loop of stitches), purl 2 together *, work from *-* the entire round = 68-76-86-90-96-104 stitches. Work rib with knit over knit and purl over purl until rib/neck edge measures 10 cm. Loosely cast off stitches with knit over knit and purl over purl. Fold neck edge double and sew it to the inside, sew stitch to stitch and make sure that to avoid a tight seam. ASSEMBLY: Sew seams along underside of sleeves inside edge stitch. Sew stitches cast off on the underside of sleeve to stitch cast of in the side on body. |
|
 |
|
Have you finished this pattern?Tag your pictures with #dropspattern #winterwillowsweater or submit them to the #dropsfan gallery. Do you need help with this pattern?You'll find 25 tutorial videos, a Comments/Questions area and more by visiting the pattern on garnstudio.com. © 1982-2026 DROPS Design A/S. We reserve all rights. This document, including all its sub-sections, has copyrights. Read more about what you can do with our patterns at the bottom of each pattern on our site. |
|


With over 40 years in knitting and crochet design, DROPS Design offers one of the most extensive collections of free patterns on the internet - translated to 17 languages. As of today we count 324 catalogues and 12290 patterns translated into English (UK/cm). 12290
We work hard to bring you the best knitting and crochet have to offer, inspiration and advice as well as great quality yarns at incredible prices! Would you like to use our patterns for other than personal use? You can read what you are allowed to do in the Copyright text at the bottom of all our patterns. Happy crafting!
Post a comment to pattern DROPS 207-30
We would love to hear what you have to say about this pattern!
If you want to leave a question, please make sure you select the correct category in the form below, to speed up the answering process. Required fields are marked *.