
Popular categories
Looking for a yarn?


Comments / Questions (46)
![]() Annie JAVOY wrote:
Annie JAVOY wrote:
Bo jour j aimerai me tricoter ce beau gilet jolina . J ai acheté 6 pelotes kid s'il et un kit d aiguilles circulaires drops romance Je ne comprends pas pour les explications du modèle si la taille 3,5 corresponds à une taille us ou en taille mm Cordialement
08.05.2024 - 16:34DROPS Design answered:
Bonjour Mme Javoy, pour trouver votre taille, mesurez un vêtement similaire que vous avez et dont vous aimez la forme et comparez ces mesures à celles du schéma (indiquées en cm), retrouvez plus d'infos ici. Bon tricot!
10.05.2024 - 07:42
![]() Christine Schwarz wrote:
Christine Schwarz wrote:
Hallo zusammen, ich stricke gerade das Modell 200-23 und würde gerne wissen, ob in der Rückrunde bei dem Muster der Umschlag auch rechts gestrickt wird, oder ob man die Masche von der Nadel fallen lässt. Ich würde mich über eine zeitnahe Antwort von Ihnen freuen. Viele Grüße Christine Schwarz
25.01.2023 - 11:24DROPS Design answered:
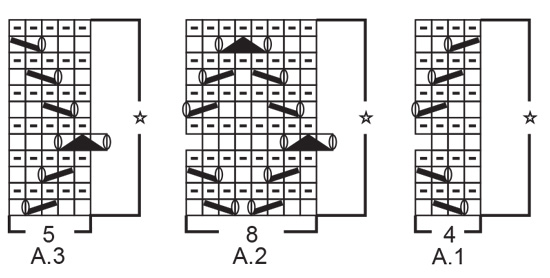
Liebe Frau Schwarz, die Diagramme zeigen alle Reihen im Muster, dh bei den Rückreihen werden alle Maschen sowie Umschläge rechts gestrickt. Viel Spaß beim stricken!
25.01.2023 - 12:16
![]() Antoinette Allocco Edlund wrote:
Antoinette Allocco Edlund wrote:
När jag skrev ut mönstret kom inte diagrammet med
01.03.2022 - 20:41
![]() Antoinette Allocco Edlund wrote:
Antoinette Allocco Edlund wrote:
På mönstret står det att 10x10 cm Är 23 m på bredde och 45 varv på höjden På garnbanderollen står det 10x10 cm 23 m på bredden och 30 på höjden Allt på drivor 3 1/2 Vilket är det rätta
01.03.2022 - 20:28DROPS Design answered:
Hej Antoinette. Stickfastheten på banderollen är i slätstickning och på mönstret är det uppgett i rätstickning. Du ska alltså få den stickfasthet som uppges på mönstret i rätstickning. Mvh DROPS Design
02.03.2022 - 11:50
![]() Vasantha Nathan wrote:
Vasantha Nathan wrote:
Total how many 12 rows of pattern do you knit?r . You say 3 repeats of pattern according to diagram. so total 4 pattern set of 12 rows. am I right? Thanks
26.02.2022 - 01:34DROPS Design answered:
Dear Vasantha, you work 3 repeats in total, so you need to work 3 x 12 pattern rows. The rest is worked in garter stitch. Happy knitting!
27.02.2022 - 17:40
![]() Vasantha Nathan wrote:
Vasantha Nathan wrote:
I am making this for my grand daughter who is 14 years 9 months. I am not sure what size to make? You have given the finished size in the pattern. How do I correlate the finished size to actual bust size? If her bust is 30", do I make small size or medium? I am having problem understanding the diagram. I am making jolina drops 200-23
26.02.2022 - 01:04DROPS Design answered:
Dear Vasantha, the measurements in the schematic are in cm. You could work size S, which has a bust of 31.50". However, due to the shape of the jacket, you need to measure the waist, which is approx. 30" as well. If the waist is larger, you would need to work the medium size. Happy knitting!
27.02.2022 - 17:38
![]() Antoinette Edlund Till Mönster Jolina wrote:
Antoinette Edlund Till Mönster Jolina wrote:
Har ni någon storleksguide och när får ni in färg månsken i kid silk
19.02.2022 - 11:30DROPS Design answered:
Hei Antoinette. Du finner størrelseoversikten / målskissen til denne jakken nederst på oppskriften. Der er alle mål i cm. Fargen måneskinn nr. 44 er på hovedlagret, så om din butikk er tom, er det bare å be de bestille inn fargen. mvh DROPS Design
21.02.2022 - 11:34
![]() Zee wrote:
Zee wrote:
Hello, this jacket looks so beautiful, light and soft. I was actually looking for a knee-long cardigan when stumbled upon this one... and was thus wondering, would it be possible for this combination of yarn/needle/pattern to keep on knitting until the total length of about 110cm? Would it work, in your opinion? Thank you so much for a reply!
24.01.2022 - 12:45DROPS Design answered:
Dear Zee, you will find some long jackets or long coat in Vivaldi (Brushed is a good alternative) or another long coat wiht 2 strands Kid-Silk, maybe you can find even more inspiration among all our patterns for cardigans?
25.01.2022 - 08:33
![]() Alex wrote:
Alex wrote:
Is it possible to knit this knit with 2 threads of kid-silk instead of 1 thread?
07.06.2021 - 19:47DROPS Design answered:
Dear Alex, while it is of course possible, you have to be aware, that knitting it with double strands would throw off the gauge, and you will have to entirely recalculate the stitchcounts and such. Happy Knitting!
07.06.2021 - 23:33
![]() Frederike wrote:
Frederike wrote:
Wat wordt er bedoeld met 'Naai de schoudernaden aan de binnenkant van de afkantrand' ? wat is de binnenkant van de afkantrand?
23.04.2021 - 10:04DROPS Design answered:
Dag Frederike,
Het is de bedoeling dat je de schoudernaden aan de binnenkant, dus aan de verkeerde kant dicht naait, zodat je het aan de buitenkant niet ziet.
25.04.2021 - 18:25
|
||||||||||||||||||||||
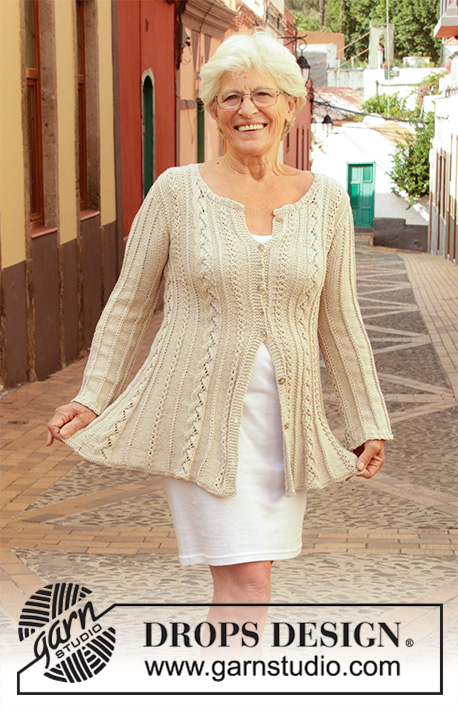
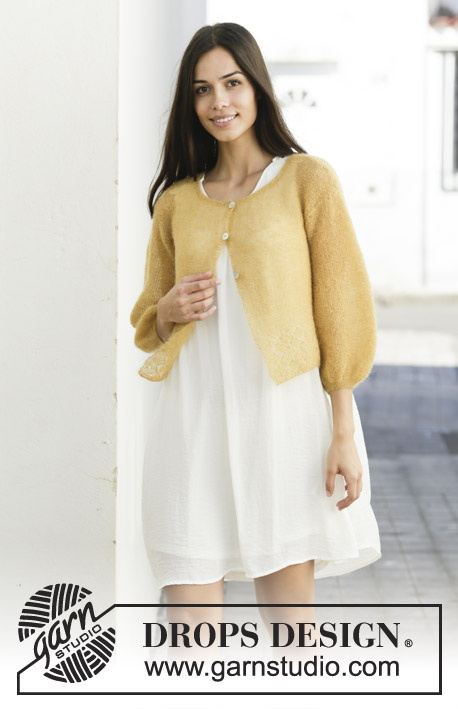
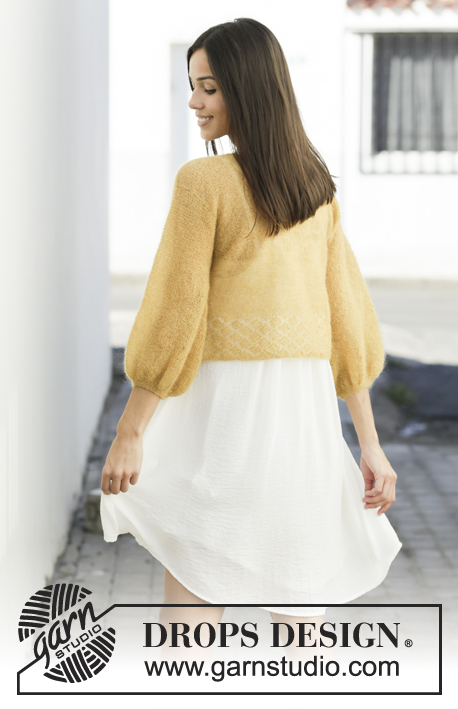
Jolina#jolinacardigan |
||||||||||||||||||||||
 |
 |
|||||||||||||||||||||
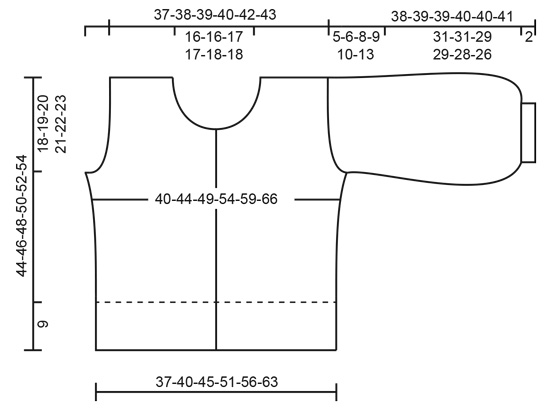
Knitted jacket in DROPS Kid-Silk. The piece is worked in garter stitch with lace pattern and ¾-length balloon sleeves. Sizes S - XXXL.
DROPS 200-23 |
||||||||||||||||||||||
|
------------------------------------------------------- EXPLANATIONS FOR THE PATTERN: ------------------------------------------------------- RIDGE/GARTER STITCH (worked back and forth): Knit all rows. 1 ridge in height = Knit 2 rows. PATTERN: See diagrams A.1 to A.3. The diagrams show all the rows in the pattern seen from the right side. INCREASE TIP: Increase 1 stitch on each side of the marker thread as follows: Work until there is 1 stitch left before the marker thread, make 1 yarn over, knit 2 (marker thread sits in between these 2 stitches), 1 yarn over (= 2 stitches increased at each marker thread and 4 stitches increased on row). On the next row knit the yarn overs twisted to avoid holes. DECREASE TIP (for sides of sleeves): All decreases are made from the right side! Decrease after the 1 edge stitch in garter stitch as follows: Knit 2 twisted together. Decrease before the 1 edge stitch in garter stitch as follows: Work until there are 2 stitches left before the edge stitch and knit 2 together. BUTTONHOLES: Work buttonholes from the right side on the right band (when the garment is worn). 1 BUTTONHOLE = Purl third and fourth stitch from the edge together and make 1 yarn over. On the next row (wrong side) purl the yarn over to leave a hole. Work buttonholes when the piece measures: S: 18, 25 and 32 cm M: 18, 26 and 34 cm L: 19, 27 and 35 cm XL: 19, 25, 31 and 37 cm XXL: 20, 26, 32 and 38 cm XXXL: 22, 28, 34 and 40 cm NOTE: The last of these 3-3-3-4-4-4 buttonholes is worked on the first row when knitting up stitches for the neck. ------------------------------------------------------- START THE PIECE HERE: ------------------------------------------------------- JACKET - SHORT OVERVIEW OF THE PIECE: The piece is worked back and forth with circular needle from mid front, bottom up as far as the armholes. Then cast off for armholes and the front and back pieces are continued separately back and forth on needle. The sleeves are worked back and forth with circular needle, bottom up. The garment is sewn together to finish. BODY: Cast on 179-195-219-243-267-299 stitches (including 5 band stitches on each side towards mid front) with circular needle size 3.5 mm and 2 strands Kid-Silk (this is done to avoid the cast-on edge being tight). Remove 1 strand and continue with just 1 strand Kid-Silk as follows: Work 2 RIDGES – read description above, but the outermost 5 stitches on each side are purled on all rows to finished length (= bands – when the bands are purled on each row they will be distinct from the rest of the garment). After the 2 ridges, work the next row from the right side as follows: 5 purled band stitches, work A.1 (= 4 stitches), work A.2 until there are 10 stitches left on row (= 20-22-25-28-31-35 repeats of 8 stitches), work A.3 (= 5 stitches) and finish with 5 purled band stitches. Continue this pattern until you have worked 3 repeats in height. REMEMBER THE KNITTING TENSION! The piece now measures approx. 9 cm from the cast-on edge. Insert 1 marker thread 47-51-57-63-69-77 stitches in from each side (= 85-93-105-117-129-145 stitches between marker threads on back piece). Allow the threads to follow your work onwards; they will be used when increasing in the sides. Work garter stitch back and forth over all stitches; the bands are purled on each row as before. When the piece measures 10 cm, increase 1 stitch on each side of both marker threads – read INCREASE TIP (= 4 stitches increased). Increase like this every 4-4-5-5-5-6 cm a total of 4 times on each side = 195-211-235-259-283-315 stitches. Remember BUTTONHOLES on right band – read description above! Continue working until the piece measures 26-27-28-29-30-31 cm. Now cast off for the armholes; i.e. the next row is worked as follows from the wrong side: Work 48-52-56-61-67-74 stitches as before (= left front piece), cast off 6-6-10-12-12-14 stitches for armhole (i.e. cast off 3-3-5-6-6-7 stitches on each side of the marker thread), knit 87-95-103-113-125-139 stitches (= back piece), cast off 6-6-10-12-12-14 stitches for armhole (e. cast off 3-3-5-6-6-7 stitches on each side of the marker thread) and work the remaining 48-52-56-61-67-74 stitches as before (= right front piece). Front and back pieces are continued separately. RIGHT FRONT PIECE (when garment is worn): = 48-52-56-61-67-74 stitches. Continue back and forth with garter stitch and 5 purled band stitches towards mid front. AT THE SAME TIME cast off for the armhole at the beginning of each row from the side as follows: Cast off 2 stitches 0-1-1-2-2-3 times and then 1 stitch 1-2-5-6-10-14 times = 47-48-49-51-53-54 stitches left on front piece. Continue working until the piece measures 32-34-35-37-38-40 cm. Now place the outermost 8-8-9-9-10-10 stitches towards mid front on 1 thread for neck, but to avoid having to cut the strand you are working with, work the stitches before putting them on the thread. Then cast off for the neck at the beginning of the each row from the neck as follows: Cast off 3 stitches 1 time, 2 stitches 4 times and 1 stitch 4 times = 24-25-25-27-28-29 stitches left on shoulder. Continue working until the piece measures 44-46-48-50-52-54 cm. Loosely cast off with knit from the right side and 2 strands Kid-Silk (this is done to avoid the cast-off edge being tight). LEFT FRONT PIECE (when garment is worn): = 48-52-56-61-67-74 stitches. Continue back and forth with garter stitch and 5 purled band stitches towards mid front. AT THE SAME TIME cast off for the armhole at the beginning of each row from the side as follows: Cast off 2 stitches 0-1-1-2-2-3 times and then 1 stitch 1-2-5-6-10-14 times = 47-48-49-51-53-54 stitches left on front piece. Continue working until the piece measures 32-34-35-37-38-40 cm. Now place the outermost 8-8-9-9-10-10 stitches towards mid front on 1 thread for neck, but to avoid having to cut the strand you are working with, work the stitches before putting them on the thread. Then cast off for the neck at the beginning of the each row from the neck as follows: Cast off 3 stitches 1 time, 2 stitches 4 times and 1 stitch 4 times = 24-25-25-27-28-29 stitches left on shoulder. Continue working until the piece measures 44-46-48-50-52-54 cm. Loosely cast off with knit from the right side and 2 strands Kid-Silk. BACK PIECE: = 87-95-103-113-125-139 stitches. Continue back and forth with garter stitch over all stitches. AT THE SAME TIME cast off for the armholes at the beginning of each row on each side as follows: Cast off 2 stitches 0-1-1-2-2-3 times and then 1 stitch 1-2-5-6-10-14 times = 85-87-89-93-97-99 stitches. Continue working until the piece measures 42-44-46-48-50-52 cm. Now cast off the middle 33-33-35-35-37-37 stitches for neck and each shoulder is finished separately. Continue back and forth with garter stitch and cast off 2 stitches on the next row from the neck = 24-25-25-27-28-29 stitches left. Continue working until the piece measures 44-46-48-50-52-54 cm. Loosely cast off with knit from the right side and 2 strands Kid-Silk. Work the other shoulder in the same way. SLEEVE: Cast on 56-58-60-62-64-66 stitches (including 1 edge stitch on each side) with circular needle size 3 mm and 2 strands Kid-Silk. Remove the one strand and continue with just 1 strand Kid-Silk as follows: Work 5 ridges back and forth over all stitches. On the next row increase 1 stitch in each stitch by knitting in both the front and back loops in all stitches on the row = 112-116-120-124-128-132 stitches. Change to circular needle size 3.5 mm and work garter stitch back and forth over all stitches. When the piece measures 5 cm, decrease 1 stitch on each side – read DECREASE TIP (= 2 stitches decreased). Decrease like this every 1½ cm a total of 18-17-16-15-14-14 times on each side = 76-82-88-94-100-104 stitches. Continue working until the piece measures 33-33-31-31-30-28 cm. Now cast off stitches on each side for sleeve cap at the beginning of each row on each side as follows: Cast off 3 stitches 1 time on each side, 2 stitches 3-3-5-6-6-6 times on each side and 1 stitch 3-4-6-7-9-16 times on each side. Then cast off 2 stitches on each side until the piece measures approx. 37-38-38-39-39-40 cm. Cast off 3 stitches 1 time on each side and then cast off the remaining stitches with knit from the right side and 2 strands Kid-Silk. The sleeve measures approx. 38-39-39-40-40-41 cm from the top down. Work the other sleeve in the same way. ASSEMBLY: Sew shoulder seams inside the cast-off edge. Sew sleeve seams inside the 1 edge stitch on each side. Sew in sleeves - sew in outermost loop of outermost stitch along the armhole. Sew buttons onto left band. NECK: Knit up from the right side approx. 114 to 130 stitches around the neck (including the stitches on the threads at front) with circular needle size 3 mm and 1 strand Kid-Silk remember to work the last buttonhole on the right band AT THE SAME TIME. Knit 1 row from the wrong side, knit 1 row from the right side, knit 1 row from the wrong side, knit 1 row from the right side and knit 1 row from the wrong side. Loosely cast off with knit from the right side and 2 strands Kid-Silk. |
||||||||||||||||||||||
Diagram explanations |
||||||||||||||||||||||
|
||||||||||||||||||||||
 |
||||||||||||||||||||||
 |
||||||||||||||||||||||
Have you finished this pattern?Tag your pictures with #dropspattern #jolinacardigan or submit them to the #dropsfan gallery. Do you need help with this pattern?You'll find 27 tutorial videos, a Comments/Questions area and more by visiting the pattern on garnstudio.com. © 1982-2026 DROPS Design A/S. We reserve all rights. This document, including all its sub-sections, has copyrights. Read more about what you can do with our patterns at the bottom of each pattern on our site. |
||||||||||||||||||||||


With over 40 years in knitting and crochet design, DROPS Design offers one of the most extensive collections of free patterns on the internet - translated to 17 languages. As of today we count 324 catalogues and 12290 patterns translated into English (UK/cm). 12290
We work hard to bring you the best knitting and crochet have to offer, inspiration and advice as well as great quality yarns at incredible prices! Would you like to use our patterns for other than personal use? You can read what you are allowed to do in the Copyright text at the bottom of all our patterns. Happy crafting!
Post a comment to pattern DROPS 200-23
We would love to hear what you have to say about this pattern!
If you want to leave a question, please make sure you select the correct category in the form below, to speed up the answering process. Required fields are marked *.