
Popular categories
Looking for a yarn?


Comments / Questions (68)
![]() Louison wrote:
Louison wrote:
OK, merci comme ça c'est clair pour moi.
22.03.2021 - 08:54
![]() Louison wrote:
Louison wrote:
Bonjour, je suis bloquée au niveau des diminutions 2, épaules. On diminue sur l'endroit, donc tous les 2 rangs. Je comprends Diminuer 1 maille après les 2 mailles au point mousse à partir de l'encolure , mais je ne comprends pas Diminuer 1 maille avant les 2 mailles au point mousse côté encolure, ce qui voudrait dire qu'on diminue, quand on est sur l'envers? En taille S combien doit-il rester de mailles quand on arrête l'ouvrage? Merci
19.03.2021 - 15:35DROPS Design answered:
Bonjour Louison, les dimimnutions-2 se font sur l'endroit, quand vous tricotez l'épaule gauche, vous diminuerez en début de rang sur l'endroit après 2 m au point mousse; pour l'épaule droite, vous diminuerez avant les 2 m point mousse, en fin de rang sur l'endroit. Il reste 31 m pour l'épaule en taille S. Bon tricot!
22.03.2021 - 07:09
![]() Sacramento Moreno Garrido wrote:
Sacramento Moreno Garrido wrote:
La frase que no comprendo es la siguiente: When the piece measures 50-52-54-56-58-60 cm, work garter stitch over the middle 18-18-20-20-22-22 stitches on the row. When you have worked 2 ridges over these stitches work the next row from the right side as follows. Gracias
16.03.2021 - 16:26DROPS Design answered:
Hola Sacramento, Los puntos centrales se trabajan en punto musgo, el resto de puntos se trabajan como antes. Los dos pliegues se trabajan sobre estos puntos centrales. Puedes consultar el patrón en español en el siguiente enlace: https://www.garnstudio.com/pattern.php?id=9036&cid=23
21.03.2021 - 19:54
![]() Bernike Pasveer wrote:
Bernike Pasveer wrote:
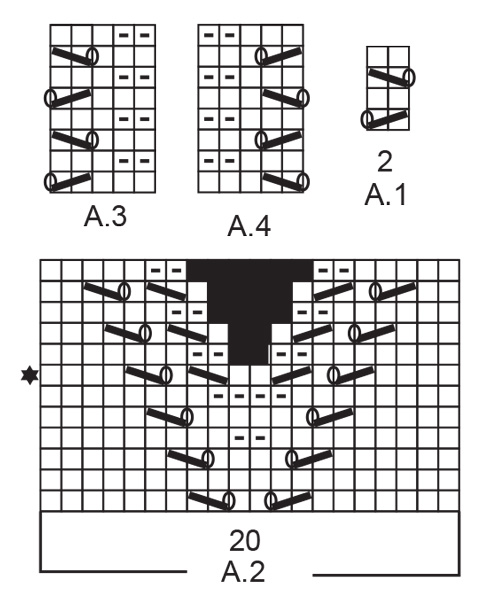
Ik begrijp niet hoe ik de steken van het telpatroon moet lezen. Gaat A1 over twee toeren, met in toer 1 een omslag en 2 recht samenbreien, en in toer 2 de omslag averecht en een steekafhalen etc?
14.03.2021 - 22:08DROPS Design answered:
Dag Bernike,
In de telpatronen zijn alle naalden aangegeven, dus zowel de heengaande als de teruggaande naald. Je leest de telpatronen van onder naar boven en van rechts naar links (aan de goede kant gezien). De eerste naald van A.1 brei je dus steeds 2 recht samen en een omslag. Op de tweede naald brei je averecht aan de verkeerde kant waarbij je de omslagen ook averecht breit (en niet gedraaid averecht), zodat er gaatjes ontstaan. De volgende toer is weer aan de goede kant met steeds 2 recht samen en een omslag.
27.03.2021 - 15:20
![]() Sacramento Moreno Garrido wrote:
Sacramento Moreno Garrido wrote:
Hola. Estoy tejiendo la espalda y no comprendo como debo tejer la parte superior. Hay un cambio de punto? Se cambia desde el punto jersey al "garter and ridge stitches"? Tienen ustedes una foto o esquema? Muchas gracias Sacri
14.03.2021 - 19:13DROPS Design answered:
Hola Sacramento, trabajar 1 punto orillo en punto musgo hacia la sisa, 2 puntos en punto musgo hacia el escote y punto jersey sobre los puntos restantes. Buen trabajo!
14.03.2021 - 19:42
![]() Louison wrote:
Louison wrote:
Désolée , mais je ne comprends toujours pas. J'ai les 105 mailles que je viens de monter, cela signifie que je fais un 1er rang jersey et ainsi sur l'envers j'aurai un rang jersey envers, ou alors je fais un rang mousse?
08.03.2021 - 10:16DROPS Design answered:
Bonjour Louison, tricotez 1 rang en mailles envers juste après le montage puis commencez les côtes au rang suivant sur l'endroit. Vous avez maintenant, vu sur l'endroit, 1 rang endroit (= le rang jersey tricoté sur l'envers). Bon tricot!
08.03.2021 - 10:22
![]() Louison wrote:
Louison wrote:
Bonjour, je ne comprends pas le début du pull " tricoter 1 rang envers sur l'envers". Est-ce que je dois commencer à tricoter le pull par un rang envers? Merci
07.03.2021 - 15:13DROPS Design answered:
Bonjour Louison, le tout premier rang est un rang envers sur l'envers pour obtenir une jolie bordure avant de commencer les côtes (= 1er rang des côtes = sur l'endroit). Bon tricot!
08.03.2021 - 09:12
![]() Clemmie Molendijk wrote:
Clemmie Molendijk wrote:
Hallo, ik ben bezig met het patroon robin song drops /202/27. Bij het voorpand is in het midden een vertikaal patroon. A.1 Ik heb het in een proeflapje al heel erg vaak gebreid, en ik krijg het niet voor elkaar. Ik kan het ook niet vinden tussen de voorbeeldvideo's. Ik ben geen ervaren breister. Ik hoop dat u mij kunt helpen.
22.02.2021 - 15:35DROPS Design answered:
Dag Clemmie,
Je breit het telpatroon van onder naar boven, dus je begint met 2 recht samen en dan 1 omslag. Op de teruggaande naald brei je 2 averecht. Op de derde naald maak je eerst 1 omslag, dan haal je 1 steek af, 1 recht en haal je de afgehaalde steek over de gebreide steek. Op de vierde, dus weer een teruggaande naald brei je 2 averecht. Zo herhaal je het patroontje steeds in de hoogte.
23.02.2021 - 12:45
![]() Hanneke wrote:
Hanneke wrote:
Ik heb deze trui in 2018 gebreid. Prachtige diepe warme donker oranje-rode kleur! Een jaar later(2019 dus) deze kleur nogmaals besteld en er een omslagdoek van gehaakt. Er zat geen verschil in de kleur tov een jaar eerder. Nu (2020) wil ik er nogmaals een trui van breien. Maar ik krijg tot 2 keer toe een echt andere kleur toegestuurd. Geen nuanceverschil dus. 2 verfbaden (3466 en 1822) die roze-rood van kleur zijn. Met de beste wil van de wereld geen oranje te noemen. Wat is er aan de hand?
16.12.2020 - 10:46DROPS Design answered:
Dag Hanneke,
Voor garenvragen en verfbaden kun je het beste even contact opnemen met de winkel waar je het garen gekocht hebt. (Er kan inderdaad nogal verschil zitten tussen de verschillende verfbaden)
17.12.2020 - 22:42
![]() Jasmin wrote:
Jasmin wrote:
Hallo! ☺️ Ich verstehe nicht wie ich die maschen beim rückenteil abkette, bzw. verstehe ich nicht was vorher passiert: ich soll über die MITTLEREN 18 Maschen 2 krausrippen stricken, okee, dann hab ich in der mitte 1cm mehr, und dann stricken ich die maschen für die schulter, und dann weiter über die mittleren maschen, obwohl die schon 4 Reihen drüber sind? Ich verstehs nicht! Bitte dringend um hilfe 😀 Lg Jasmin
09.11.2020 - 21:02DROPS Design answered:
Liebe Jasmin, wenn die Arbeit 50-52 cm mist (1. und 2. Größe), stricken Sie die mittleren 18 Maschen kraus rechts aber die anderen Maschen wie zuvor, dh alle Maschen werden Sie bei dieser 4 Reihen/2 Krausrippen über die mittleren Maschen gestrickt. Nach dieser 4 Reihen ketten Sie die mittleren 14 Maschen und stricken Sie die restlichen Maschen beidseitig separat wie zuvor: glatt rechts mit 1 Randmasche kraus rechts + 2 Maschen gegen Hals kraus rechts. Hilft es Ihnen weiter? Viel Spaß beim stricken!
10.11.2020 - 09:40
|
||||||||||||||||||||||
Robin Song#robinsongsweater |
||||||||||||||||||||||
 |
 |
|||||||||||||||||||||
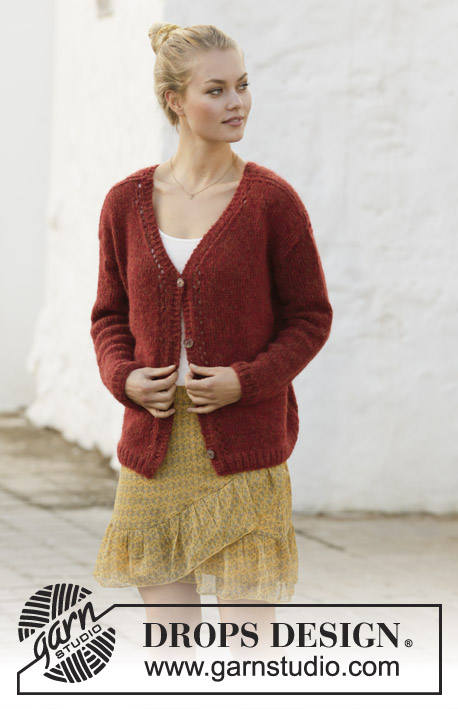
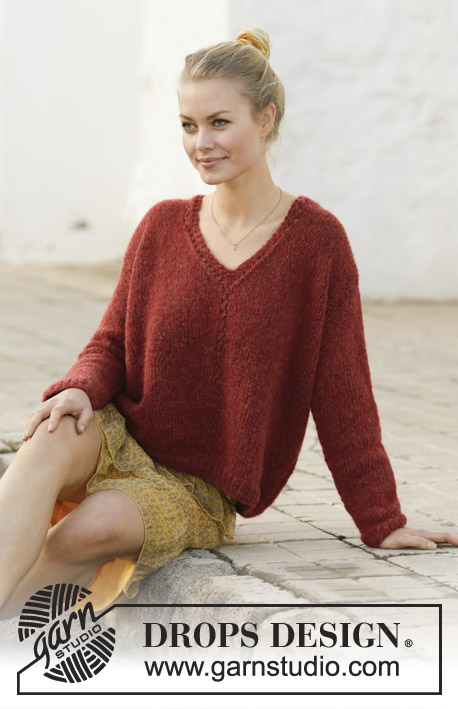
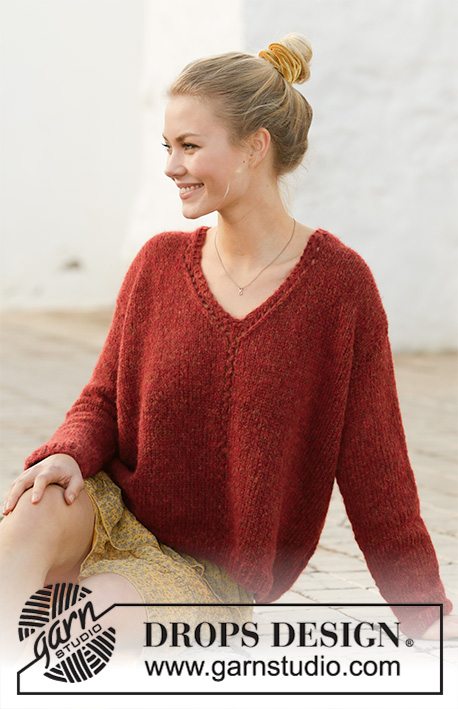
Knitted jumper with V-neck in DROPS Air. The piece is worked with lace pattern. Sizes S - XXXL.
DROPS 202-27 |
||||||||||||||||||||||
|
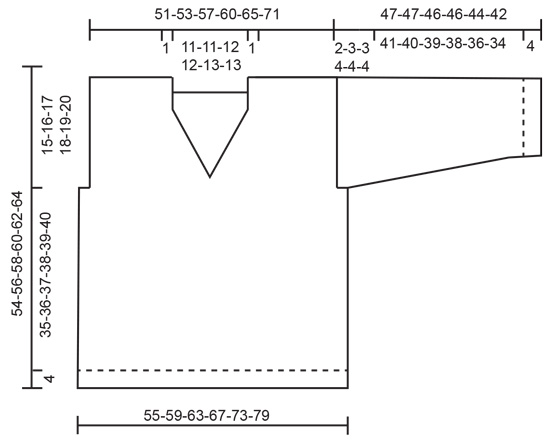
------------------------------------------------------- EXPLANATIONS FOR THE PATTERN: ------------------------------------------------------- RIDGE/GARTER STITCH (worked back and forth): Knit all rows. 1 ridge in height = Knit 2 rows. PATTERN: See diagrams A.1 to A.4. Diagrams show all rows in pattern seen from the right side. DECREASE TIP-1 (evenly spaced): To work out how to decrease evenly, count the total number of stitches on needle (e.g. 105 stitches) minus edge stitches (= 2 stitches) and divide the remaining stitches by number of decreases to be made (e.g. 21) = 4.9. In this example, decrease by knitting together approx. each 4th and 5th stitch DECREASE TIP-2 (for neck on back piece): All decreases worked from right side. Decrease 1 stitch after the 2 stitches in garter stitch from the neck as follows: Slip 1 stitch as if to knit, knit 1 and pass the slipped stitch over the knitted stitch. Decrease 1 stitch before the 2 stitches in garter stitch towards the neck as follows: Knit 2 together. INCREASE TIP (for sleeves): Work until there are 2 stitches left before A.1 under the sleeve, make 1 yarn over, knit 2, A.1, knit 2, make 1 yarn over. On the next round knit yarn overs twisted to avoid holes. Then work new stitches in stocking stitch ------------------------------------------------------- START THE PIECE HERE: ------------------------------------------------------- JUMPER - SHORT OVERVIEW OF THE PIECE: The piece is worked back and forth with circular needle in sections and sewn together to finish. The sleeves are worked in the round with double pointed needles. BACK PIECE: Cast on 105-111-117-129-141-153 stitches (including 1 edge stitch on each side) with circular needle size 5 mm and Air. Purl 1 row from the wrong side. Then work rib as follows: 1 edge stitch in GARTER STITCH – read description above, (knit 1, purl 2) until there are 2 stitches left on row, knit 1 and 1 edge stitch in garter stitch. Continue like this back and forth for 4 cm. Now knit 1 row from the right side where you decrease 21-21-21-27-29-33 stitches evenly spaced – read DECREASE TIP-1 = 84-90-96-102-112-120 STITCHES. Change to circular needle size 6 mm. Work stocking stitch with 1 edge stitch in garter stitch on each side until the piece measures 39-40-41-42-43-44 cm. REMEMBER THE KNITTING TENSION! At the beginning of the next 2 rows cast off 3-4-4-5-6-6 stitches for armholes = 78-82-88-92-100-108 stitches. Continue with stocking stitch and 1 edge stitch in garter stitch on each side. When the piece measures 50-52-54-56-58-60 cm, work garter stitch over the middle 18-18-20-20-22-22 stitches on the row. When you have worked 2 ridges over these stitches work the next row from the right side as follows: Work the first 32-34-36-38-41-45 stitches and place on 1 thread for right shoulder, cast off the next 14-14-16-16-18-18 stitches for neck and work the remaining 32-34-36-38-41-45 stitches. Then finish the shoulders separately. Work 1 edge stitch in garter stitch towards the armhole, 2 stitches in garter stitch towards the neck and stocking stitch over the remaining stitches. On the next row from the right side decrease 1 stitch inside the 2 stitches in garter stitch towards neck – read DECREASE TIP-2 = 31-33-35-37-40-44 stitches. Continue working until the armhole measures 15-16-17-18-19-20 cm. Cast off. The piece measures approx. 54-56-58-60-62-64 cm from the shoulder down. Work the other shoulder in the same way. FRONT PIECE: Cast on 105-111-117-129-141-153 stitches (including 1 edge stitch on each side) with circular needle size 5 mm and Air. Purl 1 row from the wrong side then work rib as follows: 1 edge stitch in garter stitch, (knit 1, purl 2) until there are 2 stitches left on row, knit 1 and 1 edge stitch in garter stitch. Continue back and forth like this until the piece measures 4 cm. Now work as follows: Work the first 51-54-57-63-68-75 stitches and decrease at the same time 10-10-10-13-14-16 stitches evenly spaced, work A.1 (= 2 stitches), work the remaining stitches on the row and decrease at the same time 11-11-11-14-15-17 stitches evenly spaced = 84-90-96-102-112-120 stitches. Change to circular needle size 6 mm. Continue back and forth with A.1 over the middle 2 stitches, stocking stitch and 1 edge stitch in garter stitch on each side. When the piece measures 34-36-37-39-40-42 cm work A.2 over the middle 20 stitches on the row. The 2 middle stitches in A.2 should match the 2 stitches in A.1. When you have worked the row with the star, you have decreased 2 stitches in A.2 and the piece is now divided in the middle. Place the first half of the stitches (seen from the right side) on a thread (= right front piece/shoulder) and continue back and forth over the left front piece/shoulder. Continue with stocking stitch, 1 edge stitch in garter stitch towards the armhole and A.2 towards the neck; i.e. you decrease for neck as shown in the last 6 rows of the diagram (3 decreases are shown in diagram) until you have decreased a total of 8-8-9-9-10-10 times. AT THE SAME TIME when the piece measures 39-40-41-42-43-44 cm cast off 3-4-4-5-6-6 stitches at the beginning of the row from the armhole. When all the decreases are finished, work as shown in A.3 over the outermost 5 stitches on the left front piece (towards the neck) to finished length. When all the decreases to neck and armhole are finished there are 31-33-35-37-40-44 stitches on shoulder. Continue working until the armhole measures approx. 15-16-17-18-19-20 cm - adjust to match the back piece. Cast off. The piece measures approx. 54-56-58-60-62-64 cm from the shoulder down. Place the stitches from the thread back on the circular needle and work right front piece/shoulder in the same way as the left, but reversed; i.e. start from the wrong side, at the neck on the row after the star in A.2 and work as follows: Work the 9 stitches in A.2, stocking stitch until there is 1 stitch left and 1 edge stitch in garter stitch. Continue back and forth like this and decrease for neck and armhole in the same way as on the left front piece. When the 8-8-9-9-10-10 decreases for neck are finished work A.4 over the outermost 5 stitches towards the neck to finished length. Adjust the length to match left front piece/shoulder and back piece. SLEEVE: The sleeve is worked in the round with double pointed needles. Cast on 42-42-45-48-48-51 stitches with double pointed needles size 5 mm. Knit 1 round. Then work rib (knit 1, purl 2) for 4 cm. Change to double pointed needles size 6 mm. The next round is worked as follows: Knit 2, work A.1 over the next 2 stitches (= purl 1 and knit 1), knit to end of round at the same time as you decrease 9-8-8-10-9-11 stitches evenly spaced = 33-34-37-38-39-40 stitches. Continue in the round with stocking stitch and A.1 mid under sleeve. AT THE SAME TIME when the piece measures 8-9-9-9-8-8 cm, increase 1 stitch on each side – read INCREASE TIP. Increase in the different sizes as follows: Size S: Increase alternately every 6 and 7 cm a total of 6 times. Size M: Increase every 5 cm a total of 7 times. Size L: Increase every 5 cm a total of 7 times. Size XL: Increase every 4 cm a total of 8 times. Size XXL: Increase alternately every 3 and 4 cm a total of 9 times. Size XXXL: Increase every 3 cm a total of 10 times. When all the increases are finished there are 45-48-51-54-57-60 stitches on the round. Continue working until the piece measures 45-44-43-42-40-38 cm (shorter measurements in larger sizes due to wider shoulders). Finish the round in the middle of diagram A.1 (= mid under sleeve). Now continue back and forth with stocking stitch over all stitches (to allow you to sew the sleeve to the armhole). When you have worked back and forth for 2-3-3-4-4-4 cm the sleeve measures a total of 47-47-46-46-44-42 cm. Cast off. Work the other sleeve in the same way. ASSEMBLY: Sew shoulder seams with grafting stitches inside the cast-off edge. Sew sleeves to body. Sew side seams inside the 1 edge stitch in garter stitch on each side. |
||||||||||||||||||||||
Diagram explanations |
||||||||||||||||||||||
|
||||||||||||||||||||||
 |
||||||||||||||||||||||
 |
||||||||||||||||||||||
Have you finished this pattern?Tag your pictures with #dropspattern #robinsongsweater or submit them to the #dropsfan gallery. Do you need help with this pattern?You'll find 27 tutorial videos, a Comments/Questions area and more by visiting the pattern on garnstudio.com. © 1982-2026 DROPS Design A/S. We reserve all rights. This document, including all its sub-sections, has copyrights. Read more about what you can do with our patterns at the bottom of each pattern on our site. |
||||||||||||||||||||||


With over 40 years in knitting and crochet design, DROPS Design offers one of the most extensive collections of free patterns on the internet - translated to 17 languages. As of today we count 324 catalogues and 12290 patterns translated into English (UK/cm). 12290
We work hard to bring you the best knitting and crochet have to offer, inspiration and advice as well as great quality yarns at incredible prices! Would you like to use our patterns for other than personal use? You can read what you are allowed to do in the Copyright text at the bottom of all our patterns. Happy crafting!
Post a comment to pattern DROPS 202-27
We would love to hear what you have to say about this pattern!
If you want to leave a question, please make sure you select the correct category in the form below, to speed up the answering process. Required fields are marked *.