
Popular categories
Looking for a yarn?


Comments / Questions (80)
![]() Cornelia wrote:
Cornelia wrote:
Hallo! Wunderschöne Farben in der Anleitung! Aber:Sind nur bei Paris die Farbnamen anders (7 erika jetzt kirsche, 38koralle jetzt himbeer) oder auch der Farbton? Wie kann ich anpassen?
18.07.2019 - 10:43DROPS Design answered:
Liebe Cornielia, die Farbennammen sind manchmal angepasst, aber die Farbenummer stimmt immer, die können Sie folgen. Viel Spaß beim stricken!
18.07.2019 - 10:57
![]() Peggy wrote:
Peggy wrote:
Bien évidemment... Merci.
03.06.2019 - 19:20
![]() Adela wrote:
Adela wrote:
Pueden publicareste patron adaptado a 24px32 v.?Gracias por sus respuestas. Adela
03.06.2019 - 18:07DROPS Design answered:
Hola Adela. No publicamos patrones personalizados. Puedes mirar nuestra sección Nórdico para ver los diferentes modelos.
03.06.2019 - 22:44
![]() Peggy wrote:
Peggy wrote:
Merci de votre reponse. Mais il y a quand même une erreur. A la flèche 7 il est écrit d'augmenter 21 mailles. Puis un total de 325 mailles... Cordialement.
03.06.2019 - 13:27DROPS Design answered:
Bonjour Peggy, à la flèche-7, on n'augmente qu'en taille L, XL, XXL et XXXL, la taille L est donc la 1ère taille et on augmente 12 m en L, 18 m en XL et en XXXL et 21 m en XXL et on a donc 280 m en L, 310 m en XL, 325 m en XXL et 330 m en XXXL. Bon tricot!
03.06.2019 - 16:09
![]() Peggy wrote:
Peggy wrote:
Bonjour. Je crois avoir trouvé une erreur dans ce modèle. Dans la partie empiecement flèche 7, le nombre de mailles ne correspond pas à flèche 6 plus augmentation. De plus, en taille L, au moment de mettre les mailles des manches en attente il est indiqué 280 mailles. Je pense que c'est 289. J'espère avoir été utile. Dites moi si je me trompe.
02.06.2019 - 19:30DROPS Design answered:
Bonjour Peggy, je tombe juste en taille L: on commence par 120 m et on augmente 20 m (flèche-1) + 20 m (flèche-2) + 38 m (flèche-3) + 32 m (flèche-4) + 26 m (flèche-5) + 12 m (flèche-6) + 12 m (flèche-7) = on a ainsi 280 mailles soit 56 motifs de 5 mailles. Bon tricot!
03.06.2019 - 10:52
![]() Violaine wrote:
Violaine wrote:
Bonjour ,modèle très plaisant ,peut on avoir le diagramme plus gros et en couleurs ?merci mais ce n\'est pas grave si pas possible ,viou
25.04.2019 - 19:49
![]() Annick CHAPARD wrote:
Annick CHAPARD wrote:
Bonjour, Je ne comprends pas alors qu'on ouvre des 2 cotés, comment on peut faire le bas avec des aiguilles rondes. Je suis déoslée de revenir vers vous Cordialement.
24.04.2019 - 08:28DROPS Design answered:
Bonjour Mme Chapard, on commence en rond par le col, on va augmenter pour l'empiècement, puis, on va mettre les mailles des manches en attente, monter des mailles sous les manches (= au-dessus des mailles en attente) et terminer le dos et le devant en rond. On reprend ensuite les manches l'une après l'autre pour les tricoter. cette vidéo montre comment tricoter un pull raglan de haut en bas, le principe sera le même ici, sauf que les augmentations de l'empiècement se feront réparties et non au niveau des raglans. Bon tricot!
24.04.2019 - 09:25
![]() Annick CHAPARD wrote:
Annick CHAPARD wrote:
Pourriez vous me répondre s'il vous plait. Merci
21.04.2019 - 09:05DROPS Design answered:
Nous avons deja repondu a votre question. Bon travail!
22.04.2019 - 19:37
![]() Annick CHAPARD wrote:
Annick CHAPARD wrote:
Je ne comprends pas les explications DOS et DEVANT après les dessins. Faut-il séparer le travail en 2 et alors utiliser des aiguilles "normales" et quelle taille. Pourquoi des augmentations. Pourrais-je avoir une photo du bas réalisé. Merci
13.04.2019 - 19:29DROPS Design answered:
Bonjour Annick, le dos/le devant se tricotent en rond sur aiguille circulaire no 5,5. En bas (juste avant les cotes) vous augmentez dez mailles pour que le bas de l'ouvrage ait la meme largeur, c'est-a-dire pour que les cotes (a travailler aller et retour sur aiguille circulaire no 4,5) ne resserent pas votre ouvrage (voir le dessin en bas de page). Bon tricot!
22.04.2019 - 19:35
![]() Dia K wrote:
Dia K wrote:
Hello , I love this pattern but now that I reached the sleeves, I don’t understand how to apply A2 diagram to an uneven number of stitches on sleeve. ( 47 stitches after 1 stitch decrease) I’m knitting size S. Thanks for your help!
19.02.2019 - 15:18DROPS Design answered:
Dear Dia K, start sleeve in the middle of the 6 new sts picked up mid under sleeve, work first A.2 starting with 3rd st on diagram (= work 7 sts), then repeat A.2 (all sts in diagram = 10 sts x 4 = over the last 40 sts). When the repeat will have to be worked over 12 sts, then make sure the marker thread mid on upper sleeve match the stitch with a star in diagram. Read here how to center a diagram. Happy knitting!
19.02.2019 - 15:24
|
||||||||||||||||||||||||||||||||||
Magic Mountain#magicmountainsweater |
||||||||||||||||||||||||||||||||||
 |
 |
|||||||||||||||||||||||||||||||||
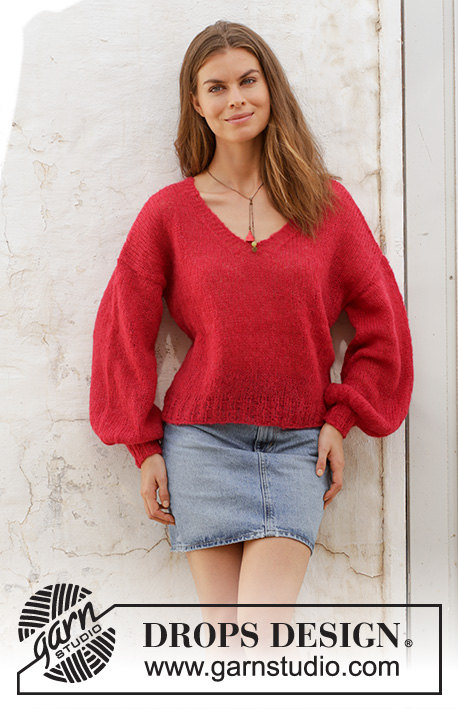
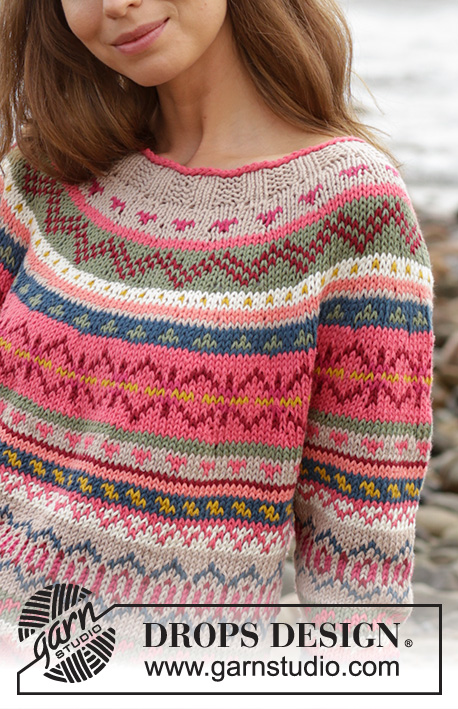
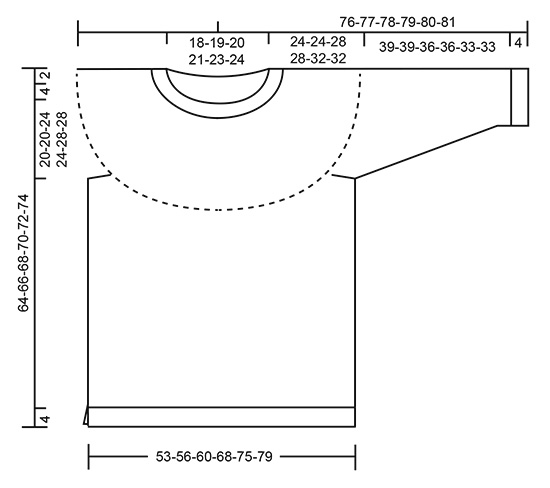
Knitted jumper with round yoke and multi-coloured Norwegian pattern, worked top down. Sizes S - XXXL. The piece is worked in DROPS Paris.
DROPS 187-8 |
||||||||||||||||||||||||||||||||||
|
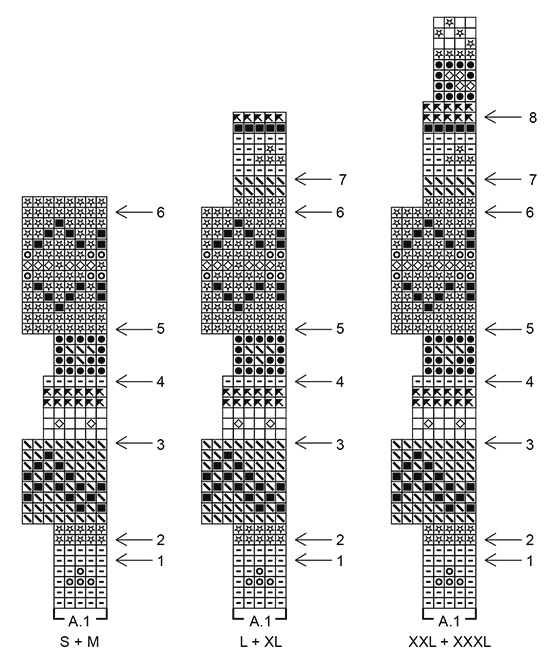
INFORMATION FOR THE PATTERN: RIDGE/GARTER STITCH (worked in the round): 1 ridge = 2 rounds. Knit 1 round and purl 1 round. RIDGE/GARTER STITCH (worked back and forth): 1 ridge = Knit 2 rows DECREASE/INCREASE TIP (evenly spaced): To work out how to decrease/increase evenly, count the total number of stitches on the needle (e.g. 90 stitches) and divide by the number of decreases/increases to be made (e.g. 6) = 15. In this example, decrease by knitting together every 14th and 15th stitch. When increasing make 1 yarn over after every 15th stitch. On the next round/row work the yarn overs twisted to avoid holes. PATTERN: See diagrams A.1 and A.2. Choose diagram for your size. The whole pattern is worked in stocking stitch. KNITTING TIP: To avoid the knitting tension becoming tighter when working pattern, it is important that the strands at the back of the piece are not tight. You can use a size larger needle when working pattern if this is a problem. DECREASE TIP (for mid under sleeve): Start 2 stitches before the marker thread, knit 2 together, slip 1 stitch as if to knit, knit 1, pass the slipped stitch over the knitted stitch (= 2 stitches decreased). ---------------------------------------------------------- JUMPER: The yoke and body are worked in the round with circular needle, top down to where the rib begins, then the front and back pieces are worked separately back and forth. The sleeves are worked in the round with short circular needle/double pointed needles, top down. NECKLINE: Cast on 90-96-96-102-102-108 stitches with short circular needle size 4.5 mm and raspberry. Knit 1 round. Change to dark beige and work the next round as follows: * Knit 3, 3 stitches in GARTER STITCH – see description above *, work from *-* to end of round. Continue the rib like this until the neck measures 4 cm. Knit 1 round where you decrease 6-10-6-8-4-6 stitches evenly on round – read DECREASE/INCREASE TIP = 84-86-90-94-98-102 stitches. Change to circular needle size 5.5 mm. Knit 1 round where you increase 31-29-30-31-32-33 stitches evenly on round = 115-115-120-125-130-135 stitches. Then work the yoke as described below. YOKE: Work A.1 in the round (= 23-23-24-25-26-27 repeats of 5 stitches). Continue the pattern as shown in the diagram. Read KNITTING TIP and REMEMBER THE KNITTING TENSION! AT THE SAME TIME on each round marked with an arrow in the diagram increase as described below: Arrow-1: Increase 15-19-20-22-23-25 stitches evenly on round = 130-134-140-147-153-160 stitches. Arrow-2: Increase 14-18-20-21-23-24 stitches evenly on round = 144-152-160-168-176-184 stitches (you now have room for 18-19-20-21-22-23 repeats of 8 stitches). Arrow-3: Increase 30-34-38-42-40-44 stitches evenly on round = 174-186-198-210-216-228 stitches. Arrow-4: Increase 26-29-32-35-34-32 stitches evenly on round = 200-215-230-245-250-260 stitches (you now have room for 40-43-46-49-50-52 repeats of 5 stitches). Arrow-5: Increase 24-25-26-27-30-28 stitches evenly on round = 224-240-256-272-280-288 stitches (you now have room for 28-30-32-34-35-36 repeats of 8 stitches). Arrow-6: Increase 18-20-12-20-24-24 stitches evenly on round = 242-260-268-292-304-312 stitches. The increases are finished in sizes S and M. L + XL + XXL + XXXL: Arrow-7: Increase 12-18-21-18 stitches evenly on round = 280-310-325-330 stitches. Increases are finished in sizes L and XL. XXL + XXXL: Arrow-8: Increase 19-18 stitches evenly on round = 344-348 stitches. Increases are finished in sizes XXL and XXXL. ALL SIZES: = 242-260-280-310-344-348 stitches. Finish working A.1. The piece measures approx. 24-24-28-28-32-32 cm from the cast-on edge. The next round is worked as follows (with moss green in sizes S and M, apricot in sizes L and XL and with off white in sizes XXL and XXXL): Place the first 42-46-52-55-60-60 stitches on 1 thread for sleeve, cast on 6-6-8-8-8-12 new stitches on the needle (= in side under sleeve), knit 79-84-88-100-112-114 stitches (= front piece), place the next 42-46-52-55-60-60 stitches on 1 thread for sleeve, cast on 6-6-8-8-8-12 new stitches on needle (= in side under sleeve) and knit the remaining 79-84-88-100-112-114 stitches (= back piece). Cut the strands. Body and sleeves are finished separately. THE PIECE IS NOW MEASURED FROM HERE! BODY: = 170-180-192-216-240-252 stitches. Insert 1 marker thread in the one side of the piece, in the middle of the 6-6-8-8-8-12 stitches cast on under sleeve. Start the round here and work A.2 in the round (= 17-18-16-18-20-21 repeats of 10-10-12-12-12-12 stitches). On the round marked with arrow-7 in A.2 decrease 2 stitches evenly on round (applies only to size S) = 168-180-192-216-240-252 stitches. When A.2 has been completed, the piece measures approx. 33-33-29-29-25-25 cm from the division. Continue with stocking stitch and dark beige. When the piece measures 34-36-34-36-34-36 cm from the division (or to desired length, there is 4 cm left to finished length) divide the piece for a split in each side. Keep the first 84-90-96-108-120-126 stitches on the needle and place the remaining 84-90-96-108-120-126 on 1 thread or extra needle. Knit 1 row from the right side - AT THE SAME TIME increase 15-21-21-21-21-27 stitches evenly on this row (do not increase over the outermost 3 stitches in each side) = 99-111-117-129-141-153 stitches. Change to circular needle size 4.5 mm and work rib as follows from the wrong side: 3 edge stitches in GARTER STITCH – see description above, * purl 3, knit 3 *, work from *-* until there are 6 stitches left on the row, purl 3 and finish with 3 edge stitches in garter stitch. Continue the rib like this for 4 cm. Cast off with garter stitch over garter stitch, knit over knit and purl over purl, but to avoid the cast-off edge being tight, make 1 yarn over after every 6th stitch at the same time as you cast off (yarn overs cast off as normal stitches). Work in the same way over the stitches on the thread/extra needle. The jumper measures approx. 64-66-68-70-72-74 cm from the shoulder down. SLEEVE: Place the 42-46-52-55-60-60 stitches from the thread on the one side of the piece on short circular needle size 5.5 mm and, in addition, knit up 1 stitch in each of the 6-6-8-8-8-12 stitches cast on under the sleeve = 48-52-60-63-68-72 stitches. Work the first round in A.2 and decrease at the same time 1-1-1-0-1-1 stitch on this round = 47-51-59-63-67-71 stitches. Insert 1 marker thread at the beginning of the round (= mid under sleeve) and 1 marker thread in the middle of the round (= mid top of sleeve). Work A.2 in the round, but start the round as described below: In sizes M, L and XXXL work A.2 from and including stitch 2 in the diagram. In size S work A.2 from and including stitch 3 in the diagram. In size XXL work A.2 from and including stitch 4 in the diagram. In size XL work A.2 from and including stitch 6 in the diagram. When starting on these different stitches, all sizes will then match the marker thread on top of sleeve with the stitch marked with a black star in the diagram, but because of different numbers of stitches in A.2 in sizes S and M the start of the round will need to be recounted when the number of stitches in the repeat has changed to 12 stitches in these sizes. AT THE SAME TIME when the piece measures 3-3-3-2-2-2 cm from the division, decrease 2 stitches mid under the sleeve – read DECREASE TIP. Decrease like this every 5½-5-3-3-2½-2 cm a total of 7-8-11-12-13-15 times = 33-35-37-39-41-41 stitches. When A.2 has been completed finish working the sleeve with dark beige. When the piece measures 39-39-36-36-33-33 cm from the division, knit 1 round where you increase 9-7-5-9-7-7 stitches evenly on round = 42-42-42-48-48-48 stitches. Change to double pointed needles size 4.5 mm and work rib in the round (= knit 3 / purl 3). When the rib measures 4 cm cast off with knit over knit and purl over purl, but to avoid the cast-off edge being tight, make 1 yarn over after every 6th stitch at the same time as you cast off (yarn overs cast off as normal stitches). The sleeve measures approx. 43-43-40-40-37-37 cm from the division. Work the other sleeve in the same way. |
||||||||||||||||||||||||||||||||||
Diagram explanations |
||||||||||||||||||||||||||||||||||
|
||||||||||||||||||||||||||||||||||
 |
||||||||||||||||||||||||||||||||||
 |
||||||||||||||||||||||||||||||||||
 |
||||||||||||||||||||||||||||||||||
Have you finished this pattern?Tag your pictures with #dropspattern #magicmountainsweater or submit them to the #dropsfan gallery. Do you need help with this pattern?You'll find 29 tutorial videos, a Comments/Questions area and more by visiting the pattern on garnstudio.com. © 1982-2026 DROPS Design A/S. We reserve all rights. This document, including all its sub-sections, has copyrights. Read more about what you can do with our patterns at the bottom of each pattern on our site. |
||||||||||||||||||||||||||||||||||


With over 40 years in knitting and crochet design, DROPS Design offers one of the most extensive collections of free patterns on the internet - translated to 17 languages. As of today we count 324 catalogues and 12290 patterns translated into English (UK/cm). 12290
We work hard to bring you the best knitting and crochet have to offer, inspiration and advice as well as great quality yarns at incredible prices! Would you like to use our patterns for other than personal use? You can read what you are allowed to do in the Copyright text at the bottom of all our patterns. Happy crafting!
Post a comment to pattern DROPS 187-8
We would love to hear what you have to say about this pattern!
If you want to leave a question, please make sure you select the correct category in the form below, to speed up the answering process. Required fields are marked *.