
Popular categories
Looking for a yarn?


Comments / Questions (43)
![]() Bianca wrote:
Bianca wrote:
Nadat de steken zijn verdeeld moet het patroon gebreid worden. Ik moet dan letten op de steekverhouding. Ik heb geen idee wanneer en hoevaak ik moet meerderen om na in mijn geval 3 x herhalen aan 274 steken te komen. Alvast bedankt
03.06.2018 - 14:46DROPS Design answered:
Dag Bianca, Het is me niet duidelijk waar in het patroon je precies bent waardoor je op 274 bent. Welke maat brei je? Welke herhalingen bedoel je?
03.06.2018 - 17:14
![]() Maryse wrote:
Maryse wrote:
Après avoir relu... je pense comprendre pour la bordure qui est un point mousse mais inverse au point mousse du corps du tricot. Dites-moi, est-ce que je tricote normalement les jetés de A2? Cela fera des trous, est-ce correct? Je ne vois pas bien sur la photo à quel endroit ces trous se situent. Gros merci!!!
22.02.2018 - 04:53DROPS Design answered:
Bonjour Maryse, effectivement, en tricotant les 5 m de la bordure à l'env tous les rangs, on va avoir aussi du point mousse mais légèrement différent pour démarquer la bordure des devants. Les jetés de A.2 se tricotent soit normalement soit torse - cf 3ème et 4ème symbole de la légende = milieu de chaque feuille et de chaque côté de chaque feuille. Bon tricot!
22.02.2018 - 08:56
![]() Maryse wrote:
Maryse wrote:
Est-ce que la bordure est en point mousse? Je ne comprends pas quand vous écrivez de tricoter les 5 m à l’envers. Merci à l’avance.
21.02.2018 - 16:30
![]() Maria Kassapidou wrote:
Maria Kassapidou wrote:
Mönster, kofta: 3:e stycket. Hur ska mönstret stickas, står endast: fortsätt med A.1,A.2 och 5 aviga maskor...Jag förstår inte hur jag får ihop till 118 maskor(som är storlek S).Förklara närmare tack. Var ska A.1 och A.2 finnas efter 1:a varvet som ni förklarar ovan. Får inte ihop det. Mvh Maria
20.01.2018 - 14:45DROPS Design answered:
Hej Maria, du fortsätter som varvet vi förklarade innan, kantmaskor i varje sida, stickar A.1 över A.1, A.2 över A.2 och resten av maskorna stickas i rätstickning. Lycka till!
30.01.2018 - 11:13
![]() Elizabeth Knudsen wrote:
Elizabeth Knudsen wrote:
Hvordan strikke knapphullet vrangt litt større enn oppskriften, og bruke litt større knapper på 20-25 mm? Da bør vel stolpen være litt bredere også?
17.12.2017 - 13:17DROPS Design answered:
Hei Elizabeth. Strikk bare vrang og evnt feller 1 maske mer og gjør et dobbelt kast/eller legg opp det maskeantalle du felte på neste pinne. Om du ønsker å gjøre stolpen bredere, må du også huske på garnmengden. God Fornøyelse!
18.12.2017 - 13:46
![]() Will Zegers wrote:
Will Zegers wrote:
Aan welke kant begint het telpatrron A1 en A2 links of rechts
23.11.2017 - 15:58DROPS Design answered:
Hallo Will, De telpatronen beginnen altijd rechts onder en de eerste naald lees je dus van rechts naar links. Bij heen en weer breien is de tweede naald op de verkeerde kant, dus dan begin je het telpatroon aan de linkerkant te lezen en zo ga je heen en weer.
23.11.2017 - 16:38
![]() Rocio wrote:
Rocio wrote:
Hola. Tejo este patrón en la talla mediana y para cuando tengo hecho 3 dibujos A2 ya mide la labor más de 29 cm y si me ciño a la sisa de 23 cm entonces no tengo 374 puntos. ¡Una locura ¿me podéis ayudar? Gracias
16.11.2017 - 18:13
![]() Jane wrote:
Jane wrote:
Hi, have just commenced this in the super NORD. I think that there is a printing error in the setup row and it should read 5 border band then A.1 and 5-7-7-12-13-13 stitches for the left front piece and also the same for the right front. The order printed is 7-7-5-12-13-13. Looking forward to making this as I love working with finer yarn.
24.10.2017 - 18:00DROPS Design answered:
Dear Jane, number of sts is correct here, you will work 5 sts in garter st, A.1 (= different number of sts depending on your size), then 7-7-5-12-13-13 sts in garter st (and reversed for 2nd front piece). Happy knitting!
25.10.2017 - 08:52
![]() Sofia Sjölander Asp wrote:
Sofia Sjölander Asp wrote:
Kan inte hitta storleksmått, bröstmått. Exempelvis large har bröstmått? Jag har letat men inte hittat.
24.08.2017 - 21:07DROPS Design answered:
Du hittar alla mått på måttskissen nederst i mönstret.
25.08.2017 - 16:05
![]() Mari wrote:
Mari wrote:
Miten tähän malliin tehdään lisäykset alun jälkeen? Niistä ei ole mainintaa ohjeessa. Pitääkö tähän tehdä raglan- lisäykset? Pitsikuvio ei itsessään lisää silmukoita.
14.08.2017 - 14:05
|
||||||||||||||||||||||
Autumn Vines Cardigan#autumnvinescardigan |
||||||||||||||||||||||
 |
 |
|||||||||||||||||||||
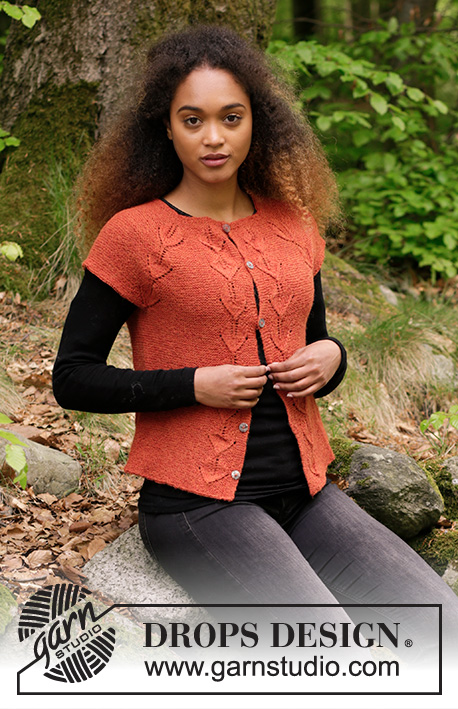
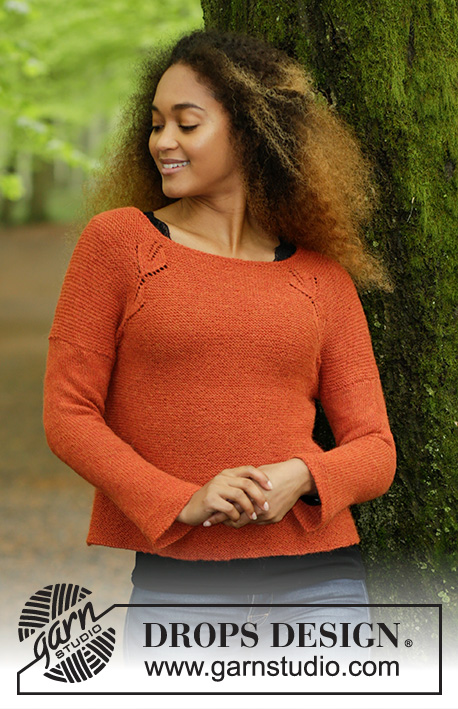
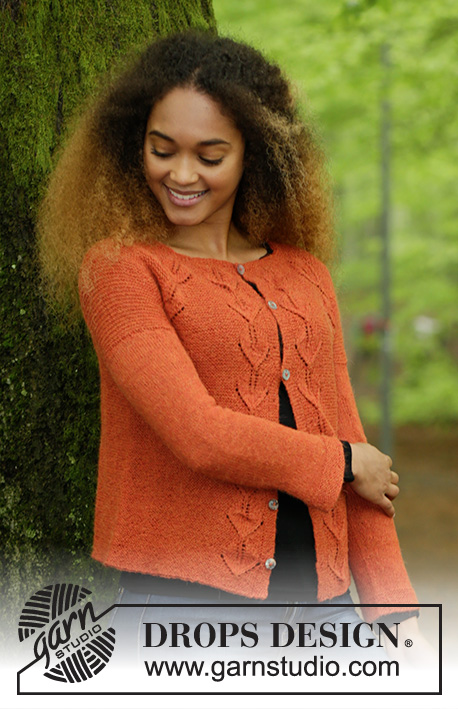
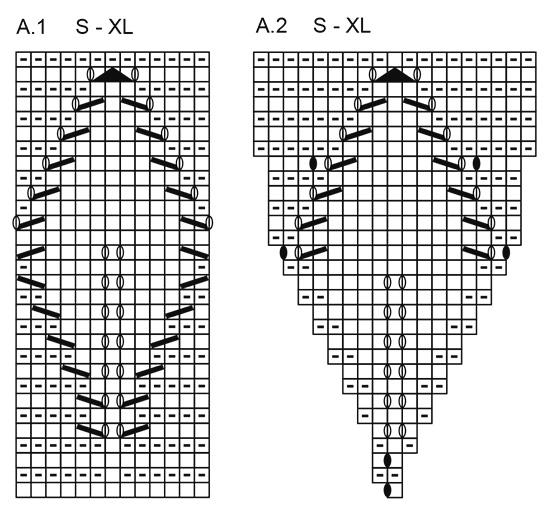
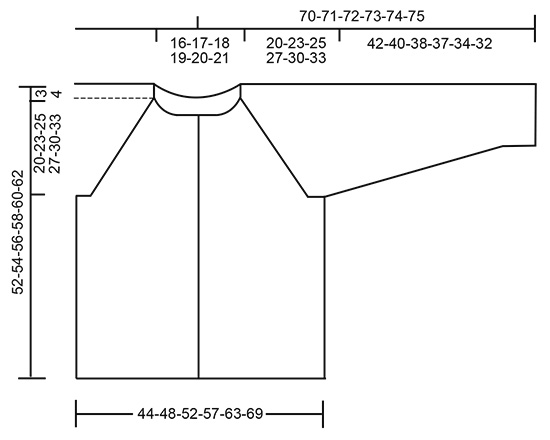
Jacket with leaf pattern and raglan, knitted top down. Size: S - XXXL Piece is knitted in DROPS Alpaca.
DROPS 179-29 |
||||||||||||||||||||||
|
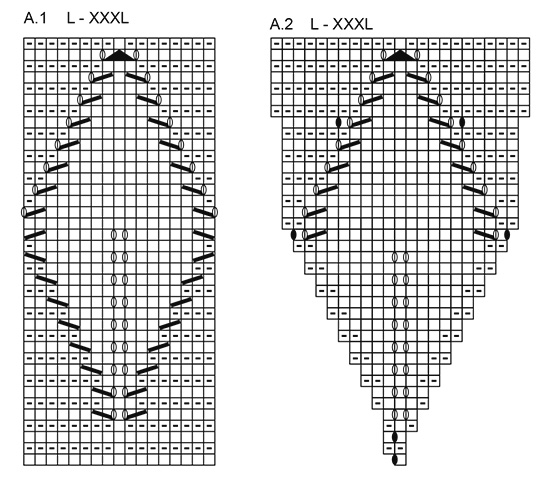
INFORMATION FOR PATTERN: GARTER STITCH (back and forth): 1 ridge = knit 2 rows. GARTER STITCH (worked in the round): 1 ridge = 2 rounds. Knit 1 round and purl 1 round. PATTERN: See diagrams A.1 and A.2. Diagrams show all rows in pattern seen from the right side. Choose diagram for your size. CAST-OFF TIP: Make 1 yarn over after approx. every 5th stitch while casting off (cast off yarn over as stitch) to make the cast-off edge more elastic. BUTTONHOLES: Decrease for first buttonhole on first row from right side after edge in garter stitch in neck, then decrease the next 5-5-5-6-6-6 approx. 8 cm apart. Decrease for buttonholes on right band as follows: Work until 3 stitches remain on needle (seen from right side), make 1 yarn over, purl 2 together and purl 1. On next row purl the yarn over to make holes. ---------------------------------------------------------- Work back and forth on circular needle from mid front, work top down. JACKET: Cast on 106-110-116-122-128-134 stitches (including 5 band stitches in each side towards mid front) on circular needle size 3 mm with Alpaca. Work 3 ridges in GARTER STITCH - see explanation above. Decrease for BUTTONHOLES on right band - see explanation above. Knit 1 row from right side while increasing 12-24-22-24-22-12 stitches evenly (purl the outermost 5 stitches in each side on every row until finished measurements) = 118-134-138-146-150-146 stitches. Knit 1 row. Work next row as follows from right side: Purl 5 stitches (= band), A.1 (= 13-15-17-13-15-17 stitches) and 7-7-5-12-13-13 stitches in garter stitch (= left front piece), A.2 (= 1 stitch), work 12-16-18-16-12-6 stitches in garter stitch (= sleeve), A.2, work 40-44-44-50-56-60 stitches in garter stitch (= back piece), A.2, work 12-16-18-16-12-6 stitches in garter stitch (= sleeve), A.2, work 7-7-5-12-13-13 stitches in garter stitch, A.1 (= right front piece) and finish with purl 5 (= band stitches). Continue with A.1, A.2 and purl 5 for band in each side. Work the rest of stitches in garter stitch. REMEMBER THE KNITTING TENSION! Work A.1 and A.2 3-3-3-4-4-4 times in total vertically, make sure that first stitch in A.2 is directly above middle stitch in previous repetition = 334-374-402-434-470-498 stitches on needle and piece measures approx. 20-23-25-27-30-33 cm from cast-on edge. Work next row as follows from right side: Work 53-58-61-67-74-80 stitches (= left front piece), slip the next 66-76-84-88-92-94 stitches on 1 stitch holder (= sleeve), cast on 10-10-12-12-14-16 new stitches on needle (= under sleeve), work 96-106-112-124-138-150 stitches (= back piece), slip the next 66-76-84-88-92-94 stitches on 1 stitch holder (= sleeve), cast on 10-10-12-12-14-16 new stitches on needle (= under sleeve) and work the remaining 53-58-61-67-74-80 stitches (= right front piece). BODY: = 222-242-258-282-314-342 stitches. Now measure the piece from here. Continue to work in garter stitch, A.1 and purl bands as before - remember buttonholes on right band. When piece measures approx. 26-25-25-25-24-23 cm, adjust after one whole or half repetition vertically, work ridges back and forth over all stitches. Work 5 ridges over all stitches (continue to purl bands), then loosely cast off - READ CAST-OFF TIP. Jacket measures approx. 52-54-56-58-60-62 cm from shoulder. SLEEVE: Work sleeve in the round on a short circular needle/double pointed needles. Slip the 66-76-84-88-92-94 stitches from stitch holder in one side of piece on circular needle/double pointed needles size 3 mm and cast in addition on 10-10-12-12-14-16 new stitches mid under sleeve = 76-86-96-100-106-110 stitches. Now measure the piece from here. Continue sleeve in stocking stitch. When piece measures 3 cm, decrease 2 stitches mid under sleeve. Decrease every 2½-1½-1½-1-1-1 cm 13-17-20-21-23-24 times in total = 50-52-56-58-60-62 stitches. When piece measures 38-36-34-33-30-28 cm, work in GARTER STITCH over all stitches - see explanation above. When sleeve measures 42-40-38-37-34-32 cm, LOOSELY cast off. See CAST OFF TIP! ASSEMBLY: Sew the openings under the sleeves. Sew the buttons on to the left band. |
||||||||||||||||||||||
Diagram explanations |
||||||||||||||||||||||
|
||||||||||||||||||||||
 |
||||||||||||||||||||||
 |
||||||||||||||||||||||
 |
||||||||||||||||||||||
 |
||||||||||||||||||||||
Have you finished this pattern?Tag your pictures with #dropspattern #autumnvinescardigan or submit them to the #dropsfan gallery. Do you need help with this pattern?You'll find 30 tutorial videos, a Comments/Questions area and more by visiting the pattern on garnstudio.com. © 1982-2026 DROPS Design A/S. We reserve all rights. This document, including all its sub-sections, has copyrights. Read more about what you can do with our patterns at the bottom of each pattern on our site. |
||||||||||||||||||||||


With over 40 years in knitting and crochet design, DROPS Design offers one of the most extensive collections of free patterns on the internet - translated to 17 languages. As of today we count 324 catalogues and 12290 patterns translated into English (UK/cm). 12290
We work hard to bring you the best knitting and crochet have to offer, inspiration and advice as well as great quality yarns at incredible prices! Would you like to use our patterns for other than personal use? You can read what you are allowed to do in the Copyright text at the bottom of all our patterns. Happy crafting!
Post a comment to pattern DROPS 179-29
We would love to hear what you have to say about this pattern!
If you want to leave a question, please make sure you select the correct category in the form below, to speed up the answering process. Required fields are marked *.