
Popular categories
Looking for a yarn?


Comments / Questions (169)
![]() Anne wrote:
Anne wrote:
Etter å ha strikket denne i str L ligner den overhodet ikke Har vært nøye og fulgt oppskr og har justert pinnestr utfra strikkefasthet. Har strikket noen 100 gensere, men aldri vært så ulik modellen. Strikket et par gensere i Air og de har blitt helt perfekt. Ser det er mange som har samme problem, så jeg vil anbefale at noen hos Drops kan teste ut oppskriften. Air er jo så og si umulig å rekke opp, så her har det gått noen kroner ut av vinduet.
01.01.2018 - 01:42
![]() Siorat wrote:
Siorat wrote:
Bonsoir, Une fois terminé, la bordure du bas roule et se retourne vers l'extérieur. Ce n'est pas du tout joli. Je ne sais pas pourquoi. Que dois-je faire pour que ça ne le fasse plus. Où est mon erreur. Merci
15.12.2017 - 21:59DROPS Design answered:
Bonjour Mme Siorat, vous pouvez bloquer le pull: humidifiez-le ou lavez-le en suivant les consignes d'entretien de l'étiquette + ici et faites-le sécher bien à plat aux mesures finales. Bon tricot!
18.12.2017 - 08:06
![]() Siorat wrote:
Siorat wrote:
Bonsoir, Est-ce que sur la photo du modèle porté par la jeune fille il a été fait l'astuce tricot 2 concernant le milieu dos et devant pour avoir un peu moins de volume ? Car je le trouve parfait sur la photo et je voudrai savoir si je dois faire ces diminutions ou pas. Si sur le modèle elles sont faites, je les ferai. Merci
10.12.2017 - 22:31DROPS Design answered:
Bonjour Mme Siorat, tout à fait, c'est ce qui permet d'avoir le nombre de mailles indiqué. Bon tricot!
11.12.2017 - 10:15
![]() Ella wrote:
Ella wrote:
Hallo, ist die Frage inzwischen geklärt, wie man plötzlich in A3 auf 20 statt bislang 18 Maschen kommt? Ist meine Einschätzung richtig, dass die zwei durchgestrichenen Maschen mit kleiner Blase rechts z.B. in A3 zunächst 1M abnehmen plus anschließenden Umschlag bedeuten?
05.12.2017 - 23:15DROPS Design answered:
Liebe Ella, die Anleitung wurde neu geschrieben und mehr Diagramme wurden dazu gezeichnet. Viel Spaß beim stricken!
06.12.2017 - 09:32
![]() Laura Menegatti wrote:
Laura Menegatti wrote:
Dopo diversi errori, l'ho finito e sono soddisfatta di poterlo regalare. Ho fatto i polsi un po' più corti rispetto al modello
26.10.2017 - 13:15
![]() Amina Quashie wrote:
Amina Quashie wrote:
J'ai terminé une taille L. Résultat décevant trop court sur les côtés et manches trop longues. Dans la version FR il n'y a pas la partie aug. des manches pour l'empiècement (cf version GB et IT). Bravo aux stylistes, traducteurs et relecteurs ! Grâce à vous il ne me reste qu'à RECOMMENCER et tirer un trait sur 4 mois de travail!
21.10.2017 - 12:32DROPS Design answered:
Bonjour Madame Quashie, je vous remercie pour votre retour, les augmentations des manches ont été ajoutées. Bon tricot!
23.10.2017 - 12:25
![]() Laura Menegatti wrote:
Laura Menegatti wrote:
Buongiorno. Per favore, vorrei sapere se nelle Istruzioni CORPO, quando si menziona per la prima volta il diagramma "A5 (=11 maglie)", si debba leggere 12 maglie (come indicato un paio di righe dopo). Grazie
11.10.2017 - 11:55DROPS Design answered:
Buongiorno Laura. Sì ha ragione, sono 12 maglie. Abbiamo corretto il testo e manderemo una segnalazione alla casa madre. Grazie e buon lavoro!
11.10.2017 - 12:24
![]() Laura Menegatti wrote:
Laura Menegatti wrote:
Buongiorno, per favore vorrei capire, quando finiscono gli aumenti corpo e maniche: "fine ultimo aum. Taglia M, 378 m. sul f. .Lav. il giro successivo come segue: ..come prima sulle prime 11 m. (=fino a 2 rov. centrali in A2).." Poiché il giro inizia con A2a, mi trovo compresa la 1^ m. a dir. dopo i 2 rovesci centrali. Grazie per l'aiuto
27.09.2017 - 08:09DROPS Design answered:
Buongiorno Laura. Nel conteggio delle 11 maglie da lavorare, deve considerare anche le 2 maglie del diagramma A2.b , quindi le ultime 2 maglie del giro precedente. In questo modo arriva al centro del diagramma A2. Buon lavoro!
28.09.2017 - 23:51
![]() Alessandra wrote:
Alessandra wrote:
Buongiorno! Ho una domanda ingenua ma che mi sta bloccando fin dalle prime righe: seguendo le istruzioni devo lavorare, nell'ordine, prima A.2B e dopo A.2A. Ma allora, il gettato che nel diagramma risulta tra i due, devo eseguirlo PRIMA delle due maglie da lavorare insieme, nel qual caso rispetto l'ordine dello schema ma mi trovo due gettati di seguito dopo gli aumenti del davanti e del retro, o DOPO le due maglie da lavorare insieme, come se leggessi lo schema da destra verso sinistra?
26.09.2017 - 09:49DROPS Design answered:
Buongiorno Alessandra. I diagrammi vanno letti dal basso verso l'alto e da destra verso sinistra. Quindi aumenta prima delle 2 maglie lavorate insieme a diritto del diagramma A2b e dopo il diagramma A2a. Non ci sono 2 gettati consecutivi.Buon lavoro!
26.09.2017 - 11:32Angela Eliana Tupayachi Ordoñez wrote:
Me gustaría saber como quedan los laterales de la prenda, si pudieran colocar mas detalles en fotos de como queda seria estupendo.
26.09.2017 - 07:35DROPS Design answered:
Hola Angela. Ya lo siento, pero no no te podemos proporcionar otras imágenes de esta prenda. Puedes ver en el diagrama bajo el patrón la forma triangular de la parte inferior del jersey.
29.09.2017 - 19:10
|
|||||||||||||||||||||||||
Emerald Queen#emeraldqueensweater |
|||||||||||||||||||||||||
 |
 |
||||||||||||||||||||||||
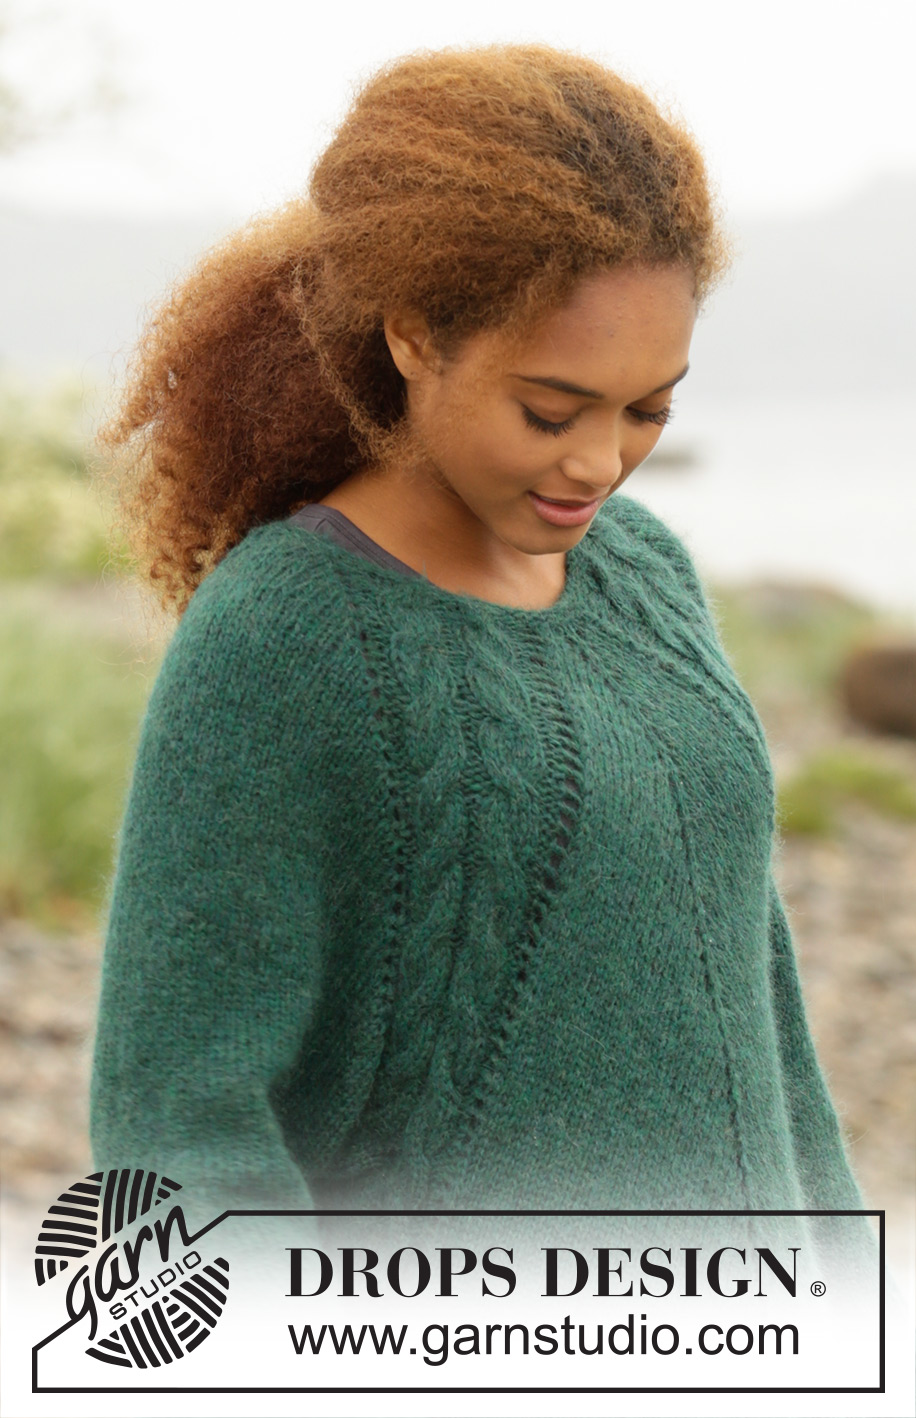
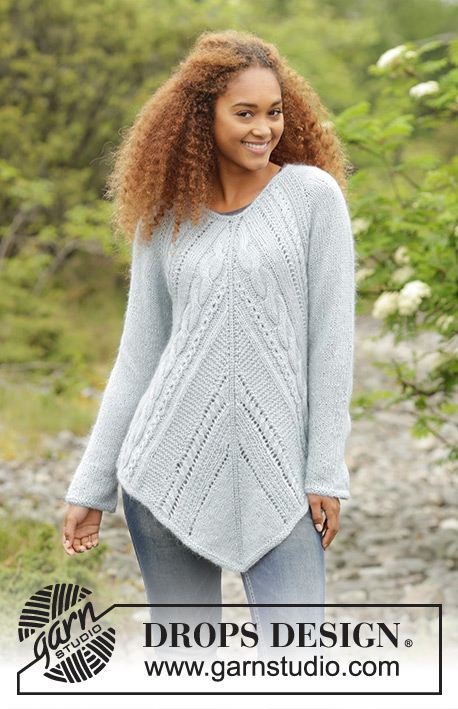
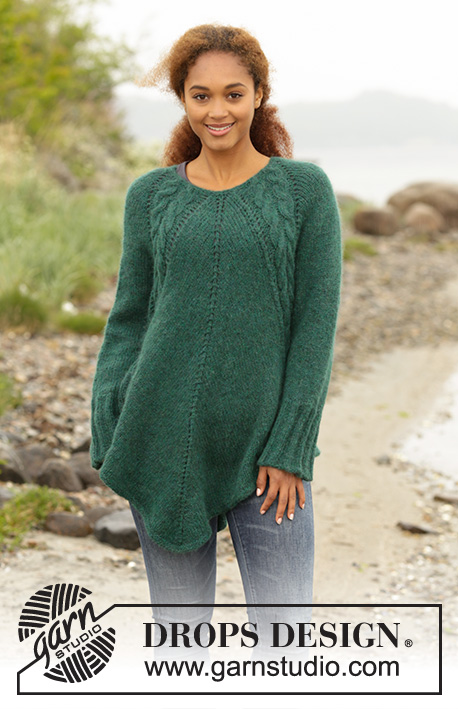
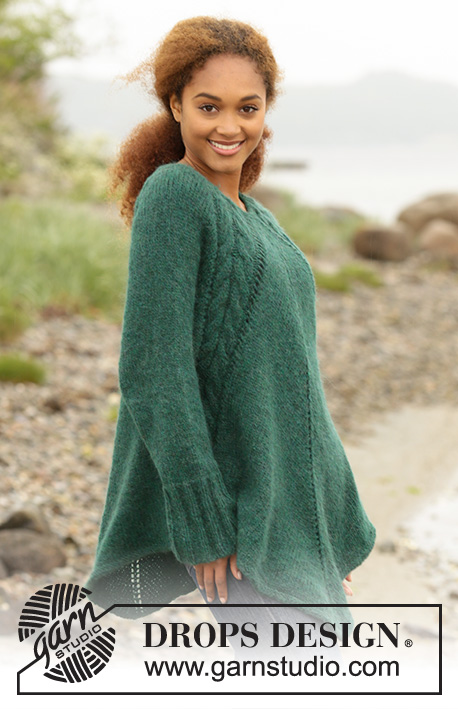
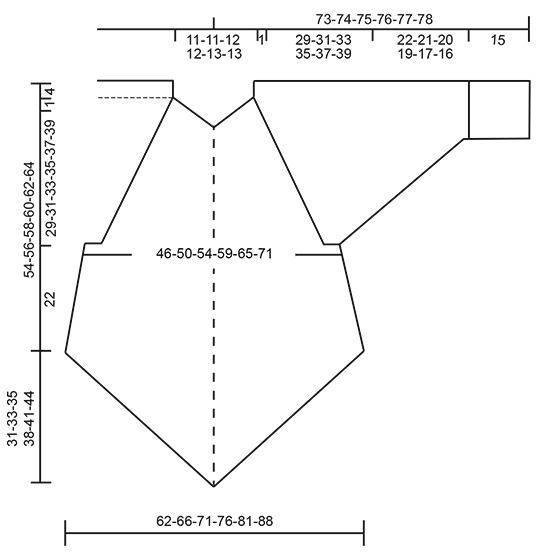
Knitted DROPS tunic with deep raglan and cables, worked top down in ”Air”. Size: S - XXXL.
DROPS 171-1 |
|||||||||||||||||||||||||
|
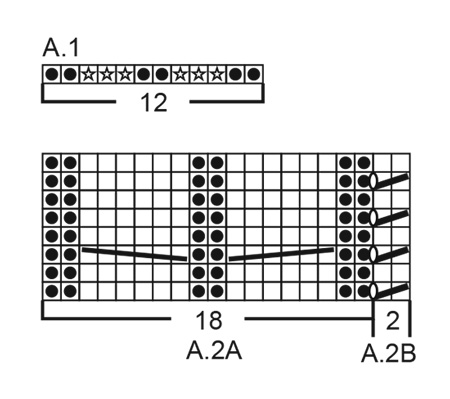
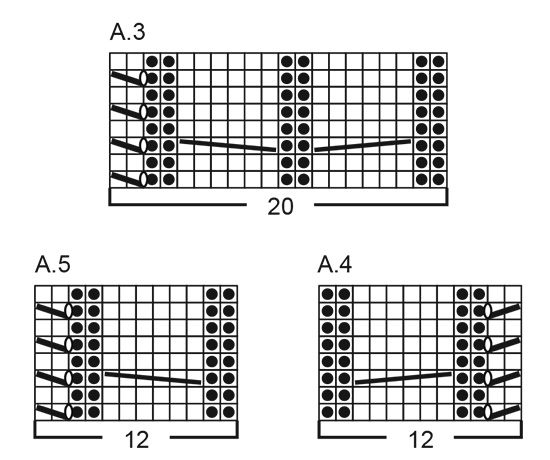
GARTER ST (worked in the round): 1 ridge = 2 rounds. * K 1 round and P 1 round *, repeat from *-*. PATTERN: See diagrams A.1 to A.5. INCREASE FOR SLEEVES: Increase 1 st in each side on each sleeve by increasing after A.2 and before A.3 (= 2 st inc on each sleeve and 4 sts in total on round). Inc 1 st by making 1 yarn over, on next round knit yarn over to make holes. INCREASE MID FRONT AND MID BACK: Increase 2 sts on each side of st with marker thread on mid front and mid back as follows: Knit until 1 st before st with marker thread, make 1 yarn over, knit 1, make 1 yarn over, knit st with marker thread, make 1 yarn over, knit 1, make 1 yarn over (= 4 sts inc mid front/mid back and 8 sts in total on round). On next round knit the 2 yarn overs closest to the st with mid-st to make holes, the outermoste 2 sts should be knit twisted to avoid holes. Increase 1 st on each side of st with marker thread on mid front and mid back as follows: Work until st with maker thread, make 1 yarn over, knit st with maker thread (mid-st), make 1 yarn over (= 2 sts inc mid front/mid back and 4 sts in total on round).On next round knit yarn overs to make holes. KNITTING TIP-1: To avoid the eye let row being interrupted while increasing for sleeves on every 4th row and not on every 2nd row as before, work as follows on the rows that previously had increases: After A.2: Make 1 yarn over, slip 1 st knitvise, knit 1 and pass slipped st over the knit st. Before A.3: Knit until 2 sts before A.3, knit 2 st tog and make 1 yarn over. KNITTING TIP-2: If you want a little less volume on body, it is possible to make some adjustments after dividing for sleeves. Decrease 2 sts mid front and mid back on i.e every 8th round as follows (decrease on a round with increases): Knit until 2 sts before st with marker (= mid-st), knit 2 tog, make 1 yarn over, knit 1 (= mid-st), make 1 yarn over, slip 1 st knitvise, knit 1 and pass slipped st over the knit st (this decrease vil give approx 8 cm less width in total at the end of body). DECREASE TIP (applies to sleeves): Beg 3 sts before marker and dec as follows: K 2 tog, K 2 (marker is in the middle of these 2 sts), slip 1 st as if to K, K 1, psso. ---------------------------------------------------------- TUNIC: Worked in the round on circular needle, top down. YOKE: Cast on 66-66-70-70-74-74 sts on a short circular needle size 4 mm with 2 strands Air. Remove 1 strand and continue with 1 strand Air as follows: Work 2 ridges in GARTER ST - see explanation above. Switch to a short circular needle size 5 mm, work next round as follows: Work A.1 (= 12 sts inc to 18 sts), 2 sts in stocking st (= sleeve), A.1 (= 12 sts inc to 18 sts), 7-7-9-9-11-11 sts in stocking st (insert 1 marker in the middle of these sts = mid front), A.1 (= 12 sts inc to 18 sts), 2 sts in stocking st (= sleeve), A.1 (= 12 sts inc to 18 sts) and 7-7-9-9-11-11 sts in stocking st (insert 1 marker in the middle of these sts = mid back) = 90-90-94-94-98-98 sts on needle. Next round work as follows: Work A.2A (= 18 sts), inc 1 st – READ INCREASE FOR SLEEVES, knit 2, inc 1 st for sleeve, work A.3 (= 20 sts), knit 0-0-1-1-2-2 s, inc 2 sts on each side of st with marker thread – READ INCREASE MID FRONT AND MID BACK, knit 0-0-1-1-2-2 sts, work A.2B (= 2 sts), work A.2A (=18 sts), inc 1 st for sleeve, knit 2 sts, inc 1 st for sleeve, work A.3 (= 20 sts), knit 0-0-1-1-2-2 sts, inc 2 sts on each side of st with marker thread (= mid back) and knit 0-0-1-1-2-2 sts and work A.2B (= 2 sts) = 102-102-106-106-110-110 sts on needle. Then work stocking st in the round with A.2 and A.3 in every transition between body and sleeves. AT THE SAME TIME continue increase for sleeves and increase mid front and mid back as follows: SLEEVES: Increase on every 2nd round 10-13-15-21-23-27 times in total (including the increase explained on firste round), then increase on every 4th round 11-11-11-9-9-8 times in total - READ KNITTING TIP-1. MID FRONT AND MID BACK : Inc 2 sts on every side of st with marker in it on every 2nd round 11-14-15-18-21-25 times in total (including the increases explained on first round). Then increase 1 st on each side of st with marker in it on every 2nd round 21-20-21-21-20-18 times in total. REMEMBER THE KNITTING TENSION! After last increase on body and sleeves there are 346-378-402-442-474-510 sts on needle. Work next round as follows: Work as before over the first 11 sts (= until middle of 2 P sts in A.2), slip the next 62-68-72-80-84-90 sts on a stitch holder (= sleeve), cast on 6-6-8-8-10-12 new sts under sleeve, work as before over the next 111-121-129-141-153-165 sts on front piece(i.e 11 st in A.3, 89-99-107-119-131-143 knit sts, 11 sts in A.2)slip the next 62-68-72-80-84-90 sts on a stitch holder (= sleeve), cast on 6-6-8-8-10-12 new sts under sleeve and work the remaining 100-110-118-130-142-154 sts on back piece as before (i.e 11 sts in A.3 and 89-99-107-119-131-143 knit sts). Finish body and sleeves separately. BODY: = 234-254-274-298-326-354 sts. Insert 1 marker in the piece. Work next round as follows: Work A.4 (12 sts), knit 4-4-6-6-8-10 sts, A.5 (=11 sts), knit until mid-st, make 1 yarn over, knit 1 (= mid-st), make 1 yarn over, knit until A.2, work A.4 (= 12 sts), knit 4-4-6-6-8-10 sts, A.5 (= 12 sts), knit until mid-st, make 1 yarn over, knit 1 (= mid-st), make 1 yarn over and knit the rest of round (= 4 sts increased). Continue pattern like this while AT THE SAME TIME continuing to increase mid front and mid back on every 2nd round until inc has been done 20 times on each side of mid front/mid back from marker - READ KNITTING TIP-2 = 314-334-354-378-406-434 sts on needle (or work until desired length). On next round work sts in each cable K tog 2 by 2 (= 12 sts dec) = 302-322-342-366-394-422 sts. Switch to circular needle size 4 mm and work 2 ridges in garter st in the round over all sts. Switch back to circular needle size 5 mm and cast off (this is done to avoid a tight cast-off edge). SLEEVE: Worked in the round on a short circular needle, switch to double pointed needles when needed. Slip the sts from stitch holder in one side of piece on a short circular needle size 5 mm and pick up 1 st in each of the 6-6-8-8-10-12 sts cast on under sleeve on body = 68-74-80-88-94-102 sts on needle. Insert 1 marker at beg of round (= mid under sleeve) - NOW MEASURE PIECE FROM HERE. Work in stocking st in the round over all sts AT THE SAME TIME on first round dec over the two cables by working sts in each cable K tog 2 by 2 (= 6 sts dec) = 62-68-74-82-88-96 sts. When piece measures 2 cm, dec 2 sts mid under sleeve - READ DECREASE TIP. Dec a total of 12-14-17-20-22-25 times in Size S: On every 4th round, in size M: On every 3rd round, in size L: Alternately on every 2nd and 3rd round, in size XL: On every other round, in size XXL: Alternately on every and every other round and size XXXL. On every round = 38-40-40-42-44-46 sts on needle. Continue to work until piece measures 22-21-20-19-17-16 cm (NOTE: Shorter measurements in the larger sizes because of wider shoulders). K 1 round while AT THE SAME TIME inc 7-10-10-8-11-9 sts evenly = 45-50-50-50-55-55 sts. Switch to double pointed needles size 4 mm and work rib in the round = K 2/P 3. When rib measures 15 cm, switch back to double pointed needles size 5 mm before casting off with K over K and P over P (this is done to avoid a tight cast-off edge). Work the other sleeve the same way. |
|||||||||||||||||||||||||
Diagram explanations |
|||||||||||||||||||||||||
|
|||||||||||||||||||||||||
 |
|||||||||||||||||||||||||
 |
|||||||||||||||||||||||||
 |
|||||||||||||||||||||||||
Have you finished this pattern?Tag your pictures with #dropspattern #emeraldqueensweater or submit them to the #dropsfan gallery. Do you need help with this pattern?You'll find 26 tutorial videos, a Comments/Questions area and more by visiting the pattern on garnstudio.com. © 1982-2026 DROPS Design A/S. We reserve all rights. This document, including all its sub-sections, has copyrights. Read more about what you can do with our patterns at the bottom of each pattern on our site. |
|||||||||||||||||||||||||


With over 40 years in knitting and crochet design, DROPS Design offers one of the most extensive collections of free patterns on the internet - translated to 17 languages. As of today we count 324 catalogues and 12239 patterns translated into English (UK/cm). 12239
We work hard to bring you the best knitting and crochet have to offer, inspiration and advice as well as great quality yarns at incredible prices! Would you like to use our patterns for other than personal use? You can read what you are allowed to do in the Copyright text at the bottom of all our patterns. Happy crafting!
Post a comment to pattern DROPS 171-1
We would love to hear what you have to say about this pattern!
If you want to leave a question, please make sure you select the correct category in the form below, to speed up the answering process. Required fields are marked *.