
Popular categories
Looking for a yarn?


Comments / Questions (169)
![]() Anne Hammer wrote:
Anne Hammer wrote:
Jeg strikker str. L og efter 15 udtagninger på hver 2. pind skal jeg kun tage på hver 4. pind mellem A2 og ærmet. Men kommer det ikke til at se sjovt ud, at hulrækken er forskellig fra det øverste. Er der noget jeg misser? Som jeg læser det skal jeg fortsætte med at tage ud på hver anden pind midt for/midt bag samt mellem A2 og forstykke/rygstykke. Og samtidig tage ind på samme omgang som der tages ud. Er det korrekt forstået? Og kan Det passe at hulrækken ændres efter 15 indtagninger? Anne
16.01.2017 - 20:21DROPS Design answered:
Hej Anne. Ja, du skal tage ind samtidig med du tager ud, saa du ikke faar flere udtagninger end du skal have til raglan (men du bliver ved med at strikke spidsen/formen midt for og midt bag). Der aendres ikke i hulraekken. Du laver stadigvaek omslaget, men bagefter strikker du sammen som der beskrives i INDTAGNING PÅ FOR- OG RYGSTK:
18.01.2017 - 16:02
![]() Gardair Aude wrote:
Gardair Aude wrote:
Bonjour J'aimerais savoir si lors des augmentations des manches il faut alterner une fois tous les deux rangs et une fois tous les quatre, ou bien si il faut faire les augmentations tous les deux rgs et ensuite tous les quatre rangs.merci pour votre réponse
16.01.2017 - 18:34DROPS Design answered:
Bonjour Mme Gardair, pour le raglan des manches, on va augmenter 10-13-15-21-23-27 fois au total tous les 2 tours, et 11-11-11-9-9-8 fois tous les 4 tours. Bon tricot!
17.01.2017 - 09:31
![]() Mc wrote:
Mc wrote:
Bonjour, J'aimerais réaliser ce pull dans une qualité alternative : de quoi doit on tenir compte pour choisir un nouveau fil : les épaisseurs sont elles les mêmes ? le poids et la longueur des pelotes sont différents ! Merci de me guider
12.12.2016 - 09:06DROPS Design answered:
Bonjour Mc, vous trouverez ici toutes les informations complémentaires nécessaires sur les alternatives - votre magasin DROPS saura vous renseigner quant au choix si besoin. Bon tricot!
12.12.2016 - 10:36
![]() Susanne wrote:
Susanne wrote:
Wenn ich DROPS AIR für 171/1 Emerald Queen in XXXL bestellen möchte, wo finde ich, wie viel ich dafür brauche??? Diese Angabe vermisse ich auch bei den anderen Anleitungen.... LG Susanne
10.12.2016 - 15:57DROPS Design answered:
Liebe Suzanne, Sie werden unter Tab "Material" das gesamte Gewicht der verbrauchenen Garn finden, dh hier in der Größe XXX brauchen Sie 550 g Air / 50 g das Knäuel Air = 11 Knäuel brauchen Sie hier. Viel Spaß beim stricken!
12.12.2016 - 09:13
![]() LIz Brouwer wrote:
LIz Brouwer wrote:
Nadat er in totaal 11-14-15-18-21-25 keer gemeerderd is middenvoor en middenachter, moet er geminderd worden op het voorpand en achterpand om te voorkomen dat het aantal meer wordt dan de meerdering in de raglan in totaal 21-20-21-21-20-18 keer. Hieruit begrijp ik dat het aantal steken voor het voor en achterpand gelijk blijven, dat lijkt mij niet goed want dat betekent dat het niet wijd uitloopt.
19.11.2016 - 21:38DROPS Design answered:
Hoi Liz. Jawel, omdat je gaat op het LIJF door met de meerderingen middenvoor en middenachter.
21.11.2016 - 14:43
![]() Deborah Davis wrote:
Deborah Davis wrote:
In the yoke section do i decrease after 15 Increases? Do I also continue to Increase? Is one instruction for front and one for Back?
19.11.2016 - 02:17DROPS Design answered:
Dear Mrs Davis, yoke is worked in the round, in size L, inc for raglan: on sleeve: every other round 15 times + every 4th round 11 times - on body: inc every other round 36 times + inc on mid front + mid back every other round to the end of work, but after you have inc 15 times on yoke, continue inc on mid front + mid back, but now dec to keep correct shape (see "DECREASE ON FRONT AND BACK PIECE"), ie dec every other round 21 times. Happy knitting!
21.11.2016 - 09:05
![]() Bettina wrote:
Bettina wrote:
Hallo DROPS Team, Ich habe leider bereits am Anfang Probleme mit dem Lesen der Anleitung. Die 70 Maschen für XL sind viel zu wenig für einen Halsausschnitt und selbst mit den darauf folgenden Maschenzunahmen auf 90 Maschen bekomme ich noch nicht den Kopf durch die Runde. Was mache ich falsch? Ich stricke mit der selben Wolle und Nadeln wie in der Anleitung , daran kann es nicht liegen. Könnt ihr mir helfen? Ich finde die Anleitung leider schwer verständlich
15.11.2016 - 23:36DROPS Design answered:
Liebe Bettina, passen Sie mal auf, daß Sie die richtige Maschenprobe beachten, und daß Sie die Maschen nicht zu eng anschlagen. Alle Maßen für jede Größe finden Sie im Maßskizze. Viel Spaß beim stricken!
16.11.2016 - 09:18
![]() Corbel Jocelyne wrote:
Corbel Jocelyne wrote:
Quand on diminue les 2m ens c est en une seul fois ou sur plusieurs rangs.
09.11.2016 - 14:22DROPS Design answered:
Bonjour Mme Corbel, si vous parlez des diminutions des torsades, elles se font sur 1 seul rang, tricotez les 6 m end de chaque torsade ainsi: 2 m ens à l'end 3 fois au total, il reste 3 m end dans chaque torsade. Bon tricot!
09.11.2016 - 17:10
![]() Corbel wrote:
Corbel wrote:
Je suis bloqué au dos et devant dans la répartition des pour les manches il faut bien 9m torsades de chaque côté le r avoir des 8 m de fait avant et après les autres 9 m torsades. je ne comprends pas non plus les diminutions des mailles de chaque torsade ens 2 par 2 a l endroit =12 mailles reste été mailles. les diminutions 2 par 2 les fait ont au même rang ?. et je n arrive pas non plus à faire la pointe du devant et dos merci de m aider
07.11.2016 - 23:57DROPS Design answered:
Bonjour Mme Corbel, oui tout à fait, vous avez sous les emmanchures: 9 m de torsade, 8 nouvelles m et 9 m de torsades. Ces 8 m vont se tricoter au tour suivant: 1 m env, 6 m end, 1 m env. Continuez les augmentations au milieu dos et milieu devant comme avant pour former la pointe. Pour les diminutions: tricoter les 6 m de chaque torsade ens 2 par 2 à l'end = il reste 3 m des 6 m de chaque torsade. Les torsades resserrent l'ouvrage on évite ainsi que ça fasse trop large ici quand on continue au point mousse. Bon tricot!
08.11.2016 - 09:43
![]() Ulla wrote:
Ulla wrote:
Spørgsmål: jeg strikker str. S. I opskriften står at man skal tage ud til raglan på ærmerne 10 gange på hver anden omg og derefter på hver 4. omg. Men skal man ikke stadig efter de 10 gange lave omslaget på hver anden omgang for at få hulrækken? Betyder det så at man skal tage ud og ind på raglan til ærmerne på hver anden omg. når man er kommet ud over de første 10 omg? Håber mit spørgsmå giver mening. Venlig hilsen, Ulla
02.11.2016 - 22:52DROPS Design answered:
Hej Ulla. Jo, det er kun raglan, du har stadigvaek omslagene midt for og midt bag. Laes ogsaa: TAG UD SÅLEDES MIDT FORAN OG MIDT BAGPÅ: Tag ud på hver 2.omg til færdig mål, men når der er taget ud totalt 11-14-15-18-21-25 gange midt foran og midt bagpå skal der nu også tages ind på for- og rygstk for at undgå at m-antallet øger mere end raglanudtagningen – læs INDTAGNING PÅ FOR- OG RYGSTK. Tag ind på hver 2.omg (dvs på samme omg som der tages ud) totalt 21-20-21-21-20-18 gange.
03.11.2016 - 16:41
|
|||||||||||||||||||||||||
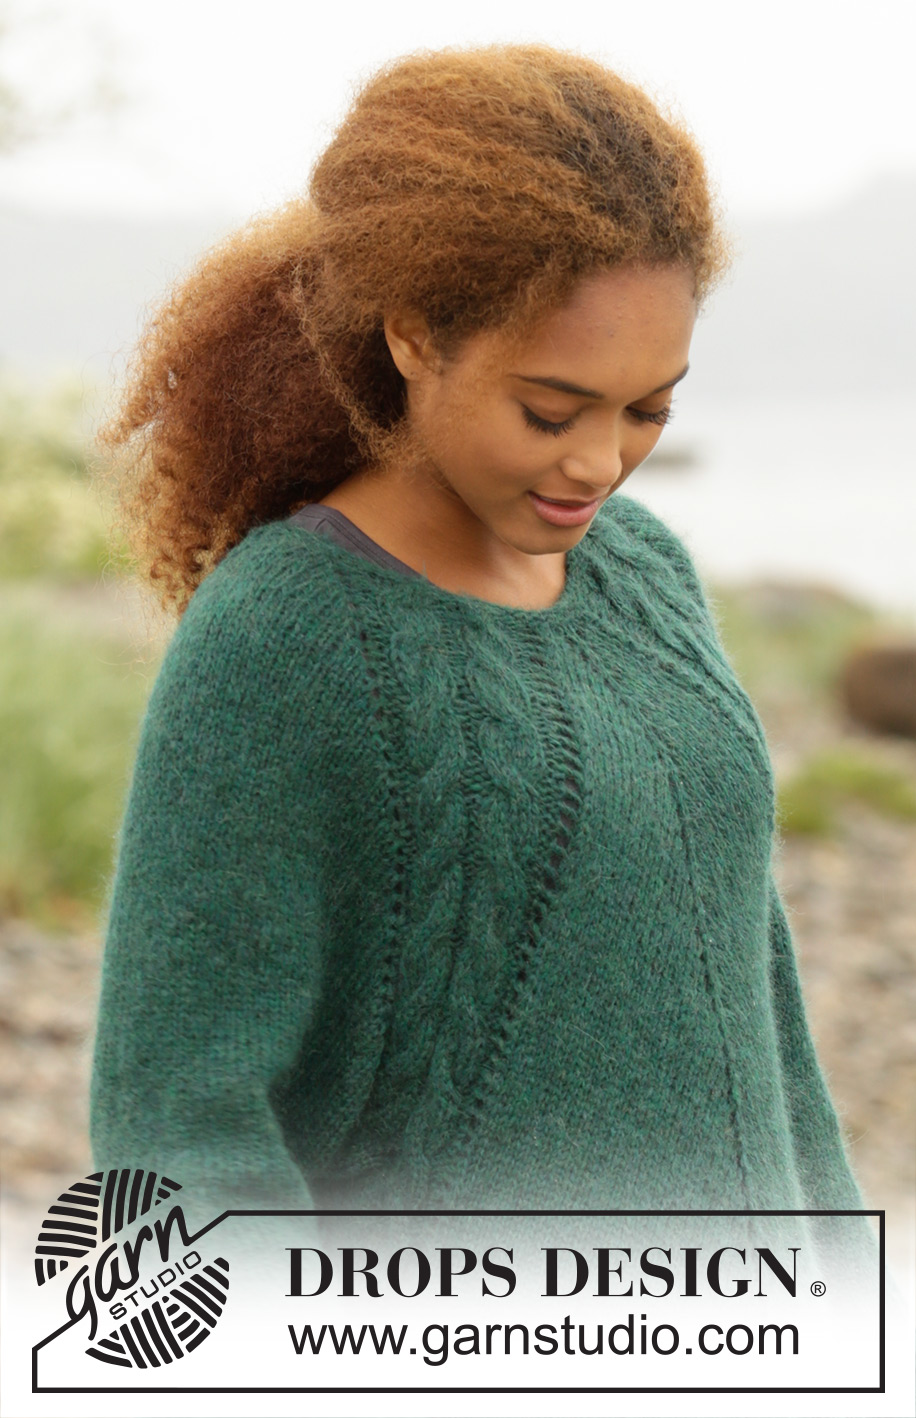
Emerald Queen#emeraldqueensweater |
|||||||||||||||||||||||||
 |
 |
||||||||||||||||||||||||
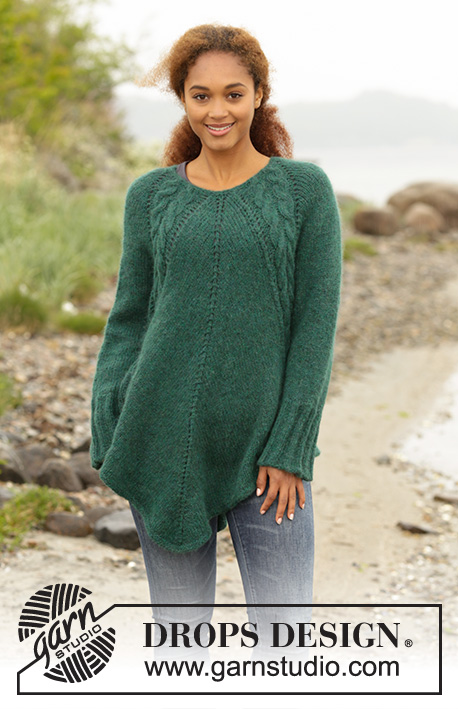
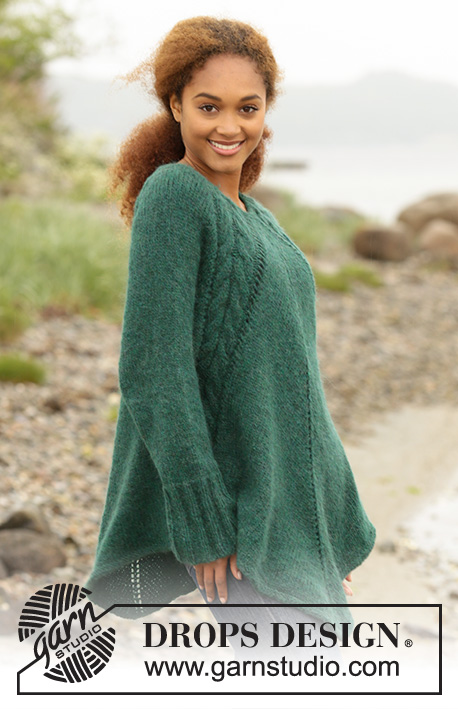
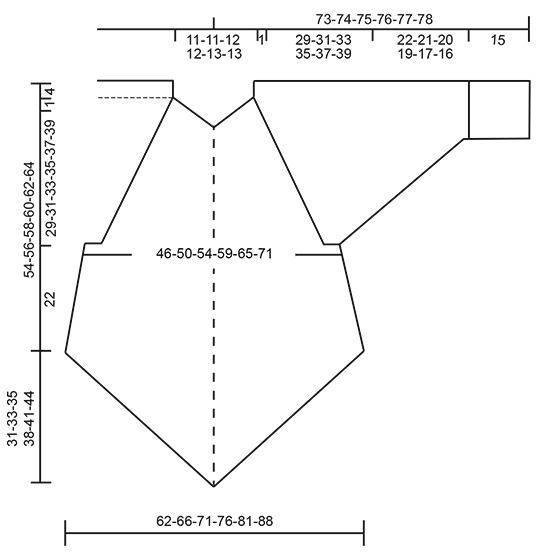
Knitted DROPS tunic with deep raglan and cables, worked top down in ”Air”. Size: S - XXXL.
DROPS 171-1 |
|||||||||||||||||||||||||
|
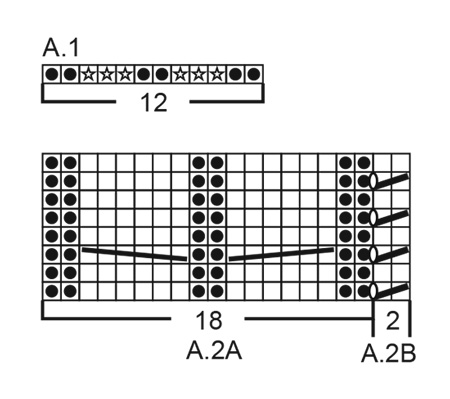
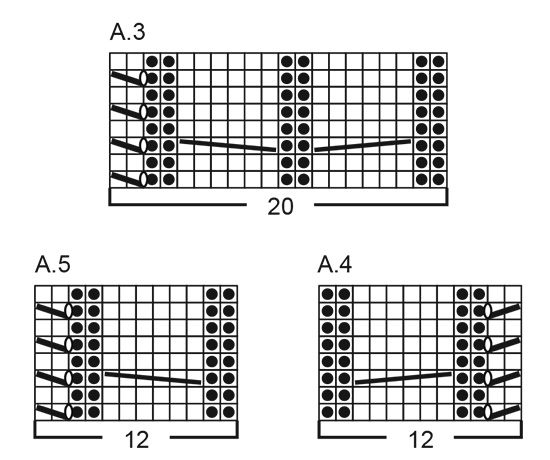
GARTER ST (worked in the round): 1 ridge = 2 rounds. * K 1 round and P 1 round *, repeat from *-*. PATTERN: See diagrams A.1 to A.5. INCREASE FOR SLEEVES: Increase 1 st in each side on each sleeve by increasing after A.2 and before A.3 (= 2 st inc on each sleeve and 4 sts in total on round). Inc 1 st by making 1 yarn over, on next round knit yarn over to make holes. INCREASE MID FRONT AND MID BACK: Increase 2 sts on each side of st with marker thread on mid front and mid back as follows: Knit until 1 st before st with marker thread, make 1 yarn over, knit 1, make 1 yarn over, knit st with marker thread, make 1 yarn over, knit 1, make 1 yarn over (= 4 sts inc mid front/mid back and 8 sts in total on round). On next round knit the 2 yarn overs closest to the st with mid-st to make holes, the outermoste 2 sts should be knit twisted to avoid holes. Increase 1 st on each side of st with marker thread on mid front and mid back as follows: Work until st with maker thread, make 1 yarn over, knit st with maker thread (mid-st), make 1 yarn over (= 2 sts inc mid front/mid back and 4 sts in total on round).On next round knit yarn overs to make holes. KNITTING TIP-1: To avoid the eye let row being interrupted while increasing for sleeves on every 4th row and not on every 2nd row as before, work as follows on the rows that previously had increases: After A.2: Make 1 yarn over, slip 1 st knitvise, knit 1 and pass slipped st over the knit st. Before A.3: Knit until 2 sts before A.3, knit 2 st tog and make 1 yarn over. KNITTING TIP-2: If you want a little less volume on body, it is possible to make some adjustments after dividing for sleeves. Decrease 2 sts mid front and mid back on i.e every 8th round as follows (decrease on a round with increases): Knit until 2 sts before st with marker (= mid-st), knit 2 tog, make 1 yarn over, knit 1 (= mid-st), make 1 yarn over, slip 1 st knitvise, knit 1 and pass slipped st over the knit st (this decrease vil give approx 8 cm less width in total at the end of body). DECREASE TIP (applies to sleeves): Beg 3 sts before marker and dec as follows: K 2 tog, K 2 (marker is in the middle of these 2 sts), slip 1 st as if to K, K 1, psso. ---------------------------------------------------------- TUNIC: Worked in the round on circular needle, top down. YOKE: Cast on 66-66-70-70-74-74 sts on a short circular needle size 4 mm with 2 strands Air. Remove 1 strand and continue with 1 strand Air as follows: Work 2 ridges in GARTER ST - see explanation above. Switch to a short circular needle size 5 mm, work next round as follows: Work A.1 (= 12 sts inc to 18 sts), 2 sts in stocking st (= sleeve), A.1 (= 12 sts inc to 18 sts), 7-7-9-9-11-11 sts in stocking st (insert 1 marker in the middle of these sts = mid front), A.1 (= 12 sts inc to 18 sts), 2 sts in stocking st (= sleeve), A.1 (= 12 sts inc to 18 sts) and 7-7-9-9-11-11 sts in stocking st (insert 1 marker in the middle of these sts = mid back) = 90-90-94-94-98-98 sts on needle. Next round work as follows: Work A.2A (= 18 sts), inc 1 st – READ INCREASE FOR SLEEVES, knit 2, inc 1 st for sleeve, work A.3 (= 20 sts), knit 0-0-1-1-2-2 s, inc 2 sts on each side of st with marker thread – READ INCREASE MID FRONT AND MID BACK, knit 0-0-1-1-2-2 sts, work A.2B (= 2 sts), work A.2A (=18 sts), inc 1 st for sleeve, knit 2 sts, inc 1 st for sleeve, work A.3 (= 20 sts), knit 0-0-1-1-2-2 sts, inc 2 sts on each side of st with marker thread (= mid back) and knit 0-0-1-1-2-2 sts and work A.2B (= 2 sts) = 102-102-106-106-110-110 sts on needle. Then work stocking st in the round with A.2 and A.3 in every transition between body and sleeves. AT THE SAME TIME continue increase for sleeves and increase mid front and mid back as follows: SLEEVES: Increase on every 2nd round 10-13-15-21-23-27 times in total (including the increase explained on firste round), then increase on every 4th round 11-11-11-9-9-8 times in total - READ KNITTING TIP-1. MID FRONT AND MID BACK : Inc 2 sts on every side of st with marker in it on every 2nd round 11-14-15-18-21-25 times in total (including the increases explained on first round). Then increase 1 st on each side of st with marker in it on every 2nd round 21-20-21-21-20-18 times in total. REMEMBER THE KNITTING TENSION! After last increase on body and sleeves there are 346-378-402-442-474-510 sts on needle. Work next round as follows: Work as before over the first 11 sts (= until middle of 2 P sts in A.2), slip the next 62-68-72-80-84-90 sts on a stitch holder (= sleeve), cast on 6-6-8-8-10-12 new sts under sleeve, work as before over the next 111-121-129-141-153-165 sts on front piece(i.e 11 st in A.3, 89-99-107-119-131-143 knit sts, 11 sts in A.2)slip the next 62-68-72-80-84-90 sts on a stitch holder (= sleeve), cast on 6-6-8-8-10-12 new sts under sleeve and work the remaining 100-110-118-130-142-154 sts on back piece as before (i.e 11 sts in A.3 and 89-99-107-119-131-143 knit sts). Finish body and sleeves separately. BODY: = 234-254-274-298-326-354 sts. Insert 1 marker in the piece. Work next round as follows: Work A.4 (12 sts), knit 4-4-6-6-8-10 sts, A.5 (=11 sts), knit until mid-st, make 1 yarn over, knit 1 (= mid-st), make 1 yarn over, knit until A.2, work A.4 (= 12 sts), knit 4-4-6-6-8-10 sts, A.5 (= 12 sts), knit until mid-st, make 1 yarn over, knit 1 (= mid-st), make 1 yarn over and knit the rest of round (= 4 sts increased). Continue pattern like this while AT THE SAME TIME continuing to increase mid front and mid back on every 2nd round until inc has been done 20 times on each side of mid front/mid back from marker - READ KNITTING TIP-2 = 314-334-354-378-406-434 sts on needle (or work until desired length). On next round work sts in each cable K tog 2 by 2 (= 12 sts dec) = 302-322-342-366-394-422 sts. Switch to circular needle size 4 mm and work 2 ridges in garter st in the round over all sts. Switch back to circular needle size 5 mm and cast off (this is done to avoid a tight cast-off edge). SLEEVE: Worked in the round on a short circular needle, switch to double pointed needles when needed. Slip the sts from stitch holder in one side of piece on a short circular needle size 5 mm and pick up 1 st in each of the 6-6-8-8-10-12 sts cast on under sleeve on body = 68-74-80-88-94-102 sts on needle. Insert 1 marker at beg of round (= mid under sleeve) - NOW MEASURE PIECE FROM HERE. Work in stocking st in the round over all sts AT THE SAME TIME on first round dec over the two cables by working sts in each cable K tog 2 by 2 (= 6 sts dec) = 62-68-74-82-88-96 sts. When piece measures 2 cm, dec 2 sts mid under sleeve - READ DECREASE TIP. Dec a total of 12-14-17-20-22-25 times in Size S: On every 4th round, in size M: On every 3rd round, in size L: Alternately on every 2nd and 3rd round, in size XL: On every other round, in size XXL: Alternately on every and every other round and size XXXL. On every round = 38-40-40-42-44-46 sts on needle. Continue to work until piece measures 22-21-20-19-17-16 cm (NOTE: Shorter measurements in the larger sizes because of wider shoulders). K 1 round while AT THE SAME TIME inc 7-10-10-8-11-9 sts evenly = 45-50-50-50-55-55 sts. Switch to double pointed needles size 4 mm and work rib in the round = K 2/P 3. When rib measures 15 cm, switch back to double pointed needles size 5 mm before casting off with K over K and P over P (this is done to avoid a tight cast-off edge). Work the other sleeve the same way. |
|||||||||||||||||||||||||
Diagram explanations |
|||||||||||||||||||||||||
|
|||||||||||||||||||||||||
 |
|||||||||||||||||||||||||
 |
|||||||||||||||||||||||||
 |
|||||||||||||||||||||||||
Have you finished this pattern?Tag your pictures with #dropspattern #emeraldqueensweater or submit them to the #dropsfan gallery. Do you need help with this pattern?You'll find 26 tutorial videos, a Comments/Questions area and more by visiting the pattern on garnstudio.com. © 1982-2026 DROPS Design A/S. We reserve all rights. This document, including all its sub-sections, has copyrights. Read more about what you can do with our patterns at the bottom of each pattern on our site. |
|||||||||||||||||||||||||


With over 40 years in knitting and crochet design, DROPS Design offers one of the most extensive collections of free patterns on the internet - translated to 17 languages. As of today we count 324 catalogues and 12239 patterns translated into English (UK/cm). 12239
We work hard to bring you the best knitting and crochet have to offer, inspiration and advice as well as great quality yarns at incredible prices! Would you like to use our patterns for other than personal use? You can read what you are allowed to do in the Copyright text at the bottom of all our patterns. Happy crafting!
Post a comment to pattern DROPS 171-1
We would love to hear what you have to say about this pattern!
If you want to leave a question, please make sure you select the correct category in the form below, to speed up the answering process. Required fields are marked *.