
Popular categories
Looking for a yarn?


Comments / Questions (126)
![]() Carina wrote:
Carina wrote:
Hej Jag undrar om det går att uppdatera detta mönster så att det stickas uppifrån och ner, samt att maskorna till ärmarna plockas upp från fram och bakstycke. Det är så mycket lättare att få rätt längder då och minskar knöligheten runt armhålorna.
16.02.2026 - 08:38DROPS Design answered:
Hej Carina, da er det lettere at vælge en opskrift som er skrevet oppefra og ned - se her: href="https://www.garnstudio.com/search.php?action=browse&c=men-sweaters&construction=uppifr%C3%A5n+och+ner&lang=se">Tröjor till herr - uppifrån och ner
26.02.2026 - 11:13
![]() Daniel wrote:
Daniel wrote:
Jeg er færdig med at strikke mit første ærme, og jeg har lukket af. når jeg syer ærmet på laver det sådan et bump på trøje fra der hvor jeg lukkede af fra. Hvordan gør jeg så at der ikke er et bump. Og i må godt svare på dansk denne gang.
30.01.2026 - 20:10
![]() Daniel wrote:
Daniel wrote:
Jeg er færdig med at strikke mit første ærme, og jeg har lukket af. når jeg syer ærmet på laver det sådan et bump på trøje fra der hvor jeg lukkede af fra. Hvordan gør jeg så at der ikke er et bump.
25.01.2026 - 11:12DROPS Design answered:
Hei Daniel. Før du monterte ermet til bolen, hadde du riktig mål / passet ermet til "hullet"? Evnt har du dratt til i den ene delen for at det skulle passe, slik at den ene delen trekker seg nå sammen og lager nå en bump. Prøv å evnt dampe genseren (sømmen) lett. mvh DROPS Design
30.01.2026 - 13:34
![]() Linda Grothues wrote:
Linda Grothues wrote:
De meerderen in het lijf klopt niet, ik ga van 103 steken naar 111 en niet naar 114
20.01.2026 - 19:19
![]() Martina wrote:
Martina wrote:
Hallo wie stricke ich die Teile separat fertig? Dann muss ich rechts und rückwärts links Stricken? Stehe da voll auf dem Schlauch
23.10.2025 - 19:00DROPS Design answered:
Liebe Martina, ja genau, Sie stricken nach der Teilung in Hin- und Rück-Reihen weiter, rechts in Hin-Reihen und links in Rück-Reihen, dabei stricken Sie das Muster weiter. Viel Spaß beim Stricken!
04.11.2025 - 09:03
![]() Nicole wrote:
Nicole wrote:
Hallo, nach dem Abketten der Armlöcher steht, dass man vorder und rückenteil seperat fertig stricken soll. Heißt das, ich muss beide Teile einzeln und jeweils in Hin- und Rückreihen stricken oder kann ich auch normal in Runden weiterstricken und eben bei beiden die unterschiedlichen Schritte befolgen?
23.09.2025 - 15:33DROPS Design answered:
Hi, Nicole, the front and back pieces are knitted back and forth separately. Happy knitting!
24.10.2025 - 09:48
![]() Sjaelfri wrote:
Sjaelfri wrote:
Ich bin an der Stelle angekommen, bei der ich am Ärmel mit dem M1 beginnen soll ( Größe S, 53 cm). Jedoch muss ich noch zwei Zunahmen machen, um auf die 17 erforderlichen Zunahmen für den Ärmel zu kommen. Verschiebt sich dadurch nicht das Muster?
26.01.2025 - 14:20DROPS Design answered:
Liebe Frau Sjaelfri, das Muster soll nicht verschoben werden, die neuen Maschen stricken Sie im Muster, dh am Anfang der Runde wird die neue Masche wie die vorige Masche im Muster gestrickt und am Ande der Runde stricken Sie die neue Masche wie die nächste Masche im Muster. Das Muster passt nicht unter den Ärmel. Viel Spaß beim Stricken!
27.01.2025 - 10:01
![]() Sjaelfrid wrote:
Sjaelfrid wrote:
Ich meinte natürlich Zunahmen, pardon!
17.01.2025 - 18:57
![]() Sjaelfrid wrote:
Sjaelfrid wrote:
In der Anleitung steht, dass bei den Ärmeln nach 6 cm mit der Abnahme begonnen werden soll... Ist dabei das Bündchen mit eingerechnet oder Messe ich die 6 cm nach dem Bündchen? Vielen Dank
17.01.2025 - 18:55DROPS Design answered:
Liebe Sjaelfrid, die 6 cm messen Sie ab Anschlagskante, dh die 5 cm Bündchen + 1 cm. Viel Spaß beim Stricken!
20.01.2025 - 09:26
![]() Daniel Röder wrote:
Daniel Röder wrote:
Welche Nadelstärken werden hier verwendet? Hier steht lediglich Nr.3 und Nr.4
19.10.2024 - 10:40DROPS Design answered:
Lieber Herr Röder, Maschenprobe stricken Sie glatt rechts mit den Nadeln Nr 4. Viel Spaß beim Stricken!
21.10.2024 - 07:49
|
||||||||||
Nordic Midnight#nordicmidnightsweater |
||||||||||
 |
 |
|||||||||
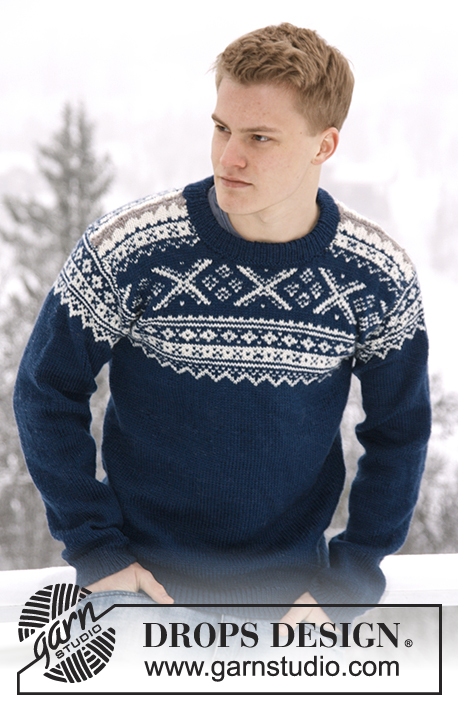
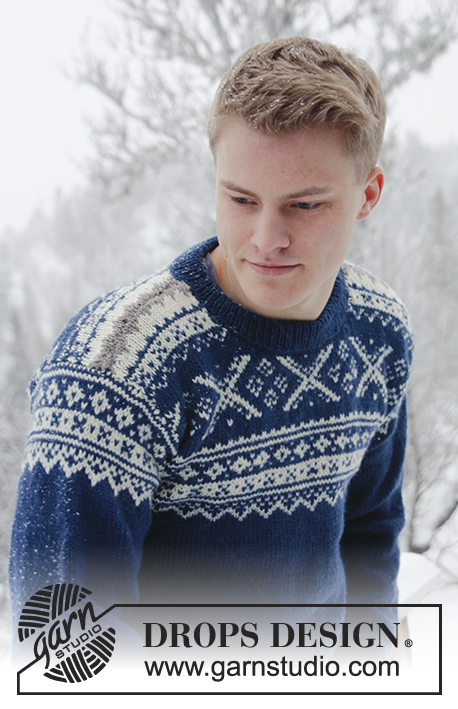
Knitted jumper for men with Norwegian pattern, in DROPS Karisma. Size: S - XXXL.
DROPS Extra 0-809 |
||||||||||
|
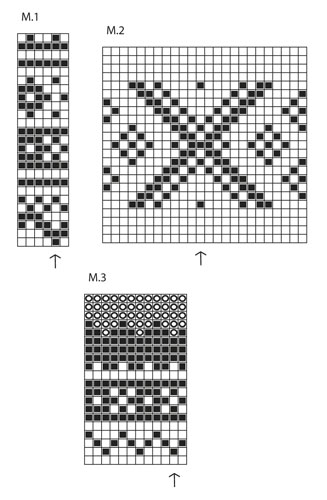
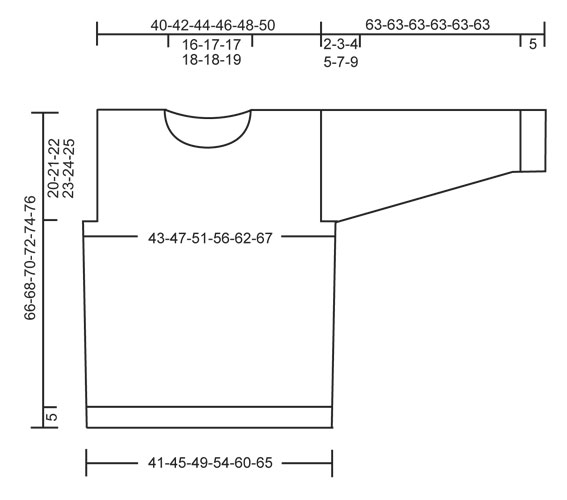
PATTERN: See diagrams M.1 to M.3 – diagrams are worked in stocking st and show 1 repetition of pattern. -------------------------------------------------------- BODY: Worked in the round on circular needle. Cast on 210-228-246-270-306-330 sts on circular needle size 3 mm with dark grey blue Karisma. Work rib = K 1/P 1 for 5 cm. Switch to circular needle size 4 mm and K 1 round while AT THE SAME TIME dec 36-38-40-44-52-56 sts evenly = 174-190-206-226-254-274 sts. Insert a marker at beg of round and a marker after 87-95-103-113-127-137 sts (these marks the sides). Continue in stocking st. REMEMBER THE KNITTING TENSION! When piece measures 15 cm, inc 1 st on each side of both markers. Repeat inc when piece measures 30 cm = 182-198-214-234-262-282 sts. When piece measures 41-43-45-46-48-50 cm, insert 2 markers in the piece; 1 in the middle st at the front and 1 in the middle st at the back. Then work diagram M.1 – st marked with arrow in diagram should be sts with marker mid front/back - count out towards the side. Count out again when at the marker in the side so that pattern is the same on the front and on the back. AT THE SAME TIME when piece measures 46-47-48-49-50-51 cm, cast off 6-10-14-20-30-36 sts for armholes in each side (i.e. 3-5-7-10-15-18 sts on each side of both markers in the sides). Finish front and back piece separately, back and forth on needle. FRONT PIECE: = 85-89-93-97-101-105 sts. Finish diagram M.1, then work diagram M.2 and finally M.3 before continuing with light beige brown until finished measurements (st with arrow in diagram should be st with marker mid front/back – count out towards the side). When piece measures 58-60-62-64-66-68 cm, slip the middle 15-17-17-19-19-21 sts on a stitch holder for neck and finish each shoulder separately. AT THE SAME TIME cast off at beg of every row from neck: 2 sts 3 times and 1 st 3 times = 26-27-29-30-32-33 sts remain on shoulder. Cast off when piece measures 66-68-70-72-74-76 cm. BACK PIECE: = 85-89-93-97-101-105 sts. Work as on front piece but do not cast off for neck until piece measures 64-66-68-70-72-74 cm. Now cast off the middle 29-31-31-33-33-35 sts for neck and finish each shoulder separately - AT THE SAME TIME cast off 2 sts on next row from neck = 26-27-29-30-32-33 sts remain on each shoulder. Cast off when piece measures approx. 66-68-70-72-74-76 cm – cast off on same row in pattern as on front piece. SLEEVE: Worked in the round on double pointed needles, switch to circular needle when needed. Cast on 62-64-66-66-68-68 sts on double pointed needles size 3 mm with dark grey blue. Work rib = K 1/P 1 for 5 cm. Switch to double pointed needles size 4 mm and K 1 round while AT THE SAME TIME dec 11 sts evenly = 51-53-55-55-57-57 sts. Insert a marker at beg of round (= mid under sleeve) and continue in stocking st. When piece measures 6 cm, inc 1 st on each side of marker. Repeat inc a total of 17-18-19-21-22-24 times in Size S: On every 9th round, Size M: Alternately on every 8th and 9th round, Size L: Every 8th round, Size XL: On every 7th round, Size XXL: Alternately on every 6th and 7th round and Size XXXL: Alternately on every 5th and 6th round = 85-89-93-97-101-105 sts. AT THE SAME TIME when piece measures 53 cm in all sizes, work diagram M.1 (st with arrow in diagram = mid on top of sleeve – count out towards the side). After diagram M.1, continue with dark grey blue until finished measurements. AT THE SAME TIME when piece measures 61-60-59-58-56-54 cm (shorter measurements in the larger sizes because of longer sleeve cap and broader shoulder width), finish the piece back and forth on needle from mid under sleeve. Cast on 1 new st in each side (= edge st for assembly) and work until sleeve measures 63 cm in all sizes, cast off. ASSEMBLY: Sew shoulder seams and sew in sleeves (section worked back and forth at the top of sleeve should fit the cast off for armhole). NECK: Knit up from RS approx. 82 to 98 sts around the neck (incl sts on stitch holder at the front) on a short circular needle size 3 mm with dark grey blue. P 1 round, then K 1 round while AT THE SAME TIME inc evenly to 102-108-110-116-118-122 sts. Then work rib = K 1/P 1 for approx. 7 cm, cast off with K over K and P over P. Fold the rib double towards WS and fasten it to the back of neck edge with neat little loose stitches. |
||||||||||
Diagram explanations |
||||||||||
|
||||||||||
 |
||||||||||
 |
||||||||||
Have you finished this pattern?Tag your pictures with #dropspattern #nordicmidnightsweater or submit them to the #dropsfan gallery. Do you need help with this pattern?You'll find 26 tutorial videos, a Comments/Questions area and more by visiting the pattern on garnstudio.com. © 1982-2026 DROPS Design A/S. We reserve all rights. This document, including all its sub-sections, has copyrights. Read more about what you can do with our patterns at the bottom of each pattern on our site. |
||||||||||


With over 40 years in knitting and crochet design, DROPS Design offers one of the most extensive collections of free patterns on the internet - translated to 17 languages. As of today we count 324 catalogues and 12290 patterns translated into English (UK/cm). 12290
We work hard to bring you the best knitting and crochet have to offer, inspiration and advice as well as great quality yarns at incredible prices! Would you like to use our patterns for other than personal use? You can read what you are allowed to do in the Copyright text at the bottom of all our patterns. Happy crafting!
Post a comment to pattern DROPS Extra 0-809
We would love to hear what you have to say about this pattern!
If you want to leave a question, please make sure you select the correct category in the form below, to speed up the answering process. Required fields are marked *.