
Popular categories
Looking for a yarn?


Comments / Questions (286)
![]() Ines wrote:
Ines wrote:
Ich brauche bitte eine Erklärung was das "R" bedeutet. Und ich lese hier kein Muster, das der Kragen dann so aussieht wie auf dem Bild. Ich bedanke mich herzlich für Ihre Hilfe. Macht mir immer wieder Spaß hier zu stricken. 2 R. über alle M., 2 R. nur über die äussersten M. *, von *-* wiederholen bis der Kragen .. cm misst (innen). Bei der nächsten R. über den 6 Zopfmaschen alle M. 2 und 2 zusammenstricken
15.12.2025 - 18:39DROPS Design answered:
Liebe Ines, hier bedeutet das "R" Reihe, so beim Kragen stricken Sie 2 Reihen über alle Maschen und 2 Reihen über die äusserten Maschen. Viel Spaß beim Stricken!
16.12.2025 - 09:04
![]() David Flores wrote:
David Flores wrote:
If I was going to incorporate 2 button holes where would I put them in the pattern on the left side? And how far apart thank you
26.04.2023 - 21:01DROPS Design answered:
Dear Mr Flores, we have no experience with buttonholes on this pattern, but if you like to add some, it could be a good idea to work first the front piece without buttonhole so that you can decide where you will have to create some on the other front piece. Happy knitting!
27.04.2023 - 08:08
![]() Cynthia wrote:
Cynthia wrote:
The pattern did not include buttonholes instructions
14.04.2023 - 18:57DROPS Design answered:
Dear Cynthia, this pattern doesn't have any buttonholes, nor you need any buttons. The jacket is closed using a pin or something similar. Happy knitting!
16.04.2023 - 19:39
![]() David Flores wrote:
David Flores wrote:
Right Edge piece question. The outermost 26 sts includes 2sts of the 6 cable sts do I just proceed? The cable will be off with the short rows added? Thank you for your time.
23.03.2023 - 17:16DROPS Design answered:
Dear Mrs Flores, work the stitches as they appear, ie k over k and p over p and continue working the cables as before, you will turn just after the cable (M.2 is 28 sts and you will work the 26 first stitches only). Happy knitting!
24.03.2023 - 08:15
![]() David Flores wrote:
David Flores wrote:
Right Edge piece question. The directions state - * work 2 rows over all sts, work 2 row only over outermost 26 sts repeat from * I'm unsure what this is asking me to do because the way it reads is not the way it is knitting. Thank you
22.03.2023 - 21:05DROPS Design answered:
Dear David, over the edge stitches you basically knit short rows. You knit 2 rows on every stitch, turn, 26 stitch, turn,26 stitch again, and then on all stitches again. This gives you one longer edge and a shorter. I hope this helps. Happy Crafting!
23.03.2023 - 00:14
![]() David Flores wrote:
David Flores wrote:
Right Edge piece question. The directions state - * work 2 rows over all sts, work 2 row only over outermost 26 sts repeat from * I'm unsure what this is asking me to do because the way it reads is not the way it is knitting. Thank you
22.03.2023 - 21:04DROPS Design answered:
Dear Mr Flores, you will now work short rows to shape shawl collar, ie the outermost stitches will be worked on every row but the stitches towards the shoulder will be left unworked on eery ridge, so that you repeat these 4 rows. Happy knitting!
23.03.2023 - 10:42
![]() Filipa Oliveira wrote:
Filipa Oliveira wrote:
Bom dia. Vende linhas passion? Qual o valor? Envia por correio? Cumprimentos
05.11.2021 - 10:34DROPS Design answered:
Bom dia, Poderá encontrar os nossos fios nas nossas lojas , no link abaixo: https://www.garnstudio.com/findastore.php?id=28&cid=28 Obrigado!
05.11.2021 - 10:38
![]() Phyllis Rhoades wrote:
Phyllis Rhoades wrote:
I commend you on your beautiful patterns, however after all these years it seem like you could translate your patterns into English that was easily understood. It is so frustrating to get in the middle of a pattern and not be able to understand the directions because you have left out an important step,or that step is in the next paragraph or you simply don't explain it. I have been knitting for over 50 years and I must give up on you lovely patterns.
15.10.2021 - 23:28
![]() Phyllis Rhoades wrote:
Phyllis Rhoades wrote:
The diagrams do not print out.
04.10.2021 - 23:12
![]() Dorothée wrote:
Dorothée wrote:
Sur la photo on voit des boutons, dans les explications il n'y a rien la dessus, est-ce une erreur? Merci
02.02.2021 - 08:53DROPS Design answered:
Bonjour Dorothée, en fait il ne s'agit pas d'un bouton sur la photo mais d'une épingle, il n'y a effectivement pas de boutons prévus sur ce modèle, on le ferme soit avec une épingle, comme sur la photo, soit avec une broche, au choix. Bon tricot!
02.02.2021 - 10:42
|
|||||||||||||||||||||||||
Chocolate Passion#chocolatepassioncardigan |
|||||||||||||||||||||||||
 |
 |
||||||||||||||||||||||||
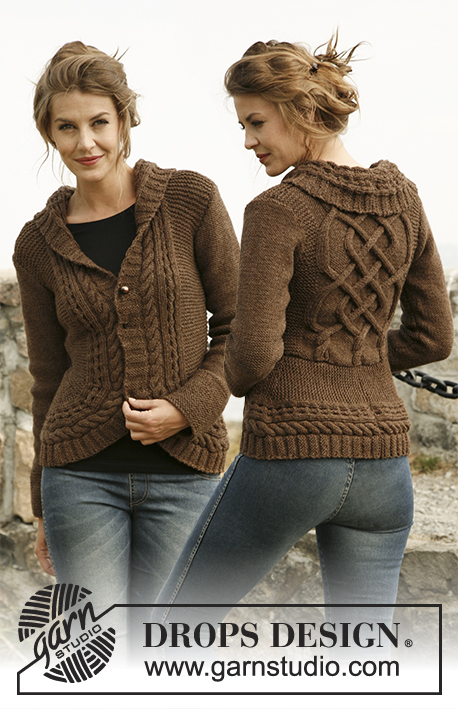
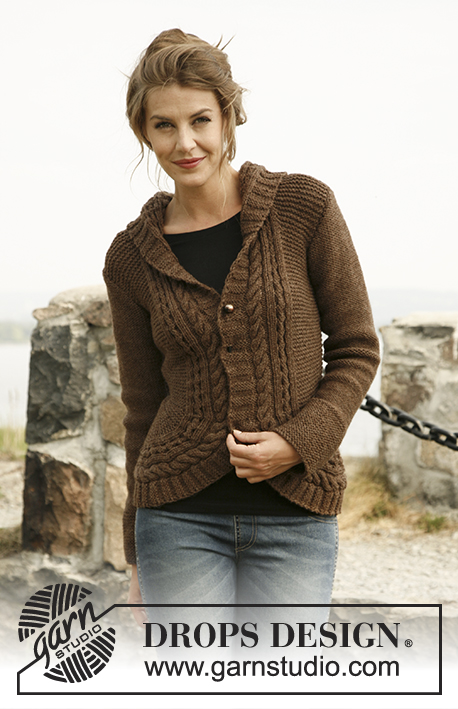
Knitted DROPS jacket with rounded front pieces and cables in ”Alaska”. Size: S to XXXL.
DROPS 134-55 |
|||||||||||||||||||||||||
|
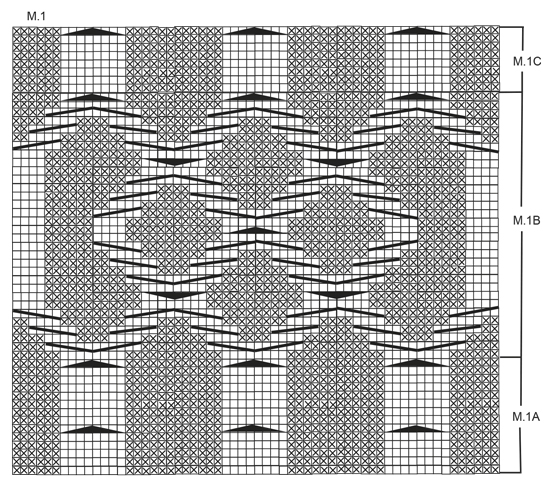
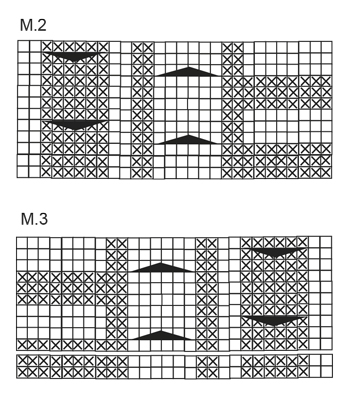
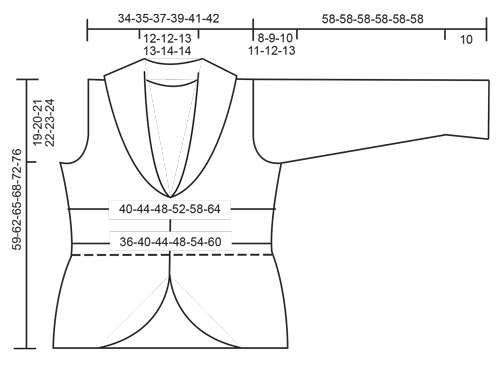
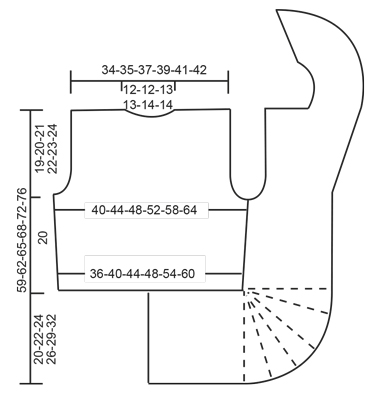
GARTER ST (back and forth on needle): K all rows. PATTERN: See diagrams M.1, M.2 and M.3 – diagrams show pattern from RS. 1st row in diagrams is worked from WS. DECREASE TIP (applies to armhole): Dec from RS inside 3 sts. Dec AFTER 3 sts as follows: K 2 tog. Dec BEFORE 3 sts as follows: K 2 twisted tog. SHORT ROWS: Work short rows on front piece to get a rounded edge on the piece. Also work short rows between the cables in the pattern. This can make it difficult to read the diagram - make sure to work 5 rows between every cable. Work short rows as follows: Row 1 and 2: Work 10 sts in all sizes, turn and work back. Row 3 and 4: Work 16 sts in all sizes, turn and work back. Row 5 and 6: Work 20 sts in all sizes, turn and work back. Row 7 and 8: Work 26 sts in all sizes, turn and work back. Row 9 and 10: Work 28-28-29-29-31-30 sts, turn and work back. Row 11 and 12: Work 31-31-32-32-34-33 sts, turn and work back. Continue to work 3 sts more on every turn until all sts have been worked. 18-20-22-24-26-30 rows in garter st have been worked at the outer side and 2 rows in garter st have been worked on the inside. Repeat from 1st row a total of 5 times. The rounded edge now measures approx. 28-31-34-37-41-46 cm on the outer side and 3 cm on the inside. -------------------------------------------------------- -------------------------------------------------------- BACK PIECE: Worked back and forth on needle. Cast on 68-74-80-88-98-108 sts on needle size 5 mm with Alaska. K 1 row from WS. Work next row from RS as follows: 10-13-16-20-25-30 sts in GARTER ST – see explanation above, * P 6, K 2 sts in each of the next 4 sts (= K 8), P 6 *, repeat from *-* a total of 3 times, 10-13-16-20-25-30 sts in garter st. There are now 80-86-92-100-110-120 sts on needle. Then work as follows (1st row = WS): 10-13-16-20-25-30 sts in garter st, diagram M.1A (= 60 sts) and 10-13-16-20-25-30 sts in garter st. After M.1A continue with M.1B 2 times vertically, then repeat M.1C until finished measurements. REMEMBER THE KNITTING TENSION! When piece measures 7 cm, inc 1 st in each side by working 1 YO inside outermost st – on next row K YO twisted (i.e. work in back loop of st instead of front) to avoid holes. Repeat inc every 5 cm a total of 3 times = 86-92-98-106-116-126 sts. When piece measures 20 cm in all sizes, cast off 3-4-5-6-7-8 sts at beg of the next 2 rows for armholes. Then dec on every row from RS: 1 st 2-3-4-5-7-10 times in each side – SEE DECREASE TIP! There are now 76-78-80-84-88-90 sts on needle. When piece measures 37-38-39-41-42-43 cm, work the 8 sts over the middle cable tog 2 by 2. On next row cast off the middle 20-20-22-22-24-24 sts for neck = 26-27-27-29-30-31 sts remaining on each shoulder. Then work 3 rows over these as before, on next row work the 8 sts over the cable tog 2 by 2 = 22-23-23-25-26-27 sts. Then cast off all sts on next row. Piece measures approx. 39-40-41-42-43-44 cm vertically. RIGHT EDGE PIECE/FRONT PIECE: All measurements should be done on the shorter side! Cast on 34-37-41-44-49-54 sts on needle size 5 mm with Alaska. K 1 row from WS. Work next row from RS as follows: K 8, P 2, K 2 sts in each of the next 3 sts (= K 6), P 2, K 2, P 2 sts in each of the next 3 sts (= P 6), K 2, 12-15-19-22-27-32 sts in garter st. There are now 40-43-47-50-55-60 sts on needle. Continue like this: 12-15-19-22-27-32 sts in garter st and diagram M.2 (= 28 sts) – 1st row = WS. When piece measures 17-19-21-23-26-29 cm, work SHORT ROWS - see explanation above – 1st row is worked from RS! When all short rows have been worked, insert a marker. NOW MEASURE PIECE FROM HERE! Continue to work over all sts as before. When piece measures 7 cm, beg to inc in the side as on back piece (i.e. the shorter side). After all inc, there are 43-46-50-53-58-63 sts on needle. When piece measures 20 cm, cast off and dec for armhole in the side as on back piece (cast off and dec in same side as inc). At the same time when piece measures 23 cm, beg to inc for collar. Inc inside diagram M.2 by making 1 YO, on next row K YO twisted (i.e. work in back loop of st instead of front) to avoid holes. Repeat inc every other row a total of 10-10-12-13-14-14 times - work inc sts in garter st. After all cast offs and dec for armhole and inc for collar, there are 48-49-53-55-58-59 sts on needle. When piece measures approx. 39-40-41-42-43-44 cm, adjust so that next row is worked from WS, cast off the first 22-23-23-25-26-27 sts in garter st = 26-26-30-30-32-32 sts remain on needle for collar. Continue to work as follows: * Work 2 rows over all sts, work 2 row only over the outermost 18-18-20-20-26-26 sts *, repeat from *-* until collar measures approx. 7-7-7½-7½-8-8 cm on the inside (it will then be twice as long at the outer side). On next row work all 6 sts over both cables tog 2 by 2 = 20-20-24-24-26-26 sts. Cast off. LEFT EDGE PIECE/FRONT PIECE: Cast on and work as right front piece but reversed. I.e. work 2nd row as follows: 12-15-19-22-27-32 sts in garter st, K 2, P 2 sts in each of the next 3 sts (= P 6), K 2, P 2, K 2 sts in each of the next 3 sts (= K 6), P 2 and K 8. There are now 40-43-47-50-55-60 sts on needle. Continue as follows (1st row = WS): Diagram M.3 (= 28 sts), 12-15-19-22-27-32 sts in garter st. Continue as on right front piece but when working short rows work 1st row from WS! Cast off shoulder sts from RS to avoid cutting the thread to work the collar. SLEEVE: Worked back and forth on needle. Cast on 42-42-44-44-46-48 sts (incl 1 edge st in each side) on needle size 5 mm with Alaska. Work 10 cm in garter st. Continue in stocking st. When piece measures 15 cm, inc 1 st in each side. Repeat inc every 4-3-3-2½-2-2 cm a total of 9-11-11-13-14-15 times = 60-64-66-70-74-78 sts. When piece measures 50-49-48-47-46-45 cm (shorter measurements in the larger sizes because of longer sleeve cap and broader shoulder width) cast off for sleeve cap at beg of every row in each side: 3 sts 1 time, 2 sts 3 times and 1 st 1-2-3-4-5-6 times, then cast off 2 sts in each side until sleeve measures 57 cm, then cast off 3 sts 1 time in each side, cast off remaining sts. The piece measures approx. 58 cm. ASSEMBLY: Sew cast on edge on edge pieces tog mid back - sew edge to edge to avoid a chunky seam. Then sew edge to bottom edge of back piece. Sew the shoulder seams. Sew side seam edge to edge. Sew the collar tog mid back and sew it to the neckline. Sew sleeve seams inside 1 edge st - sew so that WS is on the outside and sew sleeves on body. Close jacket with a pin or similar. |
|||||||||||||||||||||||||
Diagram explanations |
|||||||||||||||||||||||||
|
|||||||||||||||||||||||||
 |
|||||||||||||||||||||||||
 |
|||||||||||||||||||||||||
 |
|||||||||||||||||||||||||
 |
|||||||||||||||||||||||||
Have you finished this pattern?Tag your pictures with #dropspattern #chocolatepassioncardigan or submit them to the #dropsfan gallery. Do you need help with this pattern?You'll find 22 tutorial videos, a Comments/Questions area and more by visiting the pattern on garnstudio.com. © 1982-2026 DROPS Design A/S. We reserve all rights. This document, including all its sub-sections, has copyrights. Read more about what you can do with our patterns at the bottom of each pattern on our site. |
|||||||||||||||||||||||||


With over 40 years in knitting and crochet design, DROPS Design offers one of the most extensive collections of free patterns on the internet - translated to 17 languages. As of today we count 324 catalogues and 12290 patterns translated into English (UK/cm). 12290
We work hard to bring you the best knitting and crochet have to offer, inspiration and advice as well as great quality yarns at incredible prices! Would you like to use our patterns for other than personal use? You can read what you are allowed to do in the Copyright text at the bottom of all our patterns. Happy crafting!
Post a comment to pattern DROPS 134-55
We would love to hear what you have to say about this pattern!
If you want to leave a question, please make sure you select the correct category in the form below, to speed up the answering process. Required fields are marked *.