
Popular categories
Looking for a yarn?


Comments / Questions (44)
![]() Dagmar wrote:
Dagmar wrote:
Hallo, in der Anleitung zu M2 sollen 2 M in eine Masche gestrickt werden. Dadurch nimmt man ja immer nur zu, oder? Wann werden diese wieder abgenommen?
05.01.2026 - 15:38DROPS Design answered:
Liebe Dagmar, die Maschen werden nicht mehr abgenommen. M2 wird nur 1 x gestrickt, danach stricken Sie M3. Die Maschenzahl, die Sie in M2 nach den Zunahmen haben, ist die, mit der Sie weiterarbeiten. Viel Spaß beim Stricken!
07.01.2026 - 21:44
![]() Meyer wrote:
Meyer wrote:
Ah, vielen Dank für die Erläuterung. Zum Verständnis: bei M1 und M2 sind demnach auch jede Reihe aufgezeichnet?
07.10.2025 - 18:28DROPS Design answered:
Liebe Frau Meyer, ja genau; hier lesen Sie immer mehr über Diagramme. Viel Spaß beim Stricken!
08.10.2025 - 07:30
![]() Meyer wrote:
Meyer wrote:
M3 bildet bei mir nicht das komplette Muster ab. Die "X" erscheinen gar nicht. Ohne diese Struktur verliert aber die Jacke an pfiff. Ist die Stickschrift nicht komplett?
07.10.2025 - 16:09DROPS Design answered:
Liebe Frau Meyer, beachten Sie, daß alle Reihen gezeichnet sind, dh die Hin- sowie die Rückreihen, so sind es 7 Reihen zwischen den Zöpfen. Es kann auch sein, daß ein paar Zöpfe in der Höhe nötig sind, bevor man diese X sehen kann. Viel Spaß beim Stricken!
07.10.2025 - 16:57
![]() Maria wrote:
Maria wrote:
Bardzo efektowny kardigan!
11.06.2024 - 18:00
![]() Dolfin wrote:
Dolfin wrote:
Bonjour, Pour compléter ma précédente question, il me semble aussi que du coup on va avoir plusieurs rangs sur l'envers/endroit et non pas 2 rangs endroits, 2 rangs envers aux niveaux des rangs raccourcis ? On ne sera en M1 que sur le bout du col et non pas au bord. Merci
14.02.2024 - 12:59DROPS Design answered:
Bonjour Mme Dolfin, j'ai transmis votre question précédente à nos stylistes, mais avec la nouvelle collection, la réponse pourrait tarder; tricotez les rangs raccourcis en les commençant sur l'endroit, et en les tricotant comme indiqué, ça devrait fonctionner, le motif M.1 devrait rester le même sur l'extérieur du col, il y aura un léger décalage avec les mailles de l'intérieur du col à cause des rangs raccourcis. Bon tricot!
14.02.2024 - 16:27
![]() Dolfin wrote:
Dolfin wrote:
Bonjour, "Continuer en suivant M.1 en allers retours sur ces mailles, EN MÊME TEMPS, tricoter en rangs raccourcis ainsi – ajuster pour que le rang suivant soit un rang sur l'endroit et soit un rang 2" Mon rang 1 étant sur l'endroit, je ne vois pas comment mon rang 2 peut aussi être sur l'endroit, à part si je coupe le fil ? Pouvez-vous m'aider ? Merci
13.02.2024 - 16:25
![]() Sandra wrote:
Sandra wrote:
Ich stricke zum ersten mal eine Strickjacke und verstehe nicht wie man die Armlöcher abketten soll. Über eibe Hilfe wäre ich sehr dankbar.
21.07.2023 - 10:05DROPS Design answered:
Liebe Sandra, für das Rückenteil ketten Sie die Maschen am Anfang der Hin- sowie der Rückreihe ab; beim rechten Vorderteil ketten Sie die Maschen am Anfang einer Rückreihe ab; beim linken Vorderteil ketten Sie die Maschen am Anfang einer Hinreihe ab - dh immer am Anfang einer Reihe, die vom Armausschnitt beginnt. Viel Spaß beim stricken!
27.07.2023 - 11:38
![]() Michelle Bayetle wrote:
Michelle Bayetle wrote:
I would like to add 5” to pattern (size M). Would the best place to add it be after the first 4 rows of garter stitch? I am thinking I should start the decrease after 2-3/8” instead of after 1-½”. Does that make sense?
31.10.2021 - 22:41DROPS Design answered:
Dear Michelle, yes, if you only want to change the length, it is best to add it to the bottom, between the edge and the first decrease for waist shaping. Happy Knitting!
01.11.2021 - 11:24
![]() Sylvie wrote:
Sylvie wrote:
Bonjour, j'aimerais comprendre le motif 2 pour la taille m. Si je veux faire les augmentations à toutes les deux mailles, je manque de mailles. Pourquoi? De plus, j'aimerais savoir si l'on doit absolument faire les rangs raccourcis pour la réussite de ce tricot. Merci beaucoup.
28.09.2021 - 01:26DROPS Design answered:
Bonjour Sylvie, M.2 en M se tricote sur 15 m que vous tricotez ainsi: 4 m env, tricotez 2 fois chacune des 6 mailles suivantes (vous augmentez 6 m), 1 m end, 4 m env (= vous avez maintenant 21 m); lorsque l'on tricote du point mousse et du jersey en même temps, le point mousse va contracter l'ouvrage en hauteur, pour éviter que les bordures des devants ne soient plus courtes que la veste, on tricote des rangs raccourcis. Bon tricot!
28.09.2021 - 08:11
![]() Judy wrote:
Judy wrote:
Please explain how to knit the shortened rows on the shawl collar for the mirrored left front piece. I can’t get it. Thanks.
09.06.2020 - 20:54DROPS Design answered:
Dear Judy, on right front piece, you started the short rows from the right side of piece, on left front piece you will start them from the wrong side and work short rows the same way, just make sure to finish as on right piece. Happy knitting!
10.06.2020 - 06:29
|
|||||||||||||||||||||||||
Martina's Hug |
|||||||||||||||||||||||||
|
|
|||||||||||||||||||||||||
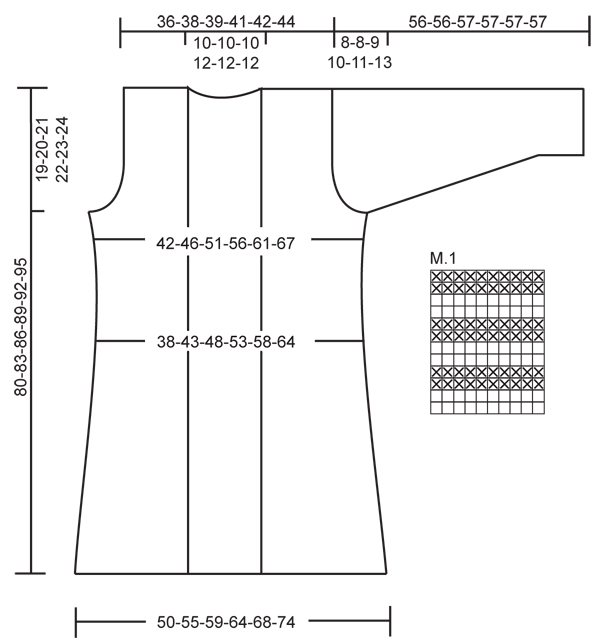
Knitted long DROPS jacket with cables and shawl collar in ”Nepal”. Size S - XXXL.
DROPS 123-39 |
|||||||||||||||||||||||||
|
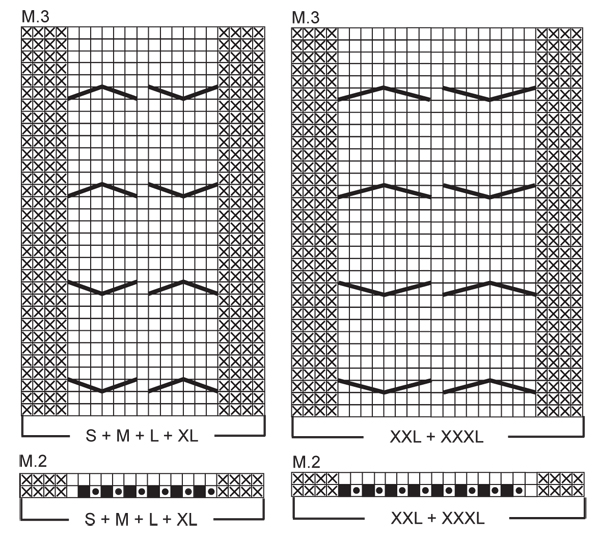
GARTER ST (back and forth on circular needle): K all rows. MEASUREMENT TIP: Because of the weight of the yarn make all measurements while the garment is hanging, otherwise it will be too long when worn. KNITTING TIP-1 (applies to front band): To make the edge neater work the 2 first sts on front band with 2 strands (use a separate small ball of yarn). It is important to either K or P first st according to pattern, i.e. do not slip first st as if to K/P. KNITTING TIP-2 (applies to front band): To make sure front band isn’t too tight, work shortened rows on front band with regular intervals as follows: * Beg mid front and work 2 rows as before on all sts on needle, turn piece, work 1 row on the 18-18-18-20-20-20 front band sts only, turn piece, slip 1 st as if to K/P, tighten thread and work return row *, repeat from *-* after approx every 10 rows. PATTERN: See diagrams M.1 to M.3. Diagrams show the pattern from RS. Row 1 in diagram = RS. INCREASING TIP (applies to shawl collar): Inc 1 st by making 1 YO inside the 2 front band sts towards front edge. On next row K YO into back of loop, to avoid a hole. BUTTONHOLES: Make buttonholes on right front band. 1 BUTTONHOLE = K tog 3rd and 4th st from mid front and make 1 YO. Make buttonholes when piece measures: SIZE S: 27, 34, 41 and 48 cm. SIZE M: 29, 36, 43 and 50 cm. SIZE L: 29, 37, 45 and 53 cm. SIZE XL: 31, 39, 47 and 55 cm. SIZE XXL: 34, 42, 50, 58 cm. SIZE XXXL: 33, 42, 51 and 60 cm. -------------------------------------------------------- JACKET: All parts worked back and forth on circular needle. BACK PIECE: Cast on 87-95-103-110-118-128 sts (includes 1 edge st each side) on circular needle size 4.5 mm with Nepal. Work 4 rows GARTER ST - see above! Change to circular needle size 5 mm and work stocking st back and forth on needle with 1 edge st each side. REMEMBER THE KNITTING TENSION! When piece measures 4-4-5-6-6-6 cm - See MEASUREMENT TIP -dec 1 st each side and repeat the dec each side on every 4-4-4-4.5-4.5-4.5 cm a total of 10-10-10-9-9-9 times = 67-75-83-92-100-110 sts. When piece measures 45-46-47-48-49-50 cm inc 1 st each side. Repeat the inc each side on every 5-5-6-6-6-6 cm a total of 3 times = 73-81-89-98-106-116 sts. When piece measures 61-63-65-67-69-71 cm cast off for armhole at beg of row each side as follows: 3 sts 1-1-1-1-2-3 times, 2 sts 1-1-2-3-3-4 times and 1 st 1-3-4-5-5-4 times = 61-65-67-70-72-74 sts. When piece measures 78-81-84-87-90-93 cm cast off the middle 15-15-15-18-18-18 sts for neck and complete each shoulder separately. Cast off 1 st on neckline on next row = 22-24-25-25-26-27 sts left on shoulder. Cast off when piece measures 80-83-86-89-92-95 cm. RIGHT FRONT PIECE: Cast on 53-57-61-65-69-74 sts (includes 1 edge st at the side and 18-18-18-20-20-20 front band sts towards front edge) on circular needle size 4.5 mm with Nepal. Work 4 rows garter st and change to circular needle size 5 mm. See KNITTING TIP 1 + 2 AND REMEMBER MEASUREMENT TIP! Work next row as follows from RS: M.1 on the first 18-18-18-20-20-20 sts (= front band), M.2 (= 15 sts in SIZE S + M + L + XL and 17 sts in SIZE XXL + XXXL), stocking st on the next 19-23-27-29-31-36 sts and 1 edge st. After 1 vertical repeat of M.2 there are 59-63-67-71-77-82 sts on needle. Now continue in M.3 instead of M.2 (Row 1 = RS, see diagram for your size) – work remaining sts as before. When piece measures 4-4-5-6-6-6 cm dec at the side as described for back piece = 49-53-57-62-68-73 sts. REMEMBER BUTTONHOLES ON FRONT BAND - see above. When piece measures 45-46-47-48-49-50 cm inc at the side as described for back piece. AT THE SAME TIME when piece measures 48-49-50-51-52-53 cm inc 1 st for shawl collar – See INCREASING TIP. Repeat the inc on every 3-3.5-3.5-4-4-4.5 cm a total of 8 times. AT THE SAME TIME when piece measures 61-63-65-67-69-71 cm cast off for armhole at the side as described for back piece (cast off at the beg of every row from the side). After all inc and dec are complete there are 54-56-57-59-62-63 sts on needle. Continue until 1 row remains before piece measures 80-83-86-89-92-95 cm – adjust so that next row is from RS. Now dec evenly on the middle 13-13-13-13-17-17 sts in cable as follows: 6 sts in SIZE S + M + L + XL and 8 sts in SIZE XXL + XXXL – NOTE: Dec by K2 tog. On next row cast off 22-24-25-25-26-27 sts for shoulder = 26-26-26-28-28-28 sts left on needle for shawl collar, work remaining sts on row. Continue in M.1 back and forth on these sts AT THE SAME TIME work shortened rows as follows - adjust so that next row is a K row from RS and either row 2, 6 or 10 in M.1 (adjust to this by working an extra row here if necessary): * K1 row from RS on all sts, turn and K return row from WS on all sts, turn and P the first 14 sts, turn, slip first st as if to K, tighten thread and K return row, turn and P 1 row on all sts, turn and P 1 row from WS on all sts *, repeat from *-* until collar measures approx 7-7-7-8-8-8 cm towards the neck, slip sts on a stitch holder. LEFT FRONT PIECE: Cast on and work like right front piece, but mirrored. NOTE: Do not make buttonholes on left front band. When working shortened rows on collar adjust so the collar is identical on both sides and mid back for sewing tog SLEEVE: Cast on 42-44-44-46-46-48 sts (includes 1 edge st each side) on circular needle size 4.5 mm with Nepal. Work 4 rows garter st. Change to circular needle size 5 mm and work M.1 back and forth on needle. When piece measures 8 cm continue in stocking st. When piece measures 9-9-11-9-12-10 cm inc 1 st each side. Repeat the inc on every 5-4-3-3-2-2 cm a total of 8-10-12-13-16-16 times = 58-64-68-72-78-80 sts. When piece measures 48-48-48-47-46-44 cm - NOTE: Less for the larger sizes because of longer sleeve cap and wider shoulder – cast off for sleeve cap at the beg of every row each side as follows: 3 sts 1 time, 2 sts 3 times and 1 st 1-1-2-3-4-5 times, then 2 sts each side until piece measures 55-55-56-56-56-56 cm. Now cast off 3 sts at the beg of the next 2 rows and cast off remaining sts, piece measures approx 56-56-57-57-57-57 cm. ASSEMBLY: Sew shoulder seams. Graft collar tog mid back and sew collar to neckline on back piece. Set in sleeves. Sew sleeve and side seams inside 1 edge st. Sew buttons on left front piece. |
|||||||||||||||||||||||||
Diagram explanations |
|||||||||||||||||||||||||
|
|||||||||||||||||||||||||
 |
|||||||||||||||||||||||||
 |
|||||||||||||||||||||||||
Have you finished this pattern?Tag your pictures with #dropspattern or submit them to the #dropsfan gallery. Do you need help with this pattern?You'll find 23 tutorial videos, a Comments/Questions area and more by visiting the pattern on garnstudio.com. © 1982-2026 DROPS Design A/S. We reserve all rights. This document, including all its sub-sections, has copyrights. Read more about what you can do with our patterns at the bottom of each pattern on our site. |
|||||||||||||||||||||||||


With over 40 years in knitting and crochet design, DROPS Design offers one of the most extensive collections of free patterns on the internet - translated to 17 languages. As of today we count 324 catalogues and 12290 patterns translated into English (UK/cm). 12290
We work hard to bring you the best knitting and crochet have to offer, inspiration and advice as well as great quality yarns at incredible prices! Would you like to use our patterns for other than personal use? You can read what you are allowed to do in the Copyright text at the bottom of all our patterns. Happy crafting!
Post a comment to pattern DROPS 123-39
We would love to hear what you have to say about this pattern!
If you want to leave a question, please make sure you select the correct category in the form below, to speed up the answering process. Required fields are marked *.