
Popular categories
Looking for a yarn?


Comments / Questions (71)
![]() Merete wrote:
Merete wrote:
Hvilke farger (fargekoder) er benyttet i genseren som barnet har på seg?
11.02.2026 - 22:04DROPS Design answered:
Hei Merete, Drops Fabel nr 910 har utgått, men vi har andre spennende farger. Hvis du holder kursoren over bildet av hvert garn, får du vite hvordan det ser ut når det er ferdig strikket. Hilsen Drops Team.
12.02.2026 - 06:53
![]() Turid wrote:
Turid wrote:
Hvilke farger brukes i genseren som er i flere blåfarger, hvitt og beige? Kan jeg bruke garnet Drops Merino baby ull?
27.01.2026 - 14:12DROPS Design answered:
Hei Turid. Det er farge 910 print - havbrus (tidligere sea mist, men fargenr er alltid det samme). Denne fargen er en utgående farge, så det er ikke alle som har denne fargen lengre. mvh DROPS Design
30.01.2026 - 06:59
![]() Michaela wrote:
Michaela wrote:
Hallo, muss ich die Raglanabnahmen nur in den Hinreihen(= Vorderseite)machen, oder auch in den Rückreihen? In einer Antwort auf eine französiche Frage(Mme Fuchs) steht: 8 Maschen in JEDER Reihe abnehmen. Aber hier steht :Jetzt von der Vorderseite an den 3 Markierungsfäden je 1 M. abn. und am Anfang/Schluss der Runde je 1 M. abn. (= 8 Abnahmen) – SIEHE TIPP ZUM ABNEHMEN!Bei jeder 2. R. total 10-12-11 (12-14) Mal und danach bei jeder R. 6-6-11 (12-12) Mal wiederholen.Danke für Ihre Hilfe
12.11.2025 - 20:28DROPS Design answered:
Liebe Michaela, die Raglanabnahmen werden zuerst in jeder 2. Reihe (= in jeder Hinreihe) dann in jeder Reihe (bei Hin- sowie Rückreihen) gestrickt: Bei jeder 2. R. total 10-12-11 (12-14) Mal und danach bei jeder R. 6-6-11 (12-12) Mal wiederholen. Viel Spaß beim Stricken!
21.11.2025 - 15:26
![]() Cornelia wrote:
Cornelia wrote:
Wird die Länge bis zum Armloch vom Anschlag oder ab dem Bündchen gemessen?
22.09.2025 - 22:17DROPS Design answered:
Liebe Cornelia, die Länge wird ab dem Anschlag gemessen.
26.10.2025 - 22:59
![]() Gail wrote:
Gail wrote:
Thanks. These shortened rows go over 4 rows. I started with 2 rows of cream colour as shown in pattern. My next 2 rows in shortened rows, according to pattern should be the blue wool. Confirming I do all shortened rows in one colour. Thanks.
25.08.2025 - 13:44DROPS Design answered:
Dear Gail, the shortened rows are all worked in the same colour, the same one as the colour used in your last row; the stripes have been finished after the decreases. Happy knitting!
31.08.2025 - 19:21
![]() Gail wrote:
Gail wrote:
I can’t understand ‘work shortened rows mid back’ instructions. RS facing has me working from the front raglan opening, across front, over sleeve to back marker. Is this correct? Work 7 sts past. Turn. Slip 1st st kw. Is this stitch included in the ‘work14sts’? Have I started this shaping in correct place? I can’t picture the result. Thanks
20.08.2025 - 09:27DROPS Design answered:
Dear Gail, you first work the first row until the mid-back marker and then start working the actual short rows. Work 7 sts past the marker, turn and slip 1 stitch knitwise, then work the remaining 13 sts (the 7 stitches before the mid-back marker and 7 sts past the mid-back marker). Each time you will work over the stitches from the previous short row and add new stitches after them, on each side. Happy knitting!
25.08.2025 - 12:45
![]() Albertien Parlevliet wrote:
Albertien Parlevliet wrote:
Ik zie op de foto meer verschillende kleuren bij hello stripes. In de beschrijving vind ik er maar 2 terug. 910: sea mist en 100: naturel. Klopt de beschrijving wel?
11.08.2025 - 16:59DROPS Design answered:
Dag Albertien,
Dat klopt, want Fabel Zeemist is een meerkleurig garen met overgangen, vandaar dat je meer kleuren ziet.
18.08.2025 - 10:30
![]() Gail wrote:
Gail wrote:
Hopefully last question. When decreasing for raglan do I have to keep including the one alternate stitch colour as shown in pattern gris? Can I skip this and knit in correct colours, but continue the pattern in keeping with previous rows? Thanks
04.08.2025 - 06:10DROPS Design answered:
Dear Gail, yes, as you decrease for the raglan you should continue working the alternate stitches. However, if you prefer how the stripes look like without the alternate stitches you can also skip these stitches and work normal stripes. Happy knitting!
05.08.2025 - 12:09
![]() Gail wrote:
Gail wrote:
Hooray! Thanks! This totally goes contrary to my knitting experiences. Suggest this could be included in pattern chart eg ‘from ws’, for dummies like me! Again thanks. Knitting 18 months. Little boy might be 3yo by the time he gets it haha! Gail
28.07.2025 - 00:06
![]() Gail wrote:
Gail wrote:
So I cast off underarms in new colour. I slipped this first row. I knitted the next row in same colour from raglan edge, casting off 3 sts and joining sleeves into knitting . This makes 2 rows. Now I have wrong side facing. Confirm this pls. I cast off 3 sts (raglan edge). This must be the row where the alternate stitch is included. So the wrong side is now the pattern side? I purl in main colour and purl the alternate st. I cannot see how else it is done. The instructions are confusing.
26.07.2025 - 10:26DROPS Design answered:
Dear Gail, yes, this is correct. Remember that you work a row with alternate stitches every 5th row, which means that sometimes this row is worked from the right side and sometimes from the wrong side. In this case, the alternate stitch is worked in a wrong side row; the next time you work an alternate stitch (in the next stripe) you will be working it from the right side. Happy knitting!
27.07.2025 - 18:55
|
|||||||
Hello Stripes#hellostripessweater |
|||||||
 |
 |
||||||
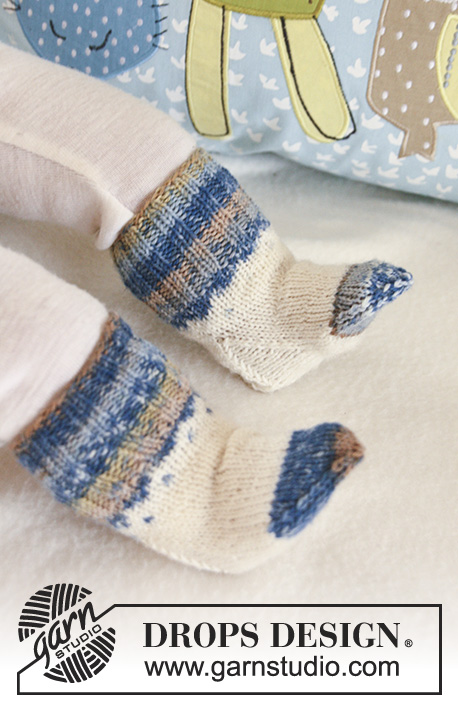
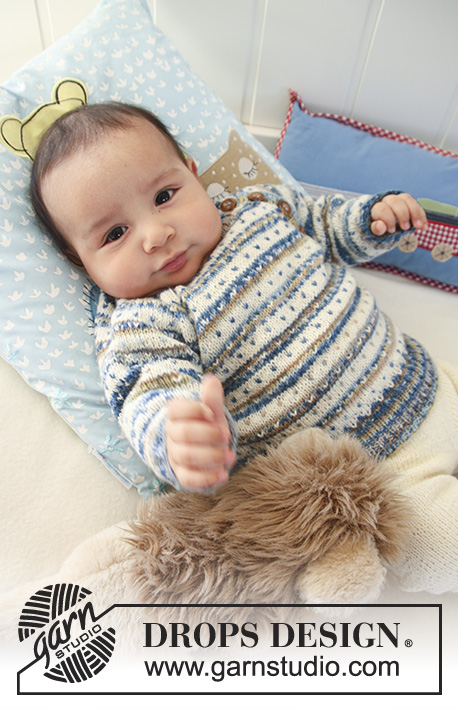
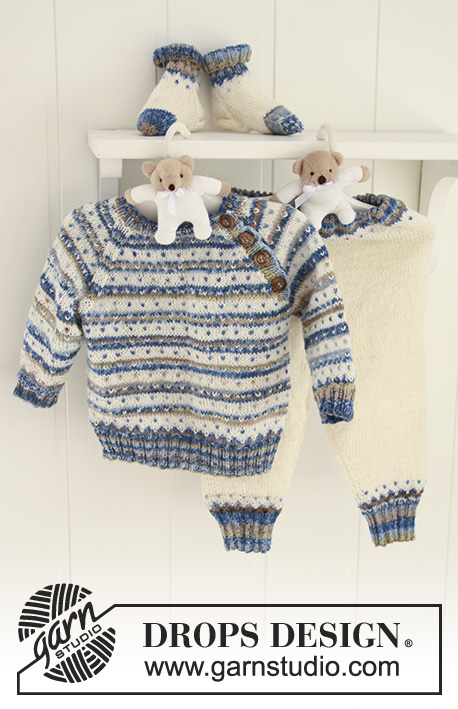
Set of knitted jumper with stripes, dots and raglan, pants and socks for baby and children in DROPS Fabel
DROPS Baby 19-3 |
|||||||
|
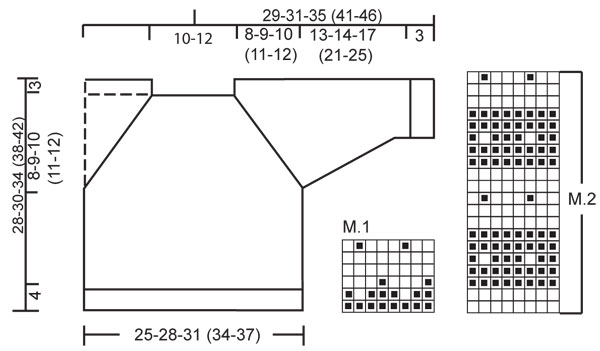
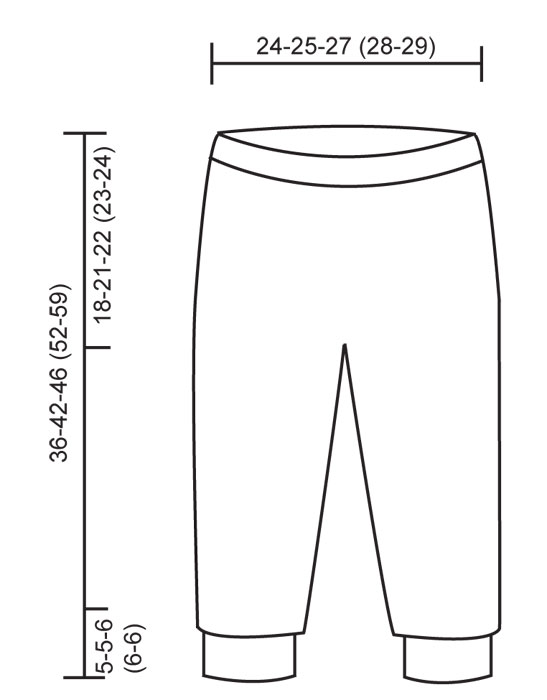
JUMPER: PATTERN: See diagram M.1 and M.2. The entire pattern is worked in stocking st. DECREASING TIP (applies to raglan): FROM RS: At beg of row: 1 edge st, slip 1 st as if to K, K1, psso. At the end of row (beg when 3 sts remain): K2 tog, 1 edge st. By the other 3 markers dec as follows in each transition between sleeve and body piece (beg 3 sts before marker): K2 tog, K2 (marker sits between these 2 sts), slip 1 st as if to K, K1, psso. FROM WS: At beg of row: 1 edge st, P2 tog. At the end of row (beg when 3 sts remain): P2 tog into back of loop, 1 edge st. By the other 3 markers dec as follows in each transition between sleeve and body piece (beg 3 sts before marker): P2 tog into back of loop, P2 (marker sits between these 2 sts), P2 tog. NOTE! Make sure sts sit the right way as seen from RS. --------------------------------------------------------- --------------------------------------------------------- JUMPER: BODY PIECE: Worked in the round on circular needle. Cast on 140-156-176 (192-212) sts on circular needle size 2.5 mm with sea mist. K 1 round and continue in rib, K2/P2. When rib measures 4 cm K 1 round, AT THE SAME TIME dec 12-12-16 (16-20) sts evenly = 128-144-160 (176-192) sts. Insert a marker each side = 64-72-80 (88-96) sts between markers. Work M.1. After M.1 continue in M.2. REMEMBER THE KNITTING TENSION! When piece measures approx 17-18-21 (24-27) cm - adjust after 1 stripe in M.2 (i.e. after 5 rows in one colour) - work next round as follows: cast off 4 sts for armhole, work 57-65-73 (81-89) sts (= front piece), cast off 7 sts for armhole, work 57-65-73 (81-89) sts (= back piece) and cast off the last 3 sts for armhole, cut the thread. Insert a marker in the middle sts on back piece (= mid back at neck). Put piece aside and knit the sleeves. SLEEVE: Worked in the round on double pointed needles. Cast on 40-44-44 (48-52) sts on double pointed needles size 2.5 mm with sea mist. K 1 round and continue in rib, K2/P2. When rib measures 3 cm K 1 round, AT THE SAME TIME dec 4 sts evenly = 36-40-40 (44-48) sts. Insert a marker at beg of round = mid under sleeve. Continue in M.1. After M.1 continue in M.2. AT THE SAME TIME when piece measures 6 cm inc 1 st each side of marker. Repeat the inc on every 4-4-4 (5-6) round a total of 8-8-12 (12-12) times = 52-56-64 (68-72) sts – incorporate inc sts in pattern as you go along. When piece measures approx 16-17-20 (24-28) cm - adjust to the same row in M.2 as on body piece – cast off 7 sts mid under sleeve (= 4 sts after marker at beg of round and 3 sts before marker at the end of round) = 45-49-57 (61-65) sts left on needle. Cut the thread and put piece aside. Knit the other sleeve. YOKE: Slip sleeves on the same circular needle as body piece where cast off for armholes = 204-228-260 (284-308) sts. Insert a marker in all transitions between sleeves and body piece except by the left raglan at front (when jumper is worn). READ ALL OF THE FOLLOWING SECTION BEFORE CONTINUING! Continue back and forth on needle from the left raglan at front. Continue in M.2 - make sure stripes on sleeves and body piece match. Beg by casting off 3 sts at the beg of the next 2 rows (= raglan opening). RAGLAN DEC: Now dec 1 st with start from RS on each side of the 3 markers, at the same time dec 1 st at the beg and at the end of row (= 8 dec per row) – SEE DECREASING TIP! Repeat the dec on every other row a total of 10-12-11 (12-14) times and then on every row: 6-6-11 (12-12) times. After all dec are complete there are 70-78-78 (86-94) sts left on needle and piece measures approx 28-30-34 (38-42) cm from cast on row to the shoulder. Now work shortened rows mid back as follows from RS – continue in the last colour and work shortened rows in this colour: work row to marker mid back, work 6-7-7 (8-9) sts past marker and turn piece (to avoid a hole slip first st as if to K and tighten thread). Work 12-14-14 (16-18) sts and turn piece, work 18-21-21 (24-27) sts and turn piece, work 24-28-28 (32-36) sts and turn piece. Now slip all sts on a stitch holder and work the raglan edges before the neckline. RAGLAN EDGES: Pick up approx 24 to 32 sts (divisible by 4) inside 1 edge st along the raglan opening on sleeve on needle size 2.5 mm with sea mist. Work rib with 1 edge st in garter st and K2 each side as seen from RS. When the edge measures 2 cm cast off with K over K and P over P. Repeat along the raglan opening on front piece, but after 2 rows make 3 buttonholes evenly distributed (the last buttonhole is made on neckline). 1 BUTTONHOLE = cast off 2 sts and cast on 2 new sts on return row. NECK: Slip sts from stitch holder back on circular needle size 2.5 mm and pick up 5 sts on each front band with sea mist = 80-88-88 (96-104) sts. Work rib back and forth on needle from raglan opening as follows as seen from RS: 1 edge st in garter st, * K2/P2 *, repeat from *-* and finish with K2 and 1 edge st in garter st. AT THE SAME TIME after 2 rows make 1 buttonhole over the others on raglan edge. Cast off with K over K and P over P when neck measures 2 cm. ASSEMBLY: Sew openings under sleeves. Sew raglan edges tog at the bottom by opening towards the sleeve. Sew on buttons. ----------------------------------------------------------------- PANTS: PATTERN: See diagram M.1 – pattern worked in stocking st. DECREASING TIP: Dec as follows 3 sts before marker: K2 tog, K1. Dec as follows after marker: K1, slip 1 st as if to K, K1, psso. --------------------------------------------------------- --------------------------------------------------------- PANTS: Worked in the round on needle from bottom up. LEG: LOOSELY cast on 52-56-60 (64-68) sts on double pointed needles size 2.5 mm with sea mist. Insert a marker at beg of round = inside of leg. K 1 round and continue in rib, K2/P2 in the round for 5-5-6 (6-6) cm. K 1 round and continue in M.1. REMEMBER THE KNITTING TENSION! After M.1 continue in off-white and stocking st. AT THE SAME TIME on first round after M.1 inc 1 st on each side of marker. Repeat the inc on every 3-4-5 (8-12) round a total of 10-11-10 (9-8) times = 72-78-80 (82-84) sts. When piece measures 16-19-22 (27-33) cm (inc are now complete) divide piece on the inside of leg and complete piece back and forth on needle (to make it easier to slip both legs on the same circular needle afterwards). Cast on 1 new st each side for seam = 74-80-82 (84-86) sts. When piece measures 18-21-24 (29-35) cm cast off 3 sts at the beg of the next 2 rows with start from RS = 68-74-76 (78-80) sts. Put piece aside and knit the other leg. PANTS: Slip legs on the same circular needle size 2.5 mm = 136-148-152 (156-160) sts – beg of round = mid back. Insert a marker mid front. Continue in the round on needle with off-white and stocking st, AT THE SAME TIME dec 1 st on each side of marker mid front – SEE DECREASING TIP. Repeat the dec on every other round a total of 5-8-7 (6-5) times = 126-132-138 (144-150) sts. When piece measures 32-38-42 (48-55) cm adjust no of sts on round to 124-132-140 (144-152) sts. Now work shortened rows mid back as follows: Work 12 sts from beg of round, turn piece (to avoid a hole slip first st as if to K and tighten thread). Work 24 sts and turn piece, work 36 sts and turn, work 48 sts and turn. Continue like this by working 12 more sts before each turn another 6-6-6 (8-8) times. Now work M.1 on all sts, but work the pattern from top down in diagram. After M.1 continue in sea mist and stocking st. When piece measures 36-42-46 (52-59) cm work next round as follows: * K2 tog, 1 YO *, repeat from *-* (= folding edge). Work 2 cm stocking st and cast off loosely. ASSEMBLY: Sew tog split on the inside of each leg inside 1 edge st. Sew tog opening between legs. Fold the top towards WS along folding edge and fasten to WS but leave a small opening and insert the elastic. -------------------------------------------------------------------- SOCK: PATTERN: See diagram M.1 – pattern worked in stocking st. HEEL DECREASES: ROW 1 (= RS): Work row until 6-6-6 (7-8) sts remain, slip next st as if to K, K1, psso, turn piece. ROW 2 (= WS): Work row until 6-6-6 (7-8) sts remain, slip next st as if to P, P1, psso, turn piece. ROW 3 (= RS): Work row until 5-5-5 (6-7) sts remain, slip next st as if to K, K1, psso, turn piece. ROW 4 (= WS): Work row until 5-5-5 (6-7) sts remain, slip next st as if to P, P1, psso, turn piece. Continue dec like this with 1 less st before each dec until there are 8-10-10 (10-12) sts on needle. DECREASING TIP: Dec as follows before marker: K2 tog. Dec as follows after marker: Slip 1 st as if to K, K1, psso. --------------------------------------------------------- --------------------------------------------------------- SOCK: Cast on 48-52-52 (56-60) sts on double pointed needles size 2.5 mm with sea mist. Work rib, K2/P2 for 5-6-6 (7-7) cm. K 1 round, AT THE SAME TIME dec 12 sts evenly = 36-40-40 (44-48) sts. Continue in M.1. After M.1 continue in off-white and stocking st. When piece measures 7-8-8 (9-9) cm keep the first 18-20-20 (22-26) sts on needle for heel and slip the remaining 18-20-20 (22-22) sts on a stitch holder (= upper foot). Work stocking st back and forth on needle on heel sts for 3-3.5-4 (4-4.5) cm – insert 1 marker. Now work HEEL DECREASES – SEE ABOVE! After heel dec pick up 8-9-10 (10-11) sts each side of heel and slip sts from stitch holder back on needle = 42-48-50 (52-56) sts. Continue in the round in stocking st. AT THE SAME TIME on first round dec 1 st before the 18-20-20 (22-22) sts on upper foot by K2 tog, and dec 1 st after the 18-20-20 (22-22) sts on upper foot by slipping 1 st as if to K, K1 and psso. Repeat the dec on every other round a total of 3-6-7 (5-7) times = 36-36-36 (42-42) sts. Continue until sock measures 7-8-9 (10-12) cm from marker on heel, change to sea mist and continue in stocking st. When sock measures 8-9-10 (12-14) cm from marker on heel insert 1 new marker each side of piece (= 18-18-18 (21-21) sts on upper foot and under foot between markers). Now dec 1 st on each side of both markers – SEE DECREASING TIP. Repeat the dec on every round a total of 7-7-7 (8-8) times = 8-8-8 (10-10) sts left on needle. Cut the thread, pull it through remaining sts, tighten and fasten. Sock measures approx 10-11-12 (14-16) cm. |
|||||||
Diagram explanations |
|||||||
|
|||||||
 |
|||||||
 |
|||||||
Have you finished this pattern?Tag your pictures with #dropspattern #hellostripessweater or submit them to the #dropsfan gallery. Do you need help with this pattern?You'll find 25 tutorial videos, a Comments/Questions area and more by visiting the pattern on garnstudio.com. © 1982-2026 DROPS Design A/S. We reserve all rights. This document, including all its sub-sections, has copyrights. Read more about what you can do with our patterns at the bottom of each pattern on our site. |
|||||||


With over 40 years in knitting and crochet design, DROPS Design offers one of the most extensive collections of free patterns on the internet - translated to 17 languages. As of today we count 324 catalogues and 12290 patterns translated into English (UK/cm). 12290
We work hard to bring you the best knitting and crochet have to offer, inspiration and advice as well as great quality yarns at incredible prices! Would you like to use our patterns for other than personal use? You can read what you are allowed to do in the Copyright text at the bottom of all our patterns. Happy crafting!
Post a comment to pattern DROPS Baby 19-3
We would love to hear what you have to say about this pattern!
If you want to leave a question, please make sure you select the correct category in the form below, to speed up the answering process. Required fields are marked *.