Clicking the ORDER button will redirect you to Saules siulas website
The yarn cost is calculated from the pattern’s smallest size and the yarn’s cheapest product type. Looking for an even better price? You might find it on the DROPS Deals!
-------------------------------------------------------
Alternative Yarn – See how to change yarns here
Yarn Groups A to F – Use the same pattern and change the yarn here
Yarn usage using an alternative yarn – Use our yarn converter here
-------------------------------------------------------
Clicking the ORDER button will redirect you to Saules siulas website
The yarn cost is calculated from the pattern’s smallest size and the yarn’s cheapest product type. Looking for an even better price? You might find it on the DROPS Deals!
= K from RS, P from WS | |
= slip 3 sts on cable needle behind piece, K3, K3 from cable needle | |
= slip 3 sts on cable needle in front of piece, K3, K3 from cable needle | |
= slip 3 sts on cable needle behind piece, K3, K2 tog and K1 from cable needle | |
= slip 3 sts on cable needle in front of piece, K2 tog, K1, K3 from cable needle | |
= slip 3 sts on cable needle behind piece, K2, K2 tog and K1 from cable needle | |
= slip 2 sts on cable needle in front of piece, K2 tog, K1, K2 from cable needle | |
= slip 2 sts on cable needle behind piece, K2, K2 from cable needle | |
= slip 2 sts on cable needle in front of piece, K2, K2 from cable needle | |
= slip 1 st as if to K, K1, psso | |
= K2 tog |
Each of our patterns has specific tutorial videos to help you.
These step-by-step tutorials might also help you:
Why is the knitting/crochet tension so important?
Knitting tension is what determines the final measurements of your work, and is usually measured per 10 x 10 cm. It is provided like so: number of stitches in width x number of rows in height - eg: 19 stitches x 26 rows = 10 x 10 cm.
The knitting tension is very individual; some people knit/crochet loosely while others work tightly. You adjust the knitting tension with the needle size, which is why the suggested needle size is only meant as a guide! You need to adjust this (up or down) to ensure that YOUR knitting tension matches the knitting tension provided in the pattern. If you work with a different knitting tension than provided you will have a different yarn consumption, and your work will have different measurements than what the pattern suggests.
The knitting tension also determines which yarns can replace each other. As long as you achieve the same knitting tension you can replace one yarn with another.
See DROPS lesson: How to measure your tension/gauge
See DROPS video: How to make a gauge tension swatch
How do I know how many balls of yarn I need?
The required amount of yarn is provided in grams, eg: 450 g. To calculate how many balls you’ll need you first need to know how many grams are in 1 ball (25g, 50g or 100g). This information is available if you click on the individual yarn quality on our pages. Divide the amount required with the amount of each ball. For example, if each ball is 50g (the most common amount), the calculation will be as follows: 450 / 50 = 9 balls.
Can I use a different yarn than what the pattern suggests?
The important thing when changing from one yarn to another is that the knitting/crochet tension remains the same. This is so that the measurements of the finished piece will be the same as on the sketch provided. It is easier to achieve the same knitting tension using yarns from the same yarn group. It is also possible to work with multiple strands of a thinner yarn to achieve the knitting tension of a thicker one. Please try our yarn converter. We recommend you to always work a test swatch.
Please NOTE: when changing yarn the garment might have a different look and feel to the garment in the photo, due to individual properties and qualities of each yarn.
See DROPS lesson: Can I use a different yarn than the one mentioned in the pattern?
What are the yarn groups?
All our yarns are categorised into yarn groups (from A to F) according to thickness and knitting tension – group A contains the thinnest yarns and group F the thickest. This makes it easier for you to find alternative yarns to our patterns, should you wish to switch yarn. All yarns within the same group have a similar knitting tension and can easily replace each other. However, different yarn qualities have different structures and properties which will give the finished work a unique look and feel.
How do I use the yarn calculator?
At the top of all our patterns you’ll find a link to our yarn calculator, which is a helpful tool should you wish to use a different yarn than suggested. By filling in the yarn quality you wish to replace, the amount (in your size) and number of strands, the calculator will present good alternative yarns with the same knitting tension. Additionally it will tell you how much you’ll require in the new qualities and whether you’ll need to work with multiple strands. Most skeins are 50g (some are 25g or 100g).
If the pattern is worked with multiple colours, every colour will have to be calculated separately. Similarly, if the pattern is worked with several strands of different yarns (for example 1 strand Alpaca and 1 strand Kid-Silk) you will have to find alternatives for each, individually.
Why do you show discontinued yarns in the patterns?
Since different yarns have different qualities and textures we have chosen to keep the original yarn in our patterns. However, you can easily find options among our available qualities by using our yarn calculator, or simply pick a yarn from the same yarn group.
It is possible that some retailers still have discontinued yarns in stock, or that someone has a few skeins at home that they would like to find patterns for.
The yarn calculator will provide both alternative yarn as well as required amount in the new quality.
What size should I knit?
If you think it's hard to decide what size to make, it can be a good idea to measure a garment you own already and like the size of. Then you can pick the size by comparing those measures with the ones available in the pattern's size chart.
You'll find the size chart at the bottom of the pattern.
See DROPS lesson: How to read size chart
Why do I get the wrong knitting tension with the suggested needle size?
The needle size provided in the pattern serves only as a guide, the important thing is to follow the knitting tension. And since knitting tension is very individual, you will have to adjust the needle size to ensure that YOUR tension is the same as in the pattern – maybe you’ll have to adjust 1, or even 2 needle sizes, up or down to achieve the correct tension. For this, we recommend that you work test swatches.
Should you work with a different knitting tension than the one provided, the measurements of the finished garment might deviate from the measurement sketch.
See DROPS lesson: How to measure your tension/gauge
See DROPS video: How to make a tension/gauge swatch
Why is the pattern worked top-down?
Working a garment top-down provides more flexibility and room for personal adjustment. For example it is easier to try the garment on while working, as well as making adjustments to length of yoke and shoulder caps.
The instructions are carefully explaining every step, in the correct order. Diagrams are adjusted to the knitting direction and are worked as usual.
How do I work according to a knitting diagram?
The diagram depicts all rows/rounds, and every stitch seen from the right side. It is read from bottom to top, from right to left. 1 square = 1 stitch.
When working back and forth, every other row is worked from the right side and every other row is worked from the wrong side. When working from the wrong side, the diagram will have to be worked reversed: from left to right, knit stitches are purled, purl stitches are knit etc.
When working in the round every round is worked from the right side and the diagram are worked from right to left on all rounds.
See DROPS lesson: How to read knitting diagrams
How do I work according to a crochet diagram?
The diagram depicts all rows/rounds, and every stitch seen from the right side. It is worked from bottom to top, from right to left.
When working back and forth every other row is worked from the right side: from right to left and every other row is worked from the wrong side: from left to right.
When working in the round, every row in the diagram are worked from the right side, from right to left.
When working a circular diagram you start in the middle and work your way outwards, counter clockwise, row by row.
The rows usually start with a given number of chain stitches (equivalent to the height of the following stitch), this will either be depicted in the diagram or explained in the pattern.
See DROPS lesson: How to read crochet diagrams
How do I work several diagrams simultaneously on the same row/round?
Instructions for working several diagrams after each other on the same row/round, will often be written like so: “work A.1, A.2, A.3 a total of 0-0-2-3-4 times". This means you work A.1 once, then A.2 is worked once, and A.3 is repeated (in width) the number of times provided for your size – in this case like so: S = 0 times, M = 0 times, L=2 times, XL= 3 times and XXL = 4 times.
The diagrams are worked as usual: begin with the first row in A.1, then work the first row in A.2 etc.
See DROPS lesson: How to read knitting diagrams
See DROPS lesson: How to read crochet diagrams
Why are the sleeves shorter in larger sizes?
The total width of the garment (from wrist-to-wrist) will be larger in the larger sizes, despite the actual sleeves being shorter. The larger sizes have longer sleeve caps and wider shoulders, so there will be a good fit in all sizes.
Where on the garment is the length measured?
The measurement sketch/schematic drawing provides information regarding the full length of the garment. If it’s a jumper or a jacket the length is measured from the highest point on the shoulder closest to the neckline, and straight down to the bottom of the garment. It is NOT measured from the tip of shoulder. Similarly, the length of yoke is measured from the highest point on the shoulder and down to where yoke is split into body and sleeves.
On a jacket measures are never taken along bands, unless specifically stated. Always measure inside band stitches when measuring the length.
See DROPS lesson: How to read a schematic drawing
What is a repeat?
Diagrams are often repeated on the round or in height. 1 repeat is the diagram the way it appears in the pattern. If it says to work 5 repeats of A.1 in the round, then you work A.1 a total of 5 times after/next to each other in the round. If it says to work 2 repeats of A.1 vertically/in height you work the entire diagram once, then begin again at the start and work the entire diagram one more time.
Why does the piece start with more chain stitches than it’s worked with?
Chain stitches are slightly narrower than other stitches and to avoid working the cast-on edge too tight, we simply chain more stitches to begin with. The stitch count will be adjusted on the following row to fit the pattern and measurement sketch.
Why increase before the rib edge when the piece is worked top-down?
The rib edge is more elastic and will contract slightly compared to, for example, stocking stitch. By increasing before the rib edge, you avoid a visible difference in width between the rib edge and the rest of the body.
Why increase in the cast-off edge?
It’s very easy to cast off too tightly, and by making yarn overs while casting off (and simultaneously casting these off) you avoid a too tight cast off edge.
See DROPS video: How to bind off with yarn overs (yo)
How do I increase/decrease on every 3rd and 4th row/round alternately?
To achieve an even increase (or decrease) you can increase on, for example: every 3rd and 4th row alternately, like so: work 2 rows and increase on the 3rd row, work 3 rows and increase on the 4th. Repeat this until the increase is complete.
See DROPS lesson: Increase or decrease 1 st on every 3rd and 4th row alternately
How can I work a jacket in the round instead of back and forth?
Should you prefer to work in the round instead of back and forth, you may of course adjust the pattern. You’ll need to add steeks mid-front (usually 5 stitches), and follow the instructions. When you would normally turn and work from the wrong side, simply work across the steek and continue in the round. At the end you’ll cut the piece open, pick up stitches to work bands, and cover the cut edges.
See DROPS video: How to knit steeks and cut open
Can I work a jumper back and forth instead of in the round?
Should you prefer to work back and forth instead of in the round, you may of course adjust the pattern so you work the pieces separately and then assemble them at the end. Divide the stitches for the body in 2, add 1 edge stitch in each side (for sewing) and work the front and back pieces separately.
See DROPS lesson: Can I adapt a pattern for circular needles into straight needles?
Why is the pattern slightly different than what I see in the photo?
Pattern repeats can vary slightly in the different sizes, in order to get the correct proportions. If you’re not working the exact same size as the garment in the photo, yours might deviate slightly. This has been carefully developed and adjusted so that the complete impression of the garment is the same in all sizes.
Make sure to follow instructions and diagrams for your size!
How do I make a women’s size garment into a men’s size one?
If you have found a pattern you like which is available in women’s size it’s not very difficult to convert it to men’s size. The biggest difference will be the length of sleeves and body. Start working on the women size that you think would fit across the chest. The additional length will be worked right before you cast off for the armhole/sleeve cap. If the pattern is worked top-down you can add the length right after the armhole or before the first decrease on sleeve.
Regarding additional yarn amount, this will depend on how much length you add, but it is better with a skein too many than too few.
How do I prevent a hairy garment from shedding?
All yarns will have excess fibres (from production) that might come off as lint or shedding. Brushed yarns (ie hairier yarns) have more of these loose, excess fibres, causing more shedding.
Shedding also depends on what is worn under or over the garment, and whether this pulls at the yarn fibres. It’s therefore not possible to guarantee that there will be no shedding
Below are some tips on how to get the best result when working with hairier yarns:
1. When the garment is finished (before you wash it) shake it vigorously so the looser hairs come off. NOTE: do NOT use a lint roller, brush or any method that pulls at the yarn.
2. Place the garment in a plastic bag and put it in your freezer - the temperature will cause the fibres to become less attached to each other, and excess fibres will come off easier.
3. Leave in the freezer for a few hours before taking it out and shaking it again.
4. Wash the garment according to the instructions on the yarn label.
Why does my garment pill?
Pilling is a natural process that happens to even the most exclusive of fibers. It's a natural sign of wear and tear that is hard to avoid, and that is most visible in high friction areas of your garment like a sweater's arms and cuffs.
You can make your garment look as new by removing the pilling, using a fabric comb or a pill/lint remover.
Sweet Greta |
||||||||||||||||||||||||||||||||||
|
|
|||||||||||||||||||||||||||||||||
Set of knitted vest with raglan sleeves and cables plus booties for baby and children in DROPS Alpaca
DROPS Baby 19-18 |
||||||||||||||||||||||||||||||||||
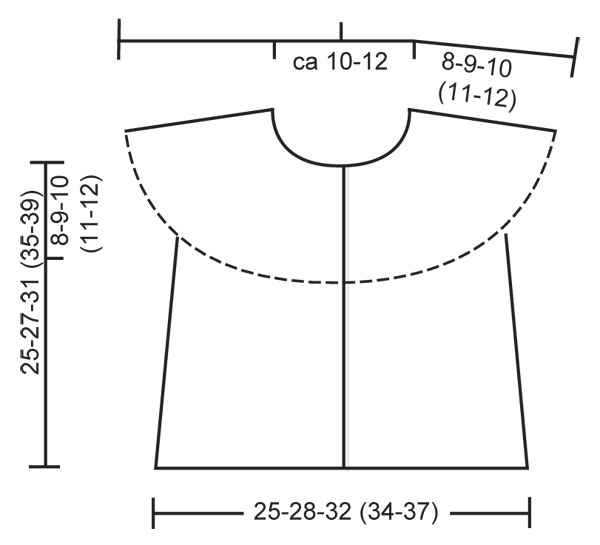
VEST: GARTER ST (back and forth on circular needle): K all rows. PATTERN: See diagram M.1 to M.4. Diagrams show the pattern from RS. BUTTONHOLES: Make buttonholes on right front band. 1 buttonhole = cast off 3rd and 4th front band st and cast on 2 new sts on next row. Make buttonholes when piece measures: SIZE 1/3 months: 9, 14, 19 and 24 cm SIZE 6/9 months: 8, 14, 20 and 26 cm SIZE 12/18 months: 8, 14, 19, 25 and 30 cm SIZE 2 years: 10, 16, 22, 28 and 34 cm SIZE 3/4 years: 10, 17, 24, 31 and 38 cm -------------------------------------------------------- -------------------------------------------------------- VEST: Worked back and forth on circular needle from mid front. Cast on 139-151-170 (183-192) sts on circular needle size 2.5 mm with Alpaca. K 4 rows, AT THE SAME TIME on 4th row inc 17-19-14 (15-20) sts evenly = 156-170-184 (198-212) sts. Work next row as follows (from RS): 5 GARTER STS - see above (= front band), P2, M.1, * P6, M.3 *, repeat from *-* on the next 112-126-140 (154-168) sts, finish with P6, M.1, P2 and 5 GARTER STS (= front band). Continue in pattern like this until piece measures 7-7-7 (8-8) cm. On next row from RS work 21 sts each side as before, K remaining sts, AT THE SAME TIME dec 9-13-8 (9-14) sts evenly on these sts = 147-157-176 (189-198) sts. On next row from WS work 21 sts each side as before, K remaining sts. NOTE! Remember BUTTONHOLES - see above. Continue as follows (from RS): 5 garter sts, P2, M.1, P2, stocking st on the next 105-115-134 (147-156) sts, P2, M.1, P2 and 5 garter sts. Continue in pattern like this until piece measures 16-17-20 (23-26) cm. Work next row as follows (from RS): 21 sts as before, 14-18-24 (26-29) stocking sts (= right front piece), garter st on the next 8 sts, 61-63-70 (79-82) stocking sts (= back piece), garter st on the next 8 sts, 14-18-24 (26-29) stocking sts and 21 sts as before (= left front piece). Continue like this until piece measures 17-18-21 (24-27) cm. On next row from RS cast off 8 sts each side (garter sts) for armhole. On next row from WS cast on 40-44-50 (54-60) new sts over the 8 cast off sts each side = 211-229-260 (281-302) sts. NOW MEASURE PIECE FROM HERE! On next row from RS work 21 sts each side as before, K remaining sts, AT THE SAME TIME inc 22-27-30 (33-36) sts evenly on these sts = 233-256-290 (314-338) sts. On next row from WS work 21 sts each side as before, K remaining sts. Now continue as follows (as seen from RS): 5 garter sts, P2, * M.1, P 11-11-12 (12-12) sts *, repeat from *-* a total of 9-10-11 (12-13) times and finish with M.1, P2 and 5 garter sts. AT THE SAME TIME dec from RS on the right and left side alternately of each P-section (dec by P2 tog, NOTE! do not dec in P2 each side) on every cm a total of 6-7-8 (9-9) times. AT THE SAME TIME when piece measures 1-1-2 (3-4) cm work M.2 over all sts in M.1 (work remaining sts as before). After 1 vertical repeat of M.2 continue with M.3. After all dec are complete there are 139-142-154 (154-165) sts on needle. Continue until piece measures approx 7-8-9 (10-11) cm, adjust to a full vertical repeat. Now work M.4 over M.3 (work remaining sts as before) = 99-98-106 (102-109) sts. After 1 vertical repeat of M.4 K 1 row from RS, AT THE SAME TIME dec 13-10-14 (6-9) sts evenly (do not dec on front bands) = 86-88-92 (96-100) sts. K 1 row from WS, K 1 row from RS, K 1 row from WS and cast off loosely. ASSEMBLY: Sew on buttons. ------------------------------------------------------ -------------------------------------------------------- BOOTIES: PATTERN: See diagram M.1. Diagram shows the pattern from RS. MOSS ST: Round 1: * K1, P1 *, repeat from *-*. Round 2: K over P and P over K. Repeat round 2. -------------------------------------------------------- BOOTIE: Piece worked in the round on double pointed needles, from top down. Cast on 50-50-54 (58-62) sts on double pointed needles size 2.5 mm with Alpaca. K 1 round on all sts and continue as follows: SIZE 1/3 months + 6/9 months + 2 years: K1, * P2/K2 *, repeat from *-* on the next 16-16-20 sts, P2, M.1 (= 12 sts), * P2/K2 *, repeat from *-* on the next 16-16-20 sts, P2, K1. SIZE 12/18 months + 3/4 years: P1, * K2/P2 *, repeat from *-* on the next 20-24 sts, M.1 (= 12 sts), * P2/K2 *, repeat from *-* on the next 20-24 sts, P1. Continue like this until piece measures 6-7-7 (8-8) cm. K 1 round on all sts, AT THE SAME TIME dec 4 sts evenly on round - do not dec on the 16 sts on upper foot (= M.1 + P2 each side) = 46-46-50 (54-58) sts. Keep the 16 sts on upper foot on needle and slip remaining 30-30-34 (38-42) sts on a stitch holder. Continue in M.1 with P2 each side back and forth on needle for 3-3.5-4 (5-6) cm. On next row from RS dec 4 sts on M.1 = 12 sts left on upper foot. Now pick up 6-8-8 (10-14) sts on the side of upper foot, slip sts from stitch holder back on needle and pick up 6-8-8 (10-14) sts on the other side of upper foot = 54-58-62 (70-82) sts. Continue in MOSS ST - see above - in the round on all sts for 1.5-2-2.5 (3-3.5) cm, and now P 1 round on all sts. Cast off all sts except the 12 sts on upper foot mid front. Work 9-10-11 (13-14) cm moss st back and forth on needle on these sts for sole. Cast off and sew sole to side pieces, sew edge to edge to avoid a chunky seam. |
||||||||||||||||||||||||||||||||||
Diagram explanations |
||||||||||||||||||||||||||||||||||
|
||||||||||||||||||||||||||||||||||
Have you made this or any other of our designs? Tag your pictures in social media with #dropsdesign so we can see them! Do you need help with this pattern?You'll find tutorial videos, a Comments/Questions area and more by visiting the pattern on garnstudio.com. © 1982-2024 DROPS Design A/S. We reserve all rights. This document, including all its sub-sections, has copyrights. Read more about what you can do with our patterns at the bottom of each pattern on our site. |
With over 40 years in knitting and crochet design, DROPS Design offers one of the most extensive collections of free patterns on the internet - translated to 17 languages. As of today we count 309 catalogues and 11518 patterns translated into English (UK/cm). 11518
We work hard to bring you the best knitting and crochet have to offer, inspiration and advice as well as great quality yarns at incredible prices! Would you like to use our patterns for other than personal use? You can read what you are allowed to do in the Copyright text at the bottom of all our patterns. Happy crafting!
Comments / Questions (59)
Jenny Douglas wrote:
Can you give advice about how to increase over stitches cast-on for the armholes. The usual way of picking up from the strand on the previous row does not work. Thank you.
23.09.2022 - 18:14DROPS Design answered:
Dear Jenny, you could increase by working yarn overs; you can see how to work them here: https://www.garnstudio.com/video.php?id=12&lang=en. Happy knitting!
25.09.2022 - 20:47Judith wrote:
Hallo In der deutschen Anleitung fehlt mir die Angabe zu den Armlöchern. Hier müssten doch M abgekettet und wieder angeschlagen werden.
05.05.2022 - 17:33DROPS Design answered:
Liebe Judith, Armlöcher finden Sie hier in der Anleitung: Nach 17-18-21 (24-27) cm bei der nächsten R. von der Vorderseite die 8 M. Krausrippe auf beiden Seiten für das Armloch abk. so haben Sie 2 Armlöcher mit je 8 Maschen beidseitig. Bei der nächsten R. von der linken Seite über den 8 M. je 40-44-50 (54-60) neu M. anschlagen = 211-229-260 (281-302) M. Von hier wird die Arbeit weiter gemessen. Bei der nächsten Reihe, schlagen Sie die neuen Maschen für die Ärmel. Viel Spaß beim stricken!
06.05.2022 - 07:38Ujhelyiné Nagy Anikó wrote:
Kedves Garnstudio! A minta leírásában miért nem láthatóak a diagramok? Előre is köszönöm a választ!
08.01.2021 - 16:30Asbjørg wrote:
Skal jeg felle en maske på hver side på mønster M2 etter fletteomgangene ? Dette i tillegg til fellingen i vrangfeltene ?
26.03.2020 - 23:46DROPS Design answered:
Hei Asbjørg, Nei, du skal bare felle i vrangpartiene. God fornøyelse!
27.03.2020 - 08:14Tatjana wrote:
Wie komme ich auf die 21 M? 5M Krausrippe+2 li.+M1 = 19 M wie ist das mit 21M zu verstehen?
17.03.2020 - 10:28DROPS Design answered:
Liebe Tatjana, meinen Sie die verkürzten Reihen über die 21 M auf beiden Seiten? Diese 21 M sind: 5 Blendemaschen + 2 M li + M.1 (= 12 M) + 3 M li (die Hälfte der 6 linken Maschen vor M.3). Viel Spaß beim stricken!
17.03.2020 - 11:44Marianne wrote:
Hallo, ich komme mit den Abnahmen in der Passe nicht klar, obwohl erfahrene Strickerin. Was bedeutet: Bei jedem cm total 6 Mal wiederholen? Und wie oft werden die Abnahmen wiederholt? In jeder Reihe der Vorderseite? Ist alles ein bisschen verwirrend erklärt. Schön wäre für Anfänger auch, ob die Diagramme nur die Hinreihe zeigen und auf der Rückseite gestrickt wird wie die Maschen erscheinen.Vielen Dank für eine Hilfe!
15.01.2019 - 19:50DROPS Design answered:
Liebe Marianne, die Abnahmen stricken Sie jede cm x 6, dh 1 Reihe mit Abnahmen stricken, dann weiter ohne Abnahmen stricken, nach 1 cm noch 1 Reihe mit Abnahmen stricken und so stricken Sie weiter bis Sie 6 Reihen mit Abnahmen gestrickt haben. Die Diagramme zeigen alle Reihen, dh Hin sowie Rückreihen. Hier lesen Sie mehr über Diagramme. Viel Spaß beim stricken!
16.01.2019 - 08:17Ella Iversen wrote:
Hvordan strikker man M4.
13.01.2019 - 18:07DROPS Design answered:
Hei Ella. M.4 strikkes slik: ta 1 m løst av p, 1 r, løft den løse m over (= 1 maske felt), ta 1 m løst av p, 1 r, løft den løse m over (= 1 maske felt), så strikker du 2 m rett sammen (=1 maske felt), 2 masker rett sammen (1 maske felt). Du har felt totalt 4 masker, og sitter igjen med 4 masker. God fornøyelse
16.01.2019 - 15:00Pamela wrote:
Hola . Tengo agujas rectas, cuantos puntos tendría q poner para hacer espalda y dos delanteras? Para talle 9 meses y dos años? Muchas gracias
28.11.2018 - 12:37DROPS Design answered:
Hola Pamela. No hacemos patrones personalizados. Puedes utilizar los cálculos para agujas circulares siempre añadiendo 1 punto a cada lado de cada parte que trabajas por separado para las costuras.
30.12.2018 - 17:43Helle Andersen wrote:
Jeg forstår ikke hvordan man skal tage ind, jeg er kommet til bærestykket Jeg kan ikke se at maskeantallet passer, og skiftevis i h og v side? Hvad betyder det? På hver cm? Tager man en ret og vrangmaske sammen?
26.09.2018 - 22:02DROPS Design answered:
Hej, Når du tager ind skiftevis, tager du ind første gang i højre side af alla vrang-partier, næste gang (efter 1 cm) tager du ind i venstre side af alle vrang-partier. God fornøjelse!
28.09.2018 - 14:56Helle Andersen wrote:
Jeg kan ikke finde ud af hvordan jeg skal komme videre fra pind 5
18.09.2018 - 11:08DROPS Design answered:
Hej Helle, Næste p strikkes således (fra retsiden): 5 m RETSTRIK - se forkl over (= forkant), 2 vr, M.1(12m), * 6 vr, M.3 (=8m) =ialt 14m*, gentag disse 14 masker fra *-* over de næste 112 m (ialt 8 gange) (hvis du strikker den mindste), slut af med 6 m vr, M.1 (12m), 2 vr og 5 m RETSTRIK ( = forkant). Fortsæt således men næste pind strikkes fra vrangen. God fornøjelse!
19.09.2018 - 15:05