
Popular categories
Looking for a yarn?


Comments / Questions (23)
![]() Birgit wrote:
Birgit wrote:
Ich verstehe nicht was heisst rechts auf rechts und links auf links stricken. Erscheint das dann auf der Vorderseite glatt rechts oder kraus rechts. Oder ergibt links auf rechts bzw. Rechts auf links vorne glatt rechts.
18.04.2024 - 21:07DROPS Design answered:
Liebe Birgit, mit "rechts auf rechts" soll man recht bein den Hinreihen und mit "links auf links" soll man links bein den Rückreihen stricken; mit "rechts auf links" wird man recht bei den Rückreihen stricken. Viel Spaß beim Stricken!
19.04.2024 - 08:38
![]() Franca wrote:
Franca wrote:
Salve, sarebbe possibile avere la traduzione in italiano del modello? grazie
01.07.2019 - 10:57DROPS Design answered:
Buongiorno Franca. Tradurremo il modello quanto prima. Buon lavoro!
01.07.2019 - 11:14
![]() DROPS Design NL wrote:
DROPS Design NL wrote:
Wij zullen de rest van het telpatroon zo snel mogelijk toevoegen!
09.01.2012 - 12:32
![]() R.jaspers wrote:
R.jaspers wrote:
L.s., graag zou ik ook het telpatroon er bij hebben. Waar kan ik deze vinden? bvd en vr groeten
09.01.2012 - 12:29
![]() DROPS Design wrote:
DROPS Design wrote:
Ja, richtig.
26.08.2011 - 09:15
![]() Hellingrath wrote:
Hellingrath wrote:
Wird über das gesamte Rückenteil 36M.3 li,3re gestrickt?
25.08.2011 - 20:35Chantal-jane wrote:
Bonjour, Lorsqu'on fait le jeté, doit-t-on tricoter la maille suivante? et après glisser la suivante? ou doit-on faire un jeté, glisser... mon problème est que je suis décalée pour le rang suivant dans tous les cas... Merci de votre aide
21.06.2011 - 20:33
![]() DROPS Deutsch wrote:
DROPS Deutsch wrote:
Das Diagramm zeigt alle Reihen. Dieses Heft ist leider in deutsch nicht erhältlich.
28.03.2011 - 09:18
![]() Colleen wrote:
Colleen wrote:
Ich hätte gern ein Bild von der Rücksete derJacke gesehen. Ist ein Bild im Heft enthalten und kann man es noch kaufen? Außerdem ist für mich nicht klar ob der Muster nur ungerade Reihen zeigt oder alle Reihen.
27.03.2011 - 09:51
![]() Élisabeth wrote:
Élisabeth wrote:
Merci, tout s'éclaire. Je me permets une suggestion : dans un tel cas, mettre une photo du dos aussi. Bonne journée et meilleurs voeux.
07.01.2010 - 10:41
|
|||||||||||||||||||
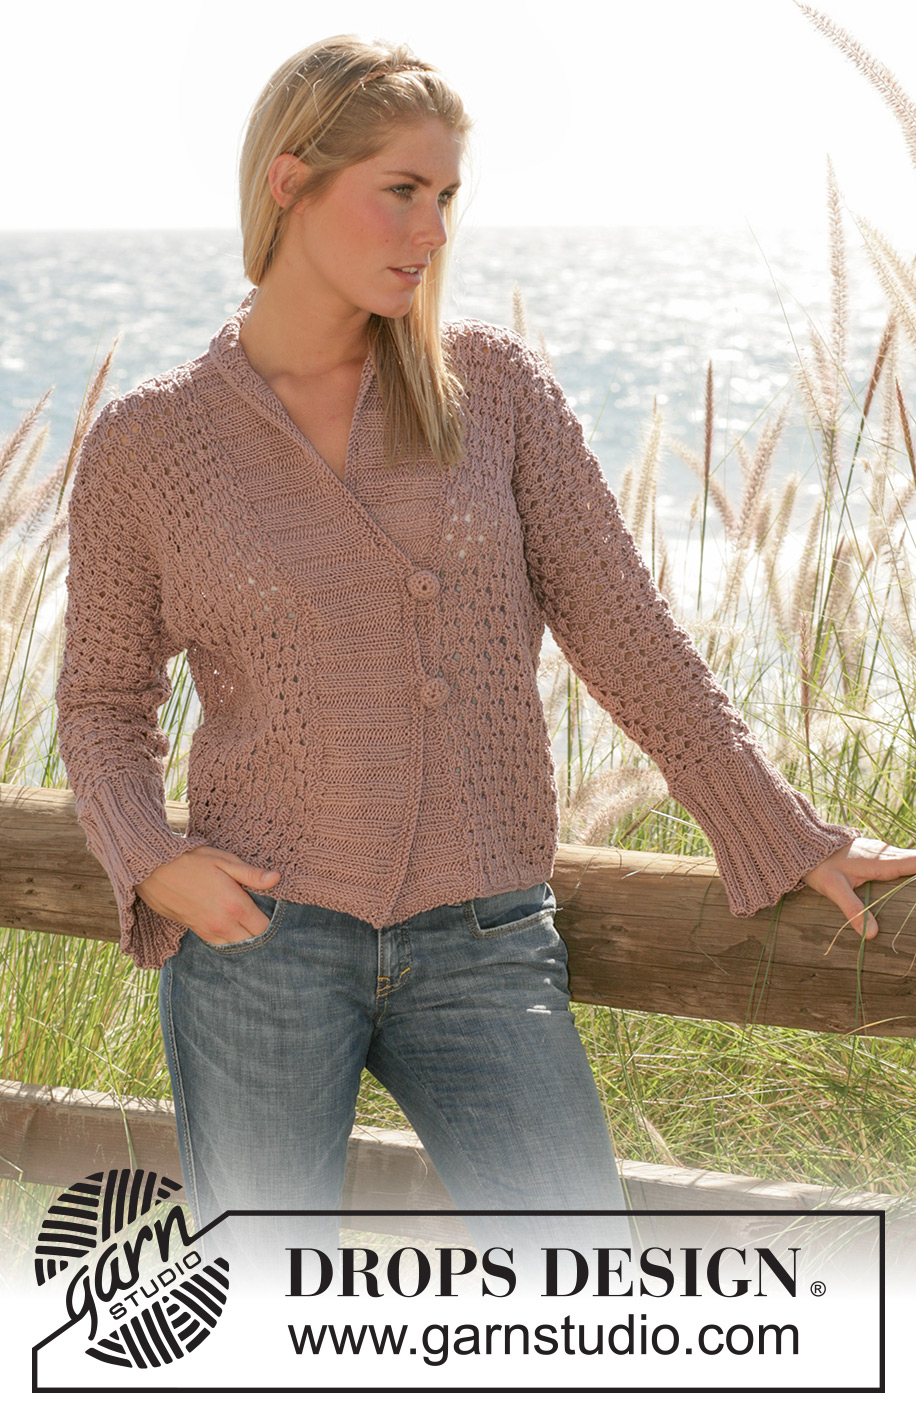
Woven Dreams Cardigan#wovendreamscardigan |
|||||||||||||||||||
|
|
|||||||||||||||||||
DROPS jacket in pattern with wide rib edge in “Muskat”
DROPS 101-16 |
|||||||||||||||||||
|
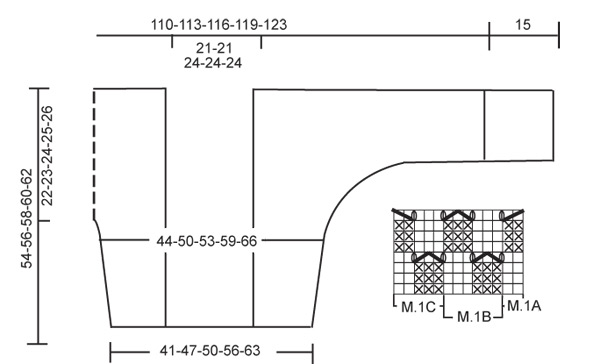
Knitting tension: 19 sts x 28 rows on needle size 4 mm in pattern = 10 x 10 cm Garter st, back and forth on needle: Knit all rows Rib: *K3, P3*, repeat from *-*. Pattern: See diagram M.1. The diagram is seen from the right side. Measurement tip: Because of the weight of the yarn, all measurements should be made whilst the garment is hanging. ____________________________________________________________________ Back piece: Knitted back and forth on circular needle. Cast on 79-91-97-109-121 sts (incl 1 edge st each side) on circular needle size 4 mm and knit 3 rows garter sts (1st row = RS). Knit next row as follows from WS: 1 edge st, M.1C (= 5 sts), M.1B over 12-18-18-24-30 sts, M.1A (= 2 sts), *P3, K3*, repeat from *-* over 36-36-42-42-42 sts, P3, M.1C (= 5 sts), M.1B over 12-18-18-24-30 sts, M.1A (= 2 sts), 1 edge st. Continue in pattern like this. At the same time when piece measures 15 cm inc 1 st each side on every 6 cm a total of 3 times = 85-97-103-115-127 sts – inc inside 1 edge st and knit inc sts in stocking st until they fit into pattern. When piece measures 32-33-34-35-36 cm – read Measurement tip – loosely cast on new sts for sleeves each side on every other row as follows: 1 st 1-1-1-2-3 times, 2 sts 1-2-2-4-3 times, 3 sts 1-1-1-2-2 times, 5 sts 1-2-2-1-1 times, 6 sts 2-2-2-1-2 times, 8 sts 1-1-1-1-0 time, 10 sts 2-1-1-1-1 times and 12 sts 1-1-1-1-1 time = 211-217-223-229-235 sts. – NB: Stocking st new sts until they fit into pattern. Continue in pattern as before over all sts until piece measures 52-54-56-58-60 cm and now cast off the middle 35-35-41-41-41 sts for neck. Dec 1 st towards neckline on every other row 2 times = 86-89-89-92-95 sts left on shoulder/sleeve. When piece measures 54-56-58-60-62 cm knit 1 row in stocking st and cast off all sts loosely. Left front piece: Knitted back and forth on circular needle. Cast on 21-27-27-33-39 sts (incl 1 edge st each side) on circular needle size 4 mm and knit 3 rows garter sts (1st row = RS). Knit next row as follows from WS: 1 edge st, M.1C (= 5 sts), M.1B over 12-18-18-24-30 sts, M.1A (= 2 sts), 1 edge st. Continue in pattern like this. At the same time when piece measures 15 cm inc 1 st each side on every 6 cm a total of 3 times = 24-30-30-36-42 sts. When piece measures 32-33-34-35-36 cm – read Measurement tip – loosely cast on new sts for sleeves at the side on every other row as described for back piece = 87-90-90-93-96 sts. Stocking st new sts until they fit into pattern. Continue in pattern as before over all sts until piece measures 54-56-58-60-62 cm and knit 1 row in stocking st before casting of loosely. Right front piece: Like left front piece, but mirrored. Assembly: Sew shoulder/sleeve seams inside the casting off edge. Cuffs: Pick up 68-68-74-74-80 sts round sleeve edge on circular needles size 4mm and knit 2 rows garter sts (1st row = WS). Continue in Rib with 1 edge st each side –see explanation above. When cuff measures 13 cm inc P3 to P4 in every other P section (seen from RS). Cast off loosely in rib when cuff measures 15 cm. Repeat round other sleeve edge. Sew under-arm seam and side seams inside 1 edge st. Front band/collar: Pick up approx 249 to 285 sts (divisible by 6 + 3) along right front piece (approx 104 to 119 sts), round neck at back (approx 41 to 47 sts), along left front piece (approx 104 to 119 sts) and knit 4 rows garter sts. Continue in Rib with 3 garter sts and K3 each side (seen from RS). When front band measures 8 cm inc all P3 to P4 in every other P section (seen from RS). When Rib measures 9 cm knit 3 rows garter sts (1st row = RS) and cast off from WS. Crochet button cover: 1st round: 2 ch, 6 dc in the first ch and finish with 1 sl st in first dc. 2nd round: 2 dc in each dc and finish with 1 sl st at beg of round (= 12 dc) 3rd and 4th round: 1 dc in each dc and finish with 1 sl st at beg of round 5th round: 1 dc in every other dc and finish with 1 sl st at beg of round (= 6 dc) Put button inside cover, sew round the opening and pull tight. Crochet covers for 2 buttons. Sew on buttons to left front piece in the transition between front piece and front band approx 20 and 30 cm from bottom edge. Sew the third button to WS of right front piece in the transition between front piece and front band. Crochet a buttonhole loop – see explanation below – and attach to left front piece. Buttonhole loop: Crochet 2 loops on right front band in line with buttons on left front band as follows: 1 sl st in cast off edge, 6 ch, skip approx 2 cm and attach with 1 sl st. |
|||||||||||||||||||
Diagram explanations |
|||||||||||||||||||
|
|||||||||||||||||||
 |
|||||||||||||||||||
Have you finished this pattern?Tag your pictures with #dropspattern #wovendreamscardigan or submit them to the #dropsfan gallery. Do you need help with this pattern?You'll find 25 tutorial videos, a Comments/Questions area and more by visiting the pattern on garnstudio.com. © 1982-2026 DROPS Design A/S. We reserve all rights. This document, including all its sub-sections, has copyrights. Read more about what you can do with our patterns at the bottom of each pattern on our site. |
|||||||||||||||||||


With over 40 years in knitting and crochet design, DROPS Design offers one of the most extensive collections of free patterns on the internet - translated to 17 languages. As of today we count 324 catalogues and 12290 patterns translated into English (UK/cm). 12290
We work hard to bring you the best knitting and crochet have to offer, inspiration and advice as well as great quality yarns at incredible prices! Would you like to use our patterns for other than personal use? You can read what you are allowed to do in the Copyright text at the bottom of all our patterns. Happy crafting!
Post a comment to pattern DROPS 101-16
We would love to hear what you have to say about this pattern!
If you want to leave a question, please make sure you select the correct category in the form below, to speed up the answering process. Required fields are marked *.