
Popular categories
Looking for a yarn?


Comments / Questions (15)
![]() Marina wrote:
Marina wrote:
Non so perché ma c'era qualcosa che non capivo, in seguito l'ho terminato ed è molto bello. Seguo sempre i vostri modelli e compro la vostra lana, grazie di pubblicarli:-)
19.01.2024 - 09:35
![]() Marina wrote:
Marina wrote:
Avviare 9 maglie (bordo), poi riprendere 18-20-20-22-22-24 maglie all’interno di 1 maglia di vivagno lungo la spalla sinistra sul dietro (cioè riprendere 1 maglia in ogni ferro) = 27-29-29-31-31-33 maglie. Lavorare A.1 sulle prime 9 maglie (= bordo) e a maglia rasata sulle altre maglie (visto dal diritto del lavoro), Io a questo punto mi ritrovo il lavoro con il rovescio davanti se inizio dalle prime 9 maglie, cosa devo fare?
22.11.2023 - 10:45DROPS Design answered:
Buongiorno Marina, può ripartire con un nuovo gomitolo lavorando sul davanti. Buon lavoro!
30.12.2023 - 11:22
![]() Marina wrote:
Marina wrote:
In effetti ho posto confusamente la domanda. "La 1° e la 3° volta che vengono lavorati i primi 6 ferri di A.1/A.2, lavorarlo su tutte le maglie del corpo. " volevo sapere come lavorare a1 e a2 durante questo ferro
25.09.2023 - 23:27
![]() Marina Venturi wrote:
Marina Venturi wrote:
Salve, sto lavorando il ferro con il lavoro tutto intorno, ho aumentato 2 maglie (prima o dopo le maglie aggiunte per unire il dietro con il davanti?), ho una taglia S quindi ora mi ritrovo 138 maglie. Inizio dal davanti destro con A2, devo lavorare sempre lo schema con 9 maglie o solo 8? A1 lo lavoro solo alla fine sul bordo sinistro? Quante maglie devo avere una volta finito il ferro?
17.09.2023 - 08:00DROPS Design answered:
Buonasera Marina, ci può spiegare meglio a quale parte del lavoro sta facendo riferimento? Buon lavoro!
25.09.2023 - 23:20
![]() Karin wrote:
Karin wrote:
Hej! På vänster framstycke.. när jag lagt upp 9 frmkmasker o sen stickar upp resten är d ju naturligt att börja sticka på avigsidan.. fast d står ju” börja på a1.. som d är nu måste jag klippa tråden o börja från 9 framkanterna.. sen så står d när jag ska börja öka till framstycken att d ska ökas varje varv från rätsidan.. sen så står d var 4 varv.. när jag räknar i hop alla masker så stämmer d med vart 4 varv o även vart 6 varv..
18.08.2023 - 09:26
![]() Ron wrote:
Ron wrote:
Over meerderen voorpand. Meerderen iedere 4e naald 6 keer = 22 naalden Dan iedere 6e naald 4 keer = 24 naalden Totaal 46 naalden, volgens steken verhouding is dit 46/15 x 10 = 30 cm + 6 cm vanaf het begin = 36 cm. Maar je moet stoppen bij 28 cm, dus dat is te kort om alle meerderingen te kunnen maken.
02.08.2023 - 18:56DROPS Design answered:
Dag Ron,
Het klopt dat het meerderen nog niet klaar is als het werk die lengte heeft. Het meerderen van de hals gaat door als je bij het lijf aangekomen bent waar je dus de draad weer oppakt.
03.08.2023 - 21:00
![]() Ron wrote:
Ron wrote:
Om er zeker van te zijn dat ik het patroon juist interpreteer. Het patroon begint met het linker voorpand. De instructie video (#2) met het rechter, klopt dat? M.a.w. voor de linkerkant neem ik steken op van boven naar beneden op het achterpand en voor de rechterzijde van beneden naar boven (naar de hals). Vraag me ook af hoe ik dit moet lezen “….. aan de binnenkant van de 1 kantsteek”. 1 als in eerste of wat anders?
30.07.2023 - 19:56DROPS Design answered:
Dag Ron,
Het patroon begint inderdaad met het linker voorpand, zoals je het kledingstuk aan hebt. Dus stel je voor dat je het vest aan hebt, waar dan het linker voorpand zit. Het patroon is altijd leidend, de video's kunnen van een ander kledingstuk zijn of meer algemeen. Voor het linker voorpand neem je steken op langs de linker schouder van het achterpand en je breit het linker voorpand van boven naar beneden en dit doe je ook van het rechter voorpand. Hoe je steken opneemt (dus binnen 1 steek) kun je in de instructievideo zien. Die ene steek valt dus aan de binnenkant van het kledingstuk.
08.08.2023 - 11:46
![]() Jennie Hast wrote:
Jennie Hast wrote:
Hej! På bilden ser det ut som att det är ett varv med aviga maskor innan och efter hålmönstret men när jag läser A1 och A2 så ser jag inte det?
22.07.2023 - 13:46DROPS Design answered:
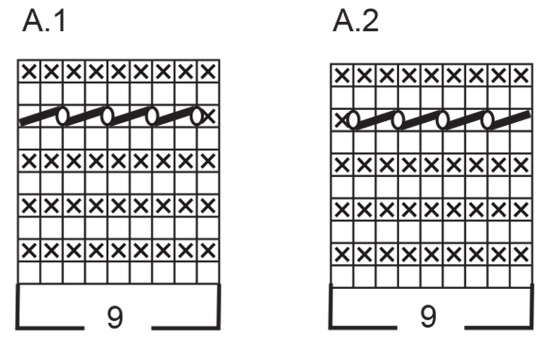
Hei Jennie. Husk at första och tredje gången de översta 6 varven i A.1/ A.2 stickas, stickas de över alla maskorna på fram- och bakstycket. Krysset i diagrammet = rätmaska från avigsidan. mvh DROPS Design
27.07.2023 - 09:36
![]() Aud Kari Jakobsen Jakobsen wrote:
Aud Kari Jakobsen Jakobsen wrote:
Hei.Har problemer med å forstå mønsteret på A 1.Hullmønster på kanten på venstre forstykke kommer på vrangsiden (skal være på rettsiden etter beskrivelsen ? Kan dere forklare meg ?
08.07.2023 - 08:33DROPS Design answered:
Hej Aud, du ser selve diagrammet fra retsiden, så det er ens på højre og venstre forstykke (bortset fra kantmasken) :)
04.08.2023 - 14:34
![]() Aniek wrote:
Aniek wrote:
Hoeveel bollen drops air heb ik nodig voor maat M of maat L?
14.06.2023 - 12:47DROPS Design answered:
Dag Aniek,
Bovenaan bij de materialen staat aangegeven hoeveel gram van de verschillende garens je nodig hebt. het eerste getal slaat op de kleinste maat, het volgende getal op de maat daarna, enzovoort. Voor maat M heb je dus 550 gram DROPS Air nodig en voor maat L 600 gram. 1 bol weegt 50 gram.
14.06.2023 - 18:09
|
||||||||||||||||||||||
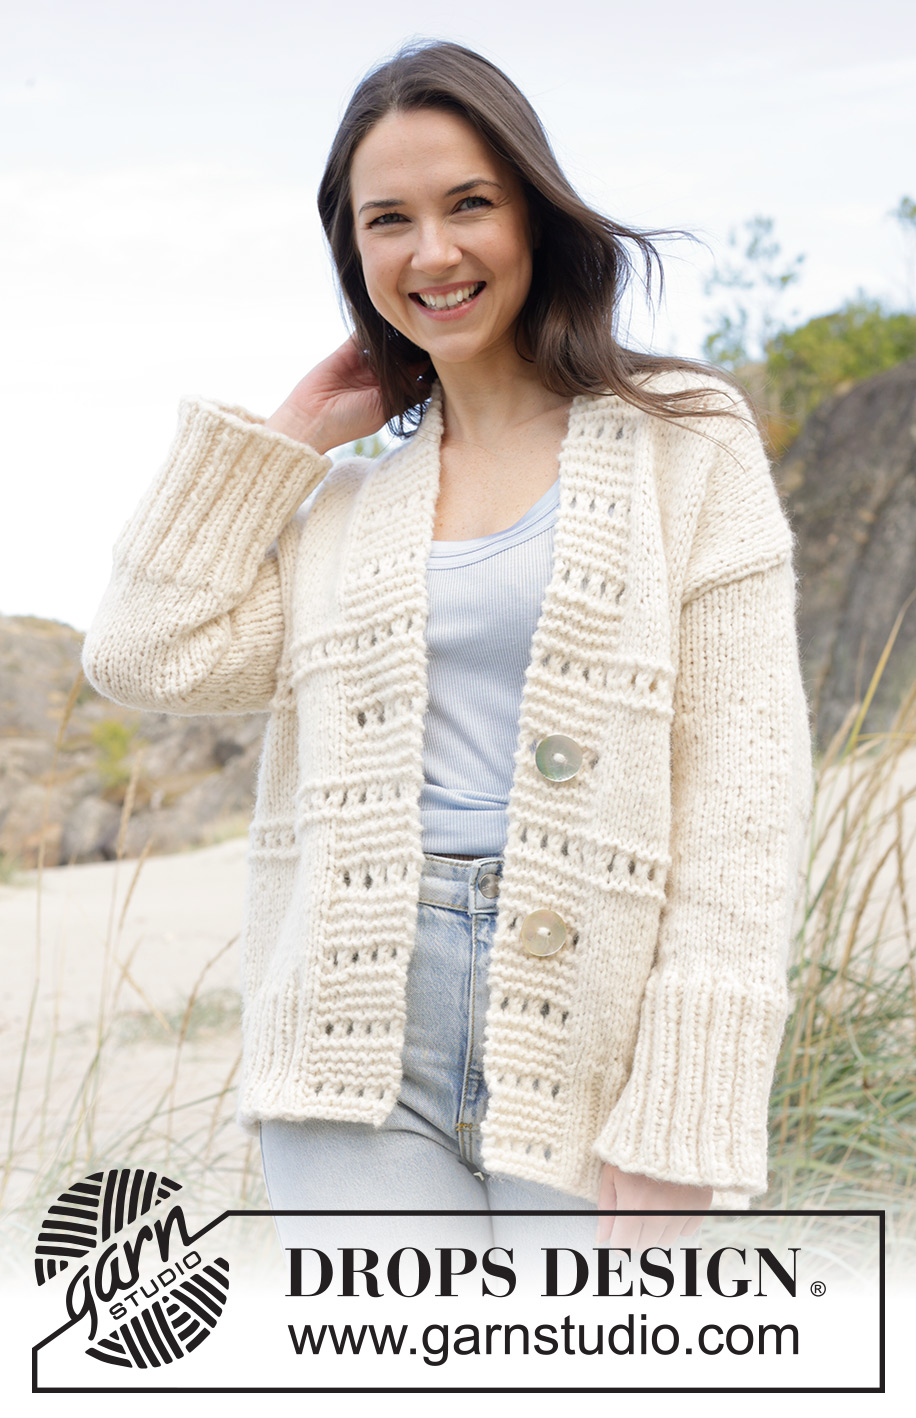
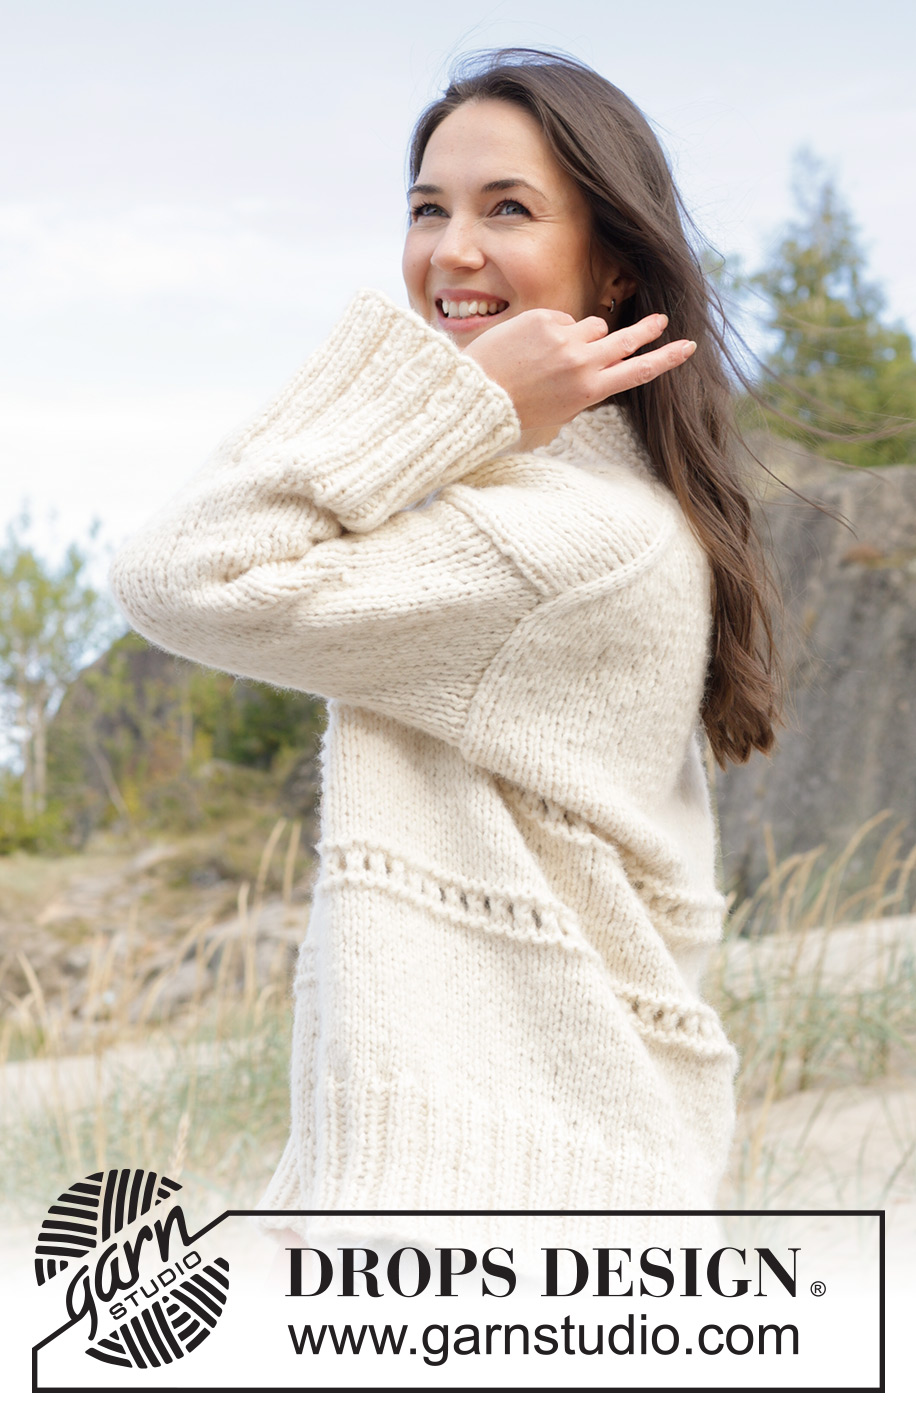
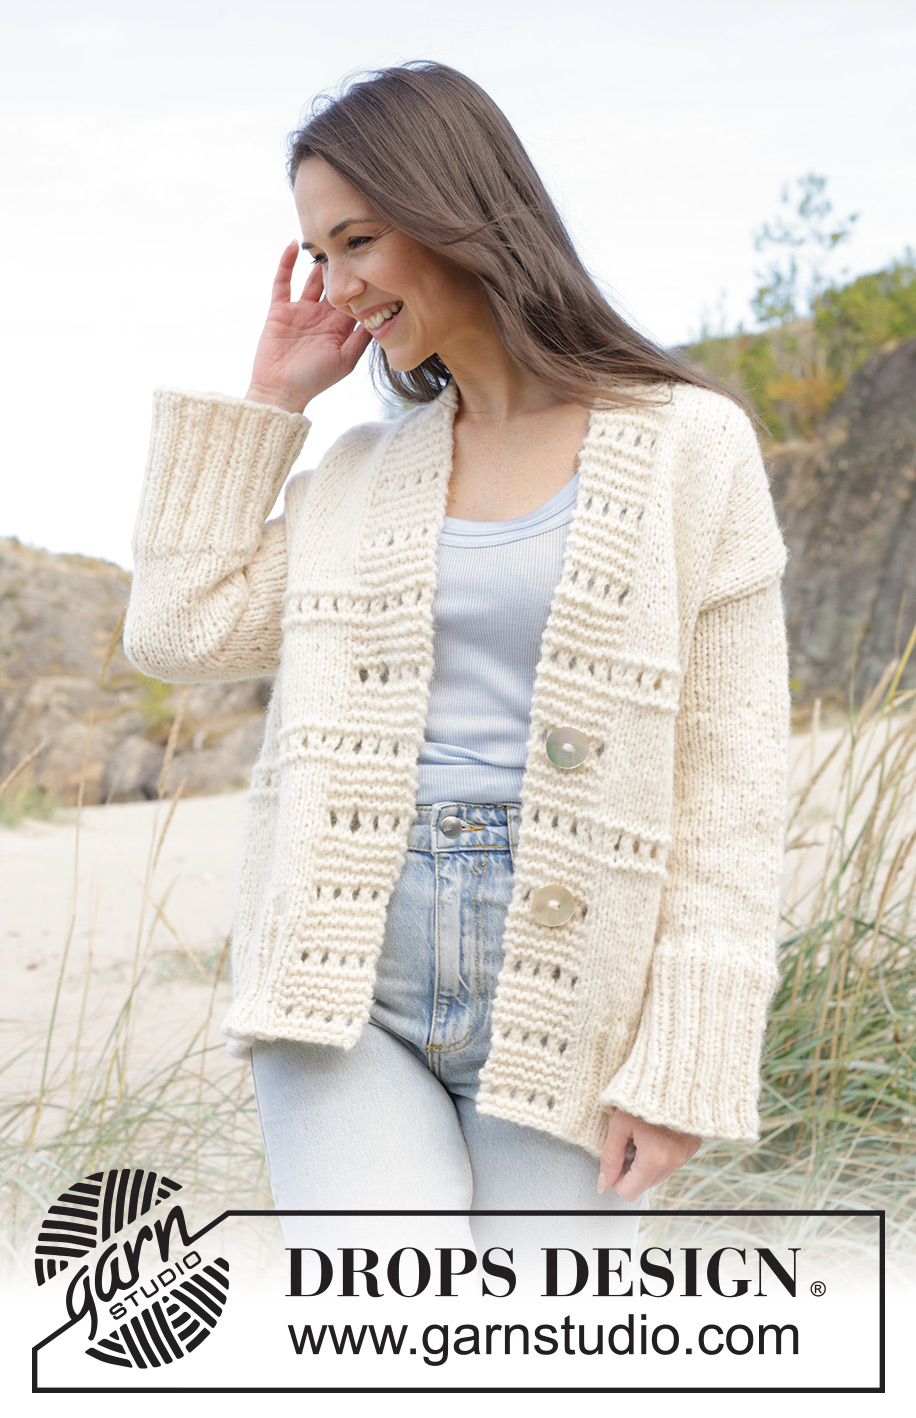
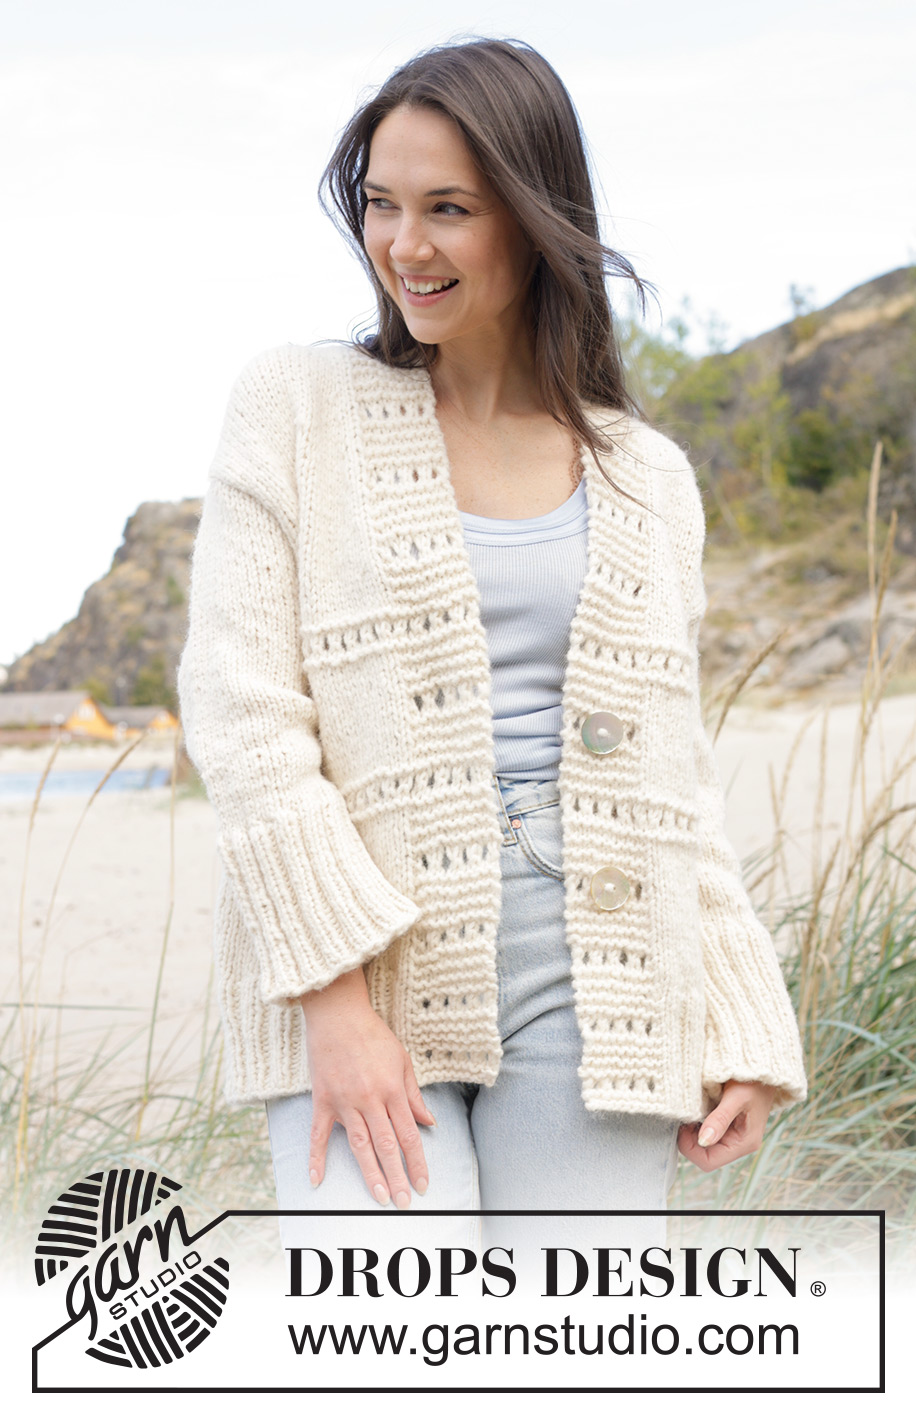
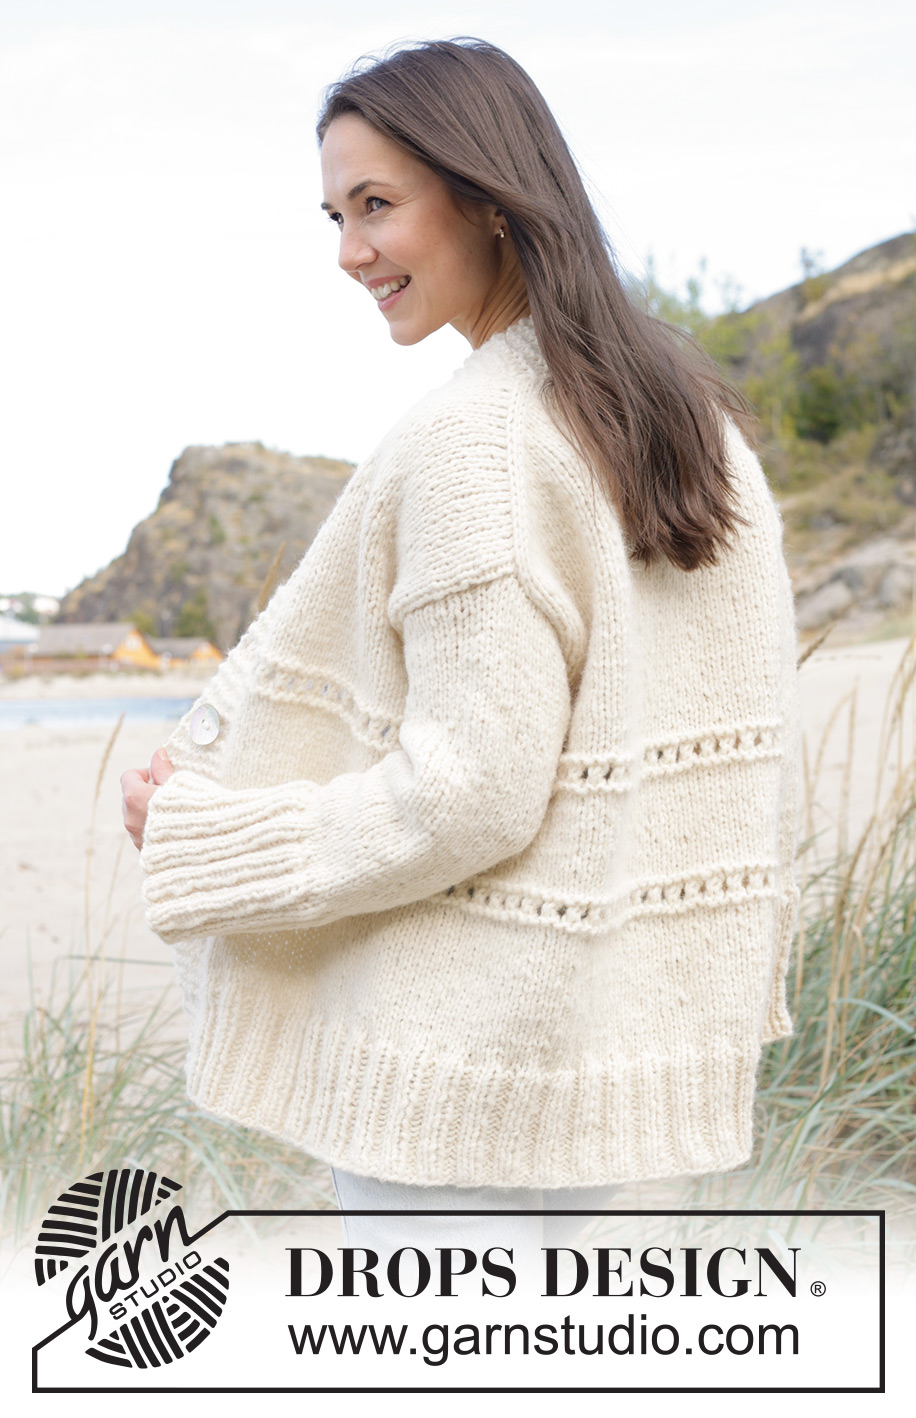
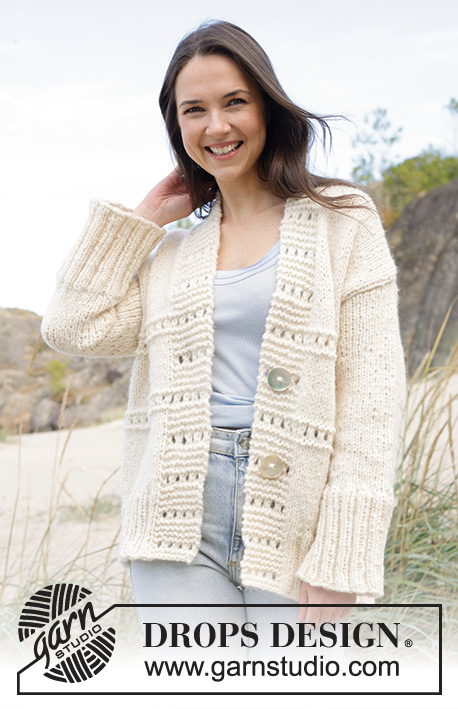
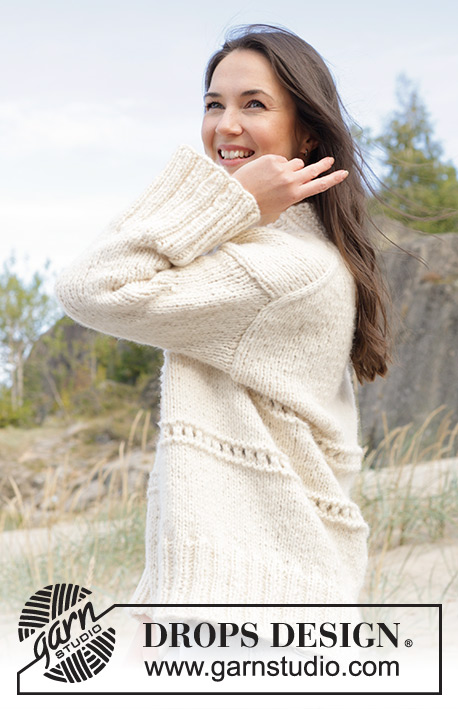
Ivory Collage Cardigan#ivorycollagecardigan |
||||||||||||||||||||||
 |
 |
|||||||||||||||||||||
Knitted jacket in 1 strand DROPS Wish or 2 strands DROPS Air. The piece is worked top down with European/diagonal shoulders and relief-pattern. Sizes S - XXXL.
DROPS 239-31 |
||||||||||||||||||||||
|
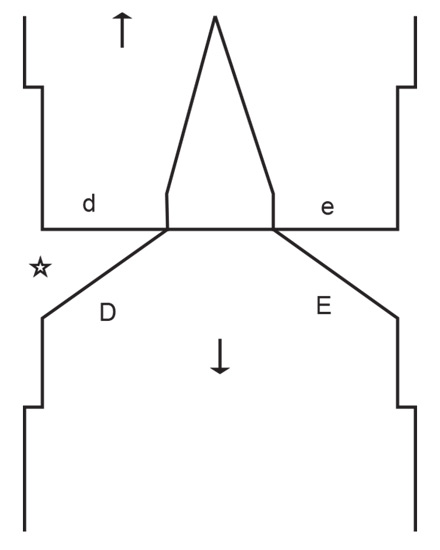
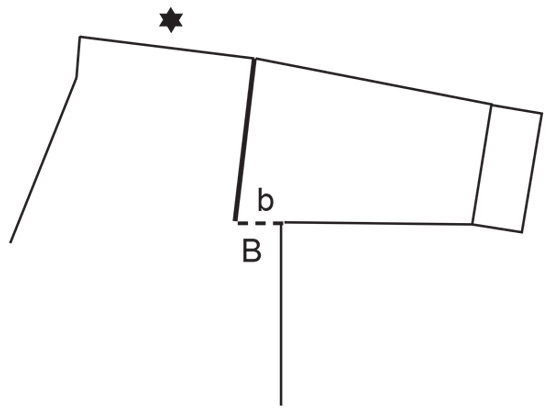
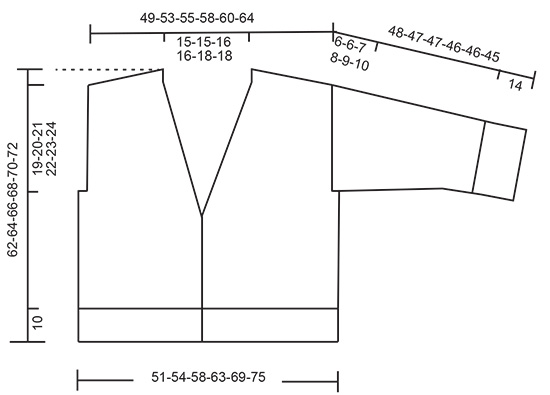
------------------------------------------------------- EXPLANATIONS FOR THE PATTERN: ------------------------------------------------------- RIDGE/GARTER STITCH (worked back and forth): Knit all rows. 1 ridge = knit 2 rows. PATTERN: See diagrams A.1 and A.2. The diagrams show all rows in the pattern from the right side. INCREASE TIP FROM THE RIGHT SIDE: Increase towards the left AFTER MARKER: Use left needle to pick up yarn between 2 stitches from row below, pick up yarn from the front and knit in the stitch loop that is on the back of the needle. Increase towards the right BEFORE MARKER: Use left needle to pick up yarn between 2 stitches from row below, pick up yarn from the back and knit in the stitch loop that is on the front side of the needle. INCREASE TIP FROM THE WRONG SIDE: Increase towards the right AFTER MARKER: Use left needle to pick up yarn between 2 stitches from row below, pick up yarn from the back and purl in the stitch loop that is on the front side of the needle. Increase towards the left BEFORE MARKER: Use left needle to pick up yarn between 2 stitches from row below, pick up yarn from the front and purl in the stitch loop that is on the back side of the needle. DECREASE TIP (for sleeves): Decrease 1 stitch on either side of the marker-thread as follows: Work until there are 3 stitches left before the marker-thread, knit 2 together, knit 2 (marker-thread sits between these 2 stitches), slip 1 stitch as if to knit, knit 1 and pass the slipped stitch over the knitted stitch. ------------------------------------------------------- START THE PIECE HERE: ------------------------------------------------------- JACKET – SHORT OVERVIEW OF THE PIECE: The pattern uses both long and short needles; start with the length which fits the number of stitches and change when necessary. The piece is started back and forth, casting on stitches at the back of the neck and working the back piece top down while increasing stitches on each side for the shoulders, which become slightly diagonal. The back piece is worked as far as the armholes. Start knitting up stitches along 1 shoulder and work the the armhole increasing for the neck. This is repeated on the other shoulder. After armhole work front and back pieces on the same circular needle and work back and forth. Stitches are knitted up around the armholes for the sleeves, which are first worked back and forth with short rows for the sleeve cap then work in the round. Stitches are knitted up on the top of the front bands to work neck. BACK PIECE: Cast on 18-18-20-20-22-22 stitches with circular needle size 8 mm and 1 strand DROPS Wish or 2 strands DROPS Air. Purl 1 row from the wrong side. Insert 1 marker inside the first 3 stitches on each side. The markers should sit inside the 3 outermost stitches on each row onwards. Work stocking stitch back and forth, AT THE SAME TIME increase AFTER the marker at the beginning of the row and BEFORE the marker at the end of the row – read INCREASE TIP FROM RIGHT SIDE. On the next row (wrong side) increase in the same way - read INCREASE TIP FROM WRONG SIDE. Increase like this from both the right and wrong side a total of 18-20-20-22-22-24 times. REMEMBER THE KNITTING TENSION! After the last increase there are 54-58-60-64-66-70 stitches. The piece is now measured from here! Continue with stocking stitch until the piece measures 14-15-16-16-17-18 cm, measured along the armhole. Cut the yarn, put stitches on a thread or on extra needle and work the front piece. LEFT FRONT PIECE: Start on the left shoulder (when the garment is worn). Cast on 9 stitches (band), then knit up 18-20-20-22-22-24 stitches inside the 1 edge stitch along the left shoulder on the back piece (i.e. knit up 1 stitch in each row) = 27-29-29-31-31-33 stitches. Work A.1 over the first 9 stitches (= band) and stocking stitch over the other stitches (seen from right side). When the piece measures 6 cm, increase for the neck at the beginning of the row from the right side. Increase after 11 stitches (A.1 + 2 stocking stitches) – remember INCREASE TIP FROM RIGHT SIDE. Increase every 4th row 6 times, then every 6th row 2-2-3-3-4-4 times. When the piece measures 24-25-26-28-29-30 cm, put stitches on a thread or an extra needle – make sure that the last row is worked from the right side. Cut the yarn. Work the right shoulder as explained below. RIGHT FRONT PIECE: Knit up 18-20-20-22-22-24 stitches inside the 1 edge stitch along the right back shoulder, cast on 9 stitches at the end of the row (band) = 27-29-29-31-31-33 stitches. Work stocking stitch until there are 9 stitches left, then work A.2 (seen from right side). When the piece measures 6 cm, increase for the neck at the end of the row from the right side. Increase before the last 11 stitches (2 stocking stitches + A.2) – remember INCREASE TIP FROM RIGHT SIDE. Increase every 4th row 6 times, then every 6th row 2-2-3-3-4-4 times. AT THE SAME TIME, when the piece measures 24-25-26-28-29-30 cm work as follows from the wrong side: Work the stitches from the right front piece, cast on 6-6-8-10-14-16 stitches at the end of the row, work from the wrong side over the 54-58-60-64-66-70 stitches on the back piece, cast on 6-6-8-10-14-16 stitches, work the stitches on the left front piece. BODY: Continue back and forth with stocking stitch and A.1/A.2. Continue to increase for the neck on the front pieces. When the increases are finished there are 136-144-152-164-176-188 stitches. The first and third time the top 6 rows in A.1/A.2 are worked, work them over all stitches on the body. NOTE! So the pattern matches the bands, start and finish with a yarn over on the body-stitches. This increased stitch will be decreased on the next row by knitting 2 together. Work stocking stitch and pattern until the piece measures 52-54-56-58-60-62 cm. Knit 1 row from the right side and increase 52-56-60-64-72-76 stitches evenly spaced (do not increase the bands) = 188-200-212-228-248-264 stitches. Change to circular needle size 7 mm. Work rib as follows from the wrong side: 9 band stitches as before, * purl 2, knit 2 *, work from *-* until there are 11 stitches left, purl 2, then 9 band stitches as before. Continue this rib for 10 cm. Cast off. LEFT SLEEVE: Use circular needle size 8 mm and knit up from the right side 26-28-30-32-32-34 stitches from the bottom of the armhole and up the front piece to the shoulder, then 16-16-18-18-20-20 stitches from the shoulder down the back piece to the bottom of the armhole = 42-44-48-50-52-54 stitches. Insert 1 marker in the middle of the stitches picked up. Work now back and forth in stocking stitch with short rows for the sleeve cap, to gives a better shape to the sleeve. 1st row (from wrong side): work to 10 stitches after marker, turn. 2nd row (from right side): work to 10 stitches after marker, turn. 3rd row (from wrong side): work to 14 stitches after marker, turn. 4th row (from right side): work to 14 stitches after marker, turn. 5th row (from wrong side): work to the beginning of the row. Work stocking stitch back and forth for 6-6-7-8-9-10 cm, measure from where the stitches were picked up (all length are measured mid on top of sleeve). Join the sleeve using short circular needle/double pointed needles size 8 mm. Insert 1 marker-thread at the beginning of the round and allow it to follow your work onwards. Start at the marker-thread and work stocking stitch in the round. When sleeve measures 8-8-9-10-11-12 cm decrease 2 stitches under the sleeve – read DECREASE TIP. Decrease like this every 8-5½-5½-4½-4-4 cm a total of 4-5-5-5-5-5 times = 34-34-38-40-42-44 stitches. Continue working until the sleeve measures 34-33-33-32-32-31 cm from the knitted-up edge. There is 14 cm left; try the jacket on and work to desired length before the rib. Knit 1 round and increase 14-18-14-16-14-16 stitches evenly spaced = 48-52-52-56-56-60 stitches. Change to double pointed needles size 7 mm. Work rib (knit 2, purl 2) for 14 cm. Cast off a little loosely. The sleeve measures approx. 48-47-47-46-46-45 cm. RIGHT SLEEVE: Work the same way as the left sleeve but knit up in reverse, with first 16-16-18-18-20-20 stitches from the bottom of the armhole up the back piece and 26-28-30-32-32-34 stitches from the shoulder down the front piece. Sew the bottom of the armholes – see sketch. NECK: Knit up 1 stitch in each of the 9 garter stitches at the top of the right band with needle size 7 mm. Work garter stitch for 7-7-8-8-9-9 cm; make sure the band reaches approx. mid-back when stretched slightly. Cast off. Work the left band in the same way. Sew the bands together mid-back and sew them to the neck-line. ASSEMBLY: Sew the 2 buttons to the left band so they can be buttoned through a row of holes on the right front piece. |
||||||||||||||||||||||
Diagram explanations |
||||||||||||||||||||||
|
||||||||||||||||||||||
 |
||||||||||||||||||||||
 |
||||||||||||||||||||||
 |
||||||||||||||||||||||
 |
||||||||||||||||||||||
Have you finished this pattern?Tag your pictures with #dropspattern #ivorycollagecardigan or submit them to the #dropsfan gallery. Do you need help with this pattern?You'll find 32 tutorial videos, a Comments/Questions area and more by visiting the pattern on garnstudio.com. © 1982-2026 DROPS Design A/S. We reserve all rights. This document, including all its sub-sections, has copyrights. Read more about what you can do with our patterns at the bottom of each pattern on our site. |
||||||||||||||||||||||


With over 40 years in knitting and crochet design, DROPS Design offers one of the most extensive collections of free patterns on the internet - translated to 17 languages. As of today we count 324 catalogues and 12290 patterns translated into English (UK/cm). 12290
We work hard to bring you the best knitting and crochet have to offer, inspiration and advice as well as great quality yarns at incredible prices! Would you like to use our patterns for other than personal use? You can read what you are allowed to do in the Copyright text at the bottom of all our patterns. Happy crafting!
Post a comment to pattern DROPS 239-31
We would love to hear what you have to say about this pattern!
If you want to leave a question, please make sure you select the correct category in the form below, to speed up the answering process. Required fields are marked *.