Comments / Questions (19)
![]() Jutta wrote:
Jutta wrote:
In Ihren Anleitungen hatten Sie immer ein Diagram mit Symbolen fuer das Muster und eine Skizze mit den Massen. Seit ein paar Tagen ist das in keinem ihrer Anleitungen. Warum nicht ? Muss ich etwas besonderes tun um dies zu bekommen?
02.10.2021 - 21:16DROPS Design answered:
Liebe Jutta, wir hatten einige Darstellungsprobleme, aber jetzt ist alles eingestellt, aktualisieren Sie die Seite oder bereinigen Ihren Browser-Cache, Bilder und Diagramme sollten jetzt angezeigt werden. Viel Spaß beim stricken!
04.10.2021 - 08:11
![]() SOFIA wrote:
SOFIA wrote:
It took me four hours, a drawing and lots of frogging to understand the first part. Many Drops patterns are sooo time consuming!!! Such a waste of time.
14.06.2021 - 19:26
![]() Willy wrote:
Willy wrote:
Prachtig mooi voor de zomer
22.02.2021 - 09:35
![]() Monique wrote:
Monique wrote:
Beauty
20.02.2021 - 22:32
![]() Julie wrote:
Julie wrote:
Scent of the sea
11.01.2021 - 04:46
![]() Doris wrote:
Doris wrote:
May
08.01.2021 - 16:39
![]() Valeria wrote:
Valeria wrote:
Elegante e ricercato.
08.01.2021 - 09:17
![]() Conny wrote:
Conny wrote:
Rosalie
08.01.2021 - 08:13
![]() Fanny wrote:
Fanny wrote:
Evening stroll
07.01.2021 - 22:13
Rosebud Parade Cardigan#rosebudparadecardigan |
||||||||||||||||
 |
 |
|||||||||||||||
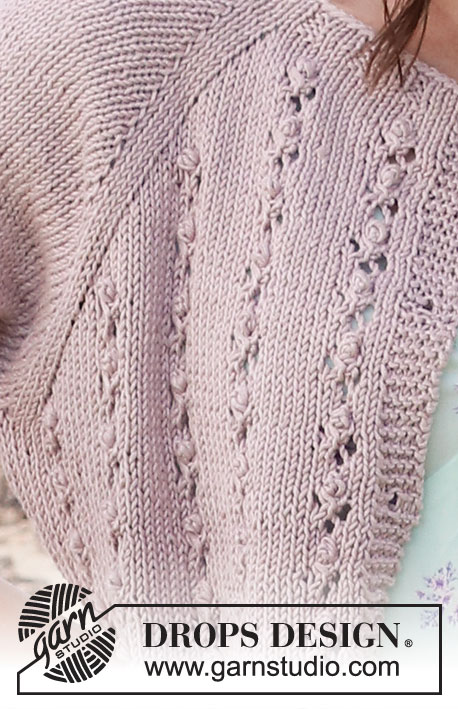
Knitted jacket in DROPS Muskat or DROPS Sky. The piece is worked top down with raglan, lace pattern, knots and ¾-length sleeves. Sizes S - XXXL.
DROPS 221-33 |
||||||||||||||||
|
------------------------------------------------------- EXPLANATIONS FOR THE PATTERN: ------------------------------------------------------- RIDGE/GARTER STITCH (worked back and forth): Knit all rows. 1 ridge in height = Knit 2 rows. PATTERN: See diagram A.1. The diagram shows all the rows in the pattern from the right side. INCREASE/DECREASE TIP (evenly spaced): To work out how to increase/decrease evenly, count the total number of stitches on needle (e.g. 112 stitches), minus the bands (e.g. 10 stitches) and divide the remaining stitches by the number of increases/decreases to be made (e.g. 2) = 51. In this example, increase by making 1 yarn over after each 51st stitch. (Do not increase over the bands). On the next row work the yarn overs twisted to avoid holes. When decreasing, knit together each 50th and 51st stitch. (Do not decrease over the bands). RAGLAN: All increases are worked from the right side! Increase 1 stitch on each side of the 3 knitted stitches in the transitions between front/back pieces and the sleeves = 8 stitches increased on the row (there are 2 stitches between the increases on the front/back pieces and the marker and 1 stitch between the increases on the sleeves and the marker). Increase 1 stitch by making 1 yarn over. On the next row work the yarn over twisted to avoid a hole. Then on the sleeves knit the new stitches. On the front/back pieces, the new stitches are worked into the pattern A.1 (i.e. knitted until there are enough stitches to start a new repeat of lace pattern/knots = A.1). You can insert a marker thread before/after each repeat of A.1 to make it easier to see where a new repeat starts. DECREASE TIP (for sleeves): Decrease 1 stitch on either side of the marker-stitch as follows: Work until there are 3 stitches left before the marker-stitch, knit 2 together, knit 3 (marker-stitch is the middle stitch), slip 1 stitch as if to knit, knit 1 and pass the slipped stitch over the knitted stitch (2 stitches decreased). BUTTONHOLES: Work buttonholes on the right band (when the garment is worn). Work from the right side when there are 3 stitches left on the row as follows: Make 1 yarn over, knit 2 together and knit 1. On the next row (wrong side), knit the yarn over to leave a hole. The first buttonhole is worked when the rib on the neck measures approx. 2 cm. Then work the other 4-4-5-5-5-5 buttonholes with approx. 9-9-8-8-8½-9 cm between each one. CASTING-OFF TIP: To avoid the cast-off edge being tight you can cast off with a larger size needle. If the edge is still tight, make 1 yarn over after approx. each 5th stitch at the same time as casting off; the yarn overs are cast off as normal stitches. ------------------------------------------------------- START THE PIECE HERE: ------------------------------------------------------- JACKET – SHORT OVERVIEW OF THE PIECE. The neck and yoke are worked back and forth with circular needle, from mid front and top down. The yoke is divided for body and sleeves and the body continued back and forth with circular needle. The sleeves are worked in the round with double pointed needles/short circular needle, top down. NECK: Cast on 113-118-123-128-133-133 stitches (including 5 band stitches on each side towards mid-front) with circular needle size 3 mm and Muskat or Sky. Purl 1 row (= wrong side). The next row is worked as follows from the right side: Work 5 band stitches in GARTER STITCH – read description above, * knit 3, purl 2 *, work from *-* until there are 8 stitches left, knit 3 and finish with 5 band stitches in garter stitch. Continue this rib for 2 cm – remember the BUTTONHOLES on the right band – read description above. When the rib is finished, Knit 1 row where you adjust the number of stitches to 114-114-122-122-142-142 stitches by decreasing/increasing evenly – read INCREASE/DECREASE TIP. Purl 1 row from the wrong side (yarn overs purled twisted and bands in garter stitch). Change to circular needle size 4 mm. Insert a marker after the band at the beginning of the round; the yoke is measured from this marker! YOKE: Now work pattern and insert 4 markers in the piece as follows: Work 5 band stitches in garter stitch, work the last 8 stitches in A.1, then work A.1 over the next 0-0-9-9-9-9 stitches (= 0-0-1-1-1-1 repeats of 9 stitches), work the first 7-7-0-0-5-5 stitches in A.1, 1 yarn over, 2 stitches in stocking stitch, insert a marker here (= in transition between left front piece and left sleeve), 1 stitch in stocking stitch, 1 yarn over, stocking stitch over the next 15 stitches, 1 yarn over, 1 stitch in stocking stitch, insert a marker here (= in transition between left sleeve and back piece), 2 stitches in stocking stitch, 1 yarn over, work the last 7-7-0-0-5-5 stitches in A.1, work A.1 over the next 18-18-36-36-36-36 stitches (= 2-2-4-4-4-4 repeats of 9 stitches), work the first 7-7-0-0-5-5 stitches in A.1, 1 yarn over, 2 stitches in stocking stitch, insert a marker here (= in transition between back piece and right sleeve), 1 stitch in stocking stitch, 1 yarn over, work stocking stitch over the next 15 stitches, 1 yarn over, 1 stitch in stocking stitch, insert a marker here (= in transition between right sleeve and right front piece), 2 stitches in stocking stitch, 1 yarn over, work the last 7-7-0-0-5-5 stitches in A.1, work A.1 over the next 0-0-9-9-9-9 stitches (= 0-0-1-1-1-1 repeats of 9 stitches), work the first 8 stitches in A.1 and 5 band stitches in garter stitch. You have now increased 8 stitches to RAGLAN – read description above. Continue like this back and forth and increase to raglan every 2nd row (every row from the right side) a total of 24-26-29-32-35-38 times = 306-322-354-378-422-446 stitches. REMEMBER THE KNITTING TENSION. When all the increases to raglan are finished, the piece measures approx. 17-19-21-23-25-27 cm from the marker on the neck. Continue with pattern and stocking stitch until the yoke measures 19-21-23-25-27-29 cm from the marker. Now divide the piece for body and sleeves on the next row as follows: Work the first 46-49-53-58-65-70 stitches (= front piece), place the next 65-67-75-77-85-87 stitches on 1 thread for the sleeve, cast on 7-9-11-11-11-11 new stitches (= in side under sleeve), work 84-90-98-108-122-132 stitches (= back piece), place the next 65-67-75-77-85-87 stitches on 1 thread for the sleeve, cast on 7-9-11-11-11-11 new stitches (= in side under sleeve), work the last 46-49-53-58-65-70 stitches (= front piece). Body and sleeves are finished separately. THE PIECE IS NOW MEASURED FROM HERE. BODY: = 190-206-226-246-274-294 stitches. Continue back and forth with 5 band stitches in garter stitch as before, and with as many repeats of A.1 as you have room for towards each side under the sleeves. The remaining stitches are knitted. Continue like this until the piece measures 17 cm from the division – finish after row 8 or 16 in the pattern; continue with extra rows of stocking stitch if necessary, to reach the correct length. On the next row from the right side increase 28-32-32-37-39-44 stitches evenly spaced = 218-238-258-283-313-338 stitches. Change to circular needle size 3 mm and work 1 row back from the wrong side. Now work rib from the right side as follows: 5 band stitches in garter stitch, * knit 3, purl 2 *, work from *-* until there are 8 stitches left on the row, knit 3 and finish with 5 band stitches in garter stitch. Continue this rib for 2 cm. Cast off with knit over knit and purl over purl – read CASTING-OFF TIP. The jacket measures approx. 42-44-46-48-50-52 cm from the shoulder down. SLEEVE: Place the 65-67-75-77-85-87 stitches from the thread on the one side of the piece on double pointed needles/short circular needle size 4 mm and knit up 1 stitch in each of the 7-9-11-11-11-11 stitches cast on under the sleeve = 72-76-86-88-96-98 stitches. Insert a marker in the middle stitch under the sleeve. Allow the thread to follow your work onwards; it will be used when decreasing under the sleeve. Continue in the round with stocking stitch. When the piece measures 4-4-3-3-3-2 cm from the division, decrease 2 stitches under the sleeve – read DECREASE TIP. Decrease like this every 2½-2-1½-1½-1-1 cm a total of 11-12-16-15-19-19 times = 50-52-54-58-58-60 stitches. Continue working until the sleeve measures 30-28-27-25-24-23 cm. Now increase 5-8-6-7-7-10 stitches evenly spaced = 55-60-60-65-65-70 stitches. Change to double pointed needles size 3 mm and work rib (knit 3, purl 2) for 2 cm. Cast off with knit over knit and purl over purl – remember CASTING-OFF TIP. The sleeve measures approx. 32-30-29-27-26-25 cm. Work the other sleeve in the same way. ASSEMBLY: Sew the buttons onto the left band. |
||||||||||||||||
Diagram explanations |
||||||||||||||||
|
||||||||||||||||
 |
||||||||||||||||
Have you finished this pattern?Tag your pictures with #dropspattern #rosebudparadecardigan or submit them to the #dropsfan gallery. Do you need help with this pattern?You'll find 27 tutorial videos, a Comments/Questions area and more by visiting the pattern on garnstudio.com. © 1982-2025 DROPS Design A/S. We reserve all rights. This document, including all its sub-sections, has copyrights. Read more about what you can do with our patterns at the bottom of each pattern on our site. |
||||||||||||||||


Post a comment to pattern DROPS 221-33
We would love to hear what you have to say about this pattern!
If you want to leave a question, please make sure you select the correct category in the form below, to speed up the answering process. Required fields are marked *.