
Categorías populares
¿Buscas un hilo?




























Comentarios / Preguntas (171)
 Sue escribió:
Drops patterns look beautiful but the patterns are always so confusing to follow. Maybe you could try to write them differently.
27.09.2021 - 22:48
 Marylou Spencer escribió:
Pattern is written in far too complicated a way - discouraging before one ever starts
16.09.2021 - 18:45
Maureen escribió:
Nevermind the message I sent earlier. I think I was working from the wrong video and have since found another one. It looks more like the lighter stitch. I think I'm happy with the current seaming results.
10.07.2021 - 14:39
Maureen A Sullivan escribió:
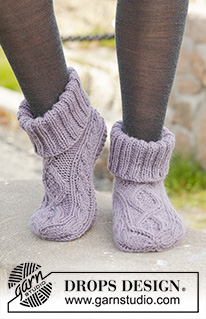
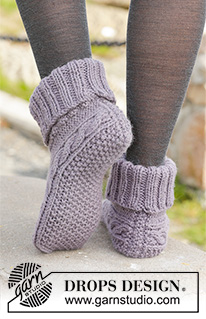
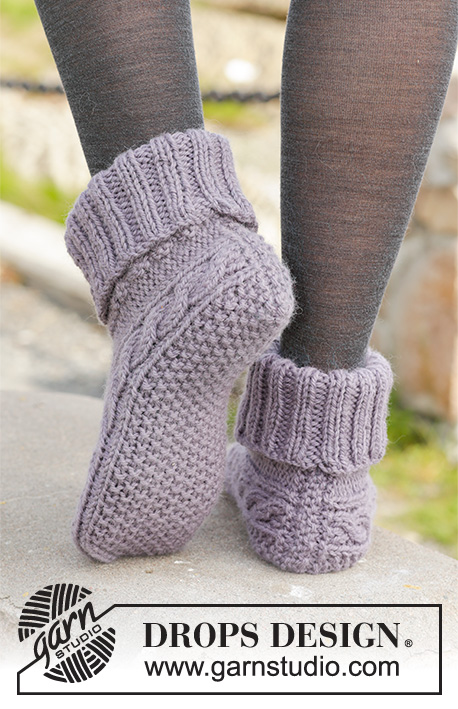
Finally finished the first slipper - on to the second. I have a question about the assembly. Looking at the photo it looks like purl stitches as the seam for the back of the foot. The instructions just say sew together. Is there a fancier way to do it to get the look of the photo? It blends so nicely with the ribbing in the cuff but I can't seem to figure it out. Maybe pick up stitches and just purl your way up?
10.07.2021 - 02:54DROPS Design respondió:
Dear Mrs Sullivan, the ridges on the picture are the ridge you started with at the beginning of the slipper, when folding the piece together, the ridge you started will make as if there were 2 ridges. Happy knitting!
12.07.2021 - 07:15
 Maureen escribió:
Just a quick thank you for the guidance! So far so good - so excited for these slippers. My daughter used to do stepdance. Her first trip to Ireland was to compete. I know she'll love these.
07.07.2021 - 02:08
Maureen escribió:
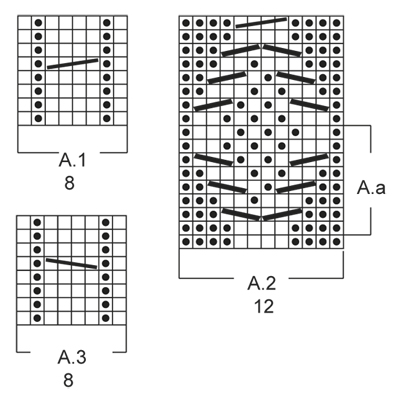
I love the look of these slippers. I've just begun. Because I'm knitting flat- when I work on the wrong side, I change P to K. And I have the seed pattern ok. My cable stitches aren't forming a cable. Does A1 and A3 reverse on the WS? Are there corrections I should make in cabling when working on the WS other than changing K to P?
05.07.2021 - 02:42DROPS Design respondió:
Dear Maureen, when you are working A.1 and A.3 from WS the white squares should be purled from WS (= K from RS) and the dots should be knitted from WS (P from WS). The cables should be worked only from right side (= on 5th row then on every 8th row). Happy knitting!
05.07.2021 - 08:22
 Janice escribió:
Very complicated instructions what does knit over purl and purl over knit mean. hankyou. Love the look of them but difficult pattern to follow
27.05.2021 - 01:39DROPS Design respondió:
Dear Janice, knit over purl means you have to knit the stitches purled on previous row/round and purl over knit means you have to p url the stitches knitted on previous row/round. Happy knitting!
27.05.2021 - 09:42
Christine Lemmetty escribió:
I am an experienced knitter, and love the Celtic Dancer slippers. I find your instructions very confusing, however. 1. I don't understand to measure from the middle of the chain - is that where the stitches cross? 2. Are the P4 sts at the beginning and end of the row knitted on the WS row? 3. When you say to start working "in a round" do I use 4 dp needles now? This is as far as I am, but the decreasing instructions look very confusing, but I will try them before I comment.
13.05.2021 - 23:19
 Nonna Shilo-Svensson escribió:
Tack så mycket för svaret. Nu har jag hittat halkspray i webbutiken.
07.04.2021 - 23:52
Nonna Shilo-Svensson escribió:
Hej! Jag undrar hur kan man bearbeta sulor för att inte glida på golvet och gå säkert. Har ni ett förslag för det? Tack så mycket på förhand.
03.04.2021 - 10:14DROPS Design respondió:
Hei Nonna. Hør i en garnbutikk om de har sånn anti skli spray du kan spraye på under sokkene eller om en tekstilbutikk har noe du kan stryke på under sokkene. Har sett slike produkter i butikker i Norge, usikker på hva de har i Sverige. mvh DROPS design
07.04.2021 - 15:22
|
|||||||||||||||||||
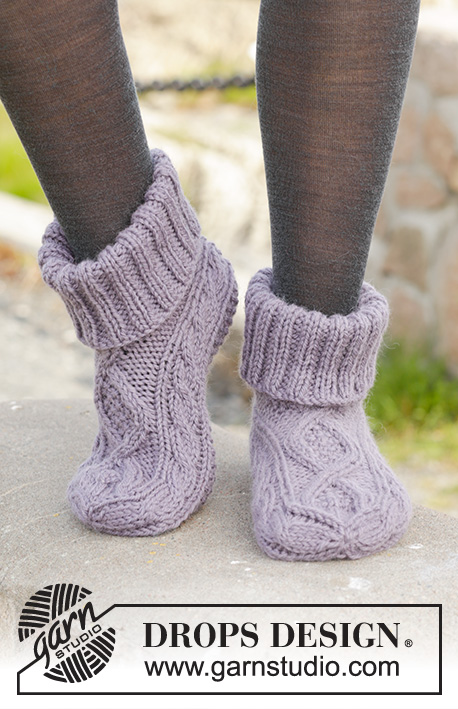
Celtic Dancer#celticdancerslippers |
|||||||||||||||||||
 |
 |
||||||||||||||||||
Pantuflas de punto DROPS con torsadas, en “Nepal”. Talla: 35 – 43.
DROPS 156-55 |
|||||||||||||||||||
|
PATRÓN: Ver diagramas A.1-A.3. Los diagramas muestran el patrón visto por el LD. TIP PARA DISMINUCIÓN: Dism 1 pt antes del marcapuntos de la manera sig: tejer 2 pjd. Dism 1 pt después del marcapuntos de la manera sig: tejer 2 pts juntos retorcidos de derecho (es decir, insertar la ag por atrás de los pts en vez de por delante). PT MUSGO (de ida y vuelta en la ag): Tejer todas las hileras de derecho. 1 surco = 2 hileras tejidas de derecho. PT DE ARROZ: Hilera/vuelta 1: * 1d, 1r *, repetir de *a*. Hilera/vuelta 2: derecho sobre revés y revés sobre derecho. Repetir la 2ª hilera/vuelta. TIP PARA MEDIR: Medir en el centro de la torsada de A.1/A.3. ---------------------------------------------------- PANTUFLA: Tejida de ida y vuelta a partir del centro de la parte de atrás. Mon 33-33-35 pts en ag tamaño 5 mm con Nepal (dejar que el cabo de hilo sea de aprox 20 cm; usado para el ensamblaje). Tejer 1 surco en PT MUSGO – ver explicación arriba y, AL MISMO TIEMPO, en la última hilera, aum 4 pts distribuidos equitativamente = 37-37-39 pts. Después tejer de la manera sig, por el LD: 4r, A.3 (= 8 pts), 13-13-15 pts en PT DE ARROZ – ver explicación arriba, A.1 (= 8 pts), terminar con 4r. Continuar el patrón de esta manera, tejer los pts reveses de derecho por el LR. Repetir A.1 y A.3 hasta el fin. RECUERDA MANTENER LA MISMA TENSIÓN DE TEJIDO DE LA MUESTRA! Cuando la pieza mida 10½-11½-13 cm – ver TIP PARA MEDIR arriba, tejer de la manera sig por el LD: 4r, A.3, 13-13-15 pts en pt de arroz, A.1, 4r, mon 4 nuevos pts, tejer los primeros 4 pts, la vta comienza aquí = 41-41-43 pts. Ahora tejer la pieza en redondo en ag de doble punta. Tejer el patrón como antes, pero ahora tejer A.2 (= 12 pts) sobre los 4 pts reveses en cada lado de la pieza y los 4 nuevos pts. Cuando A.2 ha sido tejido 1 vez verticalmente, tejer A.a hasta que la pieza mida 17-19-22 cm. Ahora tejer en pt jersey sobre los pts de A.a, o comenzar en pt jersey un poco antes. Continuar A.1 y A.3 hasta el fin. Ahora insertar 4 marcapuntos en la pieza de la manera sig: Tejer A.3 pero insertar el 1er marcapuntos entre el 1º y 2º pt y el 2º marcapuntos entre el 7º y 8º pt de A.3, tejer en pt de arroz como antes, tejer A.1 pero insertar el 3er marcapuntos entre el 1º y 2º pt y el 4º marcapuntos entre el 7º y 8º pt de A.1, tejer los pts restantes de derecho (= 14 pts en el empeine, 15-15-17 pts en la planta del pie y 6 pts en cada lado de la pieza). Ahora dism para la punta del pie, en la vta sig, de la manera sig: Dism 1 pt después del 2º marcapuntos y 1 pt antes del 3er marcapuntos en la planta del pie 0-0-1 vez en total – LEER TIP PARA DISMINUCIÓN arriba, tejer los pts restantes = 14 pts en el empeine y 15 pts en la planta del pie (= 41 pts en total). En la vta sig, dism de la manera sig: Dism 1 pt antes del 1er y 3er marcapuntos y 1 pt después del 2º y 4º marcapuntos (= 4 dism en total). Repetir las dism en cada vta 6 veces en total. AL MISMO TIEMPO, en la última dism, tejer los pts de la torsada de A.1 y A.3 de la manera sig: 2 pts juntos retorcidos de derecho, 2 pjd. Después de todas las dism, hay 13 pts en la ag. La pieza mide aprox 20-22-25 cm. Cortar el hilo y pasarlo a través de los pts restantes, fruncir y rem. ENSAMBLAJE: Doblar la orilla de montaje en dos (= centro de la parte de atrás), usar el cabo de hilo del inicio para coser con puntos cuidados en el centro de la parte de atrás. ORILLA: Tejer la orilla en redondo en ag de doble punta alrededor de la abertura de la pantufla. Levantar 50-50-54 pts en ag de doble punta tamaño 4 mm con Nepal. Tejer 1 vta de revés. Después tejer 1 vta de derecho y, AL MISMO TIEMPO, aum 10 pts distribuidos equitativamente = 60-60-64 pts. Tejer en resorte = 2d/2r hasta que la pieza mida aprox 12-13-14 cm. Rem los pts con derecho sobre derecho y revés sobre revés. Doblar la orilla en dos. Tejer la otra pantufla. |
|||||||||||||||||||
Explicaciones del diagrama |
|||||||||||||||||||
|
|||||||||||||||||||
 |
|||||||||||||||||||
¿Terminaste este patrón?Entonces, etiqueta tus fotos con #dropspattern #celticdancerslippers o envíalas a la galería #dropsfan. ¿Necesitas ayuda con este patrón?Encontrarás 13 videos tutoriales, un espacio para comentarios/preguntas y más visitando la página del patrón en garnstudio.com © 1982-2026 DROPS Design A/S. Todos los derechos reservados. Este documento, incluyendo todas sus sub-secciones, está protegido por los derechos de autor (copyright). Lee más acerca de lo que puedes hacer con nuestros patrones en la parte de abajo de cada patrón de nuestro sitio. |
|||||||||||||||||||






Con más de 40 años en el diseño de modelos de punto y de ganchillo, DROPS Design ofrece una de las más vastas colecciones de patrones gratuitos en el internet - traducidos en 17 idiomas. Al día de hoy, contamos con 333 catálogos y 12532 patrones - de los cuales 12026 están traducidos en español.
Nosotros trabajamos con mucho esmero para brindarte lo mejor que las labores de punto y ganchillo tienen para ofrecer,inspiración y consejos, así como hilos de magnífica calidad a precios increíbles! Te gustaría usar nuestros patrones para otro fin además del uso personal? Puedes leer acerca de lo que estás permitida a hacer en el texto de Copyright en la parte de abajo de todos nuestros patrones. Felices labores!
Escribe un comentario sobre DROPS 156-55
¡Nos encantaría saber qué piensas acerca de este patrón!
Si quieres escribir una pregunta referente al patrón, por favor asegúrate de elegir la categoría correcta en el formulario debajo, para acelerar el proceso de respuesta. Los campos obligatorios están marcados con un *.