
Categorías populares
¿Buscas un hilo?


Comentarios / Preguntas (168)
![]() Jane escribió:
Jane escribió:
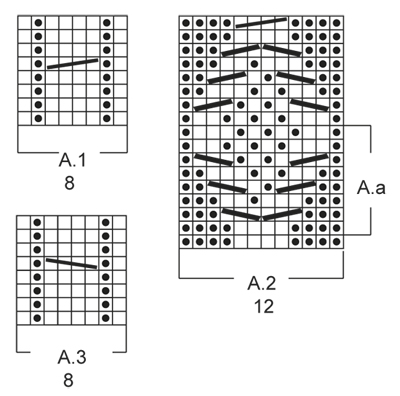
I am so sorry, I know you have answered this question before but I am still confused by the A.a chart. On the third row, when I come to the first cable it says to slip 1 stitch on cable needle behind the piece and knit 2. Do I purl the stitch from the cable needle or knit it. I don't understand when you say either P or K depending on the next row in diagram. Thanks so much for your help!!!
01.04.2022 - 23:07DROPS Design respondió:
Dear Jane, the stitches in the middle of the cables in A.2 will be worked in moss stitch; so that you should either K (if this stitch is worked purled on next round) or P (if this stitch is worked K on next round). Happy knitting!
04.04.2022 - 10:59
![]() Linda Ponsford escribió:
Linda Ponsford escribió:
The pattern says to repeat A.2 one time, then A.a until the correct measurement. But the picture clearly shows A.2 repeated twice. Can you clarify this please?
04.01.2022 - 23:16DROPS Design respondió:
Dear Mrs Ponsford, on the picture you work A.2 one time then the first rows = Aa = the beg of a 2nd repeat of the cable that will not be worked to the end because these stitches will be decreased for the toe (reason why you work them in stocking stitch, you won't have enough sts to continue the 2nd repeat due to the decreases), only the cables on each side will be kept. Happy knitting!
05.01.2022 - 08:02
![]() Trixi escribió:
Trixi escribió:
Könnten sie mir bitte erklären wenn 33-33-37 M zb. Stehen meinen sie denn insgesamt nur 103 M so weiterschicken? Ich verstehe leider auch nicht ganz wie das so beim stricken aussehen soll oder zusammengefügt wird. Gibt es konzeptzeichnungen? Oder andere optische Hilfe?
19.12.2021 - 18:06DROPS Design respondió:
Liebe Trixi, es wird am Anfang nur 33-33-35 Maschen gestrickt - siehe vorrige Antwort, Sie stricken zuerst den Fußteil von hinteren Mitte bis die Öffnung für den Fuß fertig ist, dann stricken Sie in Runden bis zur Spitze. Folgen Sie nach und nach die Anleitung genau wie beschrieben, so bekommen Sie die Hausshuhen wie auf dem Foto. Viel Spaß beim stricken!
20.12.2021 - 08:15
![]() Trixi escribió:
Trixi escribió:
Ich bin es gewohnt mit bildlichen Anleitungen zu arbeiten, wieviele Runden werden am Anfang gestrickt? Am Anfang steht ein krausrippe und zur Erklärung 2re und dann wieder 2 re ich denke da ist ein Fehler und es sollte 2 re und 2 Li stehen oder? So wie es auf dem Bild auch zu sehen ist. Leier steht in der gesammten beschreiben nicht einmal von R 1 - z.B. 7 oder ähnliches. Können sie mir bitte sagen wie genau die Anleitung ist oder wo ich vielleicht eine ausführliche finden kann?
19.12.2021 - 17:58DROPS Design respondió:
Liebe Trixi, das Bündchen 2 re/2 li wird am Ende gestrickt - siehe BÜNDCHENRAND; diese Hausschuhen werden zuerst in Hin- und Rück-Reihen ab hinteren Mitte (Fersen) gestrickt; die Anschlagskante wird am Ende doppelt gefaltet und zusammengenäht, dann wird das Bündchenrand gestrickt. Viel Spaß beim stricken!
20.12.2021 - 08:12
![]() Pauline Lee escribió:
Pauline Lee escribió:
Dear Esteemed Knitters, Diagrams A1, A2, A3 is not found within the general directions for the pattern itself. Thank you for your valued time.
26.10.2021 - 22:08DROPS Design respondió:
Dear Pauline, if you mean the written out direction for those patterns, they are only available in diagram form, below the instructions. Happy Knitting!
27.10.2021 - 00:28
![]() Dorothy Moore escribió:
Dorothy Moore escribió:
When following the charts do you start at the bottom and work up or from the top and work down? In the chart for A2 and looking at the picture it looks like you start top to bottom but then the repeat A.a does not make any sense. Also please explain what p/k 1 in the cable instructions. How are you suppose to tell when to purl or when to knit the stitch.
17.10.2021 - 01:34DROPS Design respondió:
Dear Dorothy, when following the chart, we go from the bottom up, right to left - see How to read knitting diagrams P/K 1 in cable instructions depends on moss stitch - the stitches need to be adjusted so that the pattern comes out. Happy knitting!
18.10.2021 - 05:37
![]() Lucy escribió:
Lucy escribió:
Hello, I have dreamed of someday knitting these slippers. I have tried unfortunately failed to understand the instructions. I have seen other videos from here showing how to knit the whole slipper. I would love it and I'm sure new knitters around the world would enjoy having a demo video on these slippers. Please consider making a demo video on the Celtic Dancer slipper. I will attempt them again after my current knitting project is complete. Thanks for listening. Have a wonderful day.
05.10.2021 - 16:23DROPS Design respondió:
Dear Lucy, unfortunately, it's very difficult for us to make video tutorials for each pattern, which is why we usually make videos to explain the main or most complicated techniques and one for slippers in general, as a guide to create other slippers. Happy knitting!
06.10.2021 - 23:19
![]() Sue escribió:
Sue escribió:
Drops patterns look beautiful but the patterns are always so confusing to follow. Maybe you could try to write them differently.
27.09.2021 - 22:48
![]() Marylou Spencer escribió:
Marylou Spencer escribió:
Pattern is written in far too complicated a way - discouraging before one ever starts
16.09.2021 - 18:45
![]() Maureen escribió:
Maureen escribió:
Nevermind the message I sent earlier. I think I was working from the wrong video and have since found another one. It looks more like the lighter stitch. I think I'm happy with the current seaming results.
10.07.2021 - 14:39
|
|||||||||||||||||||
Celtic Dancer#celticdancerslippers |
|||||||||||||||||||
 |
 |
||||||||||||||||||
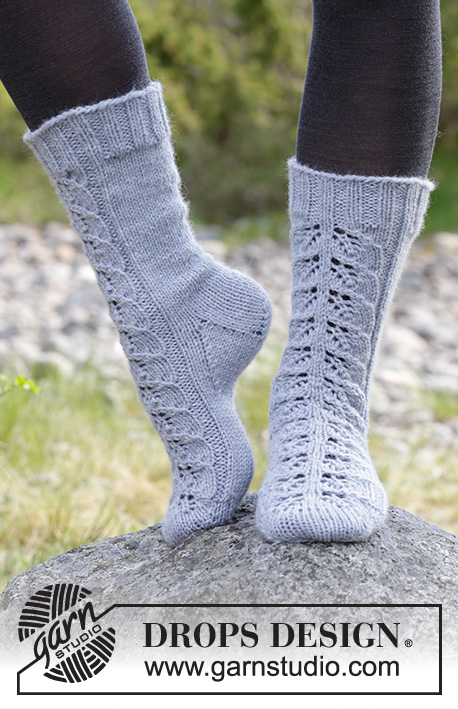
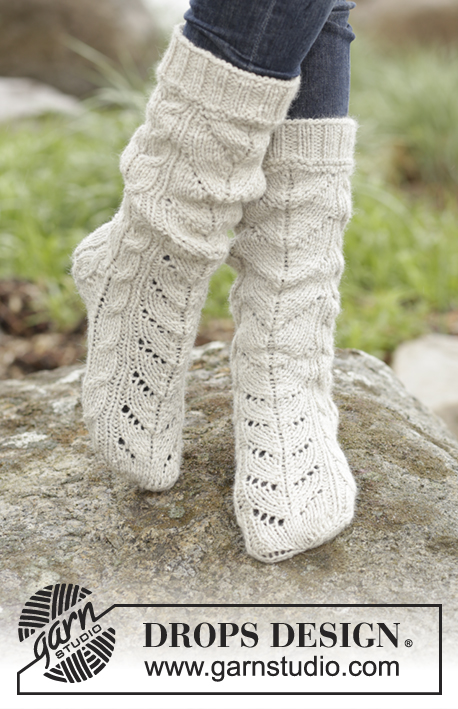
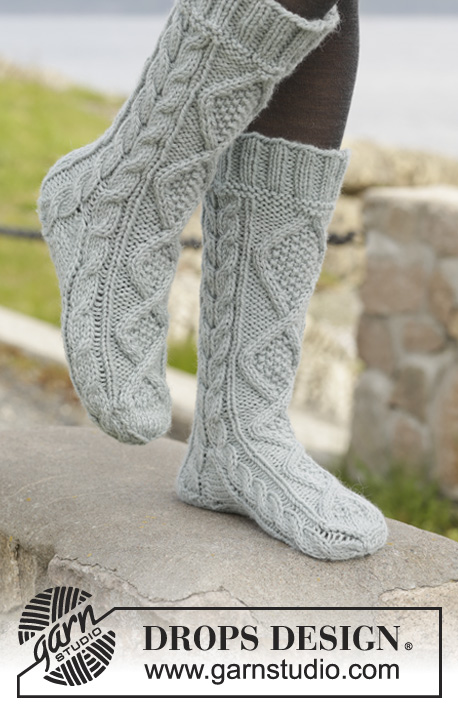
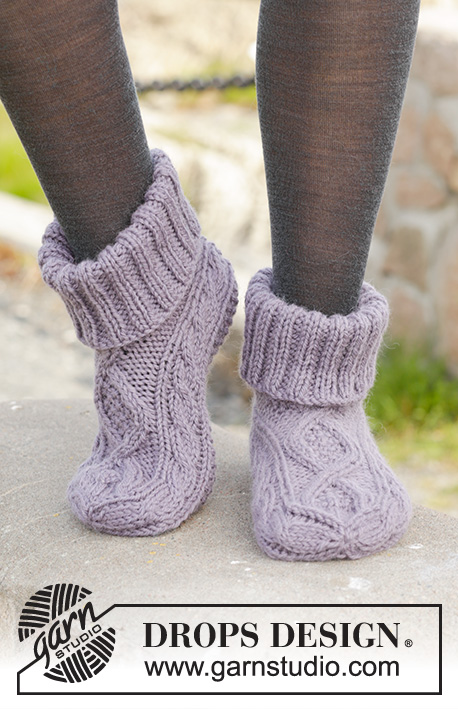
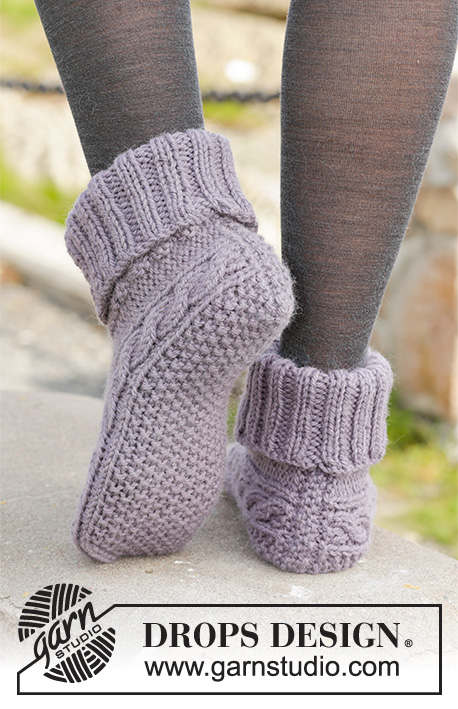
Pantuflas de punto DROPS con torsadas, en “Nepal”. Talla: 35 – 43.
DROPS 156-55 |
|||||||||||||||||||
|
PATRÓN: Ver diagramas A.1-A.3. Los diagramas muestran el patrón visto por el LD. TIP PARA DISMINUCIÓN: Dism 1 pt antes del marcapuntos de la manera sig: tejer 2 pjd. Dism 1 pt después del marcapuntos de la manera sig: tejer 2 pts juntos retorcidos de derecho (es decir, insertar la ag por atrás de los pts en vez de por delante). PT MUSGO (de ida y vuelta en la ag): Tejer todas las hileras de derecho. 1 surco = 2 hileras tejidas de derecho. PT DE ARROZ: Hilera/vuelta 1: * 1d, 1r *, repetir de *a*. Hilera/vuelta 2: derecho sobre revés y revés sobre derecho. Repetir la 2ª hilera/vuelta. TIP PARA MEDIR: Medir en el centro de la torsada de A.1/A.3. ---------------------------------------------------- PANTUFLA: Tejida de ida y vuelta a partir del centro de la parte de atrás. Mon 33-33-35 pts en ag tamaño 5 mm con Nepal (dejar que el cabo de hilo sea de aprox 20 cm; usado para el ensamblaje). Tejer 1 surco en PT MUSGO – ver explicación arriba y, AL MISMO TIEMPO, en la última hilera, aum 4 pts distribuidos equitativamente = 37-37-39 pts. Después tejer de la manera sig, por el LD: 4r, A.3 (= 8 pts), 13-13-15 pts en PT DE ARROZ – ver explicación arriba, A.1 (= 8 pts), terminar con 4r. Continuar el patrón de esta manera, tejer los pts reveses de derecho por el LR. Repetir A.1 y A.3 hasta el fin. RECUERDA MANTENER LA MISMA TENSIÓN DE TEJIDO DE LA MUESTRA! Cuando la pieza mida 10½-11½-13 cm – ver TIP PARA MEDIR arriba, tejer de la manera sig por el LD: 4r, A.3, 13-13-15 pts en pt de arroz, A.1, 4r, mon 4 nuevos pts, tejer los primeros 4 pts, la vta comienza aquí = 41-41-43 pts. Ahora tejer la pieza en redondo en ag de doble punta. Tejer el patrón como antes, pero ahora tejer A.2 (= 12 pts) sobre los 4 pts reveses en cada lado de la pieza y los 4 nuevos pts. Cuando A.2 ha sido tejido 1 vez verticalmente, tejer A.a hasta que la pieza mida 17-19-22 cm. Ahora tejer en pt jersey sobre los pts de A.a, o comenzar en pt jersey un poco antes. Continuar A.1 y A.3 hasta el fin. Ahora insertar 4 marcapuntos en la pieza de la manera sig: Tejer A.3 pero insertar el 1er marcapuntos entre el 1º y 2º pt y el 2º marcapuntos entre el 7º y 8º pt de A.3, tejer en pt de arroz como antes, tejer A.1 pero insertar el 3er marcapuntos entre el 1º y 2º pt y el 4º marcapuntos entre el 7º y 8º pt de A.1, tejer los pts restantes de derecho (= 14 pts en el empeine, 15-15-17 pts en la planta del pie y 6 pts en cada lado de la pieza). Ahora dism para la punta del pie, en la vta sig, de la manera sig: Dism 1 pt después del 2º marcapuntos y 1 pt antes del 3er marcapuntos en la planta del pie 0-0-1 vez en total – LEER TIP PARA DISMINUCIÓN arriba, tejer los pts restantes = 14 pts en el empeine y 15 pts en la planta del pie (= 41 pts en total). En la vta sig, dism de la manera sig: Dism 1 pt antes del 1er y 3er marcapuntos y 1 pt después del 2º y 4º marcapuntos (= 4 dism en total). Repetir las dism en cada vta 6 veces en total. AL MISMO TIEMPO, en la última dism, tejer los pts de la torsada de A.1 y A.3 de la manera sig: 2 pts juntos retorcidos de derecho, 2 pjd. Después de todas las dism, hay 13 pts en la ag. La pieza mide aprox 20-22-25 cm. Cortar el hilo y pasarlo a través de los pts restantes, fruncir y rem. ENSAMBLAJE: Doblar la orilla de montaje en dos (= centro de la parte de atrás), usar el cabo de hilo del inicio para coser con puntos cuidados en el centro de la parte de atrás. ORILLA: Tejer la orilla en redondo en ag de doble punta alrededor de la abertura de la pantufla. Levantar 50-50-54 pts en ag de doble punta tamaño 4 mm con Nepal. Tejer 1 vta de revés. Después tejer 1 vta de derecho y, AL MISMO TIEMPO, aum 10 pts distribuidos equitativamente = 60-60-64 pts. Tejer en resorte = 2d/2r hasta que la pieza mida aprox 12-13-14 cm. Rem los pts con derecho sobre derecho y revés sobre revés. Doblar la orilla en dos. Tejer la otra pantufla. |
|||||||||||||||||||
Explicaciones del diagrama |
|||||||||||||||||||
|
|||||||||||||||||||
 |
|||||||||||||||||||
¿Terminaste este patrón?Entonces, etiqueta tus fotos con #dropspattern #celticdancerslippers o envíalas a la galería #dropsfan. ¿Necesitas ayuda con este patrón?Encontrarás 22 videos tutoriales, un espacio para comentarios/preguntas y más visitando la página del patrón en garnstudio.com © 1982-2026 DROPS Design A/S. Todos los derechos reservados. Este documento, incluyendo todas sus sub-secciones, está protegido por los derechos de autor (copyright). Lee más acerca de lo que puedes hacer con nuestros patrones en la parte de abajo de cada patrón de nuestro sitio. |
|||||||||||||||||||


Con más de 40 años en el diseño de modelos de punto y de ganchillo, DROPS Design ofrece una de las más vastas colecciones de patrones gratuitos en el internet - traducidos en 17 idiomas. Al día de hoy, contamos con 324 catálogos y 12290 patrones - de los cuales 11685 están traducidos en español.
Nosotros trabajamos con mucho esmero para brindarte lo mejor que las labores de punto y ganchillo tienen para ofrecer,inspiración y consejos, así como hilos de magnífica calidad a precios increíbles! Te gustaría usar nuestros patrones para otro fin además del uso personal? Puedes leer acerca de lo que estás permitida a hacer en el texto de Copyright en la parte de abajo de todos nuestros patrones. Felices labores!
Escribe un comentario sobre DROPS 156-55
¡Nos encantaría saber qué piensas acerca de este patrón!
Si quieres escribir una pregunta referente al patrón, por favor asegúrate de elegir la categoría correcta en el formulario debajo, para acelerar el proceso de respuesta. Los campos obligatorios están marcados con un *.