
Popular categories
Looking for a yarn?


Comments / Questions (40)
![]() Mathilde wrote:
Mathilde wrote:
Bonjour, Concernant le col, il est indiqué de relever 80-88 maillles, à quelles tailles correspondent ces nombres de mailles? Je vous souhaite une belle journée
04.04.2026 - 21:59DROPS Design answered:
Bonjour Mathilde, ces nombres correspondent approximativement au minimum et au maximum de mailles à relever, en fonction de votre taille et de votre tension, vous devrez relever un nombre de mailles compris entre ces 2 données, il faut juste que votre nombre de mailles soit divisible par 4; veillez juste à relever suffisamment de mailles, ni trop pour que le col ne soit pas trop lâche, ni trop peu pour qu'il ne soit pas serré - cf ici et là. Bon tricot!
08.04.2026 - 10:07
![]() Julia wrote:
Julia wrote:
Ich habe den Pulli irgendwann nach Anleitung fertiggestrickt und habe dann festgestellt, dass das Rückenteil viel zu Kurz ist und hinten unschön hochkommt. Ich habe das Rückenteil daher nochmal unten aufgemacht und werde mehr dranstricken. Falls diese Info für irgendwen relevant sein sollte...
05.01.2026 - 00:06
![]() Teresa Della Pietra wrote:
Teresa Della Pietra wrote:
In questo modello vengono usati due filati diversi che io vorrei sostituire con un unico Karisma (che amo moltissimo). Come converto? Grazie
22.02.2025 - 10:25DROPS Design answered:
Buonasera Teresa, DROPS Karisma appartiene al gruppo B come DROPS Puna: dovrebbe comunque aggiungere un filato del gruppo A. Buon lavoro!
24.02.2025 - 00:15
![]() Susana Araujo wrote:
Susana Araujo wrote:
I have another question in here: " When armhole measures 18 cm, cast on new stitches for armholes in each side as follows: Cast on 1 stitch 1 times, 2 stitches 0 time and 4 stitches 1 time = 100 stitches. Insert a marker here. Now measure piece from here. Work the new stitches in stocking stitch." What do I do with the stitch in the edge that was being worked in garter stitch? It is also to start being worked as stocking stitch? Thank you, Susana
03.02.2025 - 14:32DROPS Design answered:
Dear Mrs Auraujo, the previous edge stitches -before increasing for armholes - are now worked in stocking stitch, as well as the new stitches increased for armholes. Then when all stitches are increased, continue with 1 edge stitch in garter stitch on each side. Happy knitting!
03.02.2025 - 15:45
![]() Susana Araujo wrote:
Susana Araujo wrote:
"When armhole measures 18 cm, cast on new stitches for armholes in each side as follows: Cast on 1 stitch 1 times, 2 stitches 0 time and 4 stitches 1 time = 100 stitches. Insert a marker here. Now measure piece from here." 1st Question: How can I measure the armhole to know that is 18cm when I haven't started working armholes? 2nd Question: On the "2sts 0 times" do I do a normal row without casting on or doI go straight to casting on 4 sts?
01.02.2025 - 19:39DROPS Design answered:
Dear Susana, the armhole should have been shaped from the very beginning of the shoulder; when working back and forth the side edge would correspond to the armhole (you can see this in the size chart). At this point of the pattern you will now start making the lower edge of the armhole, which is slightly rounded. And you don't skip rows when casting on; in the row where you would have cast on 2 sts you will instead cast on 4 stitches as indicated in the next instruction. Happy knitting!
02.02.2025 - 23:50
![]() Susana Araujo wrote:
Susana Araujo wrote:
Hi I have a question on the right side: On next row (from right side) work pattern as follows: 1 edge stitch in GARTER STITCH – read explanation above, 3 stitches in stocking stitch, purl 5, A.1a (choose diagram for your size) over the next 17 stitches. Continue back and forth like this. Is the "5 purls" worked as knit on the wrong side or shall I always do 5 purls? If this is the case why are these 5 stitches not just referred as stocking stitch or garter stitch? Very confusing...
01.02.2025 - 15:09DROPS Design answered:
Dear Susana, since you are working on the right side, both garter stitch (which would be knit on right and wrong side) and stocking stitch (which would be knit on right side, purl on wrong side) wouldn't fit for these purl stitches. The stitches in garter stitch are always knitted (not always the same, always knitted) and the stitches in stocking stitch are knitted and purled on alternate rows. These 5 purl stitches are worked as in reverse stocking stitch more likely (where you purl on the right side and knit on the wrong side). Happy knitting!
02.02.2025 - 23:41
![]() Claire Huart wrote:
Claire Huart wrote:
Bonjour et merci pour votre réponse précédente. Un plus loin il est dit : (TS) Quand l'emmanchure mesure 18 cm, monter de chaque côté: 1 fois 1 maille, 0 fois 2 mailles et 1 fois 4 mailles = 100mailles. Voulez-vous bien m'expliquer ce passage, les augmentations se font de chaque côté sur l'endroit ? Sur l'envers ? Meci beaucoup !
02.01.2025 - 17:31DROPS Design answered:
Bonjour Mme Huart, vous allez monter d'abord 1 maille à la fin des 2 rangs suivants (= à la fin du rang suivant sur l'endroit puis à la fin du rang suivant sur l'envers. - cf cette vidéo et/ou cette leçon), puis vous allez monter 4 mailles à la fin des 2 rangs suivants (= de même, à la fin du rang suivant sur l'endroit et à la fin du rang suivant sur l'envers), vous aurez augmenté 5 mailles (1+4) de chaque côté soit 10 mailles en plus et 100 mailles au total. Bon tricot!
03.01.2025 - 07:57
![]() Claire Huart wrote:
Claire Huart wrote:
Bonjour, TS épaule droite : 1ml pt mousse + 3mjersey + 5mailles envers = sur l'envers, faut-il tricoter ces 5 mailles à l'envers (ce qui donne un point mousse ?) Ou les tricoter à l'endroit ? Merci pour votre aide, C
01.01.2025 - 21:34DROPS Design answered:
Bonjour Mme Huart, les mailles jersey vont se tricoter à l'endroit sur l'endroit (à l'envers sur l'envers) et les mailles envers vont se tricoter à l'envers sur l'endroit (à l'endroit sur l'envers). Bon tricot!
02.01.2025 - 15:51
![]() Pam wrote:
Pam wrote:
If I want to use just one strand of yarn, what yarn would you recommend and how many yards would be required to knit the XL size?
05.09.2023 - 18:04DROPS Design answered:
Dear Pam, you can use 1 strand yarn group C - remember (as always) to e check and keep your tension. Calculate the total amount of yarn required for the shortest yarn (Puna and Kid-Silk here) and divide it by the meterage of yarn choosen. Your DROPS store can help you, even per mail or telephone if you need more individual assistance. Happy knitting!
06.09.2023 - 08:51
![]() Nicoletta Zonca wrote:
Nicoletta Zonca wrote:
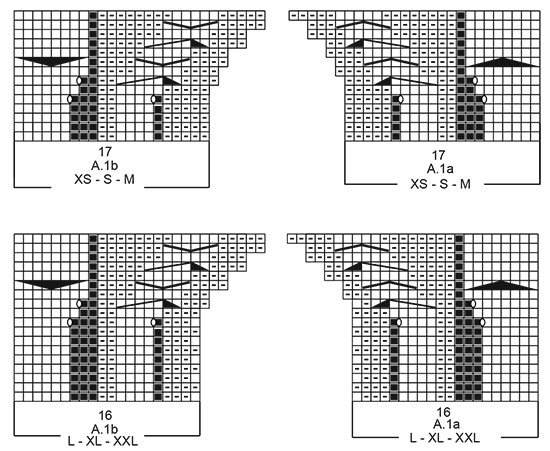
Salve, non capisco, nel dietro, negli schemi A1 a e b nel 5 e 7 ferro sembrerebbe ci siano degli aumenti che non vengono conteggiati nella descrizione... Potreste aiutarmi? Vi ringrazio anticipatamente e buona giornata
28.03.2023 - 11:35DROPS Design answered:
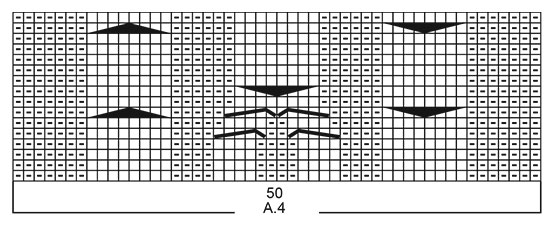
Buonasera Nicoletta, i quadratini neri non sono maglie, ma quando lavora i gettati c'è un quadratino nero in meno sul ferro successivo. Buon lavoro!
28.03.2023 - 22:10
|
|||||||||||||||||||||||||||||||||||||||||||||||||||||||||||||
Bending Willows#bendingwillowssweater |
|||||||||||||||||||||||||||||||||||||||||||||||||||||||||||||
 |
 |
||||||||||||||||||||||||||||||||||||||||||||||||||||||||||||
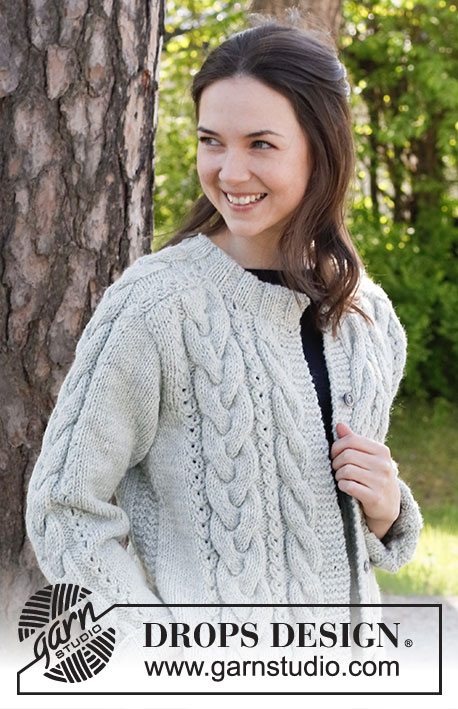
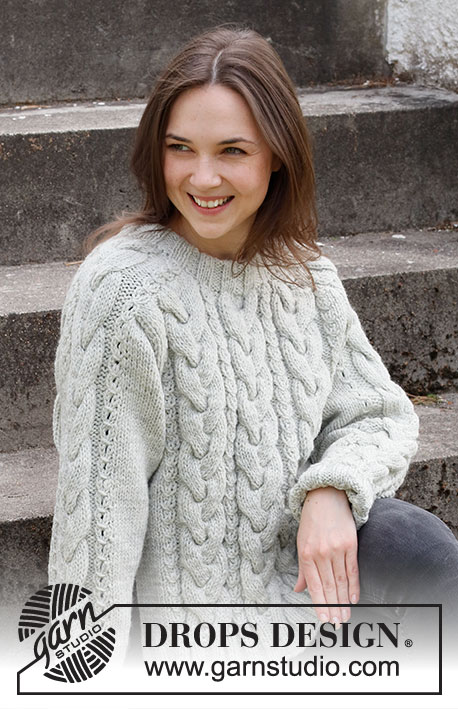
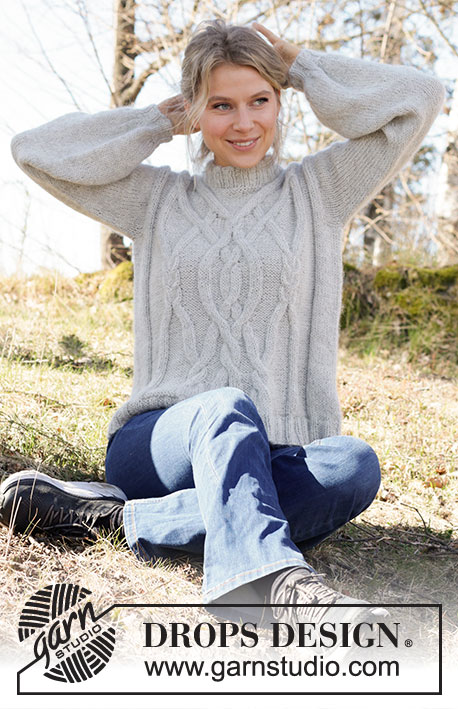
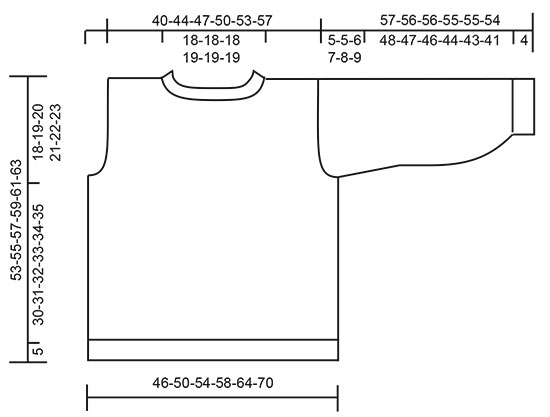
Knitted jumper in DROPS Puna and DROPS Kid-Silk. Piece is knitted top down with cables and double neck edge. Size XS–XXL.
DROPS 217-32 |
|||||||||||||||||||||||||||||||||||||||||||||||||||||||||||||
|
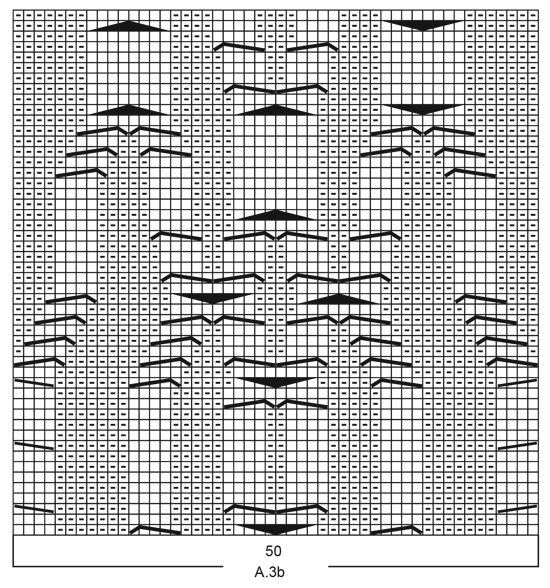
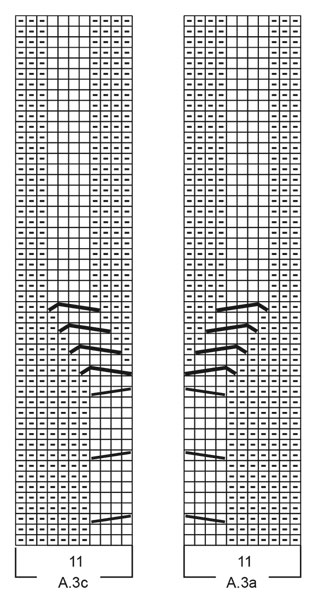
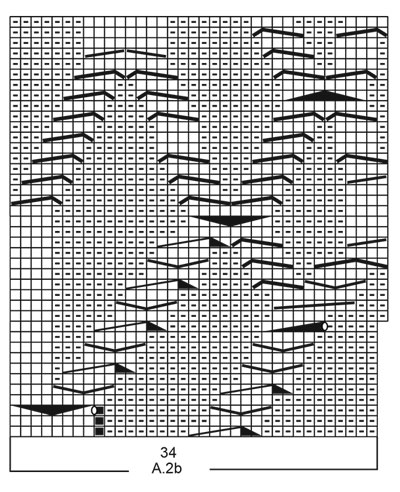
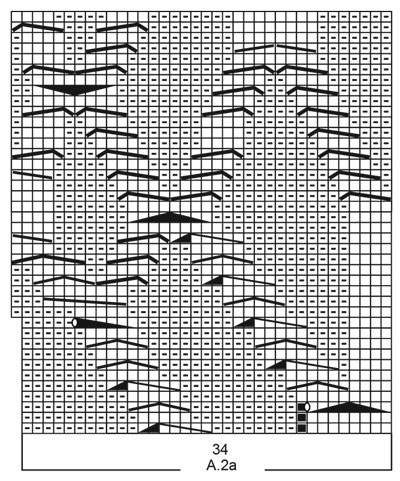
------------------------------------------------------- EXPLANATION FOR THE PATTERN: ------------------------------------------------------- GARTER STITCH (back and forth): Knit all rows. 1 ridge vertically = knit 2 rows. PATTERN: See diagrams A.1 to A.4. Choose diagram for your size (applies to A.1a and A.1b). Diagrams show all rows in pattern seen from the right side. INCREASE/DECREASE TIP (evenly): To calculate how to increase/decrease evenly, use the total number of stitches on row (e.g. 19 stitches) minus 1 edge stitch in each side (e.g. 2 stitches) , and divide the remaining stitches by number of increases/decreases to be done (e.g. 4) = 4.3. In this example increase by making 1 yarn over after alternately approx. every 4th and 5th stitch, do not increase over bands. On next row work yarn overs twisted to avoid holes If decreasing knit in this example alternately approx. every 3rd and 4th stitch and every 4th and 5th stitch together. INCREASE TIP (applies to sleeves): Work until 1 stitches remain before the first of the 3 marker threads, make 1 yarn over, work until 1 stitch remains before marker thread mid under sleeve, make 1 yarn over, knit 2 (marker thread is in the middle of these 2 stitches), work 1 yarn over, knit until next marker thread, knit 1, make 1 yarn over = 4 stitches increased. On next round knit yarn overs twisted to avoid holes. Then work the new stitches in stocking stitch. DECREASE TIP (applies to sleeves): Decrease 1 stitch on each side of marker thread as follows: Work until 3 stitches remain before marker thread and knit 2 together, knit 2 (marker thread is between these stitches), slip 1 stitch knitwise, knit 1, pass slipped stitch over stitch worked. CAST-OFF TIP: To avoid a tight cast-off edge you may use a larger needle size. If this also is too tight, work a 1 yarn over after approx. every 5th stitch while casting off (cast off yarn overs as regular stitches). ------------------------------------------------------- START THE PIECE HERE: ------------------------------------------------------- JUMPER - SHORT OVERVIEW OF THE PIECE: Work back and forth in parts, work top down. Sew the parts together when finished. Work sleeve first back and forth until sleeve cap is done, then work sleeve in the round on a short circular needle/double pointed needles. Work neck edge in the round on a short circular needle at the end. FRONT PIECE: Right shoulder: Cast on 19-22-24-26-28-31 stitches on circular needle size 5.5 mm with 1 strand Puna and 1 strand Kid-Silk (= 2 strands). Purl 1 row from wrong side while increasing 4 stitches evenly - read INCREASE/DECREASE TIP = 23-26-28-30-32-35 stitches. On next row (from right side) work pattern as follows: 1 edge stitch in GARTER STITCH – read explanation above, 2-3-4-6-8-10 stitches in stocking stitch, purl 3-5-6-7-7-8, A.1a (choose diagram for your size) over the next 17-17-17-16-16-16 stitches. Continue back and forth like this. On 7th-7th-7th-9th-9th-9th row in diagram begin increase for neck. Cast on stitches at the end of every row from right side as follows (the increased stitches are shown in diagram). Cast on 1 stitch 2-2-2-1-1-1 time and 2 stitches 2-2-2-3-3-3 times (6-6-6-7-7-7 stitches increased for neck + 3 stitches increased in diagram). When the last 2 stitches have been cast on, 1 row remains in diagram. Cut the yarn and put piece aside (work last row in diagram later when right and left shoulder are put together). There are now 32-35-37-40-42-45 stitches for right shoulder. Left shoulder: Cast on 19-22-24-26-28-31 stitches on circular needle size 5.5 mm with 1 strand Puna and 1 strand Kid-Silk (= 2 strands). Purl 1 row from wrong side while at the same time increasing 4 stitches evenly = 23-26-28-30-32-35 stitches. On next row (from right side) work pattern as follows: A.1b (choose diagram for your size) over the first 17-17-17-16-16-16 stitches, purl 3-5-6-7-7-8, 2-3-4-6-8-10 stitches in stocking stitch, 1 edge stitch in garter stitch. On 6th-6th-6th-8th-8th-8th row in diagram begin increase for neck. Cast on stitches at the end of every row from wrong side as follows (the increased stitches are shown in diagram). Cast on 1 stitch 2-2-2-1-1-1 time and 2 stitches 2-2-2-3-3-3 times (6-6-6-7-7-7 stitches increased for neck + 3 stitches increased in diagram). When last row in diagram has been worked (there are now 32-35-37-40-42-45 stitches on needle for left shoulder), cast on 16-16-16-16-16-16 stitches on needle for neck, then work last row in A.1a (from wrong side) over the first 26-26-26-26-26-26 stitches on right shoulder, then work as before over the remaining stitches = 80-86-90-96-100-106 stitches. REMEMBER THE KNITTING TENSION! Now work pattern from right side as follows: 1 stitch in garter stitch, knit over knit and purl over purl over the first 5-8-10-13-15-18 stitches, A.2a over the next 34 stitches, A.2b over the next 34 stitches, knit over knit and purl over purl over the next 5-8-10-13-15-18 stitches, 1 edge stitch in garter stitch. Continue back and forth like this (increase 2 stitches in A.2a and 2 stitches in A.2b) = 84-90-94-100-104-110 stitches. When armhole measures 17-18-18-19-19-19 cm, cast on new stitches for armholes in each side as follows: Cast on 1 stitch 1-1-2-2-2-3 times, 2 stitches 0-0-0-0-1-1 time and 3-4-4-5-6-6 stitches 1 time = 92-100-106-114-124-132 stitches. Insert a marker here. Now measure piece from here. Work the new stitches in stocking stitch. When A.2a and A.2b have been worked vertically, work pattern as follows: Work 1 edge stitch in garter stitch, knit over knit and purl over purl over the next 9-13-16-20-25-29 stitches, A.3a over the next 11 stitches, A.3b over the next 50 stitches, A.3c over the next 11 stitches, knit over knit and purl over purl over the next 9-13-16-20-25-29 stitches, 1 edge stitch in garter stitch. Continue like this until piece measures 30-31-32-33-34-35 cm from marker. If piece is shorter than this before A.3a to A.3c have been worked vertically, continue with A.4 over the middle 50 stitches on needle, and work knit over knit and purl over purl over the remaining stitches until correct measurements. Knit 1 row from right side while increasing 12-14-18-20-20-22 stitches evenly = 104-114-124-134-144-154 stitches. Purl 1 row from wrong side. Switch to circular needle size 4.5 mm. Work rib from right side as follows: 1 edge stitch in garter stitch, rib (= knit 2/purl 3) until 3 stitches remain on row, knit 2, 1 edge stitch in garter stitch. Continue back and forth with rib like this. When rib measures 5 cm, cast off with knit over knit and purl over purl. Jumper measures approx. 53-55-57-59-61-63 cm from shoulder and down. BACK PIECE: Left shoulder: Cast on 19-22-24-26-28-31 stitches on circular needle size 5.5 mm with 1 strand Puna and 1 strand Kid-Silk (= 2 strands). Purl 1 row from wrong side while at the same time increasing 4 stitches evenly = 23-26-28-30-32-35 stitches. On next row (from right side) work pattern as follows: 1 edge stitch in garter stitch, 2-3-4-6-8-10 stitches in stocking stitch, purl 3-5-6-7-7-8, A.1a (choose diagram for your size) over the next 17-17-17-16-16-16 stitches. Continue back and forth like this until 7th row has been worked. At the end of this row cast on 1 new stitch (= towards the neck) = 24-27-29-31-33-36 stitches. Cut the yarn and put piece aside. Right shoulder: Cast on 19-22-24-26-28-31 stitches on circular needle size 5.5 mm with 1 strand Puna and 1 strand Kid-Silk (= 2 strands). Purl 1 row from wrong side while at the same time increasing 4 stitches evenly = 23-26-28-30-32-35 stitches. On next row (from right side) work pattern as follows: A.1b (choose diagram for your size) over the first 17-17-17-16-16-16 stitches, purl 3-5-6-7-7-8, 2-3-4-6-8-10 stitches in stocking stitch, 1 edge stitch in garter stitch. When 6th row has been worked, cast on 1 stitch at the end of this row (= towards the neck) = 24-27-29-31-33-36 stitches. Work 1 row from right side. Work next row from wrong side as follows: Work as before over stitches on right shoulder, knit the new stitch (seen from wrong side), cast on 26-26-26-28-28-28 stitches for neck, work stitches from left shoulder onto needle from wrong side as follows: Knit first stitch (seen from wrong side), work next row in A.1a and continue as before the rest of row. There are now 74-80-84-90-94-100 stitches on needle. Continue back and forth with pattern as before and purl (seen from right side) stitches cast on for neck. The cable on each side of neck is displaced inwards towards mid back as shown in A.1a and A.1b (increase shown in diagrams towards the neck, does not apply to back piece). When A.1a and A.1b have been worked vertically, 3 stitches have been increased in each diagram and there are 80-86-90-96-100-106 stitches on needle. Then work rest of back piece the same way as on front piece. I.e. work pattern the same way (increase 2 stitches in A.2a and 2 stitches in A.2b) = 84-90-94-100-104-110 stitches. When piece measures 17-18-18-19-19-19 cm, cast on new stitches for armhole in each side the same way as on front piece = 92-100-106-114-124-132 stitches. Continue with pattern and rib the same way as on front piece. SLEEVES: Cast on 24-26-26-28-28-30 stitches on with 1 strand Puna and 1 strand Kid-Silk (= 2 strands) on circular needle size 5.5 mm. Now work in stocking stitch back and forth and cast on stitches for sleeve cap in each side as follows: Cast on 2 stitches 5-5-6-6-4-4 times, 1 stitch 0-0-0-0-3-4 times, 2 stitches 0-0-0-0-1-1 time and 3-4-4-5-6-6 stitches 1 time = 50-54-58-62-66-70 stitches. Then work sleeves in the round on double pointed needles/a short circular needle. Insert a marker thread mid under sleeve (= in the middle of the 6-4-4-10-12-12 new stitches under sleeve = 3-4-4-5-6-6 new stitches on each side of marker thread). NOW MEASURE PIECE FROM HERE! When piece measures 3 cm, decrease 1 stitch on each side of marker thread under sleeve - read DECREASE TIP. Decrease like this approx. every 3 cm 3 times in total in all sizes = 44-48-52-56-60-64 stitches. When sleeve measures 21-21-21-20-18-16 cm, insert 1 new marker thread after 12 stitches on each side of marker thread mid under sleeve (= 3 marker threads under sleeve). On next round begin increase under sleeve – read INCREASE TIP. Increase like this approx. every 3-4-4-5-5-5 cm 5-4-4-3-3-3 times in , total = 64-64-68-68-72-76 stitches. Continue round in stocking stitch until sleeve measures 48-47-46-44-43-41 cm. Knit 1-1-2-2-0-1, * knit 2 together, knit 1 *, work from *-* the entire round = 43-43-46-46-48-51 stitches. Knit 1 round while decreasing 13-8-11-11-8-11 stitches evenly = 30-35-35-35-40-40 stitches. Switch to double pointed needles size 4.5 mm. Work rib (knit 2/purl 3) in the round for 4 cm. Cast off stitches with knit over knit and purl over purl. Sleeve measures approx. 57-56-56-55-55-54 cm. Work the other sleeve the same way. ASSEMBLY: Sew shoulder seams together with grafting/kitchener stitches inside cast-on edge. Sew sleeves to body inside cast-on edge/1 edge stitch in garter stitch. Then sew side seam from armhole and down inside 1 edge stitch in garter stitch. Repeat in the other side. DOUBLE NECK EDGE: Pick up 80-88 stitches with a short circular needle size 4.5 mm and 1 strand in each quality (= 2 strands), inside 1 edge stitch around the neck. Number of stitches must be divisible by 4. Work rib (knit 2/purl 2) in the round for 11 cm. Cast off stitches with knit over knit and purl over purl. Fold rib at the top of neck down on the inside of garment. Fasten rib to form a folding edge. To avoid a tight neck edge and avoiding the edge to tip outwards, it is important to make the seam elastic. |
|||||||||||||||||||||||||||||||||||||||||||||||||||||||||||||
Diagram explanations |
|||||||||||||||||||||||||||||||||||||||||||||||||||||||||||||
|
|||||||||||||||||||||||||||||||||||||||||||||||||||||||||||||
 |
|||||||||||||||||||||||||||||||||||||||||||||||||||||||||||||
 |
|||||||||||||||||||||||||||||||||||||||||||||||||||||||||||||
 |
|||||||||||||||||||||||||||||||||||||||||||||||||||||||||||||
 |
|||||||||||||||||||||||||||||||||||||||||||||||||||||||||||||
 |
|||||||||||||||||||||||||||||||||||||||||||||||||||||||||||||
 |
|||||||||||||||||||||||||||||||||||||||||||||||||||||||||||||
 |
|||||||||||||||||||||||||||||||||||||||||||||||||||||||||||||
Have you finished this pattern?Tag your pictures with #dropspattern #bendingwillowssweater or submit them to the #dropsfan gallery. Do you need help with this pattern?You'll find 26 tutorial videos, a Comments/Questions area and more by visiting the pattern on garnstudio.com. © 1982-2026 DROPS Design A/S. We reserve all rights. This document, including all its sub-sections, has copyrights. Read more about what you can do with our patterns at the bottom of each pattern on our site. |
|||||||||||||||||||||||||||||||||||||||||||||||||||||||||||||


With over 40 years in knitting and crochet design, DROPS Design offers one of the most extensive collections of free patterns on the internet - translated to 17 languages. As of today we count 324 catalogues and 12290 patterns translated into English (UK/cm).
We work hard to bring you the best knitting and crochet have to offer, inspiration and advice as well as great quality yarns at incredible prices! Would you like to use our patterns for other than personal use? You can read what you are allowed to do in the Copyright text at the bottom of all our patterns. Happy crafting!
Post a comment to pattern DROPS 217-32
We would love to hear what you have to say about this pattern!
If you want to leave a question, please make sure you select the correct category in the form below, to speed up the answering process. Required fields are marked *.