
Popular categories
Looking for a yarn?


|
|||||||||||||||||||||||||||||||||||||||||||||||||||||||||||||
Bending Willows |
|||||||||||||||||||||||||||||||||||||||||||||||||||||||||||||
 |
 |
||||||||||||||||||||||||||||||||||||||||||||||||||||||||||||
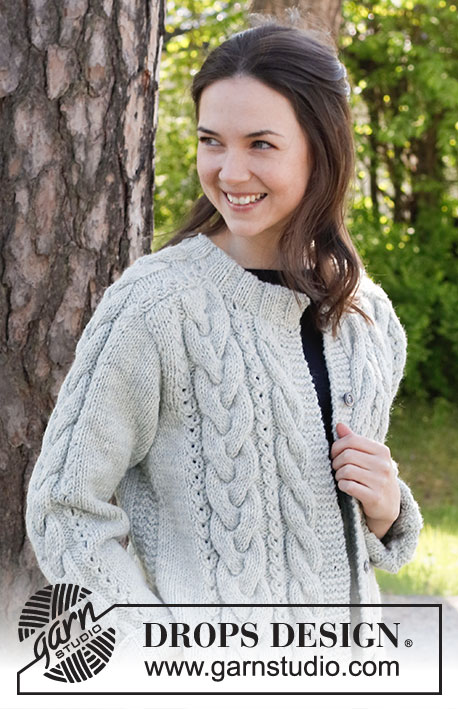
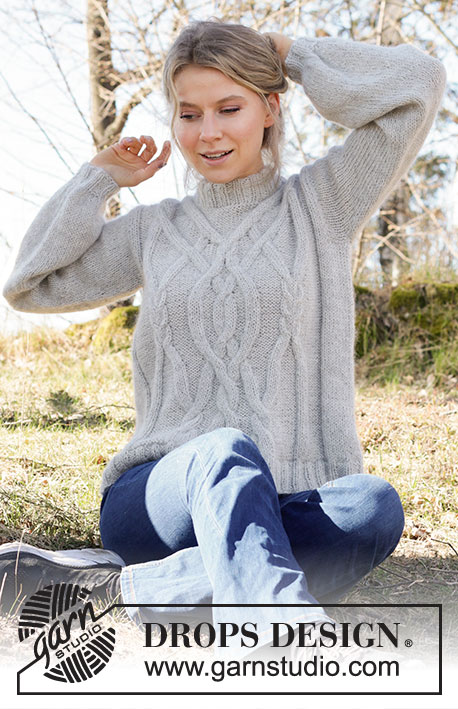
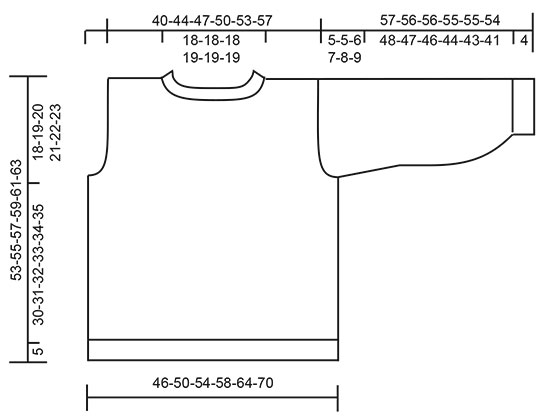
Knitted jumper in DROPS Puna and DROPS Kid-Silk. Piece is knitted top down with cables and double neck edge. Size XS–XXL.
DROPS 217-32 |
|||||||||||||||||||||||||||||||||||||||||||||||||||||||||||||
|
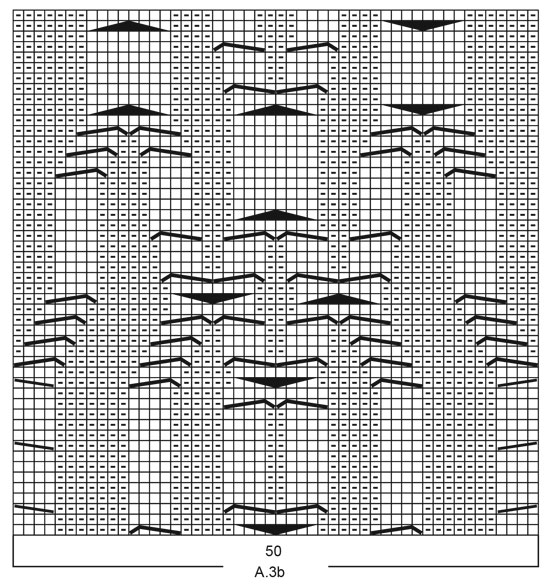
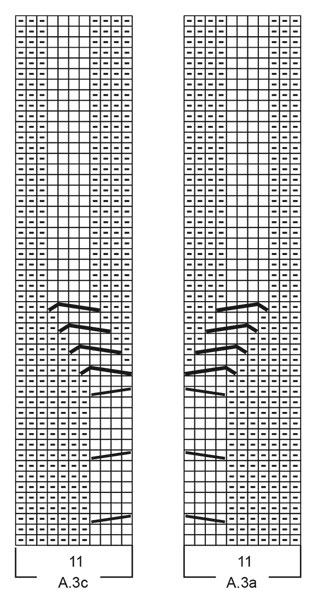
------------------------------------------------------- EXPLANATION FOR THE PATTERN: ------------------------------------------------------- GARTER STITCH (back and forth): Knit all rows. 1 ridge vertically = knit 2 rows. PATTERN: See diagrams A.1 to A.4. Choose diagram for your size (applies to A.1a and A.1b). Diagrams show all rows in pattern seen from the right side. INCREASE/DECREASE TIP (evenly): To calculate how to increase/decrease evenly, use the total number of stitches on row (e.g. 19 stitches) minus 1 edge stitch in each side (e.g. 2 stitches) , and divide the remaining stitches by number of increases/decreases to be done (e.g. 4) = 4.3. In this example increase by making 1 yarn over after alternately approx. every 4th and 5th stitch, do not increase over bands. On next row work yarn overs twisted to avoid holes If decreasing knit in this example alternately approx. every 3rd and 4th stitch and every 4th and 5th stitch together. INCREASE TIP (applies to sleeves): Work until 1 stitches remain before the first of the 3 marker threads, make 1 yarn over, work until 1 stitch remains before marker thread mid under sleeve, make 1 yarn over, knit 2 (marker thread is in the middle of these 2 stitches), work 1 yarn over, knit until next marker thread, knit 1, make 1 yarn over = 4 stitches increased. On next round knit yarn overs twisted to avoid holes. Then work the new stitches in stocking stitch. DECREASE TIP (applies to sleeves): Decrease 1 stitch on each side of marker thread as follows: Work until 3 stitches remain before marker thread and knit 2 together, knit 2 (marker thread is between these stitches), slip 1 stitch knitwise, knit 1, pass slipped stitch over stitch worked. CAST-OFF TIP: To avoid a tight cast-off edge you may use a larger needle size. If this also is too tight, work a 1 yarn over after approx. every 5th stitch while casting off (cast off yarn overs as regular stitches). ------------------------------------------------------- START THE PIECE HERE: ------------------------------------------------------- JUMPER - SHORT OVERVIEW OF THE PIECE: Work back and forth in parts, work top down. Sew the parts together when finished. Work sleeve first back and forth until sleeve cap is done, then work sleeve in the round on a short circular needle/double pointed needles. Work neck edge in the round on a short circular needle at the end. FRONT PIECE: Right shoulder: Cast on 19-22-24-26-28-31 stitches on circular needle size 5.5 mm with 1 strand Puna and 1 strand Kid-Silk (= 2 strands). Purl 1 row from wrong side while increasing 4 stitches evenly - read INCREASE/DECREASE TIP = 23-26-28-30-32-35 stitches. On next row (from right side) work pattern as follows: 1 edge stitch in GARTER STITCH – read explanation above, 2-3-4-6-8-10 stitches in stocking stitch, purl 3-5-6-7-7-8, A.1a (choose diagram for your size) over the next 17-17-17-16-16-16 stitches. Continue back and forth like this. On 7th-7th-7th-9th-9th-9th row in diagram begin increase for neck. Cast on stitches at the end of every row from right side as follows (the increased stitches are shown in diagram). Cast on 1 stitch 2-2-2-1-1-1 time and 2 stitches 2-2-2-3-3-3 times (6-6-6-7-7-7 stitches increased for neck + 3 stitches increased in diagram). When the last 2 stitches have been cast on, 1 row remains in diagram. Cut the yarn and put piece aside (work last row in diagram later when right and left shoulder are put together). There are now 32-35-37-40-42-45 stitches for right shoulder. Left shoulder: Cast on 19-22-24-26-28-31 stitches on circular needle size 5.5 mm with 1 strand Puna and 1 strand Kid-Silk (= 2 strands). Purl 1 row from wrong side while at the same time increasing 4 stitches evenly = 23-26-28-30-32-35 stitches. On next row (from right side) work pattern as follows: A.1b (choose diagram for your size) over the first 17-17-17-16-16-16 stitches, purl 3-5-6-7-7-8, 2-3-4-6-8-10 stitches in stocking stitch, 1 edge stitch in garter stitch. On 6th-6th-6th-8th-8th-8th row in diagram begin increase for neck. Cast on stitches at the end of every row from wrong side as follows (the increased stitches are shown in diagram). Cast on 1 stitch 2-2-2-1-1-1 time and 2 stitches 2-2-2-3-3-3 times (6-6-6-7-7-7 stitches increased for neck + 3 stitches increased in diagram). When last row in diagram has been worked (there are now 32-35-37-40-42-45 stitches on needle for left shoulder), cast on 16-16-16-16-16-16 stitches on needle for neck, then work last row in A.1a (from wrong side) over the first 26-26-26-26-26-26 stitches on right shoulder, then work as before over the remaining stitches = 80-86-90-96-100-106 stitches. REMEMBER THE KNITTING TENSION! Now work pattern from right side as follows: 1 stitch in garter stitch, knit over knit and purl over purl over the first 5-8-10-13-15-18 stitches, A.2a over the next 34 stitches, A.2b over the next 34 stitches, knit over knit and purl over purl over the next 5-8-10-13-15-18 stitches, 1 edge stitch in garter stitch. Continue back and forth like this (increase 2 stitches in A.2a and 2 stitches in A.2b) = 84-90-94-100-104-110 stitches. When armhole measures 17-18-18-19-19-19 cm, cast on new stitches for armholes in each side as follows: Cast on 1 stitch 1-1-2-2-2-3 times, 2 stitches 0-0-0-0-1-1 time and 3-4-4-5-6-6 stitches 1 time = 92-100-106-114-124-132 stitches. Insert a marker here. Now measure piece from here. Work the new stitches in stocking stitch. When A.2a and A.2b have been worked vertically, work pattern as follows: Work 1 edge stitch in garter stitch, knit over knit and purl over purl over the next 9-13-16-20-25-29 stitches, A.3a over the next 11 stitches, A.3b over the next 50 stitches, A.3c over the next 11 stitches, knit over knit and purl over purl over the next 9-13-16-20-25-29 stitches, 1 edge stitch in garter stitch. Continue like this until piece measures 30-31-32-33-34-35 cm from marker. If piece is shorter than this before A.3a to A.3c have been worked vertically, continue with A.4 over the middle 50 stitches on needle, and work knit over knit and purl over purl over the remaining stitches until correct measurements. Knit 1 row from right side while increasing 12-14-18-20-20-22 stitches evenly = 104-114-124-134-144-154 stitches. Purl 1 row from wrong side. Switch to circular needle size 4.5 mm. Work rib from right side as follows: 1 edge stitch in garter stitch, rib (= knit 2/purl 3) until 3 stitches remain on row, knit 2, 1 edge stitch in garter stitch. Continue back and forth with rib like this. When rib measures 5 cm, cast off with knit over knit and purl over purl. Jumper measures approx. 53-55-57-59-61-63 cm from shoulder and down. BACK PIECE: Left shoulder: Cast on 19-22-24-26-28-31 stitches on circular needle size 5.5 mm with 1 strand Puna and 1 strand Kid-Silk (= 2 strands). Purl 1 row from wrong side while at the same time increasing 4 stitches evenly = 23-26-28-30-32-35 stitches. On next row (from right side) work pattern as follows: 1 edge stitch in garter stitch, 2-3-4-6-8-10 stitches in stocking stitch, purl 3-5-6-7-7-8, A.1a (choose diagram for your size) over the next 17-17-17-16-16-16 stitches. Continue back and forth like this until 7th row has been worked. At the end of this row cast on 1 new stitch (= towards the neck) = 24-27-29-31-33-36 stitches. Cut the yarn and put piece aside. Right shoulder: Cast on 19-22-24-26-28-31 stitches on circular needle size 5.5 mm with 1 strand Puna and 1 strand Kid-Silk (= 2 strands). Purl 1 row from wrong side while at the same time increasing 4 stitches evenly = 23-26-28-30-32-35 stitches. On next row (from right side) work pattern as follows: A.1b (choose diagram for your size) over the first 17-17-17-16-16-16 stitches, purl 3-5-6-7-7-8, 2-3-4-6-8-10 stitches in stocking stitch, 1 edge stitch in garter stitch. When 6th row has been worked, cast on 1 stitch at the end of this row (= towards the neck) = 24-27-29-31-33-36 stitches. Work 1 row from right side. Work next row from wrong side as follows: Work as before over stitches on right shoulder, knit the new stitch (seen from wrong side), cast on 26-26-26-28-28-28 stitches for neck, work stitches from left shoulder onto needle from wrong side as follows: Knit first stitch (seen from wrong side), work next row in A.1a and continue as before the rest of row. There are now 74-80-84-90-94-100 stitches on needle. Continue back and forth with pattern as before and purl (seen from right side) stitches cast on for neck. The cable on each side of neck is displaced inwards towards mid back as shown in A.1a and A.1b (increase shown in diagrams towards the neck, does not apply to back piece). When A.1a and A.1b have been worked vertically, 3 stitches have been increased in each diagram and there are 80-86-90-96-100-106 stitches on needle. Then work rest of back piece the same way as on front piece. I.e. work pattern the same way (increase 2 stitches in A.2a and 2 stitches in A.2b) = 84-90-94-100-104-110 stitches. When piece measures 17-18-18-19-19-19 cm, cast on new stitches for armhole in each side the same way as on front piece = 92-100-106-114-124-132 stitches. Continue with pattern and rib the same way as on front piece. SLEEVES: Cast on 24-26-26-28-28-30 stitches on with 1 strand Puna and 1 strand Kid-Silk (= 2 strands) on circular needle size 5.5 mm. Now work in stocking stitch back and forth and cast on stitches for sleeve cap in each side as follows: Cast on 2 stitches 5-5-6-6-4-4 times, 1 stitch 0-0-0-0-3-4 times, 2 stitches 0-0-0-0-1-1 time and 3-4-4-5-6-6 stitches 1 time = 50-54-58-62-66-70 stitches. Then work sleeves in the round on double pointed needles/a short circular needle. Insert a marker thread mid under sleeve (= in the middle of the 6-4-4-10-12-12 new stitches under sleeve = 3-4-4-5-6-6 new stitches on each side of marker thread). NOW MEASURE PIECE FROM HERE! When piece measures 3 cm, decrease 1 stitch on each side of marker thread under sleeve - read DECREASE TIP. Decrease like this approx. every 3 cm 3 times in total in all sizes = 44-48-52-56-60-64 stitches. When sleeve measures 21-21-21-20-18-16 cm, insert 1 new marker thread after 12 stitches on each side of marker thread mid under sleeve (= 3 marker threads under sleeve). On next round begin increase under sleeve – read INCREASE TIP. Increase like this approx. every 3-4-4-5-5-5 cm 5-4-4-3-3-3 times in , total = 64-64-68-68-72-76 stitches. Continue round in stocking stitch until sleeve measures 48-47-46-44-43-41 cm. Knit 1-1-2-2-0-1, * knit 2 together, knit 1 *, work from *-* the entire round = 43-43-46-46-48-51 stitches. Knit 1 round while decreasing 13-8-11-11-8-11 stitches evenly = 30-35-35-35-40-40 stitches. Switch to double pointed needles size 4.5 mm. Work rib (knit 2/purl 3) in the round for 4 cm. Cast off stitches with knit over knit and purl over purl. Sleeve measures approx. 57-56-56-55-55-54 cm. Work the other sleeve the same way. ASSEMBLY: Sew shoulder seams together with grafting/kitchener stitches inside cast-on edge. Sew sleeves to body inside cast-on edge/1 edge stitch in garter stitch. Then sew side seam from armhole and down inside 1 edge stitch in garter stitch. Repeat in the other side. DOUBLE NECK EDGE: Pick up 80-88 stitches with a short circular needle size 4.5 mm and 1 strand in each quality (= 2 strands), inside 1 edge stitch around the neck. Number of stitches must be divisible by 4. Work rib (knit 2/purl 2) in the round for 11 cm. Cast off stitches with knit over knit and purl over purl. Fold rib at the top of neck down on the inside of garment. Fasten rib to form a folding edge. To avoid a tight neck edge and avoiding the edge to tip outwards, it is important to make the seam elastic. |
|||||||||||||||||||||||||||||||||||||||||||||||||||||||||||||
Diagram explanations |
|||||||||||||||||||||||||||||||||||||||||||||||||||||||||||||
|
|||||||||||||||||||||||||||||||||||||||||||||||||||||||||||||

|
|||||||||||||||||||||||||||||||||||||||||||||||||||||||||||||
|
|||||||||||||||||||||||||||||||||||||||||||||||||||||||||||||
|
|||||||||||||||||||||||||||||||||||||||||||||||||||||||||||||

|
|||||||||||||||||||||||||||||||||||||||||||||||||||||||||||||

|
|||||||||||||||||||||||||||||||||||||||||||||||||||||||||||||

|
|||||||||||||||||||||||||||||||||||||||||||||||||||||||||||||
|
|||||||||||||||||||||||||||||||||||||||||||||||||||||||||||||
|
Have you made this or any other of our designs? Tag your pictures in social media with #dropsdesign so we can see them! Do you need help with this pattern?You'll find tutorial videos, a Comments/Questions area and more by visiting the pattern on garnstudio.com. © 1982-2024 DROPS Design A/S. We reserve all rights. This document, including all its sub-sections, has copyrights. Read more about what you can do with our patterns at the bottom of each pattern on our site. |
|||||||||||||||||||||||||||||||||||||||||||||||||||||||||||||


With over 40 years in knitting and crochet design, DROPS Design offers one of the most extensive collections of free patterns on the internet - translated to 17 languages. As of today we count 304 catalogues and 11422 patterns - 11422 of which are translated into English (UK/cm).
We work hard to bring you the best knitting and crochet have to offer, inspiration and advice as well as great quality yarns at incredible prices! Would you like to use our patterns for other than personal use? You can read what you are allowed to do in the Copyright text at the bottom of all our patterns. Happy crafting!
Comments / Questions (32)
If I want to use just one strand of yarn, what yarn would you recommend and how many yards would be required to knit the XL size?
05.09.2023 - 18:04DROPS Design answered:
Dear Pam, you can use 1 strand yarn group C - remember (as always) to e check and keep your tension. Calculate the total amount of yarn required for the shortest yarn (Puna and Kid-Silk here) and divide it by the meterage of yarn choosen. Your DROPS store can help you, even per mail or telephone if you need more individual assistance. Happy knitting!
06.09.2023 - 08:51Salve, non capisco, nel dietro, negli schemi A1 a e b nel 5 e 7 ferro sembrerebbe ci siano degli aumenti che non vengono conteggiati nella descrizione...\r\nPotreste aiutarmi?\r\nVi ringrazio anticipatamente e buona giornata
28.03.2023 - 11:35DROPS Design answered:
Buonasera Nicoletta, i quadratini neri non sono maglie, ma quando lavora i gettati c'è un quadratino nero in meno sul ferro successivo. Buon lavoro!
28.03.2023 - 22:10I was knitting this in a size M, and experienced that I was missing just a bit of the Kid-Silk (for end of one sleeve and neck line). Please, note that others have also experienced this in the smaller sizes as far as I can read from the other comments. Also, the metres do not seem to correspond 500 g Puna = ~1100 m , while 100 g Kid-Silk = ~800 m (However, I have Puna in excess)
28.05.2022 - 16:10Hej, Jeg er lidt begynder og har svært ved starten. Jeg strikker 1 p vr (28m). Dernæst mønster: retp: 1 r kant, 4m r, 6m v, a1.a, hvordan strikkes næste p (vr p)? Tak på forhånd!
03.05.2022 - 21:52DROPS Design answered:
Hej Josephine, den næste pind strikkes således fra vrangen: 17 m A.1a (modsat vej i diagrammet), 6 ret, 4 vrang, 1kantmaske ret. God fornøjelse!
04.05.2022 - 10:29Hej! Jag stickar bensin willows och kommit till ärmen. Jag förstår inte instruktionen från 21 cm (xs) varför skall jag sätta markörer efter 12 maskor på vardera sida? Hur gör jag ökningarna? Öka med 3 cm (xs) mellanrum, är det på höjden så när alla ökningarna är gjorda så möter arbetet 36 cm (xs)? Men hur många maskor skall jag öka med?
29.04.2022 - 12:41DROPS Design answered:
Hej Ulla-Karin. Det står under ÖKNINGSTIPS hur du ska öka: Sticka tills det återstår 1 maska före den första av de 3 markeringstrådarna, gör 1 omslag om stickan, sticka tills det återstår 1 maska före markeringtråden mitt under ärmen, gör 1 omslag om stickan, sticka 2 rätmaskor (markeringstråden sitter mitt emellan dessa 2 maskorna), gör 1 omslag om stickan, sticka rätmaskor fram till nästa markeringstråd, 1 rätmaska, gör 1 omslag om stickan = 4 maskor ökade. På nästa varv stickas omslagen vridet räta så att det inte blir hål. Sedan stickas de nya maskorna i slätstickning. Du ökar så med 3 cm mellan rum totalt 5 gånger. Mvh DROPS Design
29.04.2022 - 13:48Hi, when knitting sleeves for xs, once you cast on 24 stitches, do you start increases right away (so essentially cast on 26 stitches to start, the extra 2 being the first increase)? Or are there rows before increases? Also, when it says increase 1 stitch 0 times, do you knit a row without increases or skip the row entirely? Thanks! Susan
18.03.2022 - 00:24DROPS Design answered:
Hi Susan, It is a good idea to work one row (purl from the wrong side) before starting to increase. The cast-on stitches are not part of the increase. If it says increase 1 stitch 0 times this means you work the row(s) without increases, don't skip the row(s). Happy knitting!
18.03.2022 - 07:04I am now working on the back left shoulder of 217-32(size S) and have 2 queries.The pattern says to increase 1st at the end of the 7th row giving 27 sts in total but what about the 3 st increases in the diagramA1a at rows 5 and 7? Also the pattern states that the cast on stitch is at the neck edge but it seems to me the opposite is true.Please tell me where I am going wrong
16.02.2022 - 15:02DROPS Design answered:
Dear Jan, neckline on back piece is less deep, reason why you work less rows in A.1a/b - just work as explained and then you will join shoulders together and work A.1a and A.1b to the end (without casting on new stitches in diagram that will have already cast on). Happy knitting!
16.02.2022 - 16:33Re 217-32 - left shoulder instructions - I feel sure I am correct in saying that 3 stocking stitch stitches have been omitted from the end of the rows before the garter stitch.
12.02.2022 - 10:54DROPS Design answered:
Dear Jan, which size are you working? Can you tell us more so that our designer can check? Thanks for your help!
14.02.2022 - 09:34I am attempting to knit 217-32 and trying to understand the instructions for the rt shoulder where it says to cast on at the end of every rt side row from row 7 of the diagram.Yet the diagram A1b seems to show the cast on stitches at the beginning of the rt side rows . What am I getting wrong?
07.02.2022 - 11:42DROPS Design answered:
Dear Jan, on the right shoulder front piece you will work A.1a, not A.1b - starting with 1st row = RS, you will cast on new stitches at the end of 7th row (= from RS too). On left shoulder, you will work A.1b and cast off at the end of row from WS. Can this help?
07.02.2022 - 15:38I intend to knit this in beige but am uncertain as to the shade of kid silk to use and would appreciate your advice
05.01.2022 - 12:17DROPS Design answered:
Dear Jan, please contact your DROPS store for any individual assistance choosing the best matching colour - they will help you even per mail or telephone. Happy knitting!
05.01.2022 - 16:48