
Popular categories
Looking for a yarn?


Comments / Questions (48)
![]() Ann Karin wrote:
Ann Karin wrote:
Liker den
06.03.2026 - 20:14
![]() Ann Karin wrote:
Ann Karin wrote:
Liker den
06.03.2026 - 20:13
![]() Viola wrote:
Viola wrote:
Hej! Hur stickar man minskningarna på ärmen tillsammans med A.4? (storlek M) Jag har valt att skippa A.3 både på kroppen och på ärmarna och stickar det istället i den mörka färgen. Jag har nu stickat såpass långt på ärmen så jag ska börja med den vita färgen i A.4 men har endast gjort 11 minskningar och har 2 minskningar kvar, så just nu har jag 50 maskor på stickorna vilket inte går att dividera med 4 så förstår inte hur jag ska få mönstret att fungera.
03.12.2025 - 10:38
![]() Nathalie wrote:
Nathalie wrote:
5 mailles couleur puis une maille naturelle je voulais dire
01.12.2025 - 17:01
![]() Nathalie wrote:
Nathalie wrote:
Bonjour ,j ai du mal à faire le second dessin dans le diagramme A2, on a bien 7 mailles foncées puis une maille naturelle au départ ?
01.12.2025 - 16:56DROPS Design answered:
Bonjour Nathalie, le diagramme A.2 va se répéter sur un nombre différent de mailles, d'abord sur 4 mailles, puis sur 6 mailles (flèche 4, en S, M et L ou flèche 5 en XL, XXL et XXXL), et sur 8 mailles (flèche 6 en S, M, L ou flèche 7 en XL, XXL et XXXL), le nombre d'augmentations fait à ces flèches permettent d'avoir un nombre divisible de mailles par ce nombre là; vous pouvez mettre un marqueur entre chaque motif à répéter (toutes les 4 m, puis toutes les 6 m et enfin toutes les 8 m) pour mieux repérer les motifs à tricoter. Bon tricot!
02.12.2025 - 09:03
![]() Anna wrote:
Anna wrote:
Jeg kan ikke finde nogle størrelse, altså længe og brede på krop og længe på arméerne
05.11.2025 - 10:36DROPS Design answered:
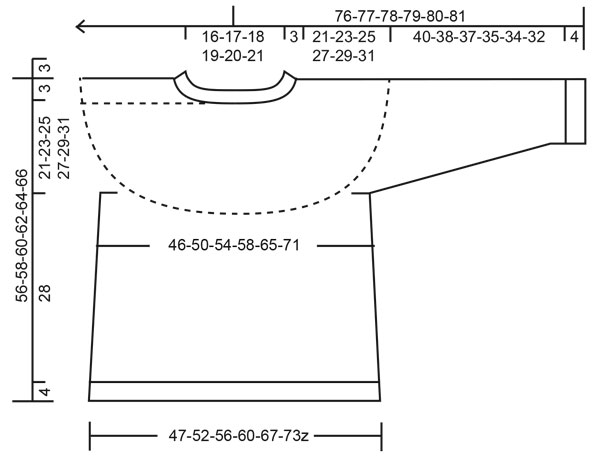
Hej Anna. Längst ned på opskriften finns en måleskits, den indeholder målene i cm på de størrelser vi præsenterer i opskriften. Mvh DROPS Design
05.11.2025 - 14:11
![]() Charlotte Henry wrote:
Charlotte Henry wrote:
Bonjour ! J'ai du mal à comprendre l'importance de l'étoile qui définit la maille centrale. Quand est il nécessaire d'y prêter attention et quoi faire de différent ? Merci :)
06.01.2025 - 11:33DROPS Design answered:
Bonjour Mme Henry, l'étoile sert à centrer le diagramme A.2 sur les manches - la maille avec le marqueur au milieu du dessus de la manche doit être celle avec l'étoile dans le diagramme - retrouvez ici comment centrer un diagramme. Bon tricot!
06.01.2025 - 14:53
![]() Rahel wrote:
Rahel wrote:
Hallo, ich verstehe nicht, warum vor dem Bund (Rippenmuster) Maschen zugenommen werden und dann auf eine kleinere Nadelgrösse gewechselt wird. Dann könnte ja die Maschenanzahl auch gelassen werden und die Nadelgrösse auch? Bzw wenn ich möchte, dass der Bund enger wird die Maschenanzahl belassen und auf eine kleinere Nadelgrösse wechseln?
13.09.2024 - 12:40DROPS Design answered:
Liebe Rahel, man wird hier zunehmen da man mehr Maschen für das Rippenmuster mit den kleineren Nadeln als für Glattrechts mit den grösseren Nadelnd braucht. Viel Spaß beim Stricken!
13.09.2024 - 16:50
![]() Camille wrote:
Camille wrote:
Bonjour, arrivé 3 rangs après la flèche 2, je m'aperçois d'un décalage dans le motif à la transition début-fin de rang, dû au tricot circulaire. J'ai remonté des mailles selon votre vidéo pour éviter un décalage en rond, mais je ne sais pas si cela résoudra le problème. Sinon comment faire, la même technique que pour éviter un décalage des rayures en rond ? Merci!
04.09.2024 - 08:01DROPS Design answered:
Bonjour Camille, vous pouvez utiliser la technique des rayures en rond (cf vidéo), mais ça ne fonctionne pas systématiquement avec tous les rangs des jacquards, un décalage est parfois inévitable, pour le "diminuer" visuellement, vous pouvez tenter de serrer le fil en début/fin de tour pour rapprocher la 1ère et la dernière maile du tour. Bon tricot!
04.09.2024 - 09:00
![]() Hannah wrote:
Hannah wrote:
In the tutorial video on how to knit an elevation, the first purl stitch is slipped but it doesn’t say to do that in the pattern. Should this stitch be slipped?
04.04.2024 - 09:41DROPS Design answered:
Dear Hannah, when working short rows slipping the first stitch will avoid holes, but feel free to use any other technique if you like. Happy knitting!
04.04.2024 - 12:50
|
|||||||||||||
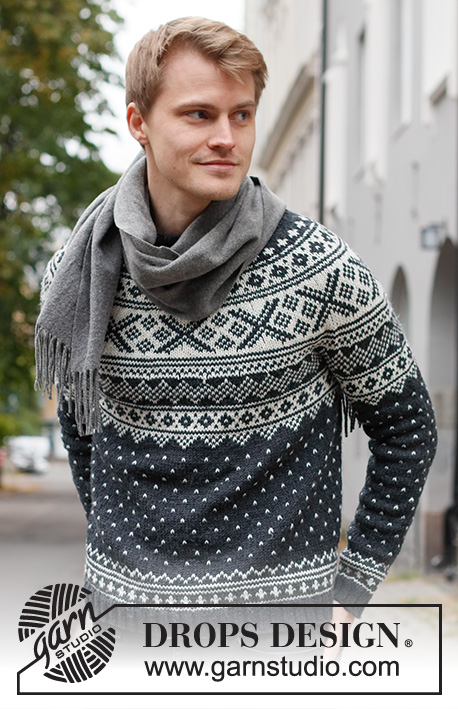
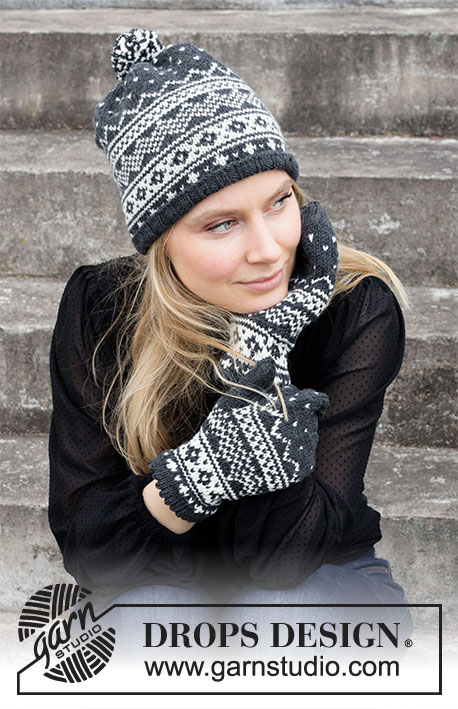
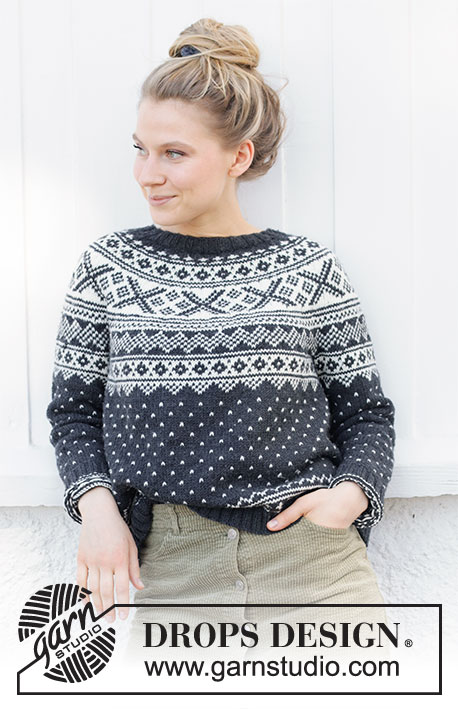
Winter's Night Enchantment#wintersnightenchantmentsweater |
|||||||||||||
 |
 |
||||||||||||
Knitted jumper in DROPS Merino Extra Fine. Piece knitted top down with round yoke and Nordic pattern. Size: S - XXXL
DROPS 217-10 |
|||||||||||||
|
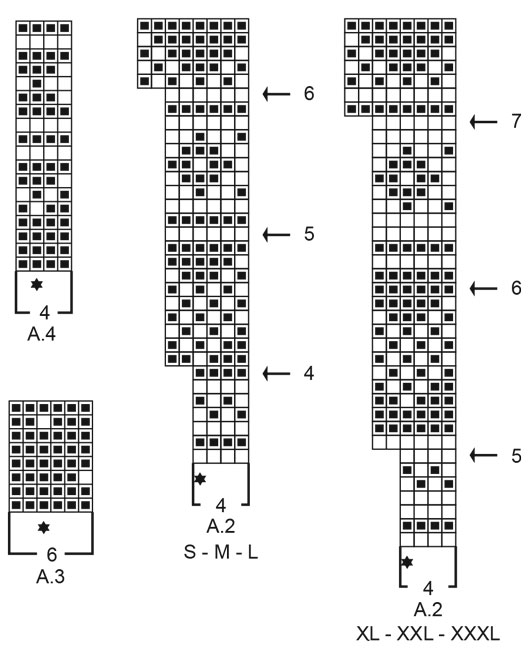
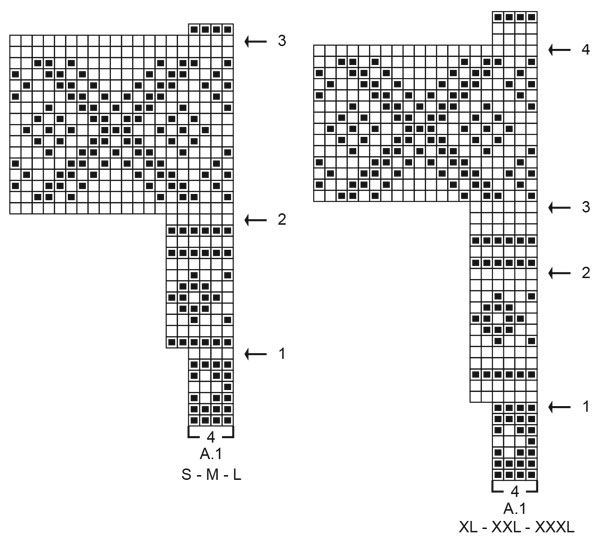
------------------------------------------------------- EXPLANATION FOR THE PATTERN: ------------------------------------------------------- INCREASE TIP (evenly): To calculate how to increase evenly, use the total number of stitches on row (e.g. 92 stitches) and divide stitches by number of increases to be done (e.g. 28) = 3.3. In this example increase by making 1 yarn over after approx. every 3rd stitch. On next round knit yarn overs twisted to avoid holes. ELEVATION (in back of neck): To make the jumper higher in the back of neck when working round yoke work an elevation as explained below. Skip this paragraph if you do not want an elevation. Insert 1 marker at beginning of round = mid back. Begin from right side with dark grey and knit 12-13-14-15-15-16 stitches past marker, turn, tighten yarn and purl 24-26-28-30-30-32. Turn, tighten yarn and knit 36-39-42-45-45-48, turn, tighten yarn and purl 48-52-56-60-60-64. Turn, tighten yarn and knit 60-65-70-75-75-80, turn, tighten yarn and purl 72-78-84-90-90-96, turn, tighten yarn and knit until mid back. Then work YOKE as explained in pattern. PATTERN: See diagrams A.1 to A.4. Choose diagram for your size (applies to A.1 and A.2). Work the entire pattern in stocking stitch. KNITTING TIP: To avoid the knitting tension to tighten when working pattern, it is important not to tighten the strands on back side of piece. Switch to a higher needle number when working pattern if the pattern is somewhat tight. If the knitting tension is too tight vertically, the garment will be too short and the armhole will be too small - this can be adjusted by working 1 row more evenly in the sections with one colour. If the knitting tension is too loose vertically, the garment will be too long and the armhole too big, this can be adjusted by working 1 row less in the sections with one colour. DECREASE TIP (applies to mid under sleeves): Decrease 2 stitches mid under sleeve as follows: S: Work until 2 stitches remain before marker mid under sleeve, knit 2 together with dark grey, marker, knit 2 twisted together stitch with dark grey (= 2 stitches decreased). M, L, XL, XXL and XXXL: Work until 2 stitches remain before stitch with marker, knit 2 together with dark grey, knit stitch with marker with dark grey, knit 2 twisted together with dark grey (= 2 stitches decreased). CAST-OFF TIP: To avoid a tight cast-off edge you may use a larger needle size. If this also is too tight, work a 1 yarn over after approx. every 4th stitch while casting off (cast off yarn overs as regular stitches). ------------------------------------------------------- START THE PIECE HERE: ------------------------------------------------------- JUMPER - SHORT OVERVIEW OF THE PIECE: Work neck edge and yoke in the round on circular needle from mid back, top down. Now divide yoke for body and sleeves. Body is worked in the round from the side, top down. Work sleeves in the round on double pointed needles/short circular needle, top down. NECK EDGE: Cast on 92-96-100-104-108-112 stitches on a short circular needle size 3 mm with dark grey. Knit 1 round. Then work rib in the round (= knit 2/purl 2) for 3 cm. Switch to circular needle size 4 mm. Knit 1 round while increasing 28-28-32-32-36-40 stitches evenly - read INCREASE TIP = 120-124-132-136-144-152 stitches. Insert 1 marker mid front, measure yoke from this marker! Now work an ELEVATION in the back of neck - read explanation above. If you do not want an elevation, skip directly to YOKE. YOKE: Work 0-0-2-2-4-6 rounds in stocking stitch with dark grey. Read KNITTING TIP, and work A.1 in the round (= 30-31-33-34-36-38 repetitions of 4 stitches). Continue pattern like this but when A.1 has been worked vertically, work A.2 the same way. REMEMBER THE KNITTING TENSION! AT THE SAME TIME on every round marked with arrow in A.1 and A.2 increase stitches evenly as explained below - remember INCREASE TIP: SIZE S, M and L: Arrow-1: Increase 36-38-42 stitches evenly = 156-162-174 stitches (there is now room for 26-27-29 repetitions of 6 stitches). Arrow-2: Increase 64-58-66 stitches evenly = 220-220-240 stitches (there is now room for 11-11-12 repetitions of 20 stitches). Arrow-3: Increase 32-40-36 stitches evenly = 252-260-276 stitches (there is now room for 63-65-69 repetitions of 4 stitches). Arrow-4: Increase 30-34-36 stitches evenly = 282-294-312 stitches (there is now room for 47-49-52 repetitions of 6 stitches). Arrow-5: Increase 24-30-36 stitches evenly = 306-324-348 stitches (there is now room for 51-54-58 repetitions of 6 stitches). Arrow-6 (only applies to M and L since S is divided for body and sleeves before this border begins): Increase 4-4 stitches evenly = 306-328-352 stitches (there is now room for 41-44 repetitions of 8 stitches in M and L). SIZE XL, XXL and XXXL: Arrow-1: Increase 44-48-52 stitches evenly = 180-192-204 stitches (there is now room for 30-32-34 repetitions of 6 stitches). Arrow-2: Increase 42-48-54 stitches evenly = 222-240-258 stitches (there is now room for 37-40-43 repetitions of 6 stitches). Arrow-3: Increase 18-20-22 stitches evenly = 240-260-280 stitches (there is now room for 12-13-14 repetitions of 20 stitches). Arrow-4: Increase 60-64-68 stitches evenly = 300-324-348 stitches (there is now room for 75-81-87 repetitions of 4 stitches). Arrow-5: Increase 54-54-60 stitches evenly = 354-378-408 stitches (there is now room for 59-63-68 repetitions of 6 stitches). Arrow-6: Increase 30-30-30 stitches evenly = 384-408-438 stitches (there is now room for 64-68-73 repetitions of 6 stitches). Arrow-7: Increase 8-8-10 stitches evenly = 392-416-448 stitches (there is now room for 49-52-56 repetitions of 8 stitches. ALL SIZES: Work until piece measures 21-23-25-27-29-31 cm from marker in neck. NOTE! In some size some rounds of A.2 will remain when piece is knitted for body and sleeves - finish the rest of A.2 on body and sleeves. Divide the yoke for body and sleeves as follows: Work 45-49-52-57-63-69 stitches as before (= ½ back piece), slip the next 63-66-72-82-82-86 stitches on 1 stitch holder for sleeve, cast on 6-6-8-8-10-10 new stitches on row (= in the side under sleeve), work 90-98-104-114-126-138 stitches as before (= front piece), slip the next 63-66-72-82-82-86 stitches on 1 stitch holder for sleeve, cast on 6-6-8-8-10-10 new stitches on row (= in the side under sleeve) and work the 45-49-52-57-63-69 stitches as before (= ½ back piece). Finish body and sleeves separately. NOW MEASURE PIECE FROM HERE! BODY: = 192-208-224-244-272-296 stitches. Finish A.2 - make sure that pattern fits nicely over A.2 on yoke but note that pattern does not fit under sleeves in all sizes when working the last rounds in A.2. When A.2 has been worked, work A.3 in the round - AT THE SAME TIME on first round increase 6-8-10-8-10-10 stitches evenly = 198-216-234-252-282-306 stitches on needle. There is now room for 33-36-39-42-47-51 repetitions A.3 of 6 stitches. Repeat A.3 vertically until piece measures approx. 22 cm from division in all sizes, but finish after a round with dots. Approx. 10 cm remain until finished measurements, try the jumper on and work A.3 in the until desired length. Work A.4 in the round – AT THE SAME TIME on first round increase 2-0-2-0-2-2 stitches evenly = 200-216-236-252-284-308 stitches on row (there is now room for 50-54-59-63-71-77 repetitions A.4 of 4 stitches). When A.4 has been worked, piece measures approx. 28 cm from division. Work the rest of the body in dark grey. Knit 1 round while increasing 48-52-56-60-68-72 stitches evenly = 248-268-292-312-352-380 stitches. Increase stitches to avoid the rib from contracting when working the piece together. Switch to circular needle size 3 mm. Work rib in the round = knit 2/purl 2 for 4 cm. Cast off with knit over knit and purl over purl - read CAST-OFF TIP. Jumper measures approx. 56-58-60-62-64-66 cm from shoulder and down. SLEEVES: Slip the 63-66-72-82-82-86 stitches from stitch holder in one side of piece on double pointed needles or a short circular needle size 4 mm – pick in addition up 1 stitch in each of the 6-6-8-8-10-10 stitches cast on under sleeve = 69-72-80-90-92-96 stitches. Now insert 2 markers in piece (this is done without working the stitches): S: Insert 1 marker mid under sleeve between the middle 6 stitches, count 34 stitch, insert 1 marker in next stitch = 34 stitches remain on round after stitch with marker. M, L, XL, XXL and XXXL: Begin mid under sleeve between the 6-8-8-10-10 stitches, insert 1 marker in the first stitch after the middle, count 35-39-44-45-47 stitches, insert 1 marker in next stitch = 35-39-44-45-47 stitches remain on round after stitch with marker. ALL SIZES: Move markers upwards when working. Use marker later when decreasing mid under sleeve. Use marker mid on top of sleeve when counting out where pattern should start. Then work PATTERN at the same time DECREASE mid under sleeve as explained below - read the rest of sleeve before continuing: PATTERN: Begin round mid under sleeve and finish A.2 the same way as on body, but count outwards from the middle of sleeve where pattern should begin - stitch with marker mid on top of sleeve should fit stitch marked with star in A.2 (decrease under sleeve while working the pattern). When A.2 has been worked, work A.3 in the round the same way. Repeat A.3 vertically until sleeve measures approx. 34-32-31-29-28-26 cm from division, but finish after a round with dots. NOTE! Shorter measurements in the larger sizes because of wider neck and longer yoke. Approx. 10 cm remain until finished measurements, try the jumper on and work A.3 in the until desired length. Then work A.4 in the round. DECREASE: At the same time when sleeve measures 3 cm from division in all sizes, decrease 2 stitches mid under sleeve - read DECREASE TIP. Decrease like this every 3-2½-2-1½-1½-1½ cm 12-13-16-20-20-20 times in total = 45-46-48-50-52-56 stitches. When A.4 has been worked, and decreases are done, sleeve measures approx. 40-38-37-35-34-32 cm from division. Work the rest of the sleeve with dark grey. Knit 1 round while increasing 7-6-8-10-8-8 stitches evenly = 52-52-56-60-60-64 stitches. Switch to double pointed needles size 3 mm. Work rib in the round = knit 2/purl 2 for 4 cm. Cast off with knit over knit and purl over purl - remember CAST-OFF TIP. Sleeve measures approx. 44-42-41-39-38-36 cm from division. Work the other sleeve the same way. |
|||||||||||||
Diagram explanations |
|||||||||||||
|
|||||||||||||
 |
|||||||||||||
 |
|||||||||||||
 |
|||||||||||||
Have you finished this pattern?Tag your pictures with #dropspattern #wintersnightenchantmentsweater or submit them to the #dropsfan gallery. Do you need help with this pattern?You'll find 27 tutorial videos, a Comments/Questions area and more by visiting the pattern on garnstudio.com. © 1982-2026 DROPS Design A/S. We reserve all rights. This document, including all its sub-sections, has copyrights. Read more about what you can do with our patterns at the bottom of each pattern on our site. |
|||||||||||||


With over 40 years in knitting and crochet design, DROPS Design offers one of the most extensive collections of free patterns on the internet - translated to 17 languages. As of today we count 325 catalogues and 12298 patterns translated into English (UK/cm).
We work hard to bring you the best knitting and crochet have to offer, inspiration and advice as well as great quality yarns at incredible prices! Would you like to use our patterns for other than personal use? You can read what you are allowed to do in the Copyright text at the bottom of all our patterns. Happy crafting!
Post a comment to pattern DROPS 217-10
We would love to hear what you have to say about this pattern!
If you want to leave a question, please make sure you select the correct category in the form below, to speed up the answering process. Required fields are marked *.