
Popular categories
Looking for a yarn?


Comments / Questions (62)
![]() Brigitte wrote:
Brigitte wrote:
Bonjour. Pourriez-vous m'expliquer SVP un peu mieux les diminutions pour l'encolure dos (10 mailles à intervalles réguliers et ensuite rabattre 24 mailles centrales) ? Je suis perdue si près de la fin... Un grand merci par avance
26.03.2026 - 15:22DROPS Design answered:
Bonjour Brigitte, comme il faut davantage de mailles pour les torsades que pour le jersey, pour éviter que le bord rabattu ne gondole, on doit diminuer avant de rabattre, donc vous allez diminuer 10 mailles dans les 42 m centrales et, au rang suivant, rabattez les 24 m centrales pour l'encolure (vous tricotez les 8 m de chaque côté de ces 24 m centrales comme elles se présentent - des 42 m - 10 dim, il reste 32 m: 8 m côté encolure qui restent pour une épaule, 24 m rabattues et 8 m pour l'autre côté de l'encolure) et terminer chaque épaule séparément en rabattant encore 2 x 2 m au début de chaque rang à partir de l'encolure, en même temps, n'oubliez pas de continuer le biais de l'épaule. Bon tricot!
26.03.2026 - 16:30
![]() Nhan wrote:
Nhan wrote:
Do we need to bind off both side of armhole of the back side? total decrease 22sts for both side of the back, right? if so, then the total stitches left will be 106 (i am working on M size Thanks
01.03.2026 - 16:24DROPS Design answered:
Hi Nhan, Yes, you cast off equal numbers of stitches on both sides of the back piece. However, in your size, you do not cast off the first 3 stitches each side ( a "0" in your size), but do cast off 2 stitches x 2 on each side = 8 stitches, then 1 stitch x 4 on each side = 8 stitches. You should then have 128 - 16 = 112 stitches left on the back piece. Regards, Drops Team.
02.03.2026 - 07:06
![]() Kirsten wrote:
Kirsten wrote:
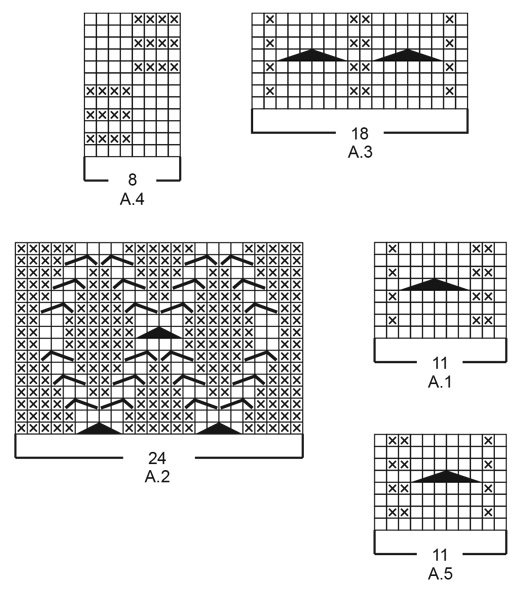
Zie telpatronen A.1 tot A.5. De telpatronen laten alle naalden in het patroon aan de goede kant zien. Dit betekend dat de 2e rij die op het telpatroon te zien is, eigenlijk dus de 3e naald is? Of is het toch een teruggaande naald die we zien?
26.02.2026 - 16:39DROPS Design answered:
Dag Kirsten,
Nee, alle naalden zijn getekend in de telpatronen. De eerste en alle andere oneven naalden brei je aan de goede kant. De even naalden aan de verkeerde kant (hierbij lees je het patroon terug van links naar rechts). In dien je in de rondte breit, brei je alle naalden aan de goede kant.
01.03.2026 - 11:42
![]() Micheline wrote:
Micheline wrote:
Bonjour, pourriez vous m expliquer le paragraphe : quand l ouvrage mesure 27-28-29..les mailles sur un fil ? La je ne comprends pas du tout merci
14.02.2026 - 18:54DROPS Design answered:
Bonjour Micheline, à cette hauteur, vous allez diviser l'ouvrage pour répartir les mailles: tricotez le devant droit (=63 à 87 mailles) et mettez ces mailles en attente; vous rabattez 6 mailles pour l'emmanchure (3 mailles de chaque côté du marqueur), vous tricotez les mailles du dos (120 à 168) que vous mettez en attente, vous rabattez 6 mailles pour l'emmanchure (comme la 1ère) et vous tricotez les 63-87 dernières mailles comme avant, vous gardez ces mailles sur l'aiguille et vous terminez le devant gauche; quand les mailles du devant gauche sont rabattues, tricotez le devant droit puis le dos (séparément, en allers et retours). Bon tricot!
16.02.2026 - 16:38
![]() Valerie Metzger wrote:
Valerie Metzger wrote:
Bonjour, je ne comprends pas en taille xl, le nombre de diminution encolure et emmanchures. Quand toutes les diminutions sont faites il doit rester 38 mailles et quand je compte, il m'en reste 34. Où est l'erreur?
23.01.2026 - 10:52DROPS Design answered:
Bonjour Mme Metzger, vous commencez le devant avec 75 m, vous rabattez pour l'emmanchure: 1 x 3 m + 3x 2 m et 3 x1 m =12m; puis pour l'encolure: 1 x 5 m, 1x3m, 3x2 m et 1x 11m =25 m, il va rester: 75-12-25=38 m. Bon tricot!
26.01.2026 - 07:40
![]() Ornella wrote:
Ornella wrote:
Leggo che i bottoni vanno cuciti sulla parte destra, ma non è il contrario?
20.01.2026 - 21:46DROPS Design answered:
Buonasera Ornella, le asole sono sul bordo sinistro. Buon lavoro"
27.01.2026 - 20:29
![]() Valerie Metzger wrote:
Valerie Metzger wrote:
Bonjour, je ne comprends pas cette partie. A.4 au-dessus des 24-32-40-48-64-72 mailles suivantes (le fil marqueur se trouve au milieu de ces mailles) Merci beaucoup
14.01.2026 - 07:48DROPS Design answered:
Bonjour Mme Metzger, vous allez tricoter les 24 à 72 mailles suivantes en suivant le diagramme A.4, autrement dit, vous allez répéter les 8 mailles de A.4 3 fois pour 24 mailles jusqu'à 9 fois pour 72 mailles - le fil marqueur que vous aviez inséré auparavant pour les côtés doit se trouver au milieu de ces mailles, soit après 12 m / 36 m (cf. Taille). Bon tricot!
14.01.2026 - 10:37
![]() Brenda wrote:
Brenda wrote:
Is this charted or written
22.12.2025 - 19:52
![]() Gabriella wrote:
Gabriella wrote:
Grazie a voi per avermi risposto subito!!! Vado avanti con il lavoro e terminato vi manderò una foto. Buona serata😉
09.12.2025 - 19:30
![]() Gabriella wrote:
Gabriella wrote:
Buonasera sto realizzando questo modello. Dopo aver realizzato il davanti sinistro ho iniziato il davanti destro e sono arrivata alla diagonale della spalla. Non si dovrebbe diminuire le maglie all'inizio del ferro rovescio del lavoro?? La descrizione mi dice all'inizio del ferro dritto ma è dalla parte del collo!! Attendo la vostra risposta per andare avanti. Grazie infinite!!!!
08.12.2025 - 19:17DROPS Design answered:
Buonasera Gabriella, grazie per il suggerimento: abbiamo corretto il testo. Buon lavoro!
08.12.2025 - 22:41
|
|||||||||||||||||||
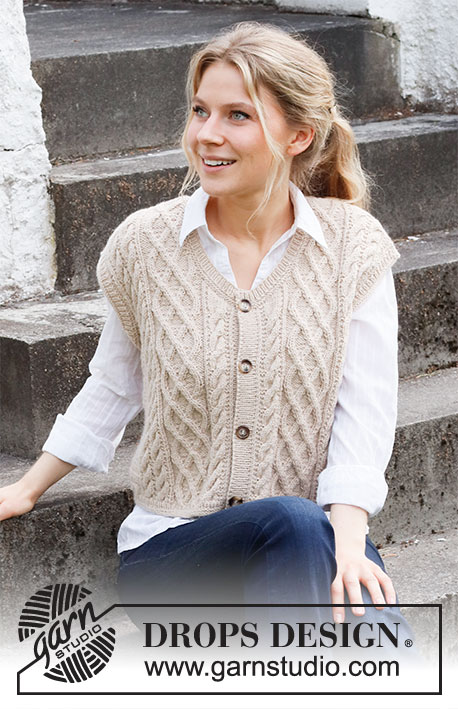
Poetry Reading#poetryreadingvest |
|||||||||||||||||||
 |
 |
||||||||||||||||||
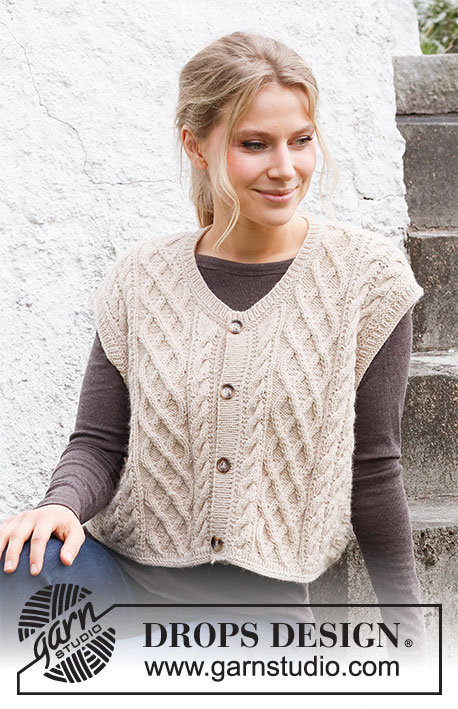
Knitted vest with cables and textured pattern in DROPS Lima. Sizes S - XXXL.
DROPS 218-4 |
|||||||||||||||||||
|
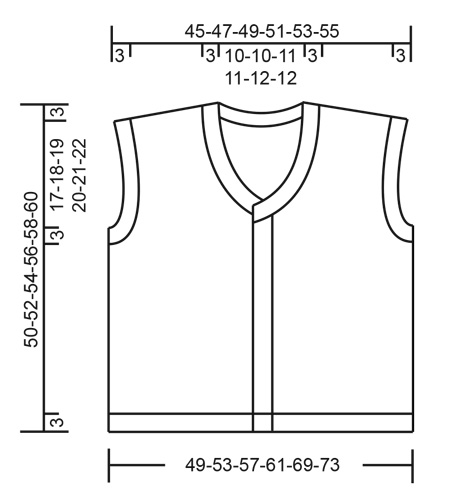
------------------------------------------------------- EXPLANATIONS FOR THE PATTERN: ------------------------------------------------------- RIDGE/GARTER STITCH (worked back and forth): Knit all rows. 1 ridge in height = Knit 2 rows. INCREASE TIP (evenly spaced): To work out how to increase evenly, count the total number of stitches on the needle (e.g. 197 stitches) minus edge stitches (e.g. 2 stitches) and divide the remaining stitches by the number of increases to be made (e.g. 61) = 3.2. In this example, increase by making 1 yarn over after approx. each 3rd stitch. Do not increase over the edge stitches. On the next row work the yarn overs twisted to avoid holes. PATTERN: See diagrams A.1 to A.5. The diagrams show all the rows in the pattern from the right side. CASTING-OFF TIP: To avoid the cast-off edge being tight you can cast off with a larger size needle. If the edge is still tight, make 1 yarn over after approx. each 8th stitch at the same time as casting off; the yarn overs are cast off as normal stitches. ------------------------------------------------------- START THE PIECE HERE: ------------------------------------------------------- VEST – SHORT OVERVIEW OF THE PIECE: The piece is worked back and forth with circular needle from mid front and bottom up. Stitches are cast off for the armholes and the front and back pieces finished separately. The piece is sewn together at the shoulders. Stitches are knitted up for the bands, neck and sleeve edges. BODY: Cast on 197-213-229-245-277-293 stitches (including 1 edge stitch on each side towards mid front) with circular needle size 3 mm and Lima. Work 2 RIDGES back and forth – read description above. Knit 1 row from the right side. The next row is worked as follows from the wrong side: 1 edge stitch in garter stitch, * purl 1, knit 1 *, work from *-* until there are 2 stitches left on the row, purl 1 and finish with 1 edge stitch in garter stitch. Work a total of 4 rows of this rib, back and forth. Then purl 1 row (edge stitches knitted) AT THE SAME TIME as you increase 61 stitches evenly spaced in all sizes – read INCREASE TIP = 258-274-290-306-338-354 stitches. Change to circular needle size 4.5 mm and insert a marker thread 66-70-74-78-86-90 stitches in from each side = 126-134-142-150-166-174 stitches between the threads on the back piece. Allow the threads to follow your work onwards; they will be used when casting off for the armholes. The next row is worked as follows from the right side: 1 edge stitch in garter stitch, work A.1 (= 11 stitches), A.2 (= 24 stitches), A.3 (= 18 stitches), A.4 over the next 24-32-40-48-64-72 stitches (the marker thread sits in the middle of these stitches), work A.3 (= 18 stitches), A.2 (= 24 stitches), A.3 (= 18 stitches), A.2 (= 24 stitches), A.3 (= 18 stitches), A.4 over the next 24-32-40-48-64-72 stitches (the marker thread sits in the middle of these stitches), work A.3 (= 18 stitches), A.2 (= 24 stitches), A.5 (= 11 stitches) and finish with 1 edge stitch in garter stitch. Continue this pattern back and forth. REMEMBER THE KNITTING TENSION. When the piece measures 27-28-29-30-31-32 cm, cast off for the armholes on the next row from the right side as follows: Work the first 63-67-71-75-83-87 stitches as before (= right front piece) – place these stitches on a thread, cast off 6 stitches for the armhole (3 stitches on each side of the marker thread), work 120-128-136-144-160-168 stitches as before (= back piece) – place these stitches on a new thread, cast off 6 stitches for the armhole (3 stitches on each side of the marker thread) and work as before over the last 63-67-71-75-83-87 stitches (= left front piece). Do not cut the strand. The front and back pieces are finished separately. LEFT FRONT PIECE: = 63-67-71-75-83-87 stitches. Start from the wrong side and continue the pattern as before. AT THE SAME TIME cast off stitches for the armhole at the beginning of each row from the right side as follows: Cast off 3 stitches 0-0-0-1-1-1 time, 2 stitches 2-2-3-3-4-5 times and then 1 stitch 2-4-4-3-7-7 times. AT THE SAME TIME when the piece measures 32-33-34-35-36-37 cm, cast off stitches for the neck at the beginning of each row from the wrong side as follows: Cast off 5 stitches 1 time, 3 stitches 1 time, 2 stitches 3-3-3-3-4-4 times and then 1 stitch 10-10-11-11-10-10 times. After all the decreases for armhole and neck there are 33-35-36-38-39-41 stitches on the shoulder. Continue working until the piece measures 47-49-51-53-55-57 cm. Now work the diagonal shoulders by casting off stitches at the beginning of each row from the right side as follows: Cast off 8-9-9-10-10-10 stitches 3 times and then 9-8-9-8-9-11 stitches 1 time. All the stitches are now cast off and the piece measures approx. 50-52-54-56-58-60 cm from the highest point on the shoulder. RIGHT FRONT PIECE: Place the 63-67-71-75-83-87 stitches from the thread back onto circular needle size 4.5 mm. Start from the wrong side and continue the pattern as before. AT THE SAME TIME cast off stitches for the armhole at the beginning of each row from the wrong side as follows: Cast off 3 stitches 0-0-0-1-1-1 time, 2 stitches 2-2-3-3-4-5 times and then 1 stitch 2-4-4-3-7-7 times. AT THE SAME TIME when the piece measures 32-33-34-35-36-37 cm, cast off stitches for the neck at the beginning of each row from the right side as follows: Cast off 5 stitches 1 time, 3 stitches 1 time, 2 stitches 3-3-3-3-4-4 times and then 1 stitch 10-10-11-11-10-10 times. After all the decreases for armhole and neck there are 33-35-36-38-39-41 stitches on the shoulder. Continue working until the piece measures 47-49-51-53-55-57 cm. Now work the diagonal shoulders by casting off stitches at the beginning of each row from the wrong side as follows: Cast off 8-9-9-10-10-10 stitches 3 times and then 9-8-9-8-9-11 stitches 1 time. All the stitches are now cast off and the piece measures approx. 50-52-54-56-58-60 cm from the highest point on the shoulder. BACK PIECE: Place the 120-128-136-144-160-168 stitches from the thread back onto circular needle size 4.5 mm. Start from the wrong side and continue the pattern as before. AT THE SAME TIME cast off stitches for the armholes at the beginning of every row as follows: Cast off 3 stitches 0-0-0-1-1-1 time, 2 stitches 2-2-3-3-4-5 times and 1 stitch 2-4-4-3-7-7 times on each side = 108-112-116-120-124-128 stitches left. Continue working until the piece measures 47-49-51-53-55-57 cm. Now cast off for the diagonal shoulders on each side AT THE SAME TIME as you cast off for the neck as described below. DIAGONAL SHOULDER: Cast off for the diagonal shoulders at the beginning of every row as follows: Cast off 8-9-9-10-10-10 stitches 3 times on each side and 9-8-9-8-9-11 stitches 1 time on each side. BACK OF NECK: AT THE SAME TIME on the first row from the right side decrease 10 stitches evenly spaced over the middle 42-42-44-44-46-46 stitches. On the next row cast off the middle 24-24-26-26-28-28 stitches for the neck. Then cast off stitches at the beginning of each row from the neck as follows: Cast off 2 stitches 2 times on each side. All the stitches are now cast off and the piece measures approx. 50-52-54-56-58-60 cm from the highest point on the shoulder. ASSEMBLY: Sew the shoulder seams inside the cast-off edge. RIGHT BAND: Start on the right side, at the bottom of the right front piece, and knit up 97 to 111 stitches with circular needle size 3 mm as far as the beginning of the neck (number of stitches divisible by 2 + 1). The first row is worked as follows from the wrong side: 1 edge stitch in garter stitch, * purl 1, knit 1 *, work from *-* until there are 2 stitches left, purl 1 and 1 edge stitch in garter stitch. Continue this rib back and forth for 2½ to 3 cm. Cast off with knit over knit and purl over purl – read CASTING-OFF TIP! LEFT BAND: Start on the right side, at the top of the left front piece below the neck, and knit up 97 to 111 stitches with circular needle size 3 mm down the edge (number of stitches divisible by 2 + 1). The first row is worked as follows from the wrong side: 1 edge stitch in garter stitch, * purl 1, knit 1 *, work from *-* until there are 2 stitches left, purl 1 and 1 edge stitch in garter stitch. Continue this rib back and forth, but after approx. 1 cm work 3-3-4-4-4-4 buttonholes evenly spaced. The top buttonhole is approx. 10-10-8-8-8-8 cm from the neck and the bottom buttonhole approx. 3 cm from the bottom edge. 1 buttonhole = cast off 2 stitches and cast on 2 stitches over the cast-off stitches on the next row. When the band measures 2½ to 3 cm, cast off with knit over knit and purl over purl – remember CASTING-OFF TIP! NECK: Start from the right side and knit up 139 to 175 stitches around the neck, inside the 1 edge stitch, with circular needle size 3 mm (number of stitches divisible by 2 + 1). Knit 1 row from the wrong side – AT THE SAME TIME work 1 buttonhole over the others on the left band (worked in the same way as on the band; make sure it is positioned directly above the other buttonholes). Knit 1 row from the right side, knit 1 row from the wrong side and knit 1 more row from the right side. The next row is worked as follows from the wrong side: 1 edge stitch in garter stitch, * purl 1, knit 1 *, work from *-* until there are 2 stitches left, purl 1 and 1 edge stitch in garter stitch. Work a total of 4 rows of this rib. Cast off with knit over knit and purl over purl – remember CASTING-OFF TIP! SLEEVE EDGE: Start from the right side at the bottom of the armhole and knit up 110 to 138 stitches around the armhole, inside the 1 edge stitch, with short circular needle size 3 mm (number of stitches divisible by 2). Purl 1 round, knit 1 round, purl 1 round and knit 1 round. Then work 4 rounds of rib (knit 1, purl 1). Knit 1 round and purl 1 round. Cast off with knit – remember CASTING-OFF TIP! Work a similar edge around the other armhole. ASSEMBLY: Sew the buttons onto the right band. |
|||||||||||||||||||
Diagram explanations |
|||||||||||||||||||
|
|||||||||||||||||||
 |
|||||||||||||||||||
 |
|||||||||||||||||||
Have you finished this pattern?Tag your pictures with #dropspattern #poetryreadingvest or submit them to the #dropsfan gallery. Do you need help with this pattern?You'll find 23 tutorial videos, a Comments/Questions area and more by visiting the pattern on garnstudio.com. © 1982-2026 DROPS Design A/S. We reserve all rights. This document, including all its sub-sections, has copyrights. Read more about what you can do with our patterns at the bottom of each pattern on our site. |
|||||||||||||||||||


With over 40 years in knitting and crochet design, DROPS Design offers one of the most extensive collections of free patterns on the internet - translated to 17 languages. As of today we count 324 catalogues and 12290 patterns translated into English (UK/cm).
We work hard to bring you the best knitting and crochet have to offer, inspiration and advice as well as great quality yarns at incredible prices! Would you like to use our patterns for other than personal use? You can read what you are allowed to do in the Copyright text at the bottom of all our patterns. Happy crafting!
Post a comment to pattern DROPS 218-4
We would love to hear what you have to say about this pattern!
If you want to leave a question, please make sure you select the correct category in the form below, to speed up the answering process. Required fields are marked *.