
Popular categories
Looking for a yarn?


|
|||||||||||||||||||||||||
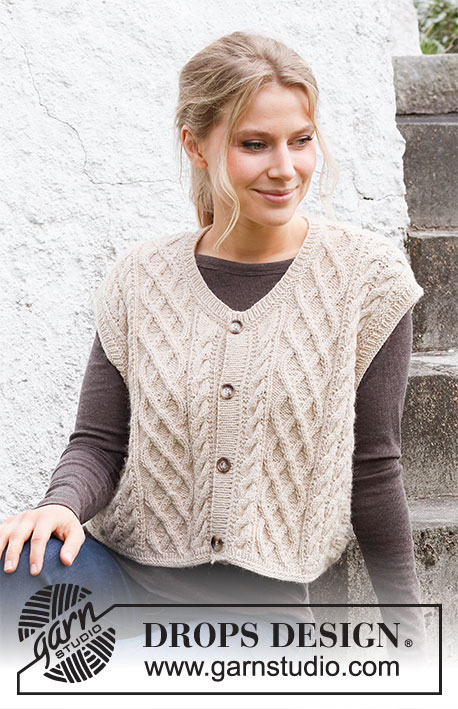
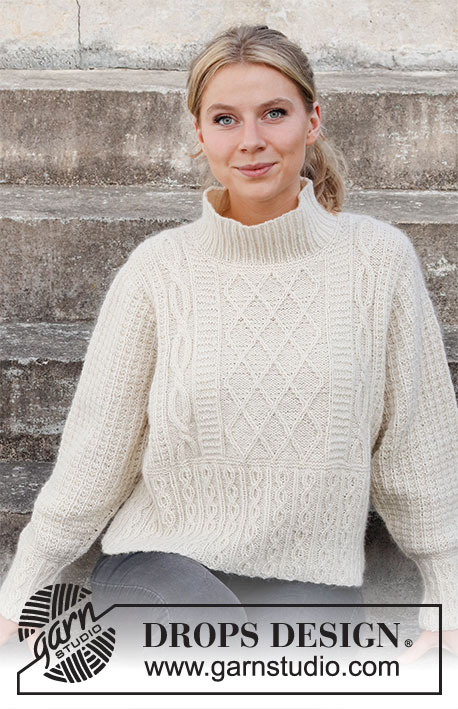
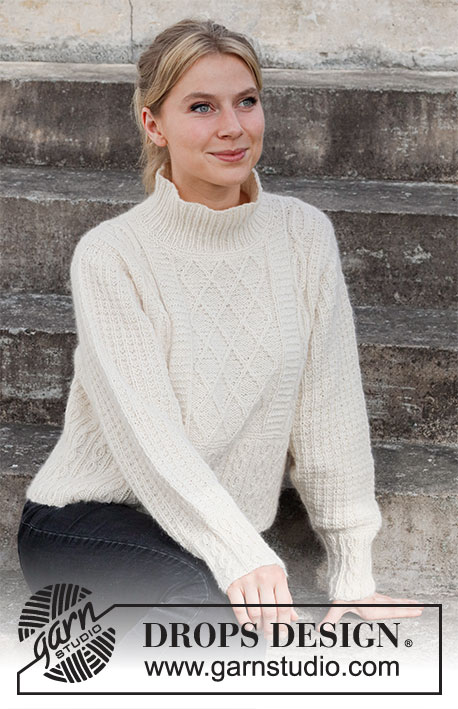
Ice Castles Sweater |
|||||||||||||||||||||||||
 |
 |
||||||||||||||||||||||||
Knitted jumper in DROPS Puna or DROPS Soft Tweed. Piece knitted with textured pattern and cables. Size: S - XXXL
DROPS 218-3 |
|||||||||||||||||||||||||
|
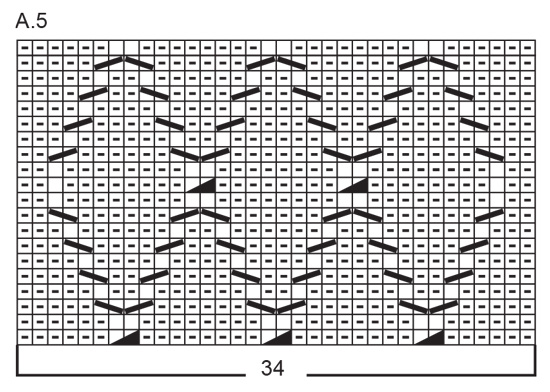
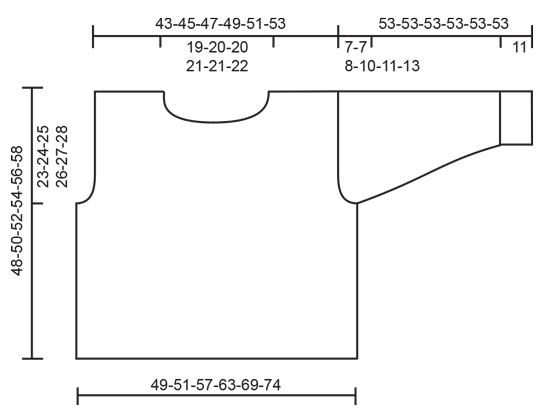
------------------------------------------------------- EXPLANATION FOR THE PATTERN: ------------------------------------------------------- GARTER STITCH (worked in the round): 1 ridge vertically = 2 rounds, i.e. knit 1 round and purl 1 round. PATTERN: See diagrams A.1 to A.6. INCREASE/DECREASE TIP (evenly): To calculate how to increase/decrease evenly, use the total number of stitches on row (e.g. 225 stitches) and divide stitches by number of increases/decreases to be done (e.g. 9) = 25. In this example increase by making 1 yarn over after approx. every 25th stitch. On next row work yarn overs twisted to avoid holes. To decrease in this example work every 24th and 25th stitch together. INCREASE TIP (applies to mid under sleeve): Work until 1 stitch remains before marker thread, 1 yarn over, knit 2 (marker thread is in the middle of these stitches), 1 yarn over. Work yarn overs twisted on next round to avoid holes - work the new stitches in A.2. ------------------------------------------------------- START THE PIECE HERE: ------------------------------------------------------- JUMPER - SHORT OVERVIEW OF THE PIECE: Piece is knitted in the round on circular needle up to armhole, then divide the piece and work front piece and back piece separately. Work sleeves in the round on a short circular needle/double pointed needles before decreasing for sleeve cap, and continue sleeve back and forth on needle. BODY: Cast on 207-225-243-261-288-315 stitches on circular needle size 4 mm with Puna or Soft Tweed. Knit 1 round, then work pattern over all stitches according to A.1 (= 23-25-27-29-32-35 repetitions of 9 stitches on round). Continue with A.1 over all stitches until piece measures approx. 15-16-17-18-19-20 cm, adjust after one whole repetition of A.1 vertically. Work 2 ridges in GARTER STITCH over all stitches – see explanation above, on last round adjust number of stitches to 204-216-240-264-288-312. Insert 1 marker thread in each side; one at the beginning of round and one after 102-108-120-132-144-156 stitches= sides. Then work pattern as follows - from beginning of round: A.2 over the first 14-17-23-29-35-41 stitches (finish with the first 2 stitches in A.2), A.3 (= 12 stitches), A.4 (= 8 stitches), A.5 (= 34 stitches), A.4, A.3, A.6 over the next 28-34-46-58-70-82 stitches (finish with first stitch in A.6), A.3, A.4, A.5, A.4, A.3, A.6 over the last 14-17-23-29-35-41 stitches (finish with the first 2 stitches in A.6). Continue this pattern. REMEMBER THE KNITTING TENSION! When piece measures 25-26-27-28-29-30 cm, work next round as follows: Cast off the 3-3-3-4-4-4 first stitches on round, work 96-102-114-124-136-148 stitches, cast off 6-6-6-8-8-8 stitches, work 96-102-114-124-136-148 stitches, cast off the last 3-3-3-4-4-4 stitches. Each part is worked separately back and forth on needle. Slip the first 96-102-114-124-136-148 stitches on a stitch holder, and work over the last 96-102-114-124-136-148 stitches on back piece. BACK PIECE: = 96-102-114-124-136-148 stitches. Continue with pattern as before, and continue to cast off for armhole in each side on every other row as follows: 2 stitches 1-1-2-3-4-5 times and 1 stitch 1-2-4-5-6-8 times = 90-94-98-102-108-112 stitches. When piece measures 46-48-50-52-54-56 cm, cast off the middle 38-40-40-42-42-44 stitches for neck, and finish each shoulder separately. Then cast off 1 stitch on next row towards the neck = 25-26-28-29-32-33 stitches. Continue with pattern until piece measures 48-50-52-54-56-58 cm (= 23-24-25-26-27-28 cm from beginning of armhole), cast off. Work the other shoulder the same way. FRONT PIECE: = 96-102-114-124-136-148 stitches. Continue with pattern and to cast off for armhole in the sides as on back piece = 90-94-98-102-108-112 stitches. When piece measures 42-44-46-48-49-51 cm, slip the middle 30-32-32-34-34-36 stitches on a stitch holder for neck, and finish shoulders separately. Then cast off stitches on every row from neck as follows: Cast off 2 stitches 1 time and 1 stitch 3 times = 25-26-28-29-32-33 stitches remain on each shoulder. Continue with pattern until piece measures 48-50-52-54-56-58 cm (= 23-24-25-26-27-28 cm from beginning of armhole), cast off. Work the other shoulder the same way. ASSEMBLY: Sew the shoulder seams. SLEEVE: Work sleeves in the round on double pointed needles/ circular needle, bottom up. Divide piece when decreasing for sleeve cap and work back and forth on needle. Cast on 54-54-54-63-63-63 stitches on double pointed needles size 4 mm with Puna or Soft Tweed. Knit 1 round, then work pattern over all stitches according to A.1 (= 6-6-6-7-7-7 repetitions of 9 stitches on round). Continue with A.1 over all stitches until piece measures approx. 11 cm, adjust after one whole repetition of A.1 vertically. Work 2 ridges in GARTER STITCH over all stitches – see explanation above, on last round adjust number of stitches to 54-56-58-60-64-66. Insert a marker thread at beginning of round = mid under sleeve. Continue as follows: 1 stitch in stocking stitch, work A.2 over the next 52-54-56-58-62-64 stitches, finish with 1 stitch in stocking stitch. Continue this pattern, AT THE SAME TIME when piece measures 12 cm, increase 1 stitch on each side of marker thread - READ INCREASE TIP. Increase on every 2-1½-1½-1½-1-1 cm 17-18-20-21-23-24 times in total = 88-92-98-102-110-114 stitches. When piece measures 46-46-45-43-42-40 cm, cast off 3 stitches on each side of marker thread (= 6 stitches cast off mid under sleeve), then work sleeve back and forth. Cast off for sleeve cap at beginning of every row in each side as follows: 2 stitches 4-4-4-5-5-6 times, 1 stitch 0-0-1-2-3-4 times. Then cast off 2 stitch in each side until piece measures 52 cm in all sizes, cast off 3 stitches in each side, then cast off the remaining stitches. Sleeve measures 53 cm in all sizes. Work another sleeve the same way. NECK EDGE: Begin from right side with Puna or Soft Tweed and a short circular needle size 4 mm - pick up approx. 96 to 106 stitches (including stitches from stitch holder and divisible by 2). Purl 1 round, knit 1 round, purl 1 round, knit 1 round. Work rib (knit 1/purl 1) in the round for 10 cm. Cast off stitches with knit over knit and purl over purl. ASSEMBLY: Sew in sleeves. |
|||||||||||||||||||||||||
Diagram explanations |
|||||||||||||||||||||||||
|
|||||||||||||||||||||||||

|
|||||||||||||||||||||||||
|
|||||||||||||||||||||||||
|
|||||||||||||||||||||||||
|
Have you made this or any other of our designs? Tag your pictures in social media with #dropsdesign so we can see them! Do you need help with this pattern?You'll find tutorial videos, a Comments/Questions area and more by visiting the pattern on garnstudio.com. © 1982-2024 DROPS Design A/S. We reserve all rights. This document, including all its sub-sections, has copyrights. Read more about what you can do with our patterns at the bottom of each pattern on our site. |
|||||||||||||||||||||||||


With over 40 years in knitting and crochet design, DROPS Design offers one of the most extensive collections of free patterns on the internet - translated to 17 languages. As of today we count 304 catalogues and 11422 patterns - 11422 of which are translated into English (UK/cm).
We work hard to bring you the best knitting and crochet have to offer, inspiration and advice as well as great quality yarns at incredible prices! Would you like to use our patterns for other than personal use? You can read what you are allowed to do in the Copyright text at the bottom of all our patterns. Happy crafting!
Comments / Questions (69)
Fattar inte ärmen. Storlek S när arbetet mäter 46 cm avmaskas 6 m sedan minskas tills arbetet mäter 52 cm = 6 cm för ärmkullen Storlek XL avmaskas 6 m när arbetet mäter 40 cm sedan stickas tills arbetet mäter 52 cm = 12 vi ärmkulle…. Varför står inget om hur många maskor som ska vara kvar när de sista maskorna avmaskas? Hur kan en ärm S vara längre än en ärm XL vid början av avmaskningen? Man tycker att ärm XL skulle vara längre….
10.01.2024 - 12:33DROPS Design answered:
Hei Lena. Om man trenger å vite maskeantallet etter fellingene er det bare å trekke i fra antalle fellinger i den str man strikker. Det er kortere mål i de større størrelsene pga bredere skuldervidde og lengre ermetopp. Man har ikke lengre armer selv om man bruker str. XL, men bredere skuldervidde. mvh DROPS Design
15.01.2024 - 13:24Bonjour A quoi correspond sur le diagramme A1 a la troisième ligne le symbole ? Je ne le trouve pas dans la légende ? Et pour les corrections elles sont déjà faites ? Ou sinon ou peut on les trouver ? Cordialement
01.11.2023 - 23:01DROPS Design answered:
Bonjour Mme Cousin, les corrections ne s'appliquent que si vous aviez imprimé le modèle avant la date de ces corrections, sinon le modèle en ligne comporte déjà les corrections. Au 3ème rang de A.1 vous retrouverez le 5ème symbole puis le 4ème de la légende, autrement dit, ce sont 2 torsades sur 2 mailles chacune; au 7ème rang, vous tricotez d'abord le 4ème symbole puis le 5ème, Bon tricot!
02.11.2023 - 17:40Est-il possible d'avoir les explications du modèle Ice Castles sweater en français? D'avance merci
13.07.2023 - 15:00DROPS Design answered:
Bonjour Madame, ce modele est disponible en francais ICI. Bon tricot!
15.07.2023 - 21:29Ich würde diesen Pullover so gerne topdown in einem Stück stricken. Wäre das möglich oder hätten sie Tipps für mich? Geben Sie den Wunsch gerne an Ihre Designer weiter, das Muster wäre dann hoch aktuell ;-)
17.04.2023 - 12:32DROPS Design answered:
Liebe Susi, bei solchen Modellen sollen Sie die ganze Anleitung dann anpassen; sonnst finden Sie alle unsere Anleitungen für Pullover von oben nach unten (mit Zöpfe) gestrickt hier - Viele Strickerinnen stricken gerne immer noch von unten nach oben deshalb haben wir Modellen mit den beiden Technikke. Viel Spaß beim stricken!
17.04.2023 - 14:04Beim Ärmel nach dem Bündchen beginne ich mit einer Rechtsmasche und weiter mit dem Mustersatz? In der folgenden Reihe kommt das Muster dann bei mir allerdings durcheinander. Was verstehe ich falsch? Liebe Grüße, Ines
27.03.2023 - 22:39DROPS Design answered:
Liebe Frau Biernath, ja genau, die 1. Masche der Ärmel strickt mann glatt rechts, dann wird das Muster wiederholt bis 1 Masche übrig ist, die wird auch glatt rechts gestrickt. So hat man mitte under der Ärmel 2 Maschen glatt rechts, die Zunahmen werden dann beidseitig von diesen 2 Maschen (und im Muster) gestrickt. Viel Spaß beim stricken!
28.03.2023 - 10:14Liebes Drops Team, Das ist vl eine blöde Frage,aber wie schließt man die Schulternähte? Danke. LG. Diana
25.02.2023 - 18:32DROPS Design answered:
Liebe Frau Seifert, dieses Video zeigt, wie man Schulter zusammennäht, wenn es rechte sowie linke Maschen gibt. Viel Spaß beim zusammennähen!
27.02.2023 - 11:36Hej Kan tekniken Magic loop användas när ärman stickas (upp till avmaskningen)? Jag gissar att jag behöver anpassa antalet maskor/sticka så att det går jämnt upp med en fläta i A1 (så att flätan inte hamnar mitt i skarven mellan stickorna).
06.10.2022 - 13:01DROPS Design answered:
Hei Anna. Ja, du kan bruke teknikken Magic loop, og da frem til ærmekuppel skal strikkes frem og tilbake. mvh DROPS Design
10.10.2022 - 11:33After splitting the piece to work front and back, how do you work back and forth in pattern using circular needles? It seems like there’s no way to work from the wrong side of your work. Thanks for your help.
21.07.2022 - 14:41DROPS Design answered:
Dear Kelly, don't look for anything complicated: just knit a row (right), then turn your work and knit another row (wrong), just as if you were knitting on two separate needles. Happy knitting!
21.07.2022 - 18:22Knitting Ice Castles size M. Is it correct that you divide for armholes at 26cms from beginning of piece? Seems very short from hem to armhole. Perhaps I'm reading it wrong and it should be 26 cm from 2 ridges in garter stitch completing the A1 sequence
09.06.2022 - 08:59DROPS Design answered:
Witaj Iwono, dobrze odczytujesz wzór, spójrz na schematyczny rysunek na dole wzoru. Sweter ma dosyć krótki fason. Przerabiaj dłużej zanim zaczniesz zamykać oczka na podkroje rękawów, jeśli chcesz, by był dłuższy. Pozdrawiamy!
09.06.2022 - 11:51In patroon A1 staan dikke schuine strepen over twee steken wat is de betekenis? Het staat niet in t rijtje met tekens bovendien schuin omhoog en schuin omlaag
21.04.2022 - 11:45DROPS Design answered:
Dag Thea,
Dit zijn het vierde en vijfde symbool van boven. In de symboolverklaring zijn de symbolen kleiner en ook de strepen dunner.
28.04.2022 - 08:20