
Popular categories
Looking for a yarn?


Comments / Questions (19)
![]() Jana wrote:
Jana wrote:
Hallo, muss ich bei den Blenden eine Randmasche und 5 Maschen kraus rechts stricken? Also insgesamt wären das 6 Maschen bei den Blenden? Vielen Dank
30.09.2024 - 13:26DROPS Design answered:
Liebe Jana, es sind nur 5 Maschen Blenden, wenn Sie aber unbeding eine Randmasche dazu brauche, dann sollen Sie 1 Masche extra beidseitig anschlagen. Viel Spaß beim Stricken!
30.09.2024 - 15:57
![]() Jana wrote:
Jana wrote:
Hallo, muss ich bei den Blenden (kraus rechts) 1 Randmasche und 4 rechte Maschen stricken, oder 1 Randmasche und 5 rechte Maschen? Vielen Dank
28.09.2024 - 11:54DROPS Design answered:
Liebe Jana, hier wird man 5 Maschen Krausrechts beidseitig stricken. Viel Spaß beim Stricken!
30.09.2024 - 07:55
![]() Esmée wrote:
Esmée wrote:
Hallo, is het mogelijk om dit vestje gewoon in tricotsteek te breien of worden de verhoudingen dan heel anders? Mvg
29.05.2023 - 10:51DROPS Design answered:
Dag Esméée,
Het zal geen groot verschil maken als je het vest in tricotsteek breit. Houd goed de stekenverhouding en de afmetingen in de gaten tijdens het breien.
01.06.2023 - 12:58
![]() Anna wrote:
Anna wrote:
Bonjour ! pour le col faut - il compter 80 (84-88) mailles y compris les 2 x 5 mailles au point mousse ou on compte les mailles au point mousse en plus de ces 80(84-88) mailles ?
11.10.2022 - 18:09DROPS Design answered:
Bonjour Anna, tout à fait, les 14, 15 ou 16 mailles mises en attente pour l'encolure de chaque devant (y compris donc les 5 mailles de bordure devant) sont comprises dans ces 80 à 88 mailles. Bon tricot!
12.10.2022 - 08:36
![]() Anne wrote:
Anne wrote:
Liebes Team, verstehe ich es richtig, dass die Ärmel zunächst rund und dann offen gearbeitet werden? Mir ist nicht klar, wie die Ärmel dann eingesetzt werden- gibt es dazu ein Video? Falls nein, freue ich mich über eine genauere Erklärung. Danke schonmal...
03.09.2021 - 21:30DROPS Design answered:
Liebe Anne, ja genau, so wird die Ärmel gestrickt. Dieses Video zeigt, wie man die Ärmel zuerst in Runden dann in Hin- Und Rückreihen strickt, und wie die Ärmel dann in das Rumpfteil eingenäht wird. Viel Spaß beim stricken!
06.09.2021 - 07:12
![]() Kathi wrote:
Kathi wrote:
Liebes Drops-Team, ich habe noch eine Frage zum Abketten: sollen dann in der ersten Reihe 3 Maschen abgekettet werden, und in der zweiten Reihe 4 Maschen und zuletzt noch mal 1 Masche? Oder wie ist das gemeint? Vielen Dank, LG, Kathi
08.03.2021 - 11:10DROPS Design answered:
Liebe Kathi, bei der nächsten Reihe von der Blende bis Schulter (Rückreihe bei linkem Vorderteil, Hinreihe bei rechtem Vorderteil), ketten Sie diese Maschen: so 3 Maschen 1 Mal, dann 2 Maschen 2 Mal (=zuerst 2 M dann 2 M bei der nächsten Reihe von Hals), und dann 1 M 1 Mal. Alle diese Maschen sollen in jeder 2. Reihe von der Halsblende abgekettet werden (= zwischen den Maschen auf dem Hilfsfaden und den Maschen auf der Nadel). Viel Spaß beim stricken!
08.03.2021 - 13:03
![]() Kathi wrote:
Kathi wrote:
Liebes Drops-Team, ich habe zwei Fragen zum rechten Vorderteil. Wie ist es gemeint, dass die Maschen für den Halsausschnitt vor dem Stilllegen gestrickt werden sollen? Und wie ist die Reihenfolge zum Abketten gemeint: 3 Maschen 1 x, 2 Maschen 2 x, und 1 Masche 1 x ? Wie soll hierbei gestrickt werden? Liebe Grüße, Kathi
07.03.2021 - 01:18DROPS Design answered:
Liebe Kathi, bei dem rechten Vorderteil stricken Sie die ersten 14-15-16 Maschen einer Hinreihe und legen diese Maschen still, dann stricken Sie die restlichen Maschen der Hinreihe, wenden Sie und stricken Sie die Rückreihe. Dann, am Anfang jeder Hinreihe werden Sie Machen für Halsausschnitt abketten: 3 M x 1, 2 M x 2, 1 M x 1. Die stillgelegten Maschen stricken Sie später bei der Halsblende. Viel Spaß beim stricken!
08.03.2021 - 08:30
![]() Anne wrote:
Anne wrote:
Liebes Team, ich habe 2 Fragen zum Modell: 1. wie arbeite ich den Anschlag am besten, so dass er nicht zu eng wird? Ich habe das Original-Garn verwendet und den Anschlag wie immer mit doppelter Nadel gemacht. Das flauschige Garn führt aber dazu, dass die Anschlagsreihe sehr eng ist weil nicht gleitet (das Problem habe ich sonst nie..) 2. werden Randmaschen einfach zusätzlich angefügt, oder statt der 1. und letzten Blenden_Masche gestrickt? Vielen Dank für Eure Hilfe 💕.
30.01.2021 - 00:40DROPS Design answered:
Liebe Anne, wenn Ihr Anschlag zu eng ist können Sie versuchen, die Maschen mit einer grösseren Nadeln anzuschlagen und dann bei der 1. Reihe mit der Nadel 4,5 weiterstricken. Alle Maschen sind inbegriffen/eingeschlossen, es sind keine Randmasche beim Rumpfteil, die 5 Maschen beidseitig werden für die Blendemaschen kraus rechts gestrickt. Viel Spaß beim stricken!
01.02.2021 - 08:16
![]() Carolyn Williams wrote:
Carolyn Williams wrote:
Is it possible to knit this sweater from the bottom up in one piece until the arm holes?
07.09.2020 - 22:36DROPS Design answered:
Dear Mrs Williams, that's the way the jacket is worked: you cast on stitches for both front pieces + back piece and work to armhole, then cast off stitches for armholes and finish each piece separately. Happy knitting!
08.09.2020 - 10:25
![]() Marimar wrote:
Marimar wrote:
Bonjour, Pouvez vous m'expliquer comment je peux faire pour : " tricoter 3 mailles ensemble à l'endroit (sur l'endroit) sans les lâcher de l’aiguille, faire 1 jeté, 3 mailles ensemble à l'endroit dans les mêmes 3 mailles et lâcher ces mailles de l'aiguille gauche (= on a 3 mailles sur l'aiguille droite)" ? Car en fait j'ai le je te + les 3 mailles. Merci beaucoup
30.12.2019 - 23:02DROPS Design answered:
Bonjour! Tricoter 3 mailles ensemble à l'endroit (sur l'endroit) sans les lâcher de l’aiguille > 1 maille sur l'aiguille droite, faire 1 jeté > deuxieme maille sur l'aiguille droite, 3 mailles ensemble à l'endroit dans les mêmes 3 mailles > 3 mailles sur l'aiguille droite et lâcher ces mailles de l'aiguille gauche. Bon tricot!
31.12.2019 - 19:10
|
||||||||||
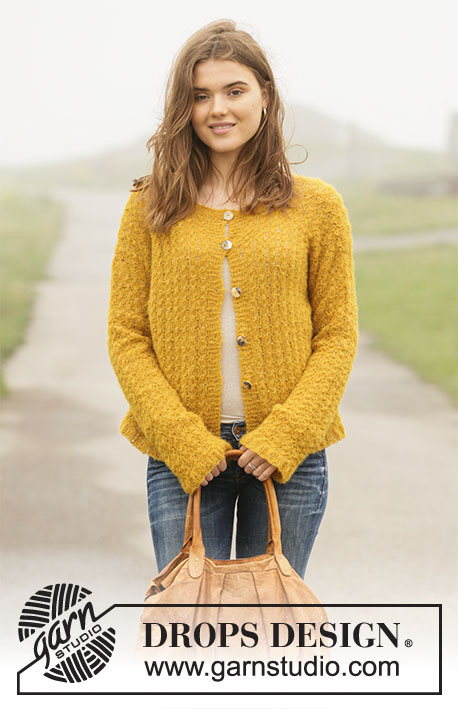
Golden Vintage Jacket#goldenvintagejacket |
||||||||||
 |
 |
|||||||||
Knitted jacket in DROPS Brushed Alpaca Silk. Piece is knitted with star pattern. Size: S - XXXL
DROPS 207-33 |
||||||||||
|
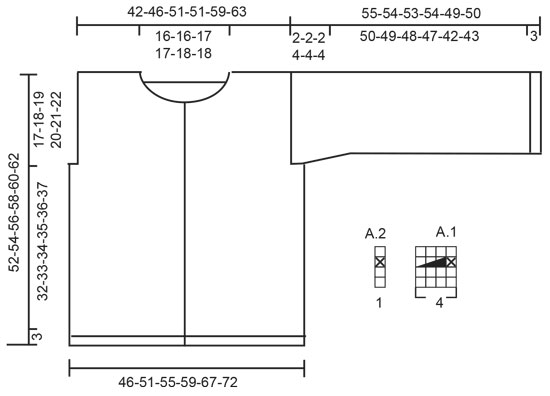
---------------------------------------------------------- EXPLANATION FOR THE PATTERN: ---------------------------------------------------------- GARTER STITCH (back and forth): Knit all rows. 1 ridge vertically = knit 2 rows. PATTERN: See diagrams A.1 and A.2. CAST OFF TIP: To avoid a tight cast-off edge you may use a needle ½ size larger. INCREASE TIP (applies to mid under sleeve): Begin 1 stitch before marker thread, make 1 yarn over, work 2 stitches (marker thread is in the middle of these 2 stitches), make 1 yarn over (= 2 stitches increased). On next round work yarn overs twisted to avoid holes. Then work the new stitches in stocking stitch until there is room for 1 new repetition of A.1 in width. BUTTONHOLES (bottom up): Decrease for buttonholes on right band. 1 BUTTONHOLE = knit third and fourth stitch from edge together and make 1 yarn over. On next row knit yarn over = hole. Decrease for buttonholes when piece measures: S: 16, 23, 30 and 37 cm M: 16, 24, 31 and 39 cm L: 16, 24, 32 and 40 cm XL: 16, 24, 32 and 40 cm XXL: 16, 23, 30, 37 and 44 cm XXXL: 16, 23, 30, 37 and 44 cm NOTE! Dec the last buttonhole on neck edge. ---------------------------------------------------------- START THE PIECE HERE: ---------------------------------------------------------- JACKET - SHORT OVERVIEW OF THE PIECE: Work back and forth from mid front, bottom up to armholes. Then work front pieces and back piece back and forth on circular needle separately. Work sleeves in the round on double pointed needles/a short circular needle. BODY: Cast on 192-208-224-240-272-288 stitches (including 5 band stitches towards mid front) on circular needle size 4.5 mm with Brushed Alpaca Silk. Purl 1 row from wrong side. Then work rib as follows from right side: 5 band stitches in GARTER STITCH - read explanation above - * knit 2, purl 2 *, repeat from *-* until 7 stitches remain, knit 2 and finish with 5 band stitches in garter stitch. Continue like this until rib measures 3 cm. Switch to circular needle size 5.5 mm and purl 1 row from wrong side while decreasing 5 stitches evenly (do not decrease over band stitches) = 187-203-219-235-267-283 stitches. Work next row as follows - from right side: Work 5 band stitches in garter stitch, work A.1 until 6 stitches remain (= 44-48-52-56-64-68 repetitions of 4 stitches), work A.2 (= 1 stitch) and finish with 5 band stitches in garter stitch. Continue pattern like this - AT THE SAME TIME when piece measures 16 cm, begin decrease for BUTTONHOLES – see explanation above. REMEMBER THE KNITTING TENSION! When piece measures 35-36-37-38-39-40 cm from cast-off for armholes, i.e. work next row from right side as follows: Work 47-51-55-55-63-67 stitches as before (= right front piece), cast off the next 6-6-6-14-14-14 stitches for armhole, work 81-89-97-97-113-121 stitches as before (= back piece), cast off the next 6-6-6-14-14-14 stitches for armhole and work the remaining 47-51-55-55-63-67 stitches as before (= left front piece). RIGHT FRONT PIECE (when garment is worn): = 47-51-55-55-63-67 stitches. Continue with 5 band stitches in garter stitch and pattern as before, work edge stitch in the side towards armhole in garter stitch. Continue to work until piece measures 42-44-45-47-48-50 cm. Now slip the outermost 14-14-15-15-16-16 stitches on 1 stitch holder for neck but to avoid cutting the yarn work the stitches before slipping them on the stitch holder. Continue to cast off for neck at beginning of every row from neck as follows: Cast off 3 stitches 1 time, 2 stitches 2 times, and 1 stitch 1 time = 25-29-32-32-39-43 stitches remain on shoulder. Continue until piece measures 52-54-56-58-60-62 cm and cast off - adjust to finish on 1 row without pattern, cast off - read CAST-OFF TIP. LEFT FRONT PIECE (when garment is worn): Work the same way as right front piece. BACK PIECE: = 81-89-97-97-113-121 stitches. Continue with pattern as before, the edge stitch in each side is worked in garter stitch. When piece measures 50-52-54-56-58-60 cm, cast off the middle 29-29-31-31-33-33 stitches for neck and finish each shoulder separately. Cast off 1 stitch on next row towards the neck = 25-29-32-32-39-43 stitches remain on the shoulder. Continue until piece measures 52-54-56-58-60-62 cm - adjust according to front pieces, cast off. Work the other shoulder the same way. SLEEVE: Cast on 52-56-60-64-68-72 stitches on double pointed needles size 4.5 mm with Brushed Alpaca Silk. Knit 1 round, then work rib = knit 2/purl 2 for 3 cm. Switch to double pointed needles size 5.5 mm and knit 1 round while decreasing 4 stitches evenly = 48-52-56-60-64-68 stitches. Insert 1 marker thread at beginning of round, use this for increases mid under sleeve. Work A.1 in the round (= 12-13-14-15-16-17 repetitions of 4 stitches). Continue this pattern. When piece measures 43-42-41-40-35-36 cm, increase 1 stitch in each side - read INCREASE TIP (= 2 stitches increased). Increase like this every other row 8 times in total = 64-68-72-76-80-84 stitches. Continue until piece measures 53-52-51-50-45-46 cm - adjust according to 1st or 3rd row in A.1. Now work back and forth on circular needle. Begin from wrong side and work pattern as before. Continue back and forth for 2-2-2-4-4-4 cm - adjust to finish on 1 row without pattern - cast off. Work the other sleeve the same way. ASSEMBLY: Sew shoulder seams inside cast-off edge. Sew in sleeves inside 1 edge stitch, and sew sleeve to the bottom of armhole. NECK EDGE: Pick up from right side approx. 80 to 88 stitches around the neck (including stitches on stitch holders at the front) on circular needle size 4.5 mm with Brushed Alpaca Silk. Purl 1 row from wrong side (with 5 band stitches in garter stitch in each side) while adjusting number of stitches to 80-80-84-84-88-88. Then work rib as follows: 5 band stitches in garter stitch, * knit 2, purl 2 *, repeat from *-* until 7 stitches remain, knit 2 and 5 band stitches in garter stitch. Work rib like this for 3 cm. Cast off with knit over knit and purl. |
||||||||||
Diagram explanations |
||||||||||
|
||||||||||
 |
||||||||||
Have you finished this pattern?Tag your pictures with #dropspattern #goldenvintagejacket or submit them to the #dropsfan gallery. Do you need help with this pattern?You'll find 28 tutorial videos, a Comments/Questions area and more by visiting the pattern on garnstudio.com. © 1982-2026 DROPS Design A/S. We reserve all rights. This document, including all its sub-sections, has copyrights. Read more about what you can do with our patterns at the bottom of each pattern on our site. |
||||||||||


With over 40 years in knitting and crochet design, DROPS Design offers one of the most extensive collections of free patterns on the internet - translated to 17 languages. As of today we count 324 catalogues and 12290 patterns translated into English (UK/cm).
We work hard to bring you the best knitting and crochet have to offer, inspiration and advice as well as great quality yarns at incredible prices! Would you like to use our patterns for other than personal use? You can read what you are allowed to do in the Copyright text at the bottom of all our patterns. Happy crafting!
Post a comment to pattern DROPS 207-33
We would love to hear what you have to say about this pattern!
If you want to leave a question, please make sure you select the correct category in the form below, to speed up the answering process. Required fields are marked *.