
Popular categories
Looking for a yarn?


Comments / Questions (83)
![]() Cathy wrote:
Cathy wrote:
Kan ik het patroon gewoon volgen als ik met 2 breinaalden ga breien ipv met rondbreinaald?
02.02.2021 - 21:37DROPS Design answered:
Dag Cathy,
Ja, je kan inderdaad de rondbreinaalden vervangen door rechte naalden. De reden dat er rondbreinaalden geadviseerd worden is vanwege het grote aantal steken op de naald (met name bij de grotere maten).
06.02.2021 - 11:35
![]() GenaP wrote:
GenaP wrote:
I have figured it out, you just add one more repetition of pattern, which in my case adds 7 more cms in height. Thank you.
01.02.2021 - 10:39
![]() GenaP wrote:
GenaP wrote:
I want to knit size L, but about 10 cm longer. Can I repeat the pattern one or two more times in height, or does this affect the total no. of stitches at the bust? Or else, could I add some height at the rib and some more stockinette between pattern repetitions. Thank you.
31.01.2021 - 01:58DROPS Design answered:
Dear GenaP, we are unfortunately not able to adjust every pattern to every single request, please contact your DROPS store (even per mail or telephone) or any knitting forum for individual assistance. Thanks for your comprehension. Happy knitting!
01.02.2021 - 09:25
![]() Ruth wrote:
Ruth wrote:
Guten Tag Liebes Drops Team Beim Vorderteil werden 14 Maschen für den Halsausschnitt stillgelegt (Größe S). Nehme ich diese 14 Maschen dann bei der Halsblende wieder mit auf? Bedeutet: 60M aus dem schon fertig gestrickten und an der Schulter zusammengenähten Halsausschnitt + die 14 stillgelegte Maschen (Total 74M für die Halsblende). Oder habe ich etwas übersehen und diese 14 M werden abgekettet? Liebe Grüße Ruth
24.01.2021 - 17:20DROPS Design answered:
Liebe Ruth, die stillgelegten Maschen beim Vorderteil gehören ja zu den 74 Maschen, die Sie für die Halsblende aufnehmen- es sollten tatsächlich 12 M (= 14 - 2 Abnahme) stillgegelgt werden. Sollten Sie mehr oder weniger als 74 M auffassen, dann können Sie bei der 1. Runde regelmäßig ab- bzw zunehmen. Viel Spaß beim stricken!
25.01.2021 - 10:39
![]() Winni Andersen wrote:
Winni Andersen wrote:
Garnet er jo meget tyndt. Skal jeg strikke med mere end 1 tråd ?
16.01.2021 - 20:30DROPS Design answered:
Hei Winnie. I denne oppskriften skal det strikkes med 1 tråd DROPS Brushed AlpacaSilk. Selv om tråden er tynn er den ganske hårete og fyller mye. Husk å sjekke strikkefastheten med det som står i oppskriften. mvh DROPS design
18.01.2021 - 15:06
![]() Riri wrote:
Riri wrote:
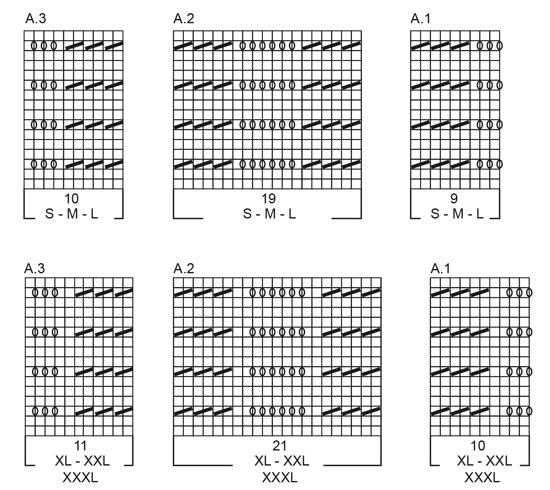
Hallo! das ist das erste mal wenn ich nach einem Muster stricke und ich habe schwierigkeiten die diagramme zu verstehen. Ich arbeite mit grösse S. Diagramm A 1 - 3 x 2 Maschen rechts stricken (alle zusammengestrickten Maschen sind immer rechts?) Diagramm A 1 Wieviel Umschläge sind das insgesamt? Nach der 3.ten zus. erst 2 Umschläge oder Masche stricken und dann 2 Umschläge? Diagramm A2 wieviel Umschläge sind das insgesamt? Vielen Dank für Ihre Hilfe! Liebe Grüße
11.01.2021 - 12:44DROPS Design answered:
Liebe Riri, es wird jeweils 2 Umschläge gemacht aber die stehen jeweils als nur 1 Masche (bei der nächsten Reihe wird der 1. Umschlag gestrickt und der 2. fallen gelassen) - A.1 wird so gestrickt (in S), 3. Reihe: (2 Umschläge, 1 M re)x 3, 2 M re zusammen x 3 (= 9 M.) A. = 2 M re zusammen x 3, (1 M re, 2 Umschläge)x 6, 1 M re, 3 M re zusammen = 19 M. A.3 = 2 M re zusammen x 3, (1 M re, 2 Umschläge) x 3, 1 M re= 10 M. Viel Spaß beim stricken!
11.01.2021 - 14:31
![]() Anne Sofie wrote:
Anne Sofie wrote:
Hej. Spørgsmål til halskanten i S. Der skal samles 74 masker op til halsen, men er det inklusiv de 14 på fortykket? Altså 88 i alt? På forhånd tak.
20.12.2020 - 13:07DROPS Design answered:
Hej Anne Sofie, ja det er incl (ialt) 74 masker, men føler du at det bliver for stramt, så må du gerne strikke flere masker op :)
21.12.2020 - 15:43
![]() Marion wrote:
Marion wrote:
Hoeveel bollen DROPS BRUSHED ALPACA SILK heb ik nodig voor deze trui? Er staat 150 gr. in maat M, dat komt dus neer op 6 bollen van 25gram. Dat lijkt mij erg weinig. Ik hoor graag van u
04.12.2020 - 14:47DROPS Design answered:
Dag Marion,
De aangegeven hoeveelheid garen in het patroon klopt, hoor. Het is licht garen wat nogal uitloopt, dus aan 6 bollen van 25 gram heb je genoeg. Veel breiplezier!
04.12.2020 - 18:35
![]() AnneG wrote:
AnneG wrote:
J ai un doute par rapport à la photo. Ce modèle se tricote en fil simple ou double? Car mon échantillon semble beaucoup plus ajouré. Merci de votre réponse
12.08.2020 - 20:14DROPS Design answered:
Bonjour AnneG, ce modèle se tricote avec 1 seul fil DROPS Brushed Alpaca Silk - pensez à bien adapter la taille de vos aiguilles si besoin- vous trouverez ici plus d'infos sur la tension. Bon tricot!
13.08.2020 - 09:30
![]() Geeske wrote:
Geeske wrote:
Dankuwel, dan ga ik dat doen!
06.06.2020 - 13:37
|
||||||||||
Footprints in the Sand#footprintsinthesandsweater |
||||||||||
 |
 |
|||||||||
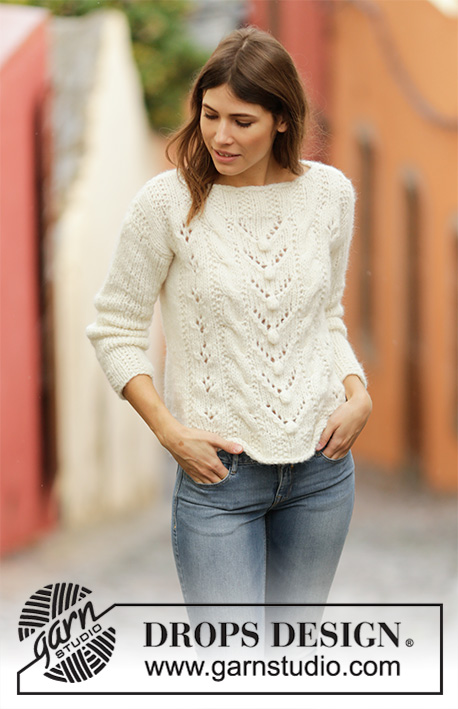
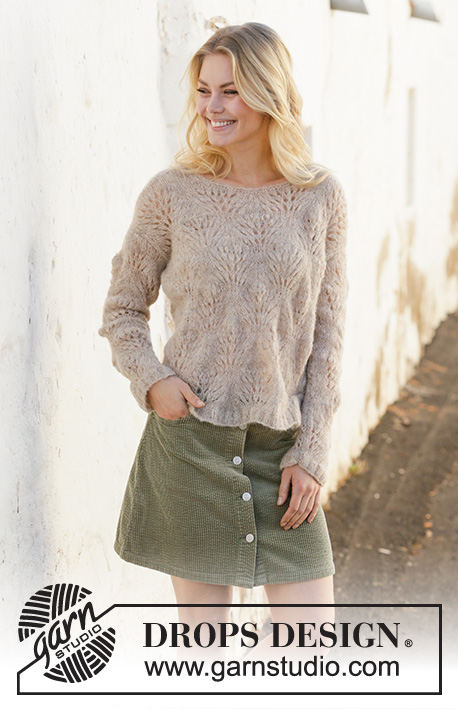
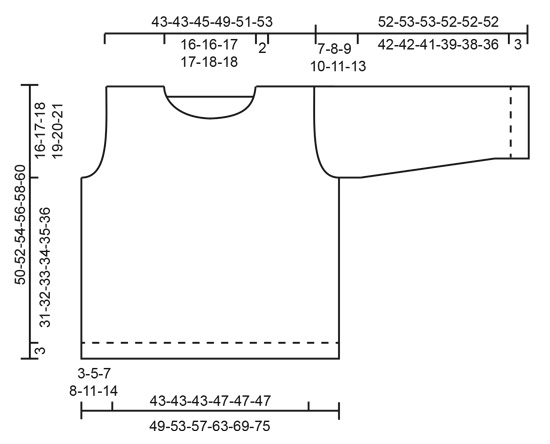
Knitted jumper with wave pattern in DROPS Brushed Alpaca Silk. Sizes S - XXXL.
DROPS 202-3 |
||||||||||
|
------------------------------------------------------- EXPLANATIONS FOR THE PATTERN: ------------------------------------------------------- RIDGE/GARTER STITCH (worked back and forth): Knit all rows. 1 ridge in height = Knit 2 rows. RIDGE/GARTER STITCH (worked in the round): 1 ridge in height = 2 rounds, i.e. knit 1 round and purl 1 round. PATTERN: See diagrams A.1 to A.3. Choose diagram for your size. The diagrams show all the rows in the pattern seen from the right side. DECREASE TIP (evenly spaced): To work out how to decrease evenly, count the total number of stitches on the needle (e.g.124 stitches) minus edge stitches (= 2 stitches) and divide the remaining stitches by number of decreases to be made (e.g. 36) = 3.38. In this example, decrease by alternately knitting together each 2nd and 3rd stitch and each 3rd and 4th stitch. INCREASE TIP (for sleeves): Increase 1 stitch by making 1 yarn over inside the 1 edge stitch on each side. On the next row work the yarn overs twisted to avoid holes. ------------------------------------------------------- START THE PIECE HERE: ------------------------------------------------------- JUMPER - SHORT OVERVIEW OF THE PIECE: The piece is worked back and forth with circular needle, bottom up and sewn together to finish. BACK PIECE: Cast on 124-132-140-156-172-180 stitches (including 1 edge stitch on each side) with circular needle size 4 mm and Brushed Alpaca Silk. Purl 1 row from the wrong side, then work rib from the right side as follows: 1 edge stitch in GARTER STITCH – read description above, (knit 2, purl 2) until there are 3 stitches left, knit 2 and 1 edge stitch in garter stitch. Continue this rib back and forth for 3 cm – adjust so that the next row is worked from the right side. Knit 1 row with 1 edge stitch in garter stitch on each side where you decrease 36-38-40-44-50-50 stitches evenly spaced – read DECREASE TIP = 88-94-100-112-122-130 stitches. Work 1 row stocking stitch back from the wrong side with 1 edge stitch in garter stitch on each side. Change to circular needle size 5.5 mm. Now work pattern – choose diagram for your size, as follows: 1 edge stitch in garter stitch, stocking stitch over the next 5-8-11-13-18-22 stitches, A.1 over the next 9-9-9-10-10-10 stitches, A.2 over the next 57-57-57-63-63-63 stitches (= 3 repeats in width), A.3 over the next 10-10-10-11-11-11 stitches, 5-8-11-13-18-22 stitches in stocking stitch and 1 edge stitch in garter stitch. Continue back and forth like this until the diagrams have been completed in height. REMEMBER THE KNITTING TENSION! Now work pattern – choose diagram for your size, as follows: 1 edge stitch in garter stitch, 5-8-11-13-18-22 stitches in stocking stitch, A.2 over the next 76-76-76-84-84-84 stitches (= 4 repeats in width), 5-8-11-13-18-22 stitches in stocking stitch and 1 edge stitch in garter stitch. When the diagram has been completed in height, continue this pattern, i.e. work first A.1, A.2 and A.3 as described at the beginning of the piece and then 4 repeats of A.2 in width so that the wave pattern is displaced each time it is worked in height. The remaining stitches are worked in stocking stitch and 1 edge stitch in garter stitch on each side. When the piece measures 34-35-36-37-38-39 cm from the cast-on edge (measure from where the rib at the beginning of the piece slopes downwards/is longest) cast off for armholes in each side as follows: Cast off 4 stitches 1-1-1-1-2-2 times, 2 stitches 0-1-1-2-2-3 times and 1 stitch 1-2-3-3-3-4 times (= 5-8-9-11-15-18 stitches cast off on each side) = 78-78-82-90-92-94 stitches. When the armhole measures approx. 13-14-15-16-17-18 cm from where the casting off began (there is approx. 3 cm left to finished length) cast off the middle 26-26-28-28-30-30 stitches from the right side at the same time as the 2 first and 2 last of these 26-26-28-28-30-30 stitches are knitted together before casting off (= 24-24-26-26-28-28 stitches for neck) = 26-26-27-31-31-32 stitches for shoulder on each side. Continue with as many whole repeats as there is room for in width and the remaining stitches are worked in stocking stitch with 1 edge stitch in garter stitch on each side. AT THE SAME TIME on the next row from the neck cast off 1 stitch = 25-25-26-30-30-31 stitches for shoulder. When the armhole measures 16-17-18-19-20-21 cm work stocking stitch with 1 edge stitch in garter stitch on each side where you decrease 2-2-3-3-3-2 stitches evenly on row = 23-23-23-27-27-29 stitches. Cast off. Make sure that the cast-off edge is not tight. Work the other shoulder in the same way. The piece measures a total of 50-52-54-56-58-60 cm from the shoulder down. FRONT PIECE: Cast on, work pattern and cast off for the armhole in the same way as for the back piece = 78-78-82-90-92-94 stitches. When the piece measures 41-43-44-46-47-49 cm from the cast-on edge work the next row from the right side as follows: Work pattern as before over the first 31-31-33-37-37-38 stitches, knit the next 16-16-16-16-18-18 stitches and at the same time decrease 2 stitches evenly (= 14-14-14-14-16-16 stitches) and place these stitches 14-14-14-14-16-16 on a thread for the neck, work pattern as before over the remaining 31-31-33-37-37-38 stitches. Then work each shoulder separately. Continue with as many repeats of the pattern in width as there is room for and the remaining stitches are worked in stocking stitch with 1 edge stitch in garter stitch on each side. AT THE SAME TIME cast off stitches for the neck on each row as follows: Cast off 3 stitches 1 time, 2 stitches 1 time and 1 stitch 1-1-2-2-2-2 times = 25-25-26-30-30-31 stitches on shoulder. When the armhole measures 16-17-18-19-20-21 cm work stocking stitch with 1 edge stitch in garter stitch on each side where you decrease 2-2-3-3-3-2 stitches evenly on row = 23-23-23-27-27-29 stitches. Cast off. Make sure that the cast-off edge is not tight. Work the other shoulder in the same way. The piece measures a total of 50-52-54-56-58-60 cm from the shoulder down. SLEEVES: The sleeves are worked back and forth with circular needle, bottom up. Cast on 54-54-58-62-66-66 stitches with circular needle size 4 mm and Brushed Alpaca Silk. Purl 1 row from the wrong side and then work rib from the right side as follows: 1 edge stitch in garter stitch, (knit 2, purl 2) until there is 1 stitch left on row and 1 edge stitch in garter stitch. Continue this rib back and forth for 3 cm – adjust so that the next row is worked from the right side. Knit 1 row with 1 edge stitch in garter stitch on each side where you decrease 12-10-12-14-16-16 stitches evenly spaced = 42-44-46-48-50-50 stitches. Work 1 row stocking stitch back from the wrong side with 1 edge stitch in garter stitch on each side. Change to circular needle size 5.5 mm. READ THIS WHOLE SECTION BEFORE CONTINUING. Work pattern – choose diagram for your size, as follows: 1 edge stitch in garter stitch, 1-2-3-2-3-3 stitches in stocking stitch, A.1 over the next 9-9-9-10-10-10 stitches, A.2 over the next 19-19-19-21-21-21 stitches, A.3 over the next 10-10-10-11-11-11 stitches, 1-2-3-2-3-3 stitches stocking stitch and 1 edge stitch in garter stitch. When A.1 to A.3 have been completed in height, work 2 repeats of A.2 in width – choose diagram for your size, over the 38-38-38-42-42-42 stitches in the pattern. When the 2 repeats of A.2 have been completed in height, work A.1, A.2 and A.3 as before over the 38-38-38-42-42-42 stitches with pattern. Continue this pattern upwards, i.e. work alternately in height first A.1, A.2 and A.3 and then A.2 (2 repeats in width). AT THE SAME TIME when the piece measures 9-8-7-7-6-6 cm increase 1 stitch on each side of the piece – read INCREASE TIP (for sleeves). Increase as follows in the different sizes: Size S: Increase every 8 cm a total of 5 times. Size M: Increase alternately every 5 cm and 6 cm a total of 7 times. Size L: Increase alternately every 5 cm and 6 cm a total of 7 times. Size XL: Increase alternately every 4 cm and 5 cm a total of 8 times. Size XXL Increase every 4 cm a total of 9 times. Size XXXL: Increase every 3 cm a total of 11 times. When all the increases are finished there are 52-58-60-64-68-72 stitches on the needle. The new stitches are worked in stocking stitch. When the piece measures 45-45-44-42-41-39 cm (shorter measurements in larger sizes due to wider yoke) continue the pattern as before and cast off stitches for the sleeve cap on the beginning of each row on each side as follows: Cast off 4 stitches 1 time, 2 stitches 2 times, 1 stitch 0-2-2-2-2-4 times, 2 stitches 2-2-4-5-6-5 times and 4 stitches 2-2-1-1-1-1 time = 12-14-16-16-16-20 stitches left. Cast off the remaining stitches. The sleeve measures approx. 52-53-53-52-52-52 cm. Work the other sleeve in the same way. ASSEMBLY: Sew shoulder seams with grafting stitches. Sew sleeves to body inside the 1edge stitch in garter stitch on body and inside the cast-off edge on sleeves. Make sure that the seam is not tight! Sew sleeve and side seams in one go. Repeat on the other side. NECK: Start mid top of shoulder and knit up 74-74-82-82-88-88 stitches with Brushed Alpaca Silk and circular needle size 4 mm. Work 2 ridges and cast off. |
||||||||||
Diagram explanations |
||||||||||
|
||||||||||
 |
||||||||||
 |
||||||||||
Have you finished this pattern?Tag your pictures with #dropspattern #footprintsinthesandsweater or submit them to the #dropsfan gallery. Do you need help with this pattern?You'll find 24 tutorial videos, a Comments/Questions area and more by visiting the pattern on garnstudio.com. © 1982-2026 DROPS Design A/S. We reserve all rights. This document, including all its sub-sections, has copyrights. Read more about what you can do with our patterns at the bottom of each pattern on our site. |
||||||||||


With over 40 years in knitting and crochet design, DROPS Design offers one of the most extensive collections of free patterns on the internet - translated to 17 languages. As of today we count 324 catalogues and 12290 patterns translated into English (UK/cm).
We work hard to bring you the best knitting and crochet have to offer, inspiration and advice as well as great quality yarns at incredible prices! Would you like to use our patterns for other than personal use? You can read what you are allowed to do in the Copyright text at the bottom of all our patterns. Happy crafting!
Post a comment to pattern DROPS 202-3
We would love to hear what you have to say about this pattern!
If you want to leave a question, please make sure you select the correct category in the form below, to speed up the answering process. Required fields are marked *.