
Popular categories
Looking for a yarn?


Comments / Questions (105)
![]() Petra Stuhldreier wrote:
Petra Stuhldreier wrote:
Vielen lieben Dank für Ihre schnelle Antwort. War im glauben das ich das rechte Vorderteil seperat häkeln muss, aber dem ist ja nicht so. Lach. Habs kapiert. Ich wünsche Ihnen und Ihren Familien allen eine schöne Weihnachtszeit und einen guten rutsch ins Jahr 2022. Bleiben Sie alle gesund und rutschen gut ins neue Jahr. LG Petra Stuhldreier
17.12.2021 - 19:17
![]() Petra Stuhldreier wrote:
Petra Stuhldreier wrote:
Wieviel Luftmaschen muss ich für das rechte Teil, Armausschnitt und Vorderteil anschlagen?
16.12.2021 - 17:46DROPS Design answered:
Liebe Frau Stuhldreier, siehe unter den nächsten Absatz Alle Größen, Sie werden für den Armausschnitt 36-40-40-44 Luftmaschen für den Armausschnitt häkeln und die nächsten 9-10-10-11 Rapporte A.6 überspringen. Viel Spaß beim häkeln!
17.12.2021 - 08:02
![]() Elizabeth wrote:
Elizabeth wrote:
In the section "RIGHT SIDE, ARMHOLE AND FRONT PIECE:", it says "Now continue working from the wrong side, i.e. 2 rows after one another from the wrong side: " What is the 'wrong side'? Left ? Right? Top? Bottom? I assume I cut off after the previous section because I don't continue from that point. Where should I be now?
30.10.2021 - 21:27DROPS Design answered:
Dear Elizabeth, right side of a pice is what you see when wearing it, what is outside, usuaééy where the pattern is the pretties,, the wrong side is the "back-side", what is usually inside, what you do not see when wearing the piece. Happy Stitching!
31.10.2021 - 07:54
![]() Lorena Rico wrote:
Lorena Rico wrote:
Beautiful !!! ... but how do I do the decreases in the sleeves?
11.10.2021 - 19:24DROPS Design answered:
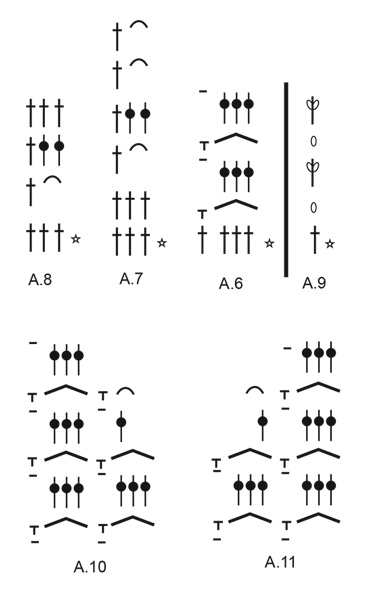
Dear Mrs Rico, you decrease mid under sleeve working A.10 at the beg of the round and A.11 at the end of the round, ie start with A.9 as before, work A.10, then work A.6 as before until 2 repeats of A.6 remain before the end of the round and work A.11 instead to finish the round. After A.10 and A.11 are done, number of sts has decreased, continue with A.9 and A.6 as before. Happy crocheting!
12.10.2021 - 08:42
![]() Ruth wrote:
Ruth wrote:
This Section is unclear in the English instructions: "Now work a row with 1 double crochet in each double crochet and 2 double crochets around each chain-space, at the same time increase 1-1-0-0 double crochets on row.The piece measures approx. 32 cm = 12 1/2" in all sizes." I'm not sure where I'm increasing, how many rows are supposed to be crocheted, or what 1-1-0-0 means. Help! I'm working on size XXXL.
03.10.2021 - 07:25DROPS Design answered:
Dear Ruth, for placement of the increases see the "DECREASE TIP-2 (evenly spaced)", the numbers after each other means how many dc should be on the row for each size (the smalles size= the first number, the largest size= the last number, etc). Happy Stitching!
03.10.2021 - 12:30
![]() Theresa Setters wrote:
Theresa Setters wrote:
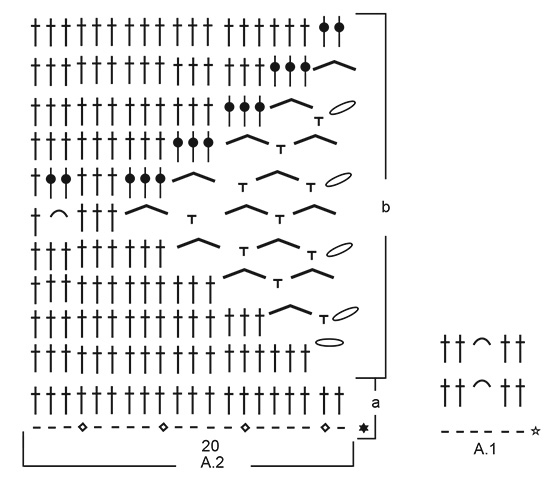
This pattern is TERRIBLE. It's written horribly. I have been crocheting well over thirty years. Section A2 has 20 stitches but the "written" section calls for 24 stitches. Each section has a particular stitch count but its a different count thats written. Sure you can increase stitches but...ummm....where? Beautiful cardigan but terrible terrible terrible pattern.
15.08.2021 - 18:39DROPS Design answered:
Dear Mrs Setters, since the foundation chain is most often too tight, you will here cast on more chain stitches than you need stitches, and you will then skip stitches evenly on first row - see 5th symbol. Maybe this lesson can help you to understand diagrams. Happy crocheting!
16.08.2021 - 08:52
![]() Nancy wrote:
Nancy wrote:
I don't understand this part can you simplify it for me RIGHT SIDE, ARMHOLE AND FRONT PIECE Work A.1 over the first 6 stitches, A.6 as far as the next A.1, but the last time when working A.6 skip the last single crochet/chain stitch in diagram (so that the pattern is symmetrical on each side) = 32-32-36-36 repeats of A.6, A.1. Work the next row in the diagram back from the right side. Size S/M is finished
02.08.2021 - 14:49DROPS Design answered:
Dear Nancy, you work now from WS (you work 2 rows from WS next to each other): A.1, repeat A.6 and end with A.1, turn and work next row from RS. In S/M continue working armhole as explained under ALL SIZES. Happy knitting!
02.08.2021 - 15:13
![]() Nancy wrote:
Nancy wrote:
I did the 163 chain and followed every step and i didn't miss the diamonds in A.2, A.3, A.4 but i ended up having 128 i don't know what i did wrong??
01.08.2021 - 21:17DROPS Design answered:
Dear Nancy, you can add markers between each diagram to check your number of sts: A.1 is worked over 6 sts, A.2 is worked over 24 sts (but you skip 4 sts (see diamond symbol) = 20 sts remain), A.3 is worked over 108 sts (= each A.3 is worked over 36 sts, but you skip 6 sts = 30 sts remain for each A.3 x 3 = 90 sts), A.4 is worked over 19 sts (you skip 3 sts = 16 sts remain) and A.1 = 6 sts = you worked over 6+24+108+19+6 chains and have 6+20+90+16+6= 138 sts at the end of 1st row (A.1 counts as 6 sts here). Happy crocheting!
02.08.2021 - 07:38
![]() Sandra wrote:
Sandra wrote:
Ik heb de 3 herhalingen van het achterpand gedaan. Nu staat er dat ik de draad moet afknippen. Als ik dan begin met de rechterkant moet ik dan de steken van het achterpand weer opnemen? Wordt het dan 1 stuk?
01.06.2021 - 16:17DROPS Design answered:
Dag Sandra,
Je haakt inderdaad gewoon verder over het achterpand, dus je hecht de draad aan het begin van de toer aan.
02.06.2021 - 11:35
![]() Gili wrote:
Gili wrote:
Hello, I have a question about the pictures that help me understand the pattern - According to the picture there is no use in a4 and a5.and the repetition of the back is only twice. It looks much more shorter in height and width even from the S size. I am croching the L size with 3 repetition of the A3 together with the a2 and a 4. It looks much more bigger. Can you explain the difference please?
23.04.2021 - 08:21DROPS Design answered:
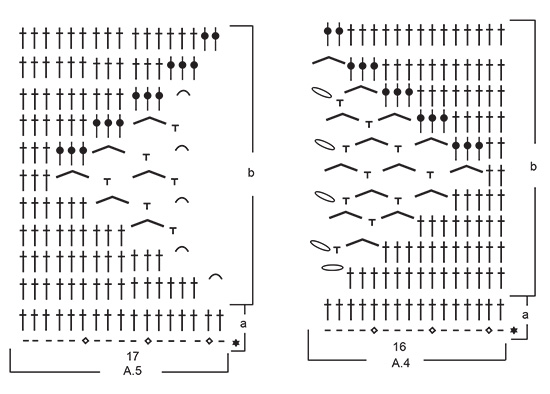
Dear Gili, A.5 applies only in size XL/XXL and XXXL, so you won't use it in size L. A.4 is worked in size L to get half a pattern in width extra to A.3, so that you will have A.2 (= half a repeat) + 3 full repeats (= A.3 x 3) + half a repeat (= A.4) - as shown on the picture. One of the half repeat is towards top = neck edge and folded down reason why you don't see it. Always remember to check and keep your gauge, you should have 20 trebles (UK-crochet terms) = 10 cm in width to get the correct measurements as shown in chart. Happy crocheting!
23.04.2021 - 11:59
|
||||||||||||||||||||||||||||||||||||||||||||||||||||
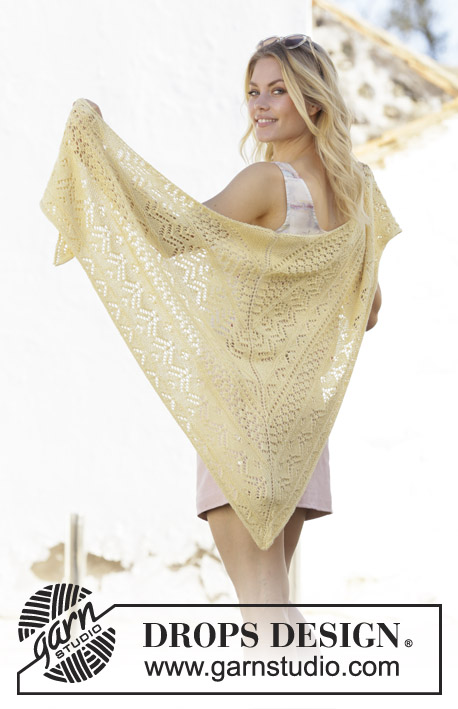
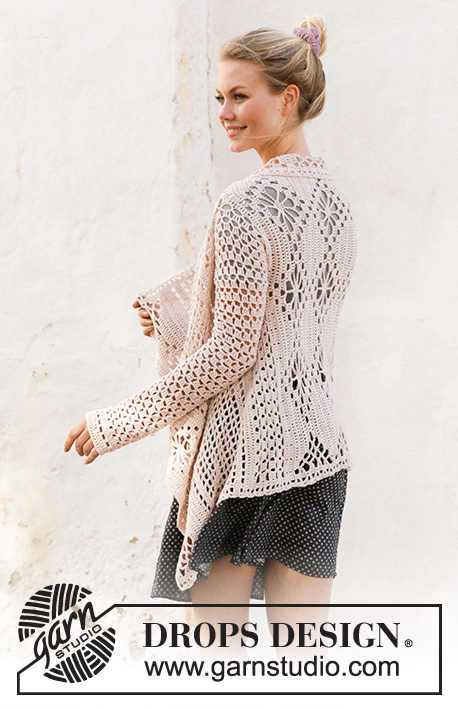
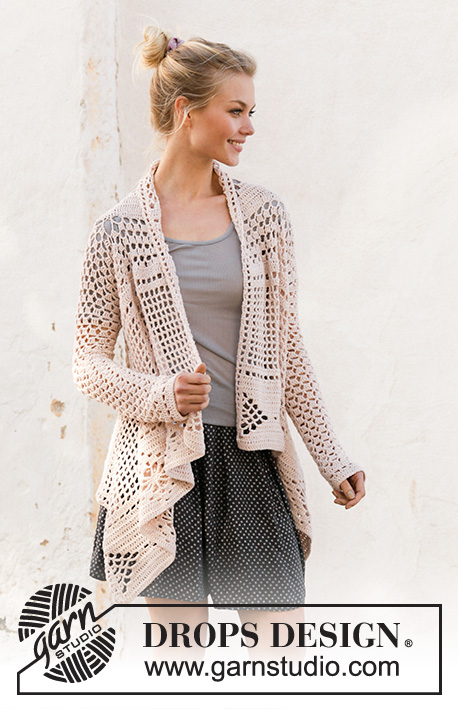
Blossoming Beauty#blossomingbeautyjacket |
||||||||||||||||||||||||||||||||||||||||||||||||||||
 |
 |
|||||||||||||||||||||||||||||||||||||||||||||||||||
Crocheted square jacket in DROPS Cotton Merino. The piece is worked with lace pattern. Sizes S - XXXL.
DROPS 200-16 |
||||||||||||||||||||||||||||||||||||||||||||||||||||
|
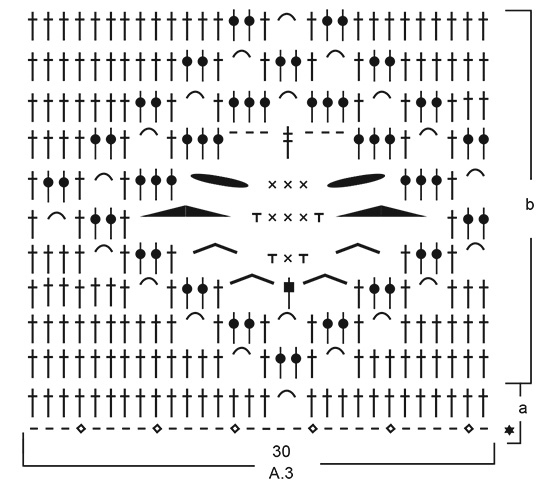
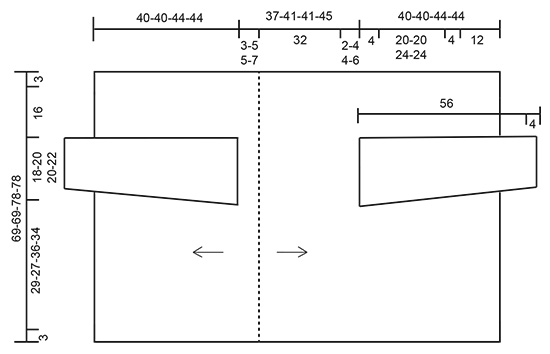
------------------------------------------------------- EXPLANATIONS FOR THE PATTERN: ------------------------------------------------------- PATTERN: See diagrams A.1 to A.11 (A.5 applies to sizes XL/XXL and XXXL). CROCHET INFORMATION: On each row of treble crochets, the first treble crochet is replaced by 3 chain stitches. The 3 chain stitches count as 1 treble crochet when counting stitches. INCREASE TIP: Increase 1 treble crochet by working 2 treble crochets in 1 treble crochet. DECREASE TIP-1: Decrease 1 treble crochet as follows: * Make 1 yarn over, insert hook through next stitch, pick up strand, make 1 yarn over and pull strand through the first 2 loops on hook *, work from *-* 1 more time, make 1 yarn over and pull strand through all 3 loops on hook (= 1 treble crochet decreased). DECREASE TIP-2 (evenly spaced): To work out how to decrease evenly, count the total number of stitches on round (e.g. 48 stitches) and divide by number of decreases to be made (e.g. 3) = 16. In this example work each 15th and 16th treble crochet together. ------------------------------------------------------- START THE PIECE HERE: ------------------------------------------------------- SQUARE JACKET - SHORT OVERVIEW OF THE PIECE: The piece is worked back and forth. First you work the back piece, then right side, armhole and front piece. Then the left side, armhole and front piece. Sleeves are worked in the round, top down. BACK PIECE: Work 163-163-183-183 chain stitches with hook size 3.5 mm and Cotton Merino. Turn and work pattern back and forth as follows in the different sizes: Sizes S/M and L: Work A.1 over the first 6 chain stitches - read CROCHET INFORMATION, A.2a over the next 24 chain stitches, A.3a over the next 108 chain stitches (= 3 repeats), A.4a over de the next 19 chain stitches, A.1 over the remaining 6 chain stitches on row = 138-138 stitches. Sizes XL/XXL and XXXL: Work A.1 over the first 6 chain stitches - read CROCHET INFORMATION, A.2a over the next 24 chain stitches, A.3a over the next 108 chain stitches (= 3 repeats), A.4a over the next 19 chain stitches, A.5 over the next 20 chain stitches, A.1 over the remaining 6 chain stitches on row = 155-155 stitches. All sizes: NOTE: A.1 is worked on each side of the piece to finished length. The first row worked is from the right side; insert a marker to show the right side of the piece. Continue with A.2b, A.3b, A.4b and A.5b (applies to sizes XL/XXL and XXXL) in height a total of 3 times. REMEMBER THE CROCHET TENSION! Now work a row with 1 treble crochet in each treble crochet and 2 treble crochets around each chain-space (A.1 worked as before on each side), at the same time increase 1-1-0-0 treble crochets on row – read INCREASE TIP = 139-139-155-155 stitches. The piece measures approx. 32 cm in all sizes. Cut the strand. Insert a marker thread in last row worked. THE PIECE IS NOW MEASURED FROM HERE! RIGHT SIDE, ARMHOLE AND FRONT PIECE: Now continue working from the wrong side, i.e. 2 rows after one another from the wrong side: Work A.1 over the first 6 stitches, A.6 as far as the next A.1, but the last time when working A.6 skip the last double crochet/chain stitch in diagram (so that the pattern is symmetrical on each side) = 32-32-36-36 repeats of A.6, A.1. Work the next row in the diagram back from the right side. Size S/M is finished. In sizes L, XL/XXL and XXXL repeat these 2 rows until you have worked 4-4-6 rows of the pattern. All sizes: Now work the armhole as follows (from the wrong side): A.1, work 8 repeats of A.6, work 36-40-40-44 chain stitches for armhole, skip the next 9-10-10-11 repeats of A.6, work 1 double crochet around the next chain stitch and continue with A.6 as far as the next A.1, but the last time you work A.6 skip the last double crochet/chain stitch in diagram (so that the pattern is symmetrical inside A.1 on each side), A.1. Continue back and forth with A.6 and A.1 on each side of the piece; over the 36-40-40-44 loose chain stitches work 9-10-10-11 repeats of A.6 for armhole = a total of 32-32-36-36 repeats of A.6 inside A.1 on each side. Repeat the last 2 rows in A.6 until the piece measures approx. 6-8-8-10 cm from the marker thread – adjust so that the last row worked is the last row in the diagram. Now work 1 row with 1 treble crochet in each treble crochet and 1 treble crochet around each chain stitch (A.1 is worked on each side of the piece as before), at the same time increase 1-1-0-0 treble crochet = 140-140-155-155 stitches. Then work pattern as follows: A.1, A.7 as far as the next A.1, but the last time A.7 is worked skip the last treble crochet in the diagram (so that the pattern is symmetrical on each side) and finish with A.1. When A.7 has been completed in height, repeat the last 2 rows in A.7 until the piece measures 26-28-32-34 cm from the marker thread; adjust so that the last row worked is from the wrong side. Now work 1 row with 1 treble crochet in each treble crochet and 1 treble crochet around each chain stitch (A.1 is worked on each side as before). Now work pattern as follows: A.1, A.8 as far as the next repeat of A.1, but the last time A.8 is worked skip the last treble crochet in the diagram (so that the pattern is symmetrical on each side) and finish with A.1. On the last row of A.8 decrease 2-2-0-0 treble crochets evenly spaced = 138-138-155-155 treble crochets. Now work pattern in the different sizes as follows: Sizes S/M and L: Work A.1, work 1 treble crochet in each of the next 20 treble crochets (= A.2a), * work 1 treble crochet in each of the next 12 treble crochets, 2 chain stitches, skip 2 treble crochets, work 1 treble crochet in each of the next 16 treble crochets (= A.3a) *, work from *-* a total of 3 times, work 1 treble crochet in each of the next 16 treble crochets (= A.4a) and finish with A.1. Now work A.2b-A.4b as before inside A.1 on each side. When A.2b-A.4b have been completed in height, work the last row with 1 treble crochet in each treble crochet and 1 treble crochet around each chain stitch inside A.1 on each side of the piece. Cut and fasten strand. The piece measures approx. 42-44 cm from the marker thread (40-40 cm from the armhole). Sizes XL/XXL and XXXL: Work A.1, work 1 treble crochet in each of the next 20 treble crochets (= A.2a), * work 1 treble crochet in each of the next 12 treble crochets, 2 chain stitches, skip 2 treble crochets, work 1 treble crochet in each of the next 16 treble crochets (= A.3a) *, work from *-* a total of 3 times, work 1 treble crochet in each of the next 16 treble crochets (= A.4a), work 1 treble crochet in each of the next 17 treble crochets (= A.5) and finish with A.1. Now work A.2b-A.5b as before inside A.1 on each side. When A.2b-A.5b have been completed in height, work the last row with 1 treble crochet in each treble crochet and 1 treble crochet around each chain stitch inside A.1 on each side of the piece. Cut and fasten strand. The piece measures approx. 48-50 cm from the marker thread (44-44 cm from the armhole). LEFT SIDE, ARMHOLE AND FRONT PIECE: Work outwards to the other side from the row of chain stitches worked at the beginning of the piece, starting from the right side as follows: Work A.1 over the first 6 chain stitches, work 2-2-1-1 treble crochets in next chain stitch, continue with 1 treble crochet in each chain stitch until there are 6 stitches left, but skip the same chain stitch skipped on first row on first piece worked and work A.1 over the next 6 chain stitch = 139-139-155-155 treble crochets. Insert a marker thread in this row. THE PIECE IS NOW MEASURED FROM HERE. Now work as follows from the wrong side: Work A.1 over the first 6 stitches, A.6 as far as the next A.1, but the last time A.6 is worked skip the last double crochet in diagram (so that the pattern is symmetrical on each side), A.1. Work the next row in the diagram back from the right side. Now size S/M is finished. In sizes L, XL/XXL and XXXL repeat the pattern in height until you have worked a total of 4-4-6 rows of pattern. All sizes: Now work the armhole as follows (from the wrong side): A.1, work 15-14-18-17 repeats of A.6, 36-40-40-44 loose chain stitches for armhole, skip the next 9-10-10-11 repeats of A.6, work 1 double crochet around the next chain stitch, then work 8 repeats of A.6, but the last time A.6 is worked skip the last double crochet in the diagram (so that the pattern is symmetrical on each side) and finish with A.1 = 32-32-36-36 repeats of A.6 inside A.1 on each side. Continue back and forth with A.6 and A.1 on each side of the piece; over the loose 36-40-40-44 chain stitches worked for the armhole, work 9-10-10-11 repeats of A.6 = a total of 32-32-36-36 repeats of A.6 inside A.1 on each side. Continue with pattern in the same way as the right front piece. SLEEVE: The sleeves are worked in the round from the armhole down. Start mid under the armhole with A.9 (= start of round), work A.6 (= row of chain-spaces + 1 double crochet) to the top of the armhole (= 9-10-10-11 repeats), work 9-10-10-11 repeats of A.6 around the row of chain stitches worked for the armhole = a total of 18-20-20-22 repeats of A.6 for the sleeve. Continue like this in the round. When the piece measures 4 cm decrease on each side as follows: Work A.9, A.10, work A.6 until there are 2 repeats of A.6 left on the round, work A.11. When A.10 and A.11 have been completed in height you have decreased 2 repeats of A.6 on the round and you have room for 16-18-18-20 repeats of A.6 on the round. Continue in the round with pattern and repeat the decrease when the sleeve measures 12 cm and 20 cm = 12-14-14-16 repeats. Continue working until the sleeve measures 52 cm – adjust so you finish after the last round in A.6. Now work 1 treble crochet in each treble crochet and 1 treble crochet around each chain stitch at the same time as you decrease 3-5-5-4 treble crochets evenly spaced – read DECREASE TIP = 45-51-51-60 treble crochets left on round. Work A.8 in the round – each round starts with 3 chain stitches and finishes with 1 slip stitch in beginning of round. The sleeve measures approx. 56 cm. Cut and fasten strand. Work the other sleeve in the same way. |
||||||||||||||||||||||||||||||||||||||||||||||||||||
Diagram explanations |
||||||||||||||||||||||||||||||||||||||||||||||||||||
|
||||||||||||||||||||||||||||||||||||||||||||||||||||
 |
||||||||||||||||||||||||||||||||||||||||||||||||||||
 |
||||||||||||||||||||||||||||||||||||||||||||||||||||
 |
||||||||||||||||||||||||||||||||||||||||||||||||||||
 |
||||||||||||||||||||||||||||||||||||||||||||||||||||
 |
||||||||||||||||||||||||||||||||||||||||||||||||||||
Have you finished this pattern?Tag your pictures with #dropspattern #blossomingbeautyjacket or submit them to the #dropsfan gallery. Do you need help with this pattern?You'll find 10 tutorial videos, a Comments/Questions area and more by visiting the pattern on garnstudio.com. © 1982-2026 DROPS Design A/S. We reserve all rights. This document, including all its sub-sections, has copyrights. Read more about what you can do with our patterns at the bottom of each pattern on our site. |
||||||||||||||||||||||||||||||||||||||||||||||||||||


With over 40 years in knitting and crochet design, DROPS Design offers one of the most extensive collections of free patterns on the internet - translated to 17 languages. As of today we count 324 catalogues and 12291 patterns translated into English (UK/cm).
We work hard to bring you the best knitting and crochet have to offer, inspiration and advice as well as great quality yarns at incredible prices! Would you like to use our patterns for other than personal use? You can read what you are allowed to do in the Copyright text at the bottom of all our patterns. Happy crafting!
Post a comment to pattern DROPS 200-16
We would love to hear what you have to say about this pattern!
If you want to leave a question, please make sure you select the correct category in the form below, to speed up the answering process. Required fields are marked *.