
Popular categories
Looking for a yarn?


|
||||||||||||||||||||||||||||||||||||||||||||||||||||
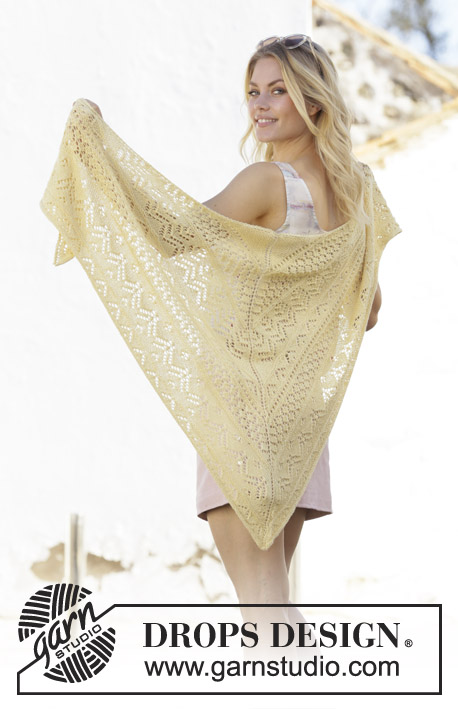
Blossoming Beauty |
||||||||||||||||||||||||||||||||||||||||||||||||||||
 |
 |
|||||||||||||||||||||||||||||||||||||||||||||||||||
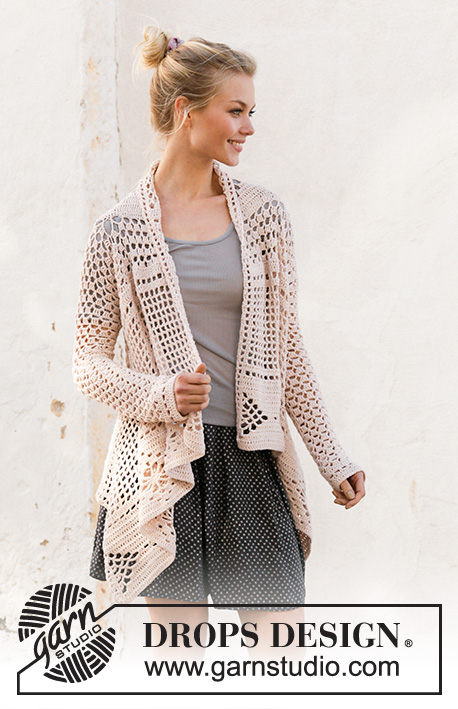
Crocheted square jacket in DROPS Cotton Merino. The piece is worked with lace pattern. Sizes S - XXXL.
DROPS 200-16 |
||||||||||||||||||||||||||||||||||||||||||||||||||||
|
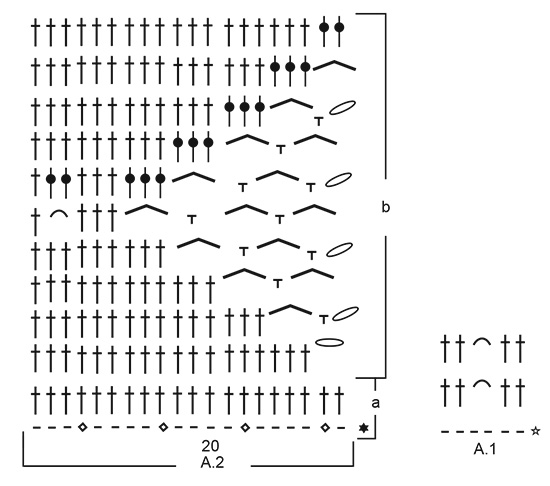
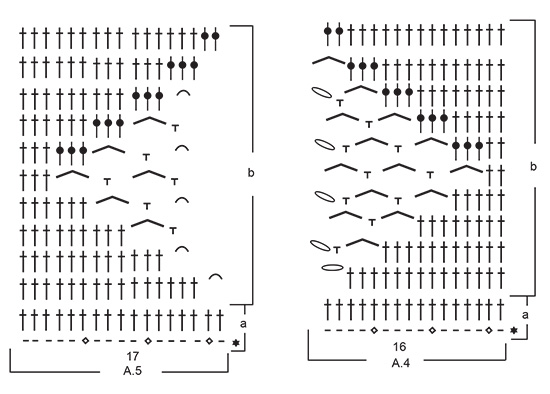
------------------------------------------------------- EXPLANATIONS FOR THE PATTERN: ------------------------------------------------------- PATTERN: See diagrams A.1 to A.11 (A.5 applies to sizes XL/XXL and XXXL). CROCHET INFORMATION: On each row of treble crochets, the first treble crochet is replaced by 3 chain stitches. The 3 chain stitches count as 1 treble crochet when counting stitches. INCREASE TIP: Increase 1 treble crochet by working 2 treble crochets in 1 treble crochet. DECREASE TIP-1: Decrease 1 treble crochet as follows: * Make 1 yarn over, insert hook through next stitch, pick up strand, make 1 yarn over and pull strand through the first 2 loops on hook *, work from *-* 1 more time, make 1 yarn over and pull strand through all 3 loops on hook (= 1 treble crochet decreased). DECREASE TIP-2 (evenly spaced): To work out how to decrease evenly, count the total number of stitches on round (e.g. 48 stitches) and divide by number of decreases to be made (e.g. 3) = 16. In this example work each 15th and 16th treble crochet together. ------------------------------------------------------- START THE PIECE HERE: ------------------------------------------------------- SQUARE JACKET - SHORT OVERVIEW OF THE PIECE: The piece is worked back and forth. First you work the back piece, then right side, armhole and front piece. Then the left side, armhole and front piece. Sleeves are worked in the round, top down. BACK PIECE: Work 163-163-183-183 chain stitches with hook size 3.5 mm and Cotton Merino. Turn and work pattern back and forth as follows in the different sizes: Sizes S/M and L: Work A.1 over the first 6 chain stitches - read CROCHET INFORMATION, A.2a over the next 24 chain stitches, A.3a over the next 108 chain stitches (= 3 repeats), A.4a over de the next 19 chain stitches, A.1 over the remaining 6 chain stitches on row = 138-138 stitches. Sizes XL/XXL and XXXL: Work A.1 over the first 6 chain stitches - read CROCHET INFORMATION, A.2a over the next 24 chain stitches, A.3a over the next 108 chain stitches (= 3 repeats), A.4a over the next 19 chain stitches, A.5 over the next 20 chain stitches, A.1 over the remaining 6 chain stitches on row = 155-155 stitches. All sizes: NOTE: A.1 is worked on each side of the piece to finished length. The first row worked is from the right side; insert a marker to show the right side of the piece. Continue with A.2b, A.3b, A.4b and A.5b (applies to sizes XL/XXL and XXXL) in height a total of 3 times. REMEMBER THE CROCHET TENSION! Now work a row with 1 treble crochet in each treble crochet and 2 treble crochets around each chain-space (A.1 worked as before on each side), at the same time increase 1-1-0-0 treble crochets on row – read INCREASE TIP = 139-139-155-155 stitches. The piece measures approx. 32 cm in all sizes. Cut the strand. Insert a marker thread in last row worked. THE PIECE IS NOW MEASURED FROM HERE! RIGHT SIDE, ARMHOLE AND FRONT PIECE: Now continue working from the wrong side, i.e. 2 rows after one another from the wrong side: Work A.1 over the first 6 stitches, A.6 as far as the next A.1, but the last time when working A.6 skip the last double crochet/chain stitch in diagram (so that the pattern is symmetrical on each side) = 32-32-36-36 repeats of A.6, A.1. Work the next row in the diagram back from the right side. Size S/M is finished. In sizes L, XL/XXL and XXXL repeat these 2 rows until you have worked 4-4-6 rows of the pattern. All sizes: Now work the armhole as follows (from the wrong side): A.1, work 8 repeats of A.6, work 36-40-40-44 chain stitches for armhole, skip the next 9-10-10-11 repeats of A.6, work 1 double crochet around the next chain stitch and continue with A.6 as far as the next A.1, but the last time you work A.6 skip the last double crochet/chain stitch in diagram (so that the pattern is symmetrical inside A.1 on each side), A.1. Continue back and forth with A.6 and A.1 on each side of the piece; over the 36-40-40-44 loose chain stitches work 9-10-10-11 repeats of A.6 for armhole = a total of 32-32-36-36 repeats of A.6 inside A.1 on each side. Repeat the last 2 rows in A.6 until the piece measures approx. 6-8-8-10 cm from the marker thread – adjust so that the last row worked is the last row in the diagram. Now work 1 row with 1 treble crochet in each treble crochet and 1 treble crochet around each chain stitch (A.1 is worked on each side of the piece as before), at the same time increase 1-1-0-0 treble crochet = 140-140-155-155 stitches. Then work pattern as follows: A.1, A.7 as far as the next A.1, but the last time A.7 is worked skip the last treble crochet in the diagram (so that the pattern is symmetrical on each side) and finish with A.1. When A.7 has been completed in height, repeat the last 2 rows in A.7 until the piece measures 26-28-32-34 cm from the marker thread; adjust so that the last row worked is from the wrong side. Now work 1 row with 1 treble crochet in each treble crochet and 1 treble crochet around each chain stitch (A.1 is worked on each side as before). Now work pattern as follows: A.1, A.8 as far as the next repeat of A.1, but the last time A.8 is worked skip the last treble crochet in the diagram (so that the pattern is symmetrical on each side) and finish with A.1. On the last row of A.8 decrease 2-2-0-0 treble crochets evenly spaced = 138-138-155-155 treble crochets. Now work pattern in the different sizes as follows: Sizes S/M and L: Work A.1, work 1 treble crochet in each of the next 20 treble crochets (= A.2a), * work 1 treble crochet in each of the next 12 treble crochets, 2 chain stitches, skip 2 treble crochets, work 1 treble crochet in each of the next 16 treble crochets (= A.3a) *, work from *-* a total of 3 times, work 1 treble crochet in each of the next 16 treble crochets (= A.4a) and finish with A.1. Now work A.2b-A.4b as before inside A.1 on each side. When A.2b-A.4b have been completed in height, work the last row with 1 treble crochet in each treble crochet and 1 treble crochet around each chain stitch inside A.1 on each side of the piece. Cut and fasten strand. The piece measures approx. 42-44 cm from the marker thread (40-40 cm from the armhole). Sizes XL/XXL and XXXL: Work A.1, work 1 treble crochet in each of the next 20 treble crochets (= A.2a), * work 1 treble crochet in each of the next 12 treble crochets, 2 chain stitches, skip 2 treble crochets, work 1 treble crochet in each of the next 16 treble crochets (= A.3a) *, work from *-* a total of 3 times, work 1 treble crochet in each of the next 16 treble crochets (= A.4a), work 1 treble crochet in each of the next 17 treble crochets (= A.5) and finish with A.1. Now work A.2b-A.5b as before inside A.1 on each side. When A.2b-A.5b have been completed in height, work the last row with 1 treble crochet in each treble crochet and 1 treble crochet around each chain stitch inside A.1 on each side of the piece. Cut and fasten strand. The piece measures approx. 48-50 cm from the marker thread (44-44 cm from the armhole). LEFT SIDE, ARMHOLE AND FRONT PIECE: Work outwards to the other side from the row of chain stitches worked at the beginning of the piece, starting from the right side as follows: Work A.1 over the first 6 chain stitches, work 2-2-1-1 treble crochets in next chain stitch, continue with 1 treble crochet in each chain stitch until there are 6 stitches left, but skip the same chain stitch skipped on first row on first piece worked and work A.1 over the next 6 chain stitch = 139-139-155-155 treble crochets. Insert a marker thread in this row. THE PIECE IS NOW MEASURED FROM HERE. Now work as follows from the wrong side: Work A.1 over the first 6 stitches, A.6 as far as the next A.1, but the last time A.6 is worked skip the last double crochet in diagram (so that the pattern is symmetrical on each side), A.1. Work the next row in the diagram back from the right side. Now size S/M is finished. In sizes L, XL/XXL and XXXL repeat the pattern in height until you have worked a total of 4-4-6 rows of pattern. All sizes: Now work the armhole as follows (from the wrong side): A.1, work 15-14-18-17 repeats of A.6, 36-40-40-44 loose chain stitches for armhole, skip the next 9-10-10-11 repeats of A.6, work 1 double crochet around the next chain stitch, then work 8 repeats of A.6, but the last time A.6 is worked skip the last double crochet in the diagram (so that the pattern is symmetrical on each side) and finish with A.1 = 32-32-36-36 repeats of A.6 inside A.1 on each side. Continue back and forth with A.6 and A.1 on each side of the piece; over the loose 36-40-40-44 chain stitches worked for the armhole, work 9-10-10-11 repeats of A.6 = a total of 32-32-36-36 repeats of A.6 inside A.1 on each side. Continue with pattern in the same way as the right front piece. SLEEVE: The sleeves are worked in the round from the armhole down. Start mid under the armhole with A.9 (= start of round), work A.6 (= row of chain-spaces + 1 double crochet) to the top of the armhole (= 9-10-10-11 repeats), work 9-10-10-11 repeats of A.6 around the row of chain stitches worked for the armhole = a total of 18-20-20-22 repeats of A.6 for the sleeve. Continue like this in the round. When the piece measures 4 cm decrease on each side as follows: Work A.9, A.10, work A.6 until there are 2 repeats of A.6 left on the round, work A.11. When A.10 and A.11 have been completed in height you have decreased 2 repeats of A.6 on the round and you have room for 16-18-18-20 repeats of A.6 on the round. Continue in the round with pattern and repeat the decrease when the sleeve measures 12 cm and 20 cm = 12-14-14-16 repeats. Continue working until the sleeve measures 52 cm – adjust so you finish after the last round in A.6. Now work 1 treble crochet in each treble crochet and 1 treble crochet around each chain stitch at the same time as you decrease 3-5-5-4 treble crochets evenly spaced – read DECREASE TIP = 45-51-51-60 treble crochets left on round. Work A.8 in the round – each round starts with 3 chain stitches and finishes with 1 slip stitch in beginning of round. The sleeve measures approx. 56 cm. Cut and fasten strand. Work the other sleeve in the same way. |
||||||||||||||||||||||||||||||||||||||||||||||||||||
Diagram explanations |
||||||||||||||||||||||||||||||||||||||||||||||||||||
|
||||||||||||||||||||||||||||||||||||||||||||||||||||
|
||||||||||||||||||||||||||||||||||||||||||||||||||||

|
||||||||||||||||||||||||||||||||||||||||||||||||||||
|
||||||||||||||||||||||||||||||||||||||||||||||||||||

|
||||||||||||||||||||||||||||||||||||||||||||||||||||

|
||||||||||||||||||||||||||||||||||||||||||||||||||||
|
Have you made this or any other of our designs? Tag your pictures in social media with #dropsdesign so we can see them! Do you need help with this pattern?You'll find tutorial videos, a Comments/Questions area and more by visiting the pattern on garnstudio.com. © 1982-2024 DROPS Design A/S. We reserve all rights. This document, including all its sub-sections, has copyrights. Read more about what you can do with our patterns at the bottom of each pattern on our site. |
||||||||||||||||||||||||||||||||||||||||||||||||||||


With over 40 years in knitting and crochet design, DROPS Design offers one of the most extensive collections of free patterns on the internet - translated to 17 languages. As of today we count 304 catalogues and 11422 patterns - 11422 of which are translated into English (UK/cm).
We work hard to bring you the best knitting and crochet have to offer, inspiration and advice as well as great quality yarns at incredible prices! Would you like to use our patterns for other than personal use? You can read what you are allowed to do in the Copyright text at the bottom of all our patterns. Happy crafting!
Comments / Questions (87)
Ik heb de 3 herhalingen van het achterpand gedaan. Nu staat er dat ik de draad moet afknippen. Als ik dan begin met de rechterkant moet ik dan de steken van het achterpand weer opnemen? Wordt het dan 1 stuk?
01.06.2021 - 16:17DROPS Design answered:
Dag Sandra,
Je haakt inderdaad gewoon verder over het achterpand, dus je hecht de draad aan het begin van de toer aan.
02.06.2021 - 11:35Hello, I have a question about the pictures that help me understand the pattern - According to the picture there is no use in a4 and a5.and the repetition of the back is only twice. It looks much more shorter in height and width even from the S size. I am croching the L size with 3 repetition of the A3 together with the a2 and a 4. It looks much more bigger. Can you explain the difference please?
23.04.2021 - 08:21DROPS Design answered:
Dear Gili, A.5 applies only in size XL/XXL and XXXL, so you won't use it in size L. A.4 is worked in size L to get half a pattern in width extra to A.3, so that you will have A.2 (= half a repeat) + 3 full repeats (= A.3 x 3) + half a repeat (= A.4) - as shown on the picture. One of the half repeat is towards top = neck edge and folded down reason why you don't see it. Always remember to check and keep your gauge, you should have 20 trebles (UK-crochet terms) = 10 cm in width to get the correct measurements as shown in chart. Happy crocheting!
23.04.2021 - 11:59This pattern is just beautiful. It’s sideways construction seems confusing at first due to some of the wording. But once you figure this out it is very simple, surprisingly quick to work up, and turns out exquisite. It looks very delicate and has a flattering and graceful fit. I have worked many of your lovely patterns, and this is alway the first place I search for a new project. Love your yarns. Love your patterns. Love you guys.
21.04.2021 - 19:38Maar in de tekst gaat het toch verder met het patroon, dus verder naar “b”? Maar dan kom ik niet uit met mij steken.
15.04.2021 - 12:54DROPS Design answered:
Dag Petra,
Excuses, het is inderdaad b en niet a. Dus de teruggaande toer is dan A.1, A.4b, 3 herhalingen van A.3b, A.2a en A.1. Het gedeelte waar b bij staat in de patronen is het gedeelte wat steeds in de hoogte herhaald wordt, je hoeft a dan niet meer te haken.
16.04.2021 - 09:18Bedankt voor het antwoord. Wat aangegeven is, klopt. Maar hoe nu verder met de volgende toer(en). Welk patroondeel moet herhaald worden?
15.04.2021 - 12:35DROPS Design answered:
Dag Suzanne,
Over de volgende toeren kun je gewoon verder gaan met de patronen op dezelfde manier. Dus je keert het werk en haakt de volgende toer terug: A.1, A.4a, 3 herhalingen van A.3a, A.2a en A.1.
15.04.2021 - 12:49Na het opzetten van de lossen en de eerste toer, moet ik verder voor maat L met A2b, A3b en A4b. Hoe verdeel ik die over de 155 steken, want ik kom dan uit op 80 steken? Welke moet herhaald worden?
12.04.2021 - 19:12DROPS Design answered:
Dag Petra,
Als het goed is heb je 163 steken opgezet. Je haakt A.1 over de eerst 6 lossen, A.2 a over de volgende 24 lossen, (let erop dat de ruitjes in het telpatroon voor 2 lossen staan, je moet dus af en toe een losse overslaan), A.3a over de volgende 108 lossen (hier ook weer op de ruitjes letten), tot slot A4.a over de volgende 19 steken (let op ruitjes), dan nog 6 steken van A.1. Als het goed is kom je dan op het juiste aantal steken.
15.04.2021 - 11:39Lovely pattern came out beautiful! Thank you so much for the pattern! I really like how it is crocheted as one piece and sleeves are added. Simple easy to follow charts thanks again!
19.03.2021 - 02:39Also, whats the difference between left/right side pieces and the FRONT? Is FRONT a collar? Your illustrations are not helpful and not concise enough to understand. Im giving up because I cant determine if i am making it the right size, because i dont understand how many pieces there are :( so will it fit me?? Please please for future crocheters include more photos and illustrations. Even the photos with model does not show how its constructed; making it very difficult to size right for my body
09.03.2021 - 21:02DROPS Design answered:
Dear Rosa, finished jacket should be like the chart at the bottom of the page (like a long rectangle with openings for arms/sleeves - and as shown on the picture. For any individual assistance, please contact the store where you purchased the yarn from, they should be able to help you even per mail or telephone. Happy crocheting!
10.03.2021 - 08:05Also, i dont understand this construction. Is this one back piece and two fronts (one on each side of back piece)? According to drawing it looks like only one back piece and one left side piece, which makes NO sense whatsoever. It sure would be extremely helpful to see the photos of actual construction!!!! I have no clue how many pieces im making so i can size this for my body as im using totally different yarn. (Bernat medium weight) my yarn store didnt have enough of of the Merino in stock.
09.03.2021 - 20:53DROPS Design answered:
See previous answer about the construction - this pattern has been worked for a gauge of 20 double crochets x 10 rows = 4"x4" - if you work with another tension, the entire pattern should be then recalculated - read more about tension here.
10.03.2021 - 08:02Also, i had no clue if I was working up and down OR side to side. The wording is very unclear. I also had what looked like the BOBBLE stitch after finishing my very 1st row of back piece (right after foundation chain row) is it made to look like that?
09.03.2021 - 17:09DROPS Design answered:
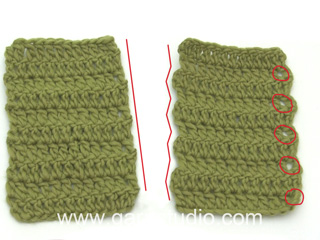
Dear Lynn Rosa, you are working from the back piece (not exactly the middle of back piece) towards the front edge. Then work the 2nd part from the fundation chain towards the other front piece. You are not supposed to have bobbles after 1st row, but you are casting on more chains than you need stitches on first row - see 4th symbol and this point of the FAQ.
10.03.2021 - 07:59