
Popular categories
Looking for a yarn?


Comments / Questions (25)
![]() Carolien wrote:
Carolien wrote:
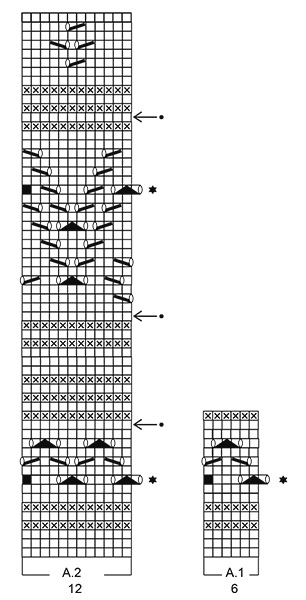
Goedemiddag, ik zit toch met naald 41 steeds in de knoop. Heb het breiwerk maar weggelegd ik kom er niet uit. Ik begin met een omslag 2 steken recht afhalen 1 breien. De omslag over de afgehaalde steken heen, maar de 12 e steek is dan gewoon recht? In de volgende toer komen de gaatjes niet schuin boven elkaar zoals op de foto, wat doe ik verkeerd? Met groet Carolien
11.08.2019 - 16:03DROPS Design answered:
Dag Carolien,
Bij naald 41 moet je de naald 1 stee naar rechts verschuiven, dus de laatste steek van de voorgaande naald is de eerste steek van naald 41. (Zie ook beschrijving bij het stersymbool) Op die manier komen de gaatjes wel goed boven elkaar.
11.08.2019 - 17:26
![]() Hanna Zozgórnik wrote:
Hanna Zozgórnik wrote:
Nie rozumie na czym polega przesunięcie oczek w 9 i 41 rzędzie. Proszę o wyjaśnienie. Hania
30.06.2019 - 12:06DROPS Design answered:
Witaj Hanno! W rzędach oznaczonych gwiazdką ostatnie oczko poprzedniego okrążenia (przed markerem na początku okrążenia) jest przerabiane jak pierwsze oczko w tym okrążeniu (= okrążenie przesunięte o 1 oczko). Na końcu tego okrążenia ponownie przesunąć początek okrążenia przerabiając pierwsze przerobione oczko w tym okrążeniu (to przed markerem) jeszcze jeden raz na końcu okrążenia. Teraz mamy początek okrążenia taki sam jak dotychczas i przechodzimy do kolejnego rzędu schematu. Powodzenia!
01.07.2019 - 08:01
![]() Carolien wrote:
Carolien wrote:
Bedankt voor de reactie, heb het al 3 keer uitgehaald maar ga met goede moed verder.
18.06.2019 - 09:12
![]() Carolien wrote:
Carolien wrote:
Goedenavond, ik had een vraag gesteld en kom er niet uit in naald 41. Ik weet niet hoe ik moet beginnen met 2 steken afhalen of met een overslag. Graag een reactie, hartelijk dank
17.06.2019 - 21:02
![]() Carolien Floors wrote:
Carolien Floors wrote:
Goedendag, Ik kom er niet uit, in naald 41. Moet ik dan beginnen met 2 steken afhalen 1 steek breien, de 2 afgehaalde over de gebreide steek heen. De rest begrijp ik en de 12e steek is dan de omslag. Met groet Carolien
16.06.2019 - 16:27DROPS Design answered:
Dag Carolien,
Naald 41 is een naald met een ster en dan brei je de laatste steek op de vorige naald asl de eerste steek op deze naald, dus de naald wordt 1 steek verschoven. Je breit de laatste steek van de vorige naald dus niet, maar je begint gelijk met 1 omslag, zoals aangegeven in het telpatroon.
17.06.2019 - 14:19
![]() Carolien wrote:
Carolien wrote:
Hartelijk bedankt voor de reactie, met groet Carolien
13.06.2019 - 09:19
![]() Carolien wrote:
Carolien wrote:
Hartelijk bedankt voor de reactie, met groet Carolien
13.06.2019 - 09:17
![]() Carolien wrote:
Carolien wrote:
Bij het herhalen van het patroon moet er dan in naald 41 ook een steek verplaatst worden net zoals in naald 9
12.06.2019 - 17:11DROPS Design answered:
Dag Carolien,
Ja, dat klopt, bij de naald met de ster brei je de laatste steek van de vorige naald zoals de eerste steek op de naald met de ster.
13.06.2019 - 08:45
![]() Magdalena wrote:
Magdalena wrote:
Bardzo przyjemny wzorek :-). Opis świetnie napisany. Dziergało mi się z ogromną przyjemnością :-)!
25.11.2018 - 17:34
![]() Elina wrote:
Elina wrote:
Hei, En saa ohjeen ruutupiirrosta auki. Missähän vika?
18.09.2018 - 17:49DROPS Design answered:
Nyt piirros aukeaa!
19.09.2018 - 14:16
|
||||||||||||||||||||||||||||
Morgendis#morgendisset |
||||||||||||||||||||||||||||
 |
 |
|||||||||||||||||||||||||||
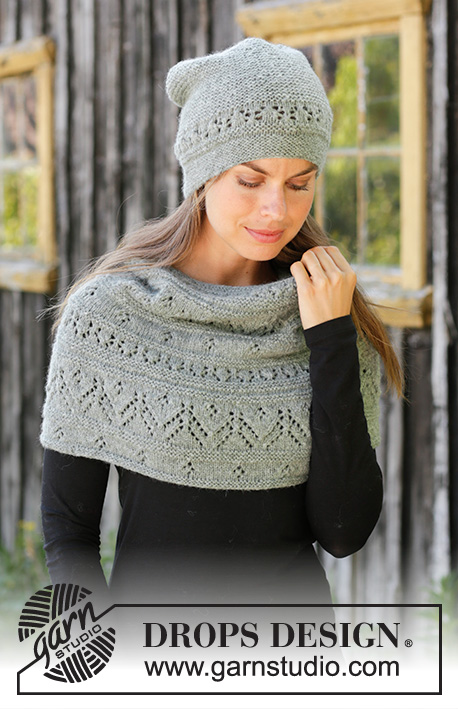
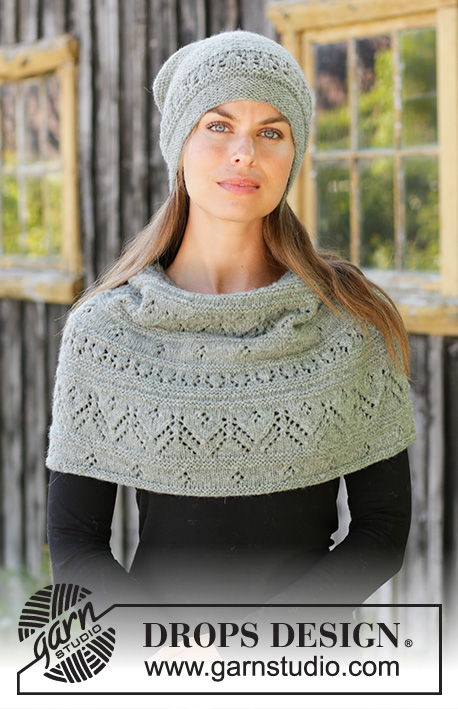
Knitted hat with garter stitch and lace pattern in DROPS Sky. Knitted neck warmer with garter stitch and lace pattern in DROPS Sky.
DROPS 192-19 |
||||||||||||||||||||||||||||
|
------------------------------------------------------- EXPLANATIONS FOR THE PATTERN: ------------------------------------------------------- RIDGE/GARTER STITCH (worked in the round): 1 ridge = 2 rounds. Knit 1 round and purl 1 round. DECREASE TIP – for hat: Decrease as follows after the marker: Slip 1 stitch as if to knit, knit 1, pass the slipped stitch over the knitted stitch (= 1 stitch decreased). PATTERN: Hat: See diagram A.1. Neck warmer: See diagram A.2. INCREASE TIP-1 (evenly spaced) – for neck warmer: To work out how to increase evenly, count the total number of stitches on the needle (e.g. 156 stitches) and divide by the number of increases to be made (e.g. 12) = 13. In this example, increase by making 1 yarn over after each 13th stitch. On the next round work the yarn overs twisted to avoid holes. ------------------------------------------------------- START THE PIECE HERE: ------------------------------------------------------- HAT - SHORT OVERVIEW OF THE PIECE: The piece is worked in the round with circular needle until you begin to decrease; then continue with double pointed needles. HAT: Cast on 102-108 stitches with circular needle size 3.5 mm and Sky. Work GARTER STITCH - read description above. When the piece measures 3 cm, change to circular needle size 4 mm and work A.1 (= 6 stitches) a total of 17-18 times in the round. On round 9 displace the round by 1 stitch so that the lace pattern fits. When A.1 has been worked 1 time in height, finish the piece in garter stitch. REMEMBER THE KNITTING TENSION! Work until the piece measures 20-21 cm (there is now approx. 5 cm left to finished length). On the next knit round, decrease 3-0 stitches evenly on round = 99-108 stitches. Now insert 9 markers in the piece with 11-12 stitches between them. On the next knit round decrease 1 stitch after each marker - read DECREASE TIP (= a total of 9 stitches decreased). Decrease like this every 2nd round a total of 10-11 times = 9 stitches. Cut the strand, pull it through the remaining stitches, tighten and fasten well. The hat measures approx. 25-26 cm from the top down. ------------------------------------------------------- NECK WARMER - SHORT OVERVIEW OF THE PIECE: The piece is worked in the round with circular needle. NECK WARMER: Cast on 156-168-180 stitches with circular needle size 4 mm and Sky. Work 2 RIDGES – read description above. Work A.2 (= 12 stitches) a total of 13-14-15 times in the round. On rounds 9 and 41 displace the round by 1 stitch so that the lace pattern fits. On the round marked with an arrow increase 12 stitches evenly on round - read INCREASE TIP. Each time you increase, A.2 is worked 1 more time in width. REMEMBER THE KNITTING TENSION! Repeat the pattern in height and increase 12 stitches on each round marked with an increase-arrow a total of 5-6-7 times = 216-240-264 stitches. A.2 is now repeated 18-20-22 times in width. Repeat A.2 in height until the piece measures 39-43-47 cm; adjust so that you finish nicely in relation to the pattern. Work 2 ridges. Then cast off with knit. The neck warmer measures approx. 40-44-48 cm in height. |
||||||||||||||||||||||||||||
Diagram explanations |
||||||||||||||||||||||||||||
|
||||||||||||||||||||||||||||
 |
||||||||||||||||||||||||||||
Have you finished this pattern?Tag your pictures with #dropspattern #morgendisset or submit them to the #dropsfan gallery. Do you need help with this pattern?You'll find 24 tutorial videos, a Comments/Questions area and more by visiting the pattern on garnstudio.com. © 1982-2026 DROPS Design A/S. We reserve all rights. This document, including all its sub-sections, has copyrights. Read more about what you can do with our patterns at the bottom of each pattern on our site. |
||||||||||||||||||||||||||||


With over 40 years in knitting and crochet design, DROPS Design offers one of the most extensive collections of free patterns on the internet - translated to 17 languages. As of today we count 324 catalogues and 12290 patterns translated into English (UK/cm).
We work hard to bring you the best knitting and crochet have to offer, inspiration and advice as well as great quality yarns at incredible prices! Would you like to use our patterns for other than personal use? You can read what you are allowed to do in the Copyright text at the bottom of all our patterns. Happy crafting!
Post a comment to pattern DROPS 192-19
We would love to hear what you have to say about this pattern!
If you want to leave a question, please make sure you select the correct category in the form below, to speed up the answering process. Required fields are marked *.