
Popular categories
Looking for a yarn?


Comments / Questions (195)
![]() Ana María wrote:
Ana María wrote:
Buenos días, estoy haciendo este modelo según el patrón y el delantero no me coincide la forma del escote con el de la foto del chaleco ya acabado. Gracias y saludos.
01.09.2022 - 00:48
![]() Zeenat wrote:
Zeenat wrote:
Thanks for the prompt response. Now I get it. One more doubt - does the increase happen throughout the whole front piece? I.e. from A1 to A3?
13.08.2022 - 14:53DROPS Design answered:
Dear Mrs Zeenat, you increase only 3 times on every row then 5 times on every other row - and at the same time work diagrams A.1 as explained - increases will be worked before starting A.2. Happy crocheting!
15.08.2022 - 08:21
![]() Zeenat wrote:
Zeenat wrote:
Hi This is for the front piece. I have worked 65 double crochets, it is called the last row. Does it mean I have to end it here? Now I can’t understand from where to begin the next row which reads as “Work next row as follows, begin from right side: Read CROCHET TIP-1 – work 1 double crochet in each of the first 0…
11.08.2022 - 15:15DROPS Design answered:
Dear Zeenat, you have increase on both sides (to get 65 sts on last row) and at the same time work the pattern, this means the first row in pattern with diagrams A.1a,b,c is worked over the 49 sts increasing 1 stitch on each side. Happy crocheting!
11.08.2022 - 16:31
![]() Fondia wrote:
Fondia wrote:
I'm rather confused. I am talking about the California dreams pattern. The A1 through a five are those a different type of stitch? If so what stitch? The pattern starts from the bottom of the top section and goes up correct ? As you can probably tell I'm used to making my own patterns not reading one. Thank you for your help I really want to do this and I really really wanted to turn out nice. Fondia
28.07.2022 - 05:34DROPS Design answered:
Dear Fondia, A.1 to A.5 are the graphs with the stitch patterns used in this model. You can find all graphs, with the graph descriptions, in the lower part of the page, after the pattern instructions. For more help reading these diagrams, please check the following link:https://www.garnstudio.com/lesson.php?id=69&cid=19 You work from the top down, the front and back piece separately until the armhole and then you work them both together ("body") downwards, until reaching the desired measurements. Happy crocheting!
31.07.2022 - 17:40
![]() Oddrun Haland wrote:
Oddrun Haland wrote:
Hei I A.4b Når man øker - lurte på om det er en luftmaske mellom de to stavene i samme masken, alså stav + luftmaske + stav i den samme masken?
08.07.2022 - 15:28
![]() Karine wrote:
Karine wrote:
Bonsoir, j'adore ce top il est trop joli, je suis debutante dans le. Crochet et je souhaite me lanser avec ce beau modèle. J'en suis au toit début. J'ai fait mon 1er rand de brides (51) maintenant je dois repartir mes 5 augmentation toutes 10 les brides . Mais pdt combien de cm ou rangs et idem concernant tous les 2 rangs ? Merci par avance
06.07.2022 - 21:52DROPS Design answered:
Bonjour Karine, vous devez maintenant augmenter 1 bride de chaque côté (= cf AUGMENTATIONS-1. ), et, en même temps, crocheter comme indiqué juste après, autrement dit: 1 bride (+ 1 augmentation), A.1a (=10 brides), A.1b (=5x), A.1c (9brides) et 1 bride (+1 augmentation), continuez ainsi en augmentant d'abord 5 fois tous les rangs puis 3 fois tous les 2 rangs (= vous aurez crocheté 8 rangs au total et augmenté 16 mailles - quand A.1 est terminé, continuez comme indiqué avec les diagrammes A.2. Bon crochet!
07.07.2022 - 08:54
![]() Kelly Sierra wrote:
Kelly Sierra wrote:
Hola 👋 esta muy linda la blusa y quisiera hacerla pero quiero saber como iniciar para una talla m, y con cuantos puntos debo empezar le agradezco me ayude o más bien cm empezar con todas tallas , y se podrá hacer para niñas de 3 años también? Yo me vi un video de como hacerla pero no explica muy por que habla es de talla chica , mediana , así casi no entiendo 🤔 espero y me ayude porque esta muy linda y quiero hacerla gracias 🙂
08.06.2022 - 13:22DROPS Design answered:
Hola Kelly. Para la talla M se empieza con 53 puntos de cadeneta (es el 2ª número de puntos en las instrucciones y de medidas en el diagrama bajo el patrón). No tenemos este modelo en versión para niños y no hacemos patrones personalizados.
08.06.2022 - 20:03
![]() Nathalie De Taeye wrote:
Nathalie De Taeye wrote:
Bonjour, j ai fait les augmentations pour avoir 65 brides. Maintenant je dois faire A1a sur 10, A1b sur 30 et A1c sur 9. Ça fait 49. Je ne comprends pas comment passer de 65 à 49. Merci pour la réponse
30.05.2022 - 11:40DROPS Design answered:
Bonjour Mme De Taeye, les augmentations se commencent au même rang que le 1er rang de A.1, autrement dit, vous devez crocheter les 49 brides en augmentant 1 bride de chaque côté au 1er rang: en M: 1 bride en augmentant 1 bride, A.1a, A1b, A.1c et terminez par 1 bride en augmentant 1 bride et ainsi de suite. Bon crochet!
30.05.2022 - 13:36
![]() Mazat wrote:
Mazat wrote:
Bonjour j’ai fini la partie dos et la partie devant mais je comprends pas la suite pour faire le dos et devant ensemble crocheter maintenant il est parti ensemble je dois faire quatre mailles en l’air pour l’emmanchure pour ensuite les côtés en rond est-ce que je dois d’abord assembler les deux parties devant et dos merci
18.04.2022 - 11:51DROPS Design answered:
Bonjour Mme Mazat, oui vous allez crocheter les 2 parties mais l'une après l'autre, vous commencez les tours maintenant sur le côté: montez 4 ml (sous l'une des manches), crochetez les mailles du dos comme avant (brides), crochetez 8 ml pour la 2ème emmanchure, crochetez les mailles du devant comme avant (brides) et terminez par 4 ml (fin de la 1ère emmanchure), faites 1 mc dans la 1ère des 4 ml du début du tour, et continuez maintenant en rond, en brides, mais tournez pour crocheter alternativement sur l'endroit et sur l'envers ainsi, vous n'aurez pas de différence entre la partie du devant et du dos crochetées en rangs et celle du bas crochetée en rond. Bon crochet!
19.04.2022 - 11:33
![]() Lilou wrote:
Lilou wrote:
Guten Tag, als ich fertig mit dem Muster für das Vorderteil war, hatte ich nicht 65 Stäbchen sonder 67. Ich überprüfte mehrmals ob ich einen Fehlergemacht habe, doch nachdem ich alles aufgezeichnet habe, bin ich zum Schluss gekommen, dass es nicht möglich ist, wenn man 16 Stäbchen zu nimmt, auf 65 Stäbchen in der letzten Reihe zu kommen. Liege ich falsch? Könnten Sie bitte die Anleitung für die Grösse S auf ihre Richtigkeit überprüfen. Vielen Dank
18.02.2022 - 20:56DROPS Design answered:
Liebe Lilou, man beginnt mit 49 Maschen und es wird beidseitig 1 Stb 3 Mal dann 5 Mal zugenommen = 49 + 3+3 + 5+5= 65 Stäbchen. Kann das Ihnen helfen?
21.02.2022 - 08:41
|
|||||||||||||||||||||||||||||||||||||||||||
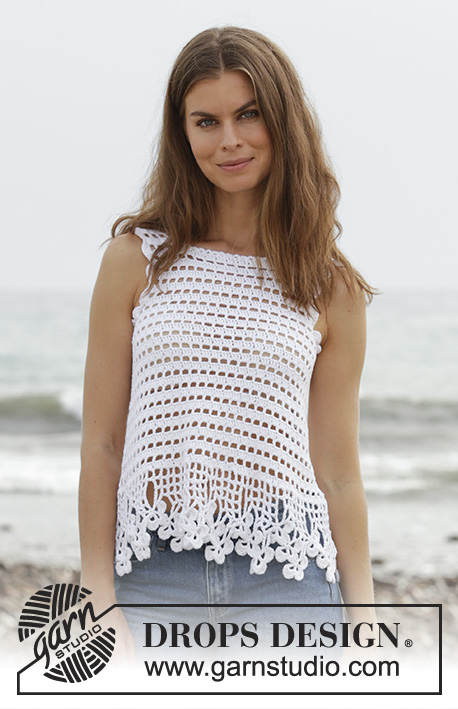
California Dream#californiadreamtop |
|||||||||||||||||||||||||||||||||||||||||||
 |
 |
||||||||||||||||||||||||||||||||||||||||||
Crocheted top with lace pattern and flounce. Size: S - XXXL Piece is crocheted in DROPS Cotton Merino.
DROPS 190-21 |
|||||||||||||||||||||||||||||||||||||||||||
|
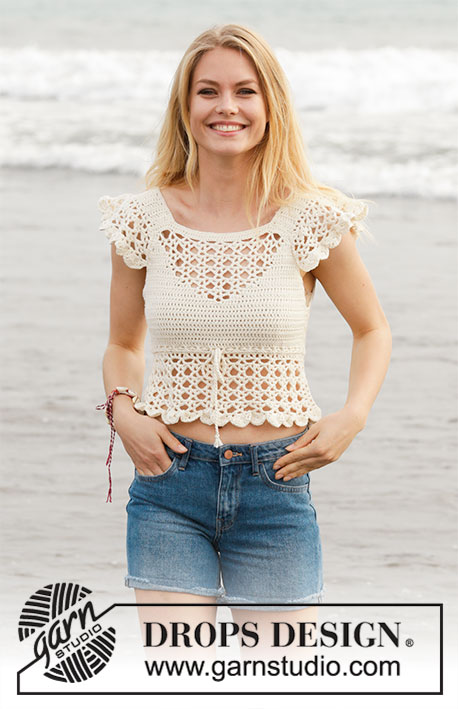
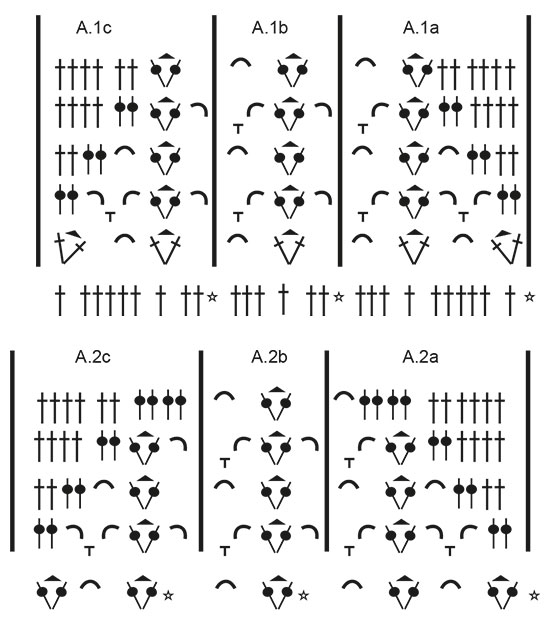
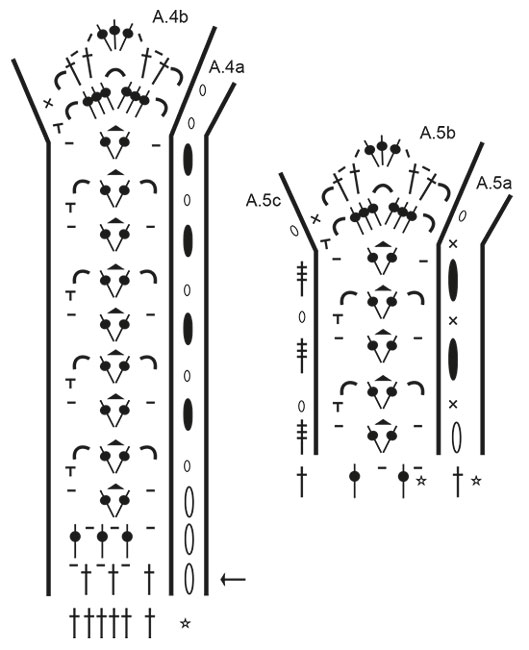
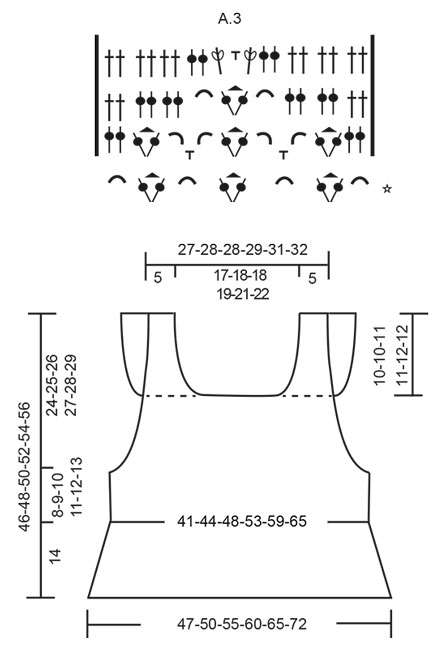
INFORMATION FOR PATTERN: PATTERN: See diagrams A.1 to A.5. INCREASE TIP-1: Increase 1 treble crochet by working 2 treble crochets in same stitch. CROCHET TIP-1 (applies to body but not diagram): Replace first treble crochet at beginning of every row with 3 chain stitches. CROCHET TIP-2 (applies to body but not diagram): When working in the round, replace first treble with 3 chain stitches, finish round with 1 slip stitch in 3rd chain stitch at beginning of round. DECREASE TIP: Decrease by working 2 treble crochets together. INCREASE TIP-2 (evenly): To calculate how to increase evenly, use the total number of treble crochets on row (e.g. 146 treble crochets) and divide treble crochets by number of increases to be done (e.g. 22) = 6.6. In this example increase by working 2 treble crochets in same treble crochet alternately approx. every 6th and 7th treble crochet. ---------------------------------------------------------- TOP: Piece is worked back and forth, top down, work front and back piece separately down to armhole, then work in the round over both parts. Then work straps from bottom up and then work flounces back and forth on straps, fasten flounce to front/back piece. FRONT PIECE: Work 51-53-53-55-57-59 chain stitches (including 3 chain stitches to turn with) on hook size 5 mm with Cotton Merino. Switch to hook size 4 mm, turn and work 1 treble crochet in 4th chain stitch from hook (= 2 treble crochets), work 1 treble crochet in each of the next 47-49-49-51-53-55 chain stitches = 49-51-51-53-55-57 treble crochets. On next row begin increase in each side of piece AT THE SAME TIME work pattern as follows: Increase 1 treble crochet in each side of piece (= 2 treble crochets increased) - read INCREASE TIP-1. Increase like this every row 3-5-8-13-14-15 times in total, and then every other row 5-5-3-0-0-0 times in total = 65-71-73-79-83-87 treble crochets on last row. Work next row as follows, begin from right side: Read CROCHET TIP-1 – work 1 treble crochet in each of the first 0-1-1-2-3-4 treble crochets, A.1a over the next 10 treble crochets, repeat A.1b over the next 30 treble crochets (= 5 times in total in width), A.1c over the next 9 treble crochets and 1 treble crochet in each of the last 0-1-1-2-3-4 treble crochets. Continue until A.1 has been work 1 time vertically. REMEMBER THE CROCHET TENSION! Then work as follows, begin from wrong side: Work 1 treble crochet in every treble crochet until 1 treble crochet remains before first chain space, work A.2c, repeat A.2b 3 times in total in width, A.2a and 1 treble crochet in every treble crochet the entire row. Continue until A.2 has been worked vertically. Then work as follows, begin from wrong side: Work 1 treble crochet in every treble crochet until first chain space, work A.3 and 1 treble crochet in every treble crochet the rest of row. Continue until A.3 has been worked vertically. Now work 1 treble crochet in every stitch until piece measures 14-15-15-16-16-17 cm. Fasten off, turn. Put piece aside. BACK PIECE: Work 51-53-53-55-57-59 chain stitches (including 3 chain stitches to turn with) on hook size 5 mm with Cotton Merino. Switch to hook size 4 mm, turn and work 1 treble crochet in 4th chain stitch from hook (= 2 treble crochets), work 1 treble crochet in each of the next 47-49-49-51-53-55 chain stitches = 49-51-51-53-55-57 treble crochets. Then work 1 treble crochet in every treble crochet - AT THE SAME TIME increase 1 treble crochet in each side of piece - remember INCREASE TIP-1. Increase like this every row 8-10-11-13-14-15 times in total = 65-71-73-79-83-87 treble crochets on last row. When piece measures 14-15-15-16-16-17 cm (adjust according to front piece), fasten off, turn. BODY: Now work the two parts together as follows: Work 4-4-7-8-12-15 chain stitches for armhole, 1 treble crochet in each of the 65-71-73-79-83-87 treble crochets from back piece, work 8-8-14-16-24-30 chain stitches for armhole, 1 treble crochet in each of the 65-71-73-79-83-87 treble crochets from front piece, work 4-4-7-8-12-15 chain stitches for armhole and finish with 1 slip stitch in first chain stitch at beginning of round. Then work piece in the round, continue with 1 treble in every treble/chain stitch = 146-158-174-190-214-234 trebles. When working in the round, turn after every round to work alternately from right side and wrong side. This is so that the texture is the same on the entire top - read CROCHET TIP-2. Insert 1 marker thread in each side, in the middle of the 8-8-14-16-24-30 chain stitches. NOW MEASURE THE PIECE FROM HERE! Continue like this until piece measures 8-9-10-11-12-13 cm. Now work in the round according to diagram A.4 while at the same time increasing on first round (round marked with arrow in diagram) as follows: Work A.4b 28-30-33-36-39-43 times in total on round – A.4a shows how rounds begin and end and is worked in addition to A.4b – AT THE SAME TIME increase 11-11-12-13-10-12 chain spaces (= 1 treble crochet + 1 chain stitch) evenly – read INCREASE TIP-2 = 84-90-99-108-117-129 chain spaces (= 1 treble crochet + 1 chain stitch). Continue in the round, i.e. always work pattern from right side. When A.4 is done vertically, fasten off. STRAPS: Now work a strap back and forth in cast-on edge on front piece over the first 8-9-9-9-10-10 treble crochets. Work 1 treble crochet in every treble crochet until strap measures 10-10-11-11-12-12 cm. Fasten off. Work 1 strap over the first 8-9-9-9-10-10 treble crochets in the other side the same way. Work straps the same way on back piece. Sew tog straps on shoulder. FLOUNCE: Work back and forth over every row on strap (= 20-20-22-22-24-24 cm). Begin from wrong side and work 1 treble crochet in first row, * 1 chain stitch, 1 treble crochet around row *, work from *-* along the entire strap – adjust so that there are 26-26-28-28-30-30 chain spaces (= 1 chain stitch + 1 treble crochet) on this row, finish with 1 treble crochet in last row = 1 treble crochet in each side and 26-26-28-28-30-30 chain spaces (= 1 chain stitch + 1 treble crochet). Turn and work as follows from right side: A.5a, A.5b 13-13-14-14-15-15 times in total in width, finish with A.5c. Continue this pattern until A.5 is done vertically, fasten off. Work flounce on the other strap the same way. NECK EDGE: Work 1 double crochet in every treble crochet/2 double crochets along every treble crochet row along the entire neck. SLEEVE EDGE: Work 1 double crochet in every treble crochet/2 double crochets along every treble crochet row along armhole – start right after flounce, work along armhole and to the flounce. Place flounce edge to edge to this sleeve edge (on both front and back piece) and fasten with small, neat stitches. Work the other sleeve edge the same way and fasten flounce. TIE: Cut 3 lengths of 3 metres each with Cotton Merino. Twine the strands tog until they resist, fold them double so that they twine again. Make a knot at each end. Baste the yarn up and down through first row with eyelet holes - start mid front. Tie a bow at the front. |
|||||||||||||||||||||||||||||||||||||||||||
Diagram explanations |
|||||||||||||||||||||||||||||||||||||||||||
|
|||||||||||||||||||||||||||||||||||||||||||
 |
|||||||||||||||||||||||||||||||||||||||||||
 |
|||||||||||||||||||||||||||||||||||||||||||
 |
|||||||||||||||||||||||||||||||||||||||||||
Have you finished this pattern?Tag your pictures with #dropspattern #californiadreamtop or submit them to the #dropsfan gallery. Do you need help with this pattern?You'll find 10 tutorial videos, a Comments/Questions area and more by visiting the pattern on garnstudio.com. © 1982-2026 DROPS Design A/S. We reserve all rights. This document, including all its sub-sections, has copyrights. Read more about what you can do with our patterns at the bottom of each pattern on our site. |
|||||||||||||||||||||||||||||||||||||||||||


With over 40 years in knitting and crochet design, DROPS Design offers one of the most extensive collections of free patterns on the internet - translated to 17 languages. As of today we count 324 catalogues and 12290 patterns translated into English (UK/cm).
We work hard to bring you the best knitting and crochet have to offer, inspiration and advice as well as great quality yarns at incredible prices! Would you like to use our patterns for other than personal use? You can read what you are allowed to do in the Copyright text at the bottom of all our patterns. Happy crafting!
Post a comment to pattern DROPS 190-21
We would love to hear what you have to say about this pattern!
If you want to leave a question, please make sure you select the correct category in the form below, to speed up the answering process. Required fields are marked *.