
Popular categories
Looking for a yarn?


Comments / Questions (49)
![]() Steffi wrote:
Steffi wrote:
Hallo ich komme mit der Anleitung gar nicht klar die Diagramme nicht klar gibt's es ein Video wo das gezeigt wird wäre lieb wenn .liebe Grüße
19.03.2025 - 19:03DROPS Design answered:
Liebe Steffi, wir haben für diese Diagramme keine spezielle Video, hier lesen Sie, wie man Diagramme liest bzw häkelt, das kann Ihnen vielleicht helfen?
20.03.2025 - 09:45
![]() Mette Andersen wrote:
Mette Andersen wrote:
Hvordan tager man en stangmaske gruppe ud på arbejdet? Kan simpelthen ikke få det til at se rigtig ud.
11.01.2025 - 18:42DROPS Design answered:
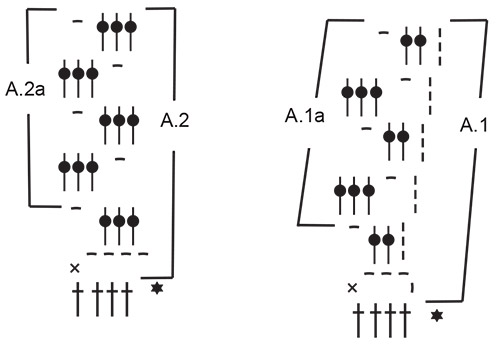
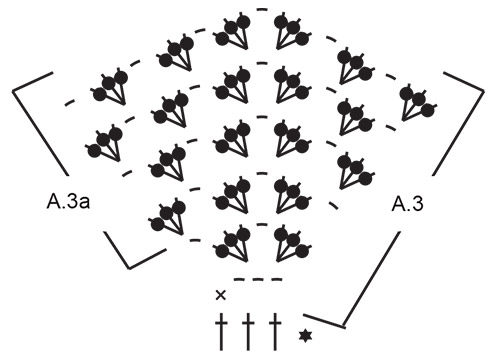
Hej Mette, du finder udtagningerne af stangmaske grupperne i diagram A.3 (3 stangmasker, luftmaske, 3 stangmasker i samme luftmaske)
14.01.2025 - 14:02
![]() Salma wrote:
Salma wrote:
Wie soll ich A1.a bis A5.a wiederholen, wenn A1.a bis A4.a jeweils aus 4 Runden (in der Höhe) bestehen, A5.a aber aus 6 Runden besteht?
24.03.2024 - 08:34DROPS Design answered:
Liebe Salma, A.1 bis A.5 sind jeweils 6 Runden für alle Diagramme, dann wiederholen Sie die 4 Reihen A.1a bis A.4a und wiederholen Sie einfach A.5a in der Höhe, dh wenn die 4 Reihen A.1a-A.4a Fertig sind, häkeln Sie ab 1. Reihe wieder und gleichzeitig häkeln Sie A.5a weiter. Viel Spaß beim Häkeln!
02.04.2024 - 09:09
![]() Sharon wrote:
Sharon wrote:
Please could you clarify for me. The round 2 increases, should they be at the front and back of the piece, or on the shoulders? Many thanks.
30.12.2023 - 20:56DROPS Design answered:
Dear Sharon, these increases are made on the shoulders. Happy crocheting!
31.12.2023 - 10:46
![]() Emily Scott wrote:
Emily Scott wrote:
What is the point of the spacing of the increases in Round 2 of the yoke? Why are they bunched up in an awkward spot on the opposite side of the front and back of the garment? It doesn't seem to make any difference in the shaping of the garment later on in the pattern, and the increases being all together means that the yoke on mine won't lay flat.
01.11.2023 - 21:28DROPS Design answered:
Dear Mrs Scott, on this round you will just work with dc increasing on mid front and on mid back with 2 dc in each of the 8 dc on mid back/mid front. this row is the one with a star in A.1/A.5, that's just a dc row with increases. Happy crocheting!
02.11.2023 - 17:36
![]() Maria wrote:
Maria wrote:
Nel giro 2, dove si indica di eseguire 2 maglie alte in ognuna delle 8 maglie alte successive (= 8 maglie alte aumentate) si ottengono 16 maglie. Sono le 16 maglie delle maniche? Se si nel centro deve di queste deve essere eseguito il motivo A5 giusto. Grazie
22.07.2023 - 09:55
![]() Lilian wrote:
Lilian wrote:
Am embarking on this beautiful Tunic but the pattern looks challenging all the same ,lets do this!
16.11.2022 - 14:28
![]() Maren wrote:
Maren wrote:
3. RUNDE: 1x A.1 + 3x A.2 + 1x A.3 + 6x A.2 + 1x A.5 + 6x A.2 + 1x A.3 + 6x A.2 + 1x A.5 + 1x A.2 + 1x A.4 => rechnerisch: 28 Bögen + feste Masche (nicht 32). Wo liegt mein Fehler? Sollen schon Stäbchengruppen statt Luftmaschen gehäkelt werden?
27.10.2022 - 17:25DROPS Design answered:
Liebe Maren, am Ende dieser Runde sind es 2 Lufmaschenbogen in jedem A.2 und in jedem A.5, so haben Sie: A.1x1, A.2x3, A.3x2, A.2x6, A.5x2, A.2x6, A.3x2, A.2x6, A.5x2,A.2x1, A.4x1=1+3+2+6+2+6+2+6+2+1+1=32 Luftmaschenbogen. Viel Spaß beim häkeln!
28.10.2022 - 14:48
![]() Eileen Niclasen wrote:
Eileen Niclasen wrote:
Jeg ville også gerne vide om man kan få opskriften med ord istedent for diagram?
25.04.2022 - 23:31DROPS Design answered:
Hej Eileen, det har vi desværre ikke, men længere nede i spørgsmål og svar har vi beskrevet de først 3 rækker, har du først hæklet dem, så er jeg sikker på at du kan fortsætte :)
26.04.2022 - 13:21
![]() Vivi Kaae wrote:
Vivi Kaae wrote:
Findes opskriften med ord i stedet for diagram, jeg er desværre en af dem der ikke forstår diagram og har brug for en ordforklaring? Mvh Vivi
25.04.2022 - 21:33DROPS Design answered:
Hej Vivi, det har vi desværre ikke, men længere nede i spørgsmål og svar har vi beskrevet de først 3 rækker, har du først hæklet dem, så er jeg sikker på at du kan fortsætte :)
26.04.2022 - 13:21
|
|||||||||||||||||||
Strawberry Delight#strawberrydelighttunic |
|||||||||||||||||||
|
|
|||||||||||||||||||
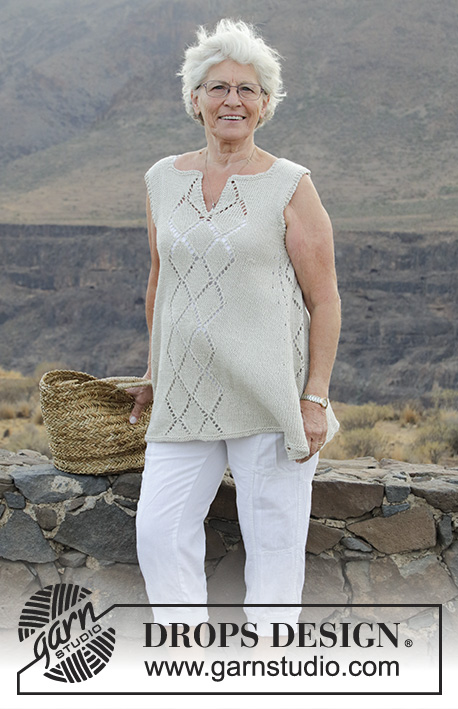
Crocheted poncho-jumper with lace pattern. Sizes S - XXXL. The piece is worked top down in DROPS Belle.
DROPS 190-9 |
|||||||||||||||||||
|
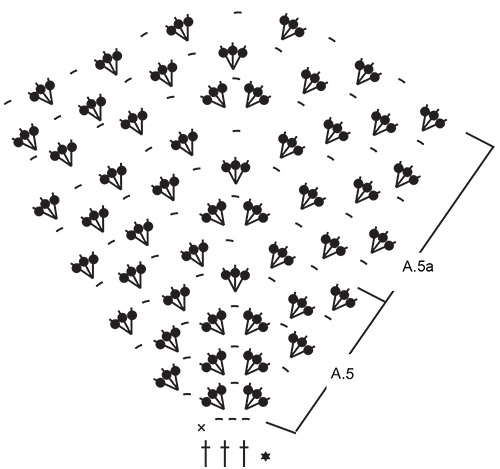
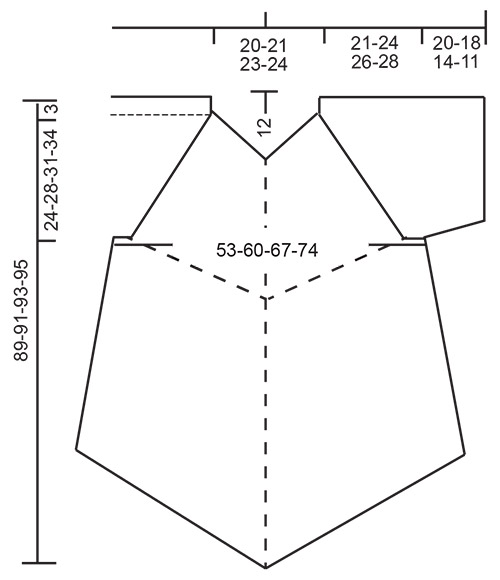
INFORMATION FOR THE PATTERN: PATTERN: See diagrams A.1 to A.5. CROCHET INFO: At the beginning of each round of treble crochets, replace the first treble crochet with 3 chain stitches. The round ends with 1 slip stitch in the chain stitch at the beginning of the round. Diagram A.1 shows how each round starts and diagram A.4 shows how each round ends; the slip stitch is worked in the 3rd chain stitch at the beginning of the round, the 3 chain stitches replace alternately the first and last treble crochet on the round. STRIPES: ROUND 1: Work with old pink – read COLOUR CHANGE! ROUND 2: Work with light beige Repeat rounds 1 and 2 a total of 3 times. ROUNDS 7 and 8: Work with old pink ROUNDS 9 and 10: Work with light beige Then work as follows: Work 3 rounds with old pink, 3 rounds with light beige. Work 4 rounds with old pink, 4 rounds with light beige. Continue like this, i.e. work 1 more round of each colour to finished length. When the gap between each stripe gets too long, cut and fasten the strand. COLOUR CHANGE: To get a neat transition when changing colours, work the last slip stitch on the round with the new colour as follows: Insert the hook in the last chain stitch from the beginning of the round, pick up the new strand, make a yarn over with the new colour and pull it through the loop on the hook. DECREASE TIP (for sleeves): Adjust so that decreases are worked on either round 1 or round 3 in A.2a. Decrease 1 treble crochet group by skipping the first chain stitch in the first repeat of A.2a. The next round is worked as before, but now there is no treble crochet group worked between the 2 treble crochet groups where you skipped a chain stitch (= 1 treble crochet group decreased). The next time you decrease, skip the last chain stitch in the last repeat of A.2a. The next round is worked as before, but there is no treble crochet group worked between the 2 treble crochet groups where you skipped a chain stitch (= 1 treble crochet group decreased). Decrease like this upwards, i.e. decrease alternately at the beginning and end of round. ---------------------------------------------------------- PONCHO JUMPER: The piece is worked in the round, top down. You increase mid front and back and in the middle of each sleeve. The piece is divided for the sleeves and body; the body is continued in the round with increases mid back and front as before. The sleeves are worked in the round to finish. YOKE: Work 107-107-125-125 chain stitches with hook size 4.5 mm and old pink and form them into a ring with 1 slip stitch in the first chain stitch. ROUND 1(worked with old pink): Work 3 chain stitches (= 1 treble crochet) in the first chain stitch – read CROCHET INFO, work 1 treble crochet in each of the next 1-1-5-5 chain stitches, * skip 1 chain stitch, 1 treble crochet in each of the next 6 chain stitches *, repeat from *-*, and finish with 1 slip stitch in the 3rd chain stitch at the beginning of the round = 92-92-108-108 treble crochets. ROUND 2 (worked with old pink – equivalent to the first round in A.1 to A.5 marked with a star): (the round starts in the transition between the sleeve and the back piece) Work * 1 treble crochet in each of the next 38-38-46-46 treble crochets (= back/front piece), work 2 treble crochets in each of the next 8 treble crochets (= 8 treble crochets increased) *, work from *-* 1 more time = 108-108-124-124 treble crochets. Continue by working STRIPES – see description above, as follows: ROUND 3 (equivalent to round 1 in the stripes and round 2 in A.1 to A.5): Work A.1 over the first 4 treble crochets, A.2 over the next 12 treble crochets (= 3 times in width), work A.3 over the next 3 treble crochets (= tip mid back), * A.2 over the next 24-24-28-28 treble crochets (= 6-6-7-7 times in width), A.5 over the next 3 treble crochets (= mid top of shoulder) *, A.2 over the next 24-24-28-28 treble crochets (= 6-6-7-7 times in width), A.3 over the next 3 treble crochets (= tip mid front), work from *-* 1 more time, work A.2 over the next 4-4-8-8 treble crochets and finish with A.4 over the last 4 treble crochets = 32-32-36-36 chain spaces with 1 double crochet between each. Continue the pattern like this; when A.1 to A.5 have been worked 1 time in height (i.e a total of 5 rounds have been worked) there is 44-44-48-48 treble crochets on last round.Repeat A.1a to A.5a. REMEMBER THE CROCHET TENSION! Increase 1 treble crochet group in each A.3a on each round. Increase 1 treble crochet group every 3rd round in each A.5a. For every 3rd round worked you increase a total of 8 treble crochet groups and the increased stitches are worked into A.2a as you go. Continue like this until you have worked 20-23-26-29 rounds of treble crochet groups in A.1a to A.5a in height. There are now 84-92-104-112 treble crochet groups/chain stitches on the round. The piece measures approx. 24-28-31-34 cm. The piece is now divided for the body and sleeves. BODY: Cut the strand. Count 14-16-18-20 chain stitches from the middle, seen from the right side, from mid back and out to the side/shoulder (without the chain stitch mid back), work 1 slip stitch around the 14th-16th-18th-20th chain stitch, work round 2 of A.1a (= 3 chain stitches, work 2 treble crochets around the same chain stitch), work 6 chain stitches (= under the sleeve), skip 13-13-15-15 chain stitches and 14-14-16-16 treble crochet groups (= sleeve), around the next chain stitch work A.2a onwards as before, work A.2a and A.3a as before until you have worked around 14-16-18-20 chain stitches past the middle chain stitch in front, work 6 chain stitches (= under the sleeve), skip 13-13-15-15 chain stitches and 14-14-16-16 treble crochet groups (= sleeve), work A.2a and A.3a as before until there is 1 chain stitch left, finish with round 2 of A.4a around the same space as the slip stitch at the beginning of the round = a total of 60-68-76-84 treble crochet groups (including the treble crochet group mid front and mid back) and 6 chain stitches under each sleeve. The next round is worked as follows: Work A.1a around the 6 chain stitches under the sleeve, continue with A.2a and A.3a as before as far as the 6 chain stitches under the other sleeve, work A.2a around the 6 chain stitches under the sleeve 1 time, then work pattern as before to end of round. In other words continue to increase mid front and back with A.3a; the rounds start with A.1a and finish with A.4a and the remaining stitches are worked as A.2a. Continue like this until the piece measures approx. 89-91-93-95 cm, measured from the shoulder and down to the tip in front of piece. Cut and fasten the strands. SLEEVE: The sleeves are worked in the round with light beige. Start in the first chain stitch which was skipped when the sleeve and body were divided, work 1 slip stitch around this chain stitch, work round 2 of A.1a (= 3 chain stitches, work 2 treble crochets around the same chain stitch), work A.2a in each of the 12-12-14-14 chain stitches/13-13-15-15 treble crochet groups which were skipped, work 6 chain stitches mid under sleeve and finish with 1 slip stitch in the 3rd chain stitch at the beginning of the round. Continue with A.1a and A.2a on the next round, then finish with one repeat of A.2a and A.4a around the 6 chain stitches worked under the sleeve = 14-14-16-16 repeats of A.1a/A.2a/A.4a. Continue this pattern. When the piece measures 3 cm decrease 1 treble crochet group under the sleeve after A.1/ before A.4 – read DECREASE TIP! Decrease like this every 3-3-2-2 cm a total of 3 times = 11-11-13-13 treble crochet groups. Cut and fasten the strand when the sleeve measures 20-18-14-11 cm from the division of body/sleeve. Work the other sleeve in the same way. ASSEMBLY: Sew the opening under the sleeves. |
|||||||||||||||||||
Diagram explanations |
|||||||||||||||||||
|
|||||||||||||||||||
 |
|||||||||||||||||||
 |
|||||||||||||||||||
 |
|||||||||||||||||||
 |
|||||||||||||||||||
 |
|||||||||||||||||||
Have you finished this pattern?Tag your pictures with #dropspattern #strawberrydelighttunic or submit them to the #dropsfan gallery. Do you need help with this pattern?You'll find 9 tutorial videos, a Comments/Questions area and more by visiting the pattern on garnstudio.com. © 1982-2026 DROPS Design A/S. We reserve all rights. This document, including all its sub-sections, has copyrights. Read more about what you can do with our patterns at the bottom of each pattern on our site. |
|||||||||||||||||||


With over 40 years in knitting and crochet design, DROPS Design offers one of the most extensive collections of free patterns on the internet - translated to 17 languages. As of today we count 325 catalogues and 12298 patterns translated into English (UK/cm).
We work hard to bring you the best knitting and crochet have to offer, inspiration and advice as well as great quality yarns at incredible prices! Would you like to use our patterns for other than personal use? You can read what you are allowed to do in the Copyright text at the bottom of all our patterns. Happy crafting!
Post a comment to pattern DROPS 190-9
We would love to hear what you have to say about this pattern!
If you want to leave a question, please make sure you select the correct category in the form below, to speed up the answering process. Required fields are marked *.