DROPS Belle
DROPS Belle
53% Cotton, 33% Viscose, 14% Linen
from 2.00 £ /50g
DROPS SS24

Strawberry Delight

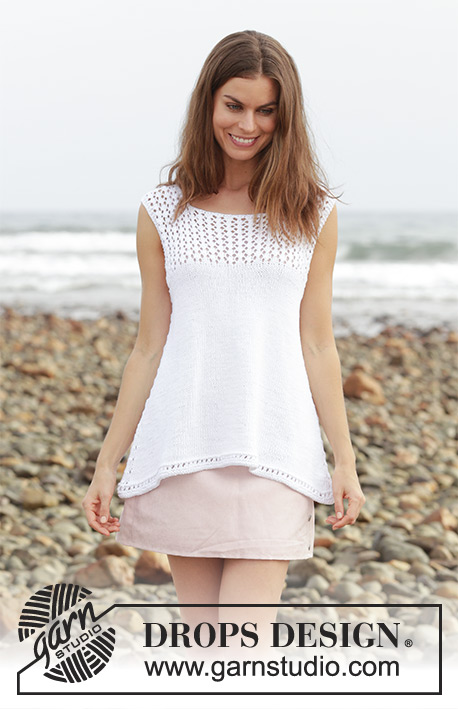
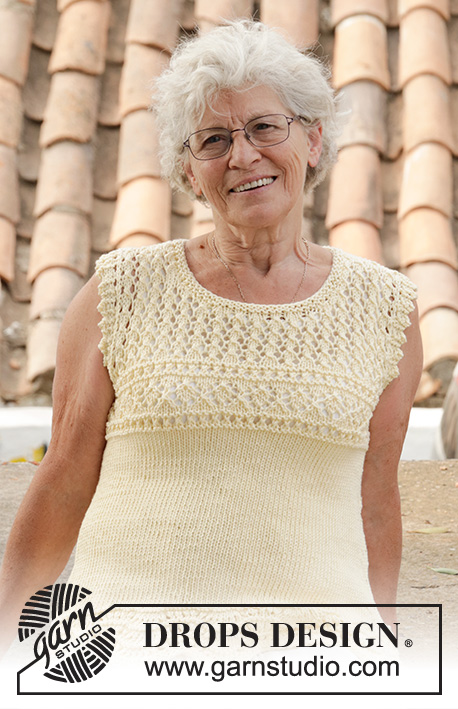
Crocheted poncho-jumper with lace pattern. Sizes S - XXXL. The piece is worked top down in DROPS Belle.

DROPS 190-9
DROPS Design: Pattern no vs-043
Yarn group B
-----------------------------------------------------------
Sizes: S/M – L/XL - XXL - XXXL
Materials:
DROPS BELLE from Garnstudio (belongs to yarn group B)
400-400-450-500-550-600 g colour 11, old pink
350-400-400-450-450-500 g colour 03, light beige

The piece can also be crocheted with yarn from:
"Alternative yarn (Yarn group B)" – see link below.

DROPS CROCHET HOOK SIZE 4.5 MM – or the size needed to get 16 treble crochets and 9 rows on 10 cm in width and 10 cm in height.
----------------------------------------------------------

-------------------------------------------------------

Alternative Yarn – See how to change yarns here
Yarn Groups A to F – Use the same pattern and change the yarn here
Yarn usage using an alternative yarn – Use our yarn converter here

-------------------------------------------------------

DROPS Belle
DROPS Belle
53% Cotton, 33% Viscose, 14% Linen
from 2.00 £ /50g

Pattern instructions

NOTE: This pattern is written in British English. All measurements in charts are in cm. For conversion from cm to inches - click here. There are different terms for crocheting in British and American English. If this pattern includes crochet, click for "crochet terms" here. For this pattern in American English, please click here.
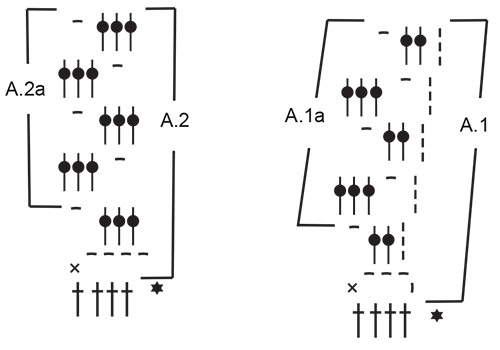
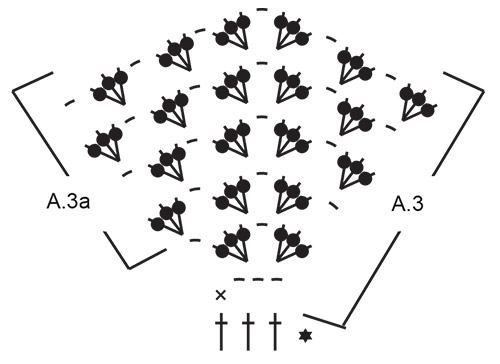
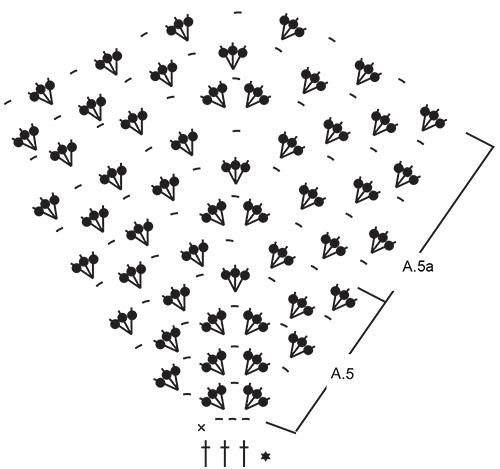
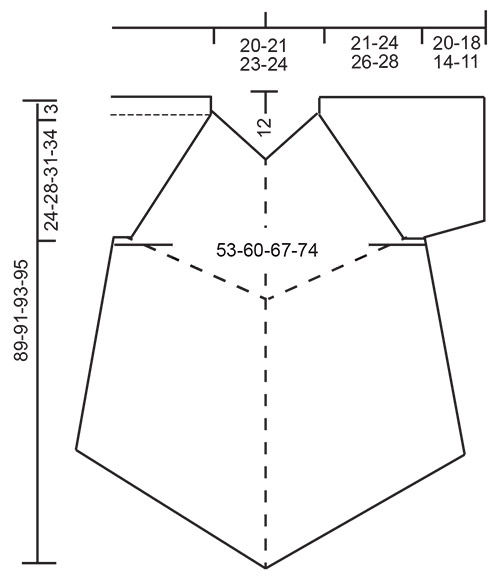
INFORMATION FOR THE PATTERN:

PATTERN:
See diagrams A.1 to A.5.

CROCHET INFO:
At the beginning of each round of treble crochets, replace the first treble crochet with 3 chain stitches. The round ends with 1 slip stitch in the chain stitch at the beginning of the round. Diagram A.1 shows how each round starts and diagram A.4 shows how each round ends; the slip stitch is worked in the 3rd chain stitch at the beginning of the round, the 3 chain stitches replace alternately the first and last treble crochet on the round.

STRIPES:
ROUND 1: Work with old pink – read COLOUR CHANGE!
ROUND 2: Work with light beige
Repeat rounds 1 and 2 a total of 3 times.
ROUNDS 7 and 8: Work with old pink
ROUNDS 9 and 10: Work with light beige
Then work as follows:
Work 3 rounds with old pink, 3 rounds with light beige.
Work 4 rounds with old pink, 4 rounds with light beige. Continue like this, i.e. work 1 more round of each colour to finished length.
When the gap between each stripe gets too long, cut and fasten the strand.

COLOUR CHANGE:
To get a neat transition when changing colours, work the last slip stitch on the round with the new colour as follows: Insert the hook in the last chain stitch from the beginning of the round, pick up the new strand, make a yarn over with the new colour and pull it through the loop on the hook.

DECREASE TIP (for sleeves):
Adjust so that decreases are worked on either round 1 or round 3 in A.2a. Decrease 1 treble crochet group by skipping the first chain stitch in the first repeat of A.2a. The next round is worked as before, but now there is no treble crochet group worked between the 2 treble crochet groups where you skipped a chain stitch (= 1 treble crochet group decreased). The next time you decrease, skip the last chain stitch in the last repeat of A.2a. The next round is worked as before, but there is no treble crochet group worked between the 2 treble crochet groups where you skipped a chain stitch (= 1 treble crochet group decreased). Decrease like this upwards, i.e. decrease alternately at the beginning and end of round.
----------------------------------------------------------

PONCHO JUMPER:
The piece is worked in the round, top down. You increase mid front and back and in the middle of each sleeve. The piece is divided for the sleeves and body; the body is continued in the round with increases mid back and front as before. The sleeves are worked in the round to finish.

YOKE:
Work 107-107-125-125 chain stitches with hook size 4.5 mm and old pink and form them into a ring with 1 slip stitch in the first chain stitch.
ROUND 1(worked with old pink): Work 3 chain stitches (= 1 treble crochet) in the first chain stitch – read CROCHET INFO, work 1 treble crochet in each of the next 1-1-5-5 chain stitches, * skip 1 chain stitch, 1 treble crochet in each of the next 6 chain stitches *, repeat from *-*, and finish with 1 slip stitch in the 3rd chain stitch at the beginning of the round = 92-92-108-108 treble crochets. 

ROUND 2 (worked with old pink – equivalent to the first round in A.1 to A.5 marked with a star): (the round starts in the transition between the sleeve and the back piece) Work * 1 treble crochet in each of the next 38-38-46-46 treble crochets (= back/front piece), work 2 treble crochets in each of the next 8 treble crochets (= 8 treble crochets increased) *, work from *-* 1 more time = 108-108-124-124 treble crochets.

Continue by working STRIPES – see description above, as follows:
ROUND 3 (equivalent to round 1 in the stripes and round 2 in A.1 to A.5): Work A.1 over the first 4 treble crochets, A.2 over the next 12 treble crochets (= 3 times in width), work A.3 over the next 3 treble crochets (= tip mid back), * A.2 over the next 24-24-28-28 treble crochets (= 6-6-7-7 times in width), A.5 over the next 3 treble crochets (= mid top of shoulder) *, A.2 over the next 24-24-28-28 treble crochets (= 6-6-7-7 times in width), A.3 over the next 3 treble crochets (= tip mid front), work from *-* 1 more time, work A.2 over the next 4-4-8-8 treble crochets and finish with A.4 over the last 4 treble crochets = 32-32-36-36 chain spaces with 1 double crochet between each.

Continue the pattern like this; when A.1 to A.5 have been worked 1 time in height (i.e a total of 5 rounds have been worked) there is 44-44-48-48 treble crochets on last round.Repeat A.1a to A.5a. REMEMBER THE CROCHET TENSION! Increase 1 treble crochet group in each A.3a on each round. Increase 1 treble crochet group every 3rd round in each A.5a. For every 3rd round worked you increase a total of 8 treble crochet groups and the increased stitches are worked into A.2a as you go. Continue like this until you have worked 20-23-26-29 rounds of treble crochet groups in A.1a to A.5a in height. There are now 84-92-104-112 treble crochet groups/chain stitches on the round. The piece measures approx. 24-28-31-34 cm. The piece is now divided for the body and sleeves.

BODY:
Cut the strand. Count 14-16-18-20 chain stitches from the middle, seen from the right side, from mid back and out to the side/shoulder (without the chain stitch mid back), work 1 slip stitch around the 14th-16th-18th-20th chain stitch, work round 2 of A.1a (= 3 chain stitches, work 2 treble crochets around the same chain stitch), work 6 chain stitches (= under the sleeve), skip 13-13-15-15 chain stitches and 14-14-16-16 treble crochet groups (= sleeve), around the next chain stitch work A.2a onwards as before, work A.2a and A.3a as before until you have worked around 14-16-18-20 chain stitches past the middle chain stitch in front, work 6 chain stitches (= under the sleeve), skip 13-13-15-15 chain stitches and 14-14-16-16 treble crochet groups (= sleeve), work A.2a and A.3a as before until there is 1 chain stitch left, finish with round 2 of A.4a around the same space as the slip stitch at the beginning of the round = a total of 60-68-76-84 treble crochet groups (including the treble crochet group mid front and mid back) and 6 chain stitches under each sleeve. The next round is worked as follows: Work A.1a around the 6 chain stitches under the sleeve, continue with A.2a and A.3a as before as far as the 6 chain stitches under the other sleeve, work A.2a around the 6 chain stitches under the sleeve 1 time, then work pattern as before to end of round. In other words continue to increase mid front and back with A.3a; the rounds start with A.1a and finish with A.4a and the remaining stitches are worked as A.2a. Continue like this until the piece measures approx. 89-91-93-95 cm, measured from the shoulder and down to the tip in front of piece. Cut and fasten the strands.

SLEEVE:
The sleeves are worked in the round with light beige.
Start in the first chain stitch which was skipped when the sleeve and body were divided, work 1 slip stitch around this chain stitch, work round 2 of A.1a (= 3 chain stitches, work 2 treble crochets around the same chain stitch), work A.2a in each of the 12-12-14-14 chain stitches/13-13-15-15 treble crochet groups which were skipped, work 6 chain stitches mid under sleeve and finish with 1 slip stitch in the 3rd chain stitch at the beginning of the round. Continue with A.1a and A.2a on the next round, then finish with one repeat of A.2a and A.4a around the 6 chain stitches worked under the sleeve = 14-14-16-16 repeats of A.1a/A.2a/A.4a. Continue this pattern. When the piece measures 3 cm decrease 1 treble crochet group under the sleeve after A.1/ before A.4 – read DECREASE TIP! Decrease like this every 3-3-2-2 cm a total of 3 times = 11-11-13-13 treble crochet groups. Cut and fasten the strand when the sleeve measures 20-18-14-11 cm from the division of body/sleeve. Work the other sleeve in the same way.

ASSEMBLY:
Sew the opening under the sleeves.

This pattern has been corrected.

Updated online: 07.03.2022
ROUND 3: ... work A.2 over the next 4-4-8-8 treble crochets and finish with A.4 over the last 4 treble crochets = 32-32-36-36 chain spaces with 1 double crochet between each.

Diagram

symbols = double crochet
symbols = treble crochet in stitch
symbols = treble crochet around chain stitch/chain-space
symbols = slip stitch
symbols = chain stitch
symbols = first round explained in text
diagram
diagram
diagram
diagram
diagram
Do you have a question? See a list of frequently asked questions (FAQ)

Knitting tension is what determines the final measurements of your work, and is usually measured per 10 x 10 cm. It is provided like so: number of stitches in width x number of rows in height - eg: 19 stitches x 26 rows = 10 x 10 cm.

The knitting tension is very individual; some people knit/crochet loosely while others work tightly. You adjust the knitting tension with the needle size, which is why the suggested needle size is only meant as a guide! You need to adjust this (up or down) to ensure that YOUR knitting tension matches the knitting tension provided in the pattern. If you work with a different knitting tension than provided you will have a different yarn consumption, and your work will have different measurements than what the pattern suggests.

The knitting tension also determines which yarns can replace each other. As long as you achieve the same knitting tension you can replace one yarn with another.

See DROPS lesson: How to measure your tension/gauge

See DROPS video: How to make a gauge tension swatch

The required amount of yarn is provided in grams, eg: 450 g. To calculate how many balls you’ll need you first need to know how many grams are in 1 ball (25g, 50g or 100g). This information is available if you click on the individual yarn quality on our pages. Divide the amount required with the amount of each ball. For example, if each ball is 50g (the most common amount), the calculation will be as follows: 450 / 50 = 9 balls.

The important thing when changing from one yarn to another is that the knitting/crochet tension remains the same. This is so that the measurements of the finished piece will be the same as on the sketch provided. It is easier to achieve the same knitting tension using yarns from the same yarn group. It is also possible to work with multiple strands of a thinner yarn to achieve the knitting tension of a thicker one. Please try our yarn converter. We recommend you to always work a test swatch.

Please NOTE: when changing yarn the garment might have a different look and feel to the garment in the photo, due to individual properties and qualities of each yarn.

See DROPS lesson: Can I use a different yarn than the one mentioned in the pattern?

All our yarns are categorised into yarn groups (from A to F) according to thickness and knitting tension – group A contains the thinnest yarns and group F the thickest. This makes it easier for you to find alternative yarns to our patterns, should you wish to switch yarn. All yarns within the same group have a similar knitting tension and can easily replace each other. However, different yarn qualities have different structures and properties which will give the finished work a unique look and feel.

Click here for an overview of the yarns in each yarn group

At the top of all our patterns you’ll find a link to our yarn calculator, which is a helpful tool should you wish to use a different yarn than suggested. By filling in the yarn quality you wish to replace, the amount (in your size) and number of strands, the calculator will present good alternative yarns with the same knitting tension. Additionally it will tell you how much you’ll require in the new qualities and whether you’ll need to work with multiple strands. Most skeins are 50g (some are 25g or 100g).

If the pattern is worked with multiple colours, every colour will have to be calculated separately. Similarly, if the pattern is worked with several strands of different yarns (for example 1 strand Alpaca and 1 strand Kid-Silk) you will have to find alternatives for each, individually.

Click here to see our yarn calculator

Since different yarns have different qualities and textures we have chosen to keep the original yarn in our patterns. However, you can easily find options among our available qualities by using our yarn calculator, or simply pick a yarn from the same yarn group.

It is possible that some retailers still have discontinued yarns in stock, or that someone has a few skeins at home that they would like to find patterns for.

The yarn calculator will provide both alternative yarn as well as required amount in the new quality.

If you think it's hard to decide what size to make, it can be a good idea to measure a garment you own already and like the size of. Then you can pick the size by comparing those measures with the ones available in the pattern's size chart.

You'll find the size chart at the bottom of the pattern.

See DROPS lesson: How to read size chart

The needle size provided in the pattern serves only as a guide, the important thing is to follow the knitting tension. And since knitting tension is very individual, you will have to adjust the needle size to ensure that YOUR tension is the same as in the pattern – maybe you’ll have to adjust 1, or even 2 needle sizes, up or down to achieve the correct tension. For this, we recommend that you work test swatches.

Should you work with a different knitting tension than the one provided, the measurements of the finished garment might deviate from the measurement sketch.

See DROPS lesson: How to measure your tension/gauge

See DROPS video: How to make a tension/gauge swatch

Working a garment top-down provides more flexibility and room for personal adjustment. For example it is easier to try the garment on while working, as well as making adjustments to length of yoke and shoulder caps.

The instructions are carefully explaining every step, in the correct order. Diagrams are adjusted to the knitting direction and are worked as usual.

The diagram depicts all rows/rounds, and every stitch seen from the right side. It is read from bottom to top, from right to left. 1 square = 1 stitch.

When working back and forth, every other row is worked from the right side and every other row is worked from the wrong side. When working from the wrong side, the diagram will have to be worked reversed: from left to right, knit stitches are purled, purl stitches are knit etc.

When working in the round every round is worked from the right side and the diagram are worked from right to left on all rounds.

See DROPS lesson: How to read knitting diagrams

The diagram depicts all rows/rounds, and every stitch seen from the right side. It is worked from bottom to top, from right to left.

When working back and forth every other row is worked from the right side: from right to left and every other row is worked from the wrong side: from left to right.

When working in the round, every row in the diagram are worked from the right side, from right to left.

When working a circular diagram you start in the middle and work your way outwards, counter clockwise, row by row.

The rows usually start with a given number of chain stitches (equivalent to the height of the following stitch), this will either be depicted in the diagram or explained in the pattern.

See DROPS lesson: How to read crochet diagrams

Instructions for working several diagrams after each other on the same row/round, will often be written like so: “work A.1, A.2, A.3 a total of 0-0-2-3-4 times". This means you work A.1 once, then A.2 is worked once, and A.3 is repeated (in width) the number of times provided for your size – in this case like so: S = 0 times, M = 0 times, L=2 times, XL= 3 times and XXL = 4 times.

The diagrams are worked as usual: begin with the first row in A.1, then work the first row in A.2 etc.

See DROPS lesson: How to read knitting diagrams

See DROPS lesson: How to read crochet diagrams

The total width of the garment (from wrist-to-wrist) will be larger in the larger sizes, despite the actual sleeves being shorter. The larger sizes have longer sleeve caps and wider shoulders, so there will be a good fit in all sizes.

The measurement sketch/schematic drawing provides information regarding the full length of the garment. If it’s a jumper or a jacket the length is measured from the highest point on the shoulder closest to the neckline, and straight down to the bottom of the garment. It is NOT measured from the tip of shoulder. Similarly, the length of yoke is measured from the highest point on the shoulder and down to where yoke is split into body and sleeves.

On a jacket measures are never taken along bands, unless specifically stated. Always measure inside band stitches when measuring the length.

See DROPS lesson: How to read a schematic drawing

Diagrams are often repeated on the round or in height. 1 repeat is the diagram the way it appears in the pattern. If it says to work 5 repeats of A.1 in the round, then you work A.1 a total of 5 times after/next to each other in the round. If it says to work 2 repeats of A.1 vertically/in height you work the entire diagram once, then begin again at the start and work the entire diagram one more time.

Chain stitches are slightly narrower than other stitches and to avoid working the cast-on edge too tight, we simply chain more stitches to begin with. The stitch count will be adjusted on the following row to fit the pattern and measurement sketch.

The rib edge is more elastic and will contract slightly compared to, for example, stocking stitch. By increasing before the rib edge, you avoid a visible difference in width between the rib edge and the rest of the body.

It’s very easy to cast off too tightly, and by making yarn overs while casting off (and simultaneously casting these off) you avoid a too tight cast off edge.

See DROPS video: How to bind off with yarn overs (yo)

To achieve an even increase (or decrease) you can increase on, for example: every 3rd and 4th row alternately, like so: work 2 rows and increase on the 3rd row, work 3 rows and increase on the 4th. Repeat this until the increase is complete.

See DROPS lesson: Increase or decrease 1 st on every 3rd and 4th row alternately

Should you prefer to work in the round instead of back and forth, you may of course adjust the pattern. You’ll need to add steeks mid-front (usually 5 stitches), and follow the instructions. When you would normally turn and work from the wrong side, simply work across the steek and continue in the round. At the end you’ll cut the piece open, pick up stitches to work bands, and cover the cut edges.

See DROPS video: How to knit steeks and cut open

Should you prefer to work back and forth instead of in the round, you may of course adjust the pattern so you work the pieces separately and then assemble them at the end. Divide the stitches for the body in 2, add 1 edge stitch in each side (for sewing) and work the front and back pieces separately.

See DROPS lesson: Can I adapt a pattern for circular needles into straight needles?

Pattern repeats can vary slightly in the different sizes, in order to get the correct proportions. If you’re not working the exact same size as the garment in the photo, yours might deviate slightly. This has been carefully developed and adjusted so that the complete impression of the garment is the same in all sizes.

Make sure to follow instructions and diagrams for your size!

If you have found a pattern you like which is available in women’s size it’s not very difficult to convert it to men’s size. The biggest difference will be the length of sleeves and body. Start working on the women size that you think would fit across the chest. The additional length will be worked right before you cast off for the armhole/sleeve cap. If the pattern is worked top-down you can add the length right after the armhole or before the first decrease on sleeve.

Regarding additional yarn amount, this will depend on how much length you add, but it is better with a skein too many than too few.

All yarns will have excess fibres (from production) that might come off as lint or shedding. Brushed yarns (ie hairier yarns) have more of these loose, excess fibres, causing more shedding.

Shedding also depends on what is worn under or over the garment, and whether this pulls at the yarn fibres. It’s therefore not possible to guarantee that there will be no shedding

Below are some tips on how to get the best result when working with hairier yarns:

1. When the garment is finished (before you wash it) shake it vigorously so the looser hairs come off. NOTE: do NOT use a lint roller, brush or any method that pulls at the yarn.

2. Place the garment in a plastic bag and put it in your freezer - the temperature will cause the fibres to become less attached to each other, and excess fibres will come off easier.

3. Leave in the freezer for a few hours before taking it out and shaking it again.

4. Wash the garment according to the instructions on the yarn label.

Pilling is a natural process that happens to even the most exclusive of fibers. It's a natural sign of wear and tear that is hard to avoid, and that is most visible in high friction areas of your garment like a sweater's arms and cuffs.

You can make your garment look as new by removing the pilling, using a fabric comb or a pill/lint remover.

Still can't find the answer you need? Then scroll down and leave your question so one of our experts can try to help you. This will be done normally within 5 to 10 working days.
In the meantime, you can read the questions and answers that others have left to this pattern or join the DROPS Workshop on Facebook to get help from fellow knitters/crocheters!

You might also like...

Post a comment to pattern DROPS 190-9

We would love to hear what you have to say about this pattern!

If you want to leave a question, please make sure you select the correct category in the form below, to speed up the answering process. Required fields are marked *.

Comments / Questions (47)

country flag France wrote:

Bonjour, est-ce possible de faire ce modèle sans faire de manche? la quantité de laine pour M est bien 400g? Merci, France

16.09.2020 - 19:09

DROPS Design answered:

Bonjour France, comme ce modèle se crochète de haut en bas, vous pourrez arrêter les manches au niveau de la division, à la fin de l'empiècement - pour le modèle présenté, il faut 400 g DROPS Belle dans chacune des 2 couleurs (soit 800 g au total). Bon crochet!

17.09.2020 - 10:34

country flag Sanne wrote:

Hey jeg forstår ikke omgang 3 vil du prøve a uddybe det lidt bedre for mig

18.08.2020 - 11:58

DROPS Design answered:

Hej Sanne, mener du der hvor du skal starte med at lave grupper á 3 stangmasker med 1 lm imellem hver gruppe? Første gang hækler du 3st i hver lm-bue, 1 lm og 3 st i næste lm-bue. På næste række hækler du de 3 st i den ene lm som er mellem grupperne i forrige række. God fornøjelse!

20.08.2020 - 12:29

country flag Anette Stjärnquist wrote:

Varv 3, är det luftmaskbågar, som ska göras, och hur många maskor ska jag hoppa över?

25.07.2020 - 09:34

DROPS Design answered:

Hej Anette, Mener du varv 2 ifølge A.1, så hækler du 4lm, hopper over 3 st og hækler 1 fm i 4. st. Nu hækler du 3lm, 1 fm i 4.st osv. God fornøjelse!

30.07.2020 - 15:46

country flag Merete Hesselager wrote:

Jeg kan simpelthen ikke forstå, at der ikke skal tages ind i siden. Den bliver jo så bred. I modellen 213-35 tages der 2 stangmaster ind i hver side i hver omgang samtidig med at der tages ud midt for og midt bag.

25.06.2020 - 18:43

country flag Merete Hesselager wrote:

Hej. Bør der ikke tages ind under ærmet? Blusen bliver meget bred. Den ser ikke ud som tegningen nederst i opskriften.

22.06.2020 - 18:39

DROPS Design answered:

Hej Merete, jo du tager ind under ærmerne. Men ikke i siden på blusen, her tager du ud midt foran og midt bagpå. Føler du at den bliver for stor, så kan du tage færre antal masker ud foran og bagpå :)

25.06.2020 - 09:04

country flag Kristel wrote:

Ik heb moeite met het haken van het lijf. Ik snap niet hoe ik moet beginnen en een opening houd voor de mouwen

13.05.2020 - 18:30

DROPS Design answered:

Dag Kristel,

Vanaf de punt midden achter tel je het aantal aangegeven steken uit richting de zijkant en daar hecht je de draad weer aan met 1 halve vaste. Dan haak je volgens de instructie richting de zijnaad. Op een gegeven moment haak je 6 lossen en sla je een aantal steken over (zoals aagegeven in de beschrijving voor jouw maat) om vervolgens weer verder te haken over het voorpand. Je hebt dan het armsgat gemaakt.

20.05.2020 - 11:09

country flag Susan wrote:

I am having trouble getting the correct size. I needed to go down a hook to get the gauge but the yoke is still too big. I don't understand what the numbers mean on the pattern picture. Inches??? CM.??? Thank you.

27.03.2020 - 17:27

DROPS Design answered:

Dear Susan, the numbers on the schematic drawings are in cm-s. Happy Crafting!

29.03.2020 - 22:46

country flag Setya wrote:

Hi, I'm having trouble making a sleeve. Round 1 how many dc groups should I make? And how many sp sts should I skip?

26.10.2019 - 10:20

DROPS Design answered:

Dear Setya, on first round on sleeve you should have 14 or 16 times (see size) A.1a/A.2a/A.4a ie 14 or 16 dc-groups + 14 or 16 ch-spaces. Happy crocheting!

04.11.2019 - 11:54

country flag Zuzana wrote:

Hello, I have trouble to find out, which row in the begining is the one with chain stiches (first line of the diagrams). I work start row chain, then 2 rows of doubles and then? Thank you.

07.09.2019 - 15:01

DROPS Design answered:

Dear Zuzana, the chain row is not drawn in diagram, the first row in diagram is the first round worked with treble crochets (= UK-English) after the chain row. When you have worked first row = 92-92-108 treble crochets, now work diagrams = ROUND 2 in text = round with the star in diagram. Happy crocheting!

09.09.2019 - 08:19

country flag Lucia wrote:

È molto bello questo modello, ce n'è uno simile aperto davanti? Eventualmente anche con spiegazioni in lingua non italiana. Grazie❣

23.06.2019 - 15:46

DROPS Design answered:

Buongiorno Lucia. Purtroppo una versione aperta sul davanti non è prevista. A questo link trova l’elenco dei modelli a poncho disponibili in lingua inglese. Può vedere se ne trova uno che soddisfi le sue esigenze. Se non disponibile in italiano, può chiederne la traduzione. Buon lavoro!

23.06.2019 - 20:50