
Popular categories
Looking for a yarn?


Comments / Questions (212)
![]() Anke wrote:
Anke wrote:
Hallo, wie häkelt man den Rand? Irgendwie verstehe ich die zweite Reihe nicht 🙈
31.01.2025 - 13:30
![]() Martina wrote:
Martina wrote:
Schühchen 48 Maschen anschlagen, wenn das Muster über 8 Maschen geht, fehlen mir die 2 Randmaschen, oder? Wenn ich die Muster fertig gestrickt habe, soll ich 6 Maschen verteilt abnehmen, wären demnach 42 Maschen Rest. In der Anleitung stehen aber 38 Maschen Rest?? Sollen 10 Maschen abgenommen werden, statt 6?
24.12.2024 - 09:34DROPS Design answered:
Liebe Martina, in die 5. Größe stricken Sie die 48 Maschen mit nur A.4, dh die 8 Maschen A.4 insgesamt 6 Mal wiederholen (keine extra Randmaschen). Viel Spaß beim Stricken!
02.01.2025 - 11:03
![]() Meike wrote:
Meike wrote:
In A1 soll in der Hinreihe zwischen 2 Maschen Jemen Umschlag gearbeitet werden, werden diese in den Rückreihen links abgestrickt?
21.12.2024 - 09:05DROPS Design answered:
Liebe Meike, ja genau, die Hin- sowie die Rückreihen sind im Diagram gezeichnet, so bei der Rückreihe werden die Umschläge links gestrickt, damit Löcher entstehen; Viel Spaß beim Stricken!
02.01.2025 - 09:35
![]() Jane wrote:
Jane wrote:
Hi with this pattern I was looking for the hat also. Please and thanks
30.11.2024 - 23:23DROPS Design answered:
Hi Jane, you can find the pattern for the hat here. Happy knitting!
01.12.2024 - 19:18
![]() Rita Briggs wrote:
Rita Briggs wrote:
The jacket. Please explain why after casting on 125 the pattern = 120 a1 and a2 1stitch where are the rest?
08.11.2024 - 15:51DROPS Design answered:
Dear Mrs Briggs, work the 125 stitches as follows: 2 sts in garter stitch, then repeat the 8 stitches in A.1 a total of 15 times (over the next 8x15= 120 stitches), then work the stitch in A.2 (so that pattern is symmetrical) and finish with 2 stitches in garter stitch = 2+120+1+2=125. From Wrong side, read diagrams from the left towards the right and work: 2 sts in garter stitch, 1 st A.2, 8 sts A.1 x 15 and 2 sts in garter stitch. Happy knitting!
08.11.2024 - 16:03
![]() Stefanie Lorenz wrote:
Stefanie Lorenz wrote:
Guten Abend! Ich habe das Jäckchen gestrickt, habe aber das Gefühl, dass ein Band zu kurz ist. Wird das Band am linken Vorderteil durch die Kraus-Rechts-Rippen gezogen und am Rücken entlang nach wieder vorne? Dafür würde es nämlich nicht reichen. Danke für eure Hilfe! Stefanie
26.10.2024 - 21:46DROPS Design answered:
Liebe Frau Lorenz, bei der 1. Reihe der Häkelkante wird man 2 Bänder häkeln, dann wird man 2 separate Bindebänder häkeln, die jeweils an der Innenseite an der rechten Seite der Jacke anbringen und an der Außenseite der linken Seite angenäht werden (so sind es insgesamt 4 Bänder). Viel Spaß beim Häkeln!
28.10.2024 - 09:14
![]() Melanie wrote:
Melanie wrote:
I am questioning my math skills! Doing jacket, size 1/3, you split the stitches: 44 on each side, 58 for back. On each side, you decrease 1 stitch every other row x 18, then one every 4 rows x2. This means reduced by 20 to a total of 24. You increase on sleeve side of the front piece 6x4 (24) plus 19, totaling 43 added stitches to the 24 = 67, not 63 (which pattern says you will have). I have reread several times, what am I missing?
26.10.2024 - 05:16DROPS Design answered:
Dear Melanie, in the 3rd size you will decreasee first 22 times on every 2nd row then 2 times on every 4th row = 24 times/stitches so that you will have: 44 sts - 24 + (for sleeves: 24+19)=63 stitches. Happy knitting!
28.10.2024 - 10:25
![]() Melanie wrote:
Melanie wrote:
I think it helps. The language is not consistent - it’s reversed but meaning the same thing, and that is actually what I was doing as it made most sense. Thanks so much for your patience.
24.10.2024 - 20:47
![]() Melanie Bacon wrote:
Melanie Bacon wrote:
Just to be clear - it says to decrease every other, increase every row. Are the decreases every other row or every other right side row (like the increases). Sorry I’m finding this confusing. Lovely jacket so far!
24.10.2024 - 14:32DROPS Design answered:
Dear Mrs Bacon, when you decrease on mid front you decrease on every other row = on every row from right side then on every 4th row (= on every other row from right side); you increase at the end of every row from mid front towards side/sleeve = on every other row worked. The decrease for neck are worked towards opening on jacket, the stitches increased for sleeves are worked towards side. Can this help?
24.10.2024 - 15:14
![]() Melanie Bacon wrote:
Melanie Bacon wrote:
I am working on Odeta jacket, decreasing on front and increasing on sides of front. It says to add 6 stitches EVERY row on the side (for sleeve. To be clear: I add six stitches on the right hand needle, then turn the needles and immediately add 6 more before knitting back (on wrong side)? I used loop add on on the front, is there a good add on stitch for going back, given the first stitch is just a loop? I misread initially, started to add the 6stitches on right side only, am ripping out now
23.10.2024 - 21:02DROPS Design answered:
Dear Mrs Bacon, the new stitches for sleeve will be added at the end of every row from the mid front towards side/sleeve, ie on every other row from RS on right front piece/from WS on left front piece. You an use the technique shown in this lesson for example. Happy knitting!
24.10.2024 - 09:22
|
|||||||||||||||||||
Odeta#odetajacket |
|||||||||||||||||||
 |
 |
||||||||||||||||||
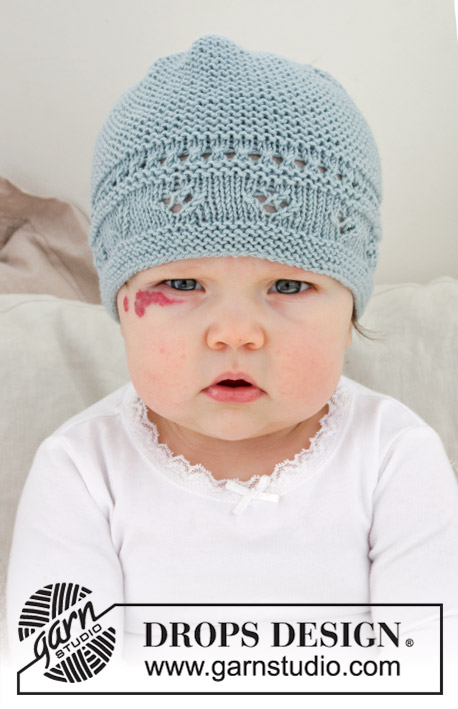
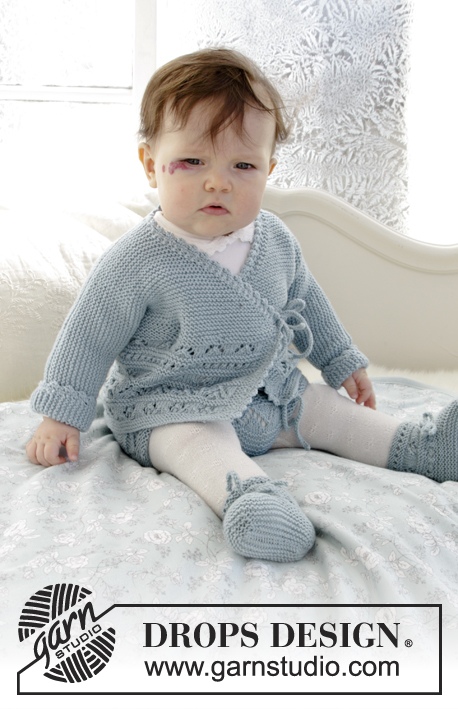
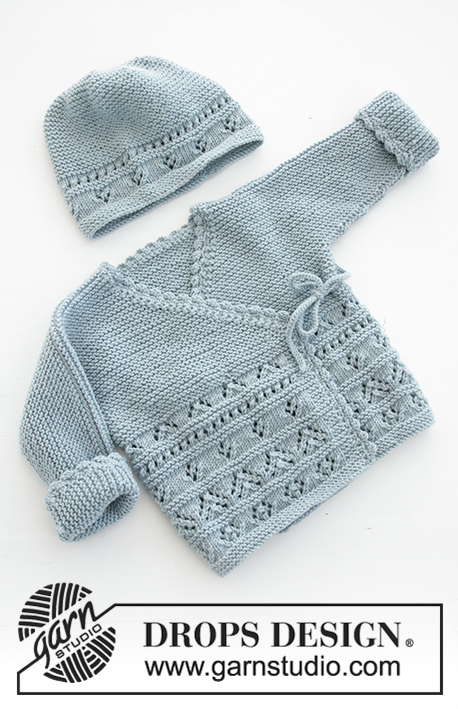
The set consists of: Knitted baby jacket and slippers with lace pattern and garter stitch. Sizes premature - 4 years. The set is worked in DROPS BabyMerino.
DROPS Baby 31-3 |
|||||||||||||||||||
|
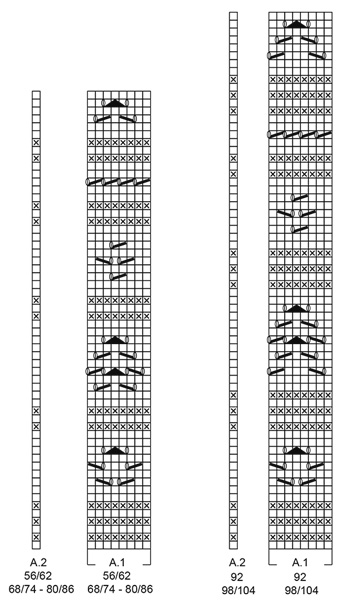
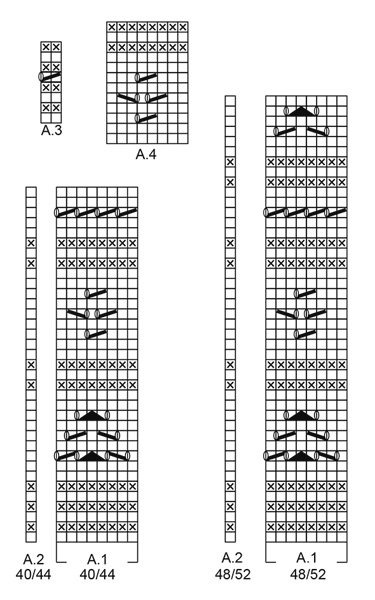
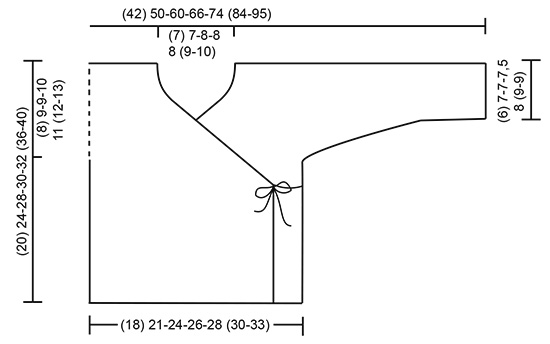
INFORMATION FOR THE PATTERN: RIDGE/GARTER STITCH (worked back and forth): 1 ridge = Knit 2 rows. PATTERN: Jacket: See diagrams A.1 and A.2. Choose diagram for your size. Slippers: See diagrams A.3 and A.4. The diagrams show all the rows in the pattern seen from the right side. DECREASE TIP (for jacket): Decrease inside the 1 band stitch in garter stitch. All decreases are made from the right side! Decrease as follows after the 1 band stitch: Slip 1 stitch as if to knit, knit 1, pass the slipped stitch over. Decrease as follows before the 1 band stitch: Knit 2 together. ---------------------------------------------------------- JACKET: The piece is worked back and forth with circular needle. The body is worked first, then stitches are cast on for sleeves and the front and back pieces are finished separately. BODY: Cast on (111) 125-145-157-173 (181-205) stitches with circular needle size 3 mm and BabyMerino. Work as follows from the right side: Work (3) 2-4-2-2 (2-2) stitches GARTER STITCH – see description above – (= band), work A.1 (= 8 stitches) over the next (104) 120-136-152-168 (176-200) stitches (= (13) 15-17-19-21 (22-25) times in width), work A.2 (= 1 stitch) and finish with (3) 2-4-2-2 (2-2) stitches garter stitch. REMEMBER THE KNITTING TENSION! On the last row in A.1 adjust the number of stitches to (112) 124-146-158-172 (182-204) stitches. When A.1 has been worked 1 time in height, continue in garter stitch to finished length. The piece measures approx. (10) 12-16-16-16 (19-19) cm. Insert 1 marker (34) 37-44-48-52 (55-62) stitches in from each side. Allow the markers to follow your work onwards, they mark the front and back pieces = (44) 50-58-62-68 (72-80) stitches on back piece. READ THE WHOLE OF THE NEXT SECTION BEFORE CONTINUING! DECREASE FOR NECK INSIDE 1 BAND STITCH IN EACH SIDE OF THE PIECE AT THE SAME TIME AS THE PIECE IS DIVIDED AND STITCHES ARE CAST ON FOR SLEEVES. DECREASE MID FRONT AS FOLLOWS: When the piece measures (10) 12-16-16-17 (20-23) cm – adjust so that the next row is worked from the right side, decrease 1 stitch for the neck inside the 1 band stitch in each side of the piece (= 2 stitches decreased) – read DECREASE TIP. Decrease like this every 2nd row a total of (18) 18-22-24-26 (28-32) times, then every 4th row a total of 2 times. THE PIECE IS NOW DIVIDED AND STITCHES ARE CAST ON FOR THE SLEEVES AS FOLLOWS: RIGHT FRONT PIECE: When the piece measures (12) 15-19-20-21 (24-27) cm, divide the piece at the 2 markers and the front and back pieces are finished separately. Adjust so that the next row is from the right side. Now work over all the stitches as far as the first marker (= right front piece). Place the remaining stitches on a thread. Cast on new stitches at the end of each row from the right side (= towards the side) for the sleeve as follows: Cast on (3) 4-6-6-6 (6-6) stitches a total of (4) 4-4-5-6 (7-8) times and then (16) 19-19-18-19 (23-26) stitches 1 time. When all the stitches are cast on for the sleeve and the decreases to neck are finished, there are (42) 52-63-70-79 (90-102) stitches on the needle for shoulder/sleeve. Work garter stitch until the piece measures (20) 24-28-30-32 (36-40) cm. Cast off. LEFT FRONT PIECE: Work over the last stitches which were placed on the thread, as far as the marker in the side. Work as for the right front piece, but in reverse. In other words, cast on stitches for the shoulder/sleeve at the end of each row from the wrong side. Continue to decrease inside the 1 band stitch at the end of each row from the right side as before (towards neck). BACK PIECE: = (44) 50-58-62-68 (72-80) stitches. Cast on new stitches at the end of each row in each side of the piece for the sleeves as follows: Cast on (3) 4-6-6-6 (6-6) stitches a total of (4) 4-4-5-6 (7-8) times and then (16) 19-19-18-19 (23-26) stitches 1 time = (100) 120-144-158-178 (202-228) stitches. When the piece measures (19) 23-27-29-31 (35-39) cm cast off the middle (16) 16-18-18-20 (22-24) stitches for neck and each shoulder/sleeve is finished separately = (42) 52-63-70-79 (90-102) stitches left on each shoulder/sleeve. Work until the piece measures (20) 24-28-30-32 (36-40) cm, adjust to match the front pieces. Cast off. Work the other shoulder/sleeve in the same way. ASSEMBLY: Sew the seams on top of sleeve with grafting stitches from the right side. Sew the seams under the sleeves edge to edge in the outermost loop of the outermost stitch. CROCHET EDGE: Crochet with hook size 2.5 mm and BabyMerino around the whole jacket opening (i.e. work from the right front piece, up along the jacket opening, around the neck and down the opening to the cast on edge on the left front piece) as follows: ROW 1: Work 1 slip stitch in the cast on edge on the right front piece, * 1 chain stitch, skip approx. 2 stitches/rows, 1 double crochet in the next stitch/row *, work from *-* to the corner where the decreases for neck started. Work the cord as follows: 1 double crochet in the tip, then work chain stitches for approx. 20-25 cm, turn and work back with 1 slip stitch in each chain stitch, then work 1 double crochet in the tip of the front piece again, continue the crochet edge around the jacket and neck to the tip on the left front piece, work cord as on the right front piece, continue working down the left front piece and finish with 1 slip stitch in the cast on edge. ROW 2: Work 1 chain stitch, 1 double crochet around the first chain stitch on the previous row, * 4 chain stitches, 1 treble crochet in the 4th chain stitch from the hook, skip 1 double crochet + 1 chain stitch + 1 double crochet, work 1 double crochet around the next chain stitch *, work from *-* (make sure you work over the cords so the cords lie underneath), finish with 1 slip stitch in the last stitch. Work rows 1 and 2 in the same way around the bottom of both sleeves (the rounds start with 1 chain stitch and finish with 1 slip stitch in the first chain stitch). Work 2 loose cords: Work chain stitches for approx. 20-25 cm, turn and work back with 1 slip stitch in each chain stitch. Cut the strand and work 1 more cord in the same way. Sew 1 cord to the inside of the right side in the side and 1 cord on the outside of the left side in the side. Make sure the two cords are at the same height on each side. ---------------------------------------------------------- SLIPPER: The slipper is worked back and forth with circular needle from mid back, top down; i.e. you first work the leg then the foot. Cast on (36) 38-40-44-48 (52-56) stitches with circular needle size 2.5 mm and BabyMerino. Work 1 stitch in GARTER STITCH – see above, A.3 (= 2 stitches) until 1 stitch remains, work 1 stitch in garter stitch . When A.3 has been worked 1 time in height, work the next row from the right side as follows: Work (2) 3-0-2-0 (2-0) stitches stocking stitch, A.4 (= 8 stitches) a total of (4) 4-5-5-6 (6-7) times in width and finish with (2) 3-0-2-0 (2-0) stitches stocking stitch. REMEMBER THE KNITTING TENSION! When A.4 has been completed 1 time in height continue with A.3 as follows: work 1 stitch in garter stitch, A.3 until 1 stitch remains, and work 1 stitch in garter stitch (the cord is later thread through this row of holes). When A.3 has been completed in height, work 2 RIDGES – see description above and decrease (6) 8-6-6-6- (10-14) stitches evenly on the last row from the right side = (30) 30-34-38-38 (42-42) stitches. Cut the strand. Now place the first (11) 11-12-13-13 (15-15) stitches and the last (11) 11-12-13-13 (15-15) stitches on two separate threads. The piece is now worked in garter stitch to finished length. Work (3) 3½-4-4½-5½ (6½-8) cm, over the middle (8) 8-10-12-12 (12-12) stitches (= mid top of slipper), cut the strand. The next row is worked as follows from the right side: Work the stitches from the one thread in the one side back onto the double pointed needles, knit up (7) 9-10-11-13 (16-21) stitches in the outermost loop of the outermost stitch along the side of the middle piece, work the (8) 8-10-12-12 (12-12) stitches on the needle (= front), knit up (7) 9-10-11-13 (16-21) stitches in the outermost loop of the outermost stitch along the other side of the middle piece and work the stitches from the other thread back onto the double pointed needles = (44) 48-54-60-64 (74-84) stitches on the needles. THE PIECE IS NOW MEASURED FROM HERE! Work a total of (2½) 3-3-4-5 (5-5) cm garter stitch over all stitches AT THE SAME TIME when you have worked approx. (1) 1½-1½-2-3 (3-3) cm, insert 1 marker (22) 24-27-30-32 (37-42) stitches in (= middle of slipper). Now decrease every 2nd row to finished length as follows: Knit 1 stitch, knit the next 2 stitches together (= 1 stitch decreased), knit until there are 2 stitches left before the marker, knit together the next 4 stitches, 2 and 2 (= 2 stitches decreased), knit until there are 3 stitches left, knit the next 2 stitches together (= 1 stitch decreased), knit 1 stitch (= 4 stitches decreased every 2nd row) = approx. (32) 36-42-48-52 (62-72) stitches. Cast off and sew the seam under the foot and up mid back in the outermost loop of the outermost stitch so the seam is flat. Work 1 more slipper in the same way. CORD: Work a cord as follows: Work chain stitches with hook size 2.5 mm and BabyMerino for approx. 30-40 cm, turn and work back with 1 slip stitch in each chain stitch. Cut and fasten the strand. Thread the cord in and out of the row of holes on the slipper (start and finish mid front of slipper). ---------------------------------------------------------- For shorts see DROPS number 31-4. ---------------------------------------------------------- |
|||||||||||||||||||
Diagram explanations |
|||||||||||||||||||
|
|||||||||||||||||||
 |
|||||||||||||||||||
 |
|||||||||||||||||||
 |
|||||||||||||||||||
Have you finished this pattern?Tag your pictures with #dropspattern #odetajacket or submit them to the #dropsfan gallery. Do you need help with this pattern?You'll find 27 tutorial videos, a Comments/Questions area and more by visiting the pattern on garnstudio.com. © 1982-2026 DROPS Design A/S. We reserve all rights. This document, including all its sub-sections, has copyrights. Read more about what you can do with our patterns at the bottom of each pattern on our site. |
|||||||||||||||||||


With over 40 years in knitting and crochet design, DROPS Design offers one of the most extensive collections of free patterns on the internet - translated to 17 languages. As of today we count 324 catalogues and 12260 patterns translated into English (UK/cm).
We work hard to bring you the best knitting and crochet have to offer, inspiration and advice as well as great quality yarns at incredible prices! Would you like to use our patterns for other than personal use? You can read what you are allowed to do in the Copyright text at the bottom of all our patterns. Happy crafting!
Post a comment to pattern DROPS Baby 31-3
We would love to hear what you have to say about this pattern!
If you want to leave a question, please make sure you select the correct category in the form below, to speed up the answering process. Required fields are marked *.