
Popular categories
Looking for a yarn?


Comments / Questions (212)
![]() Elena wrote:
Elena wrote:
Buongiorno, dove trovo la spiegazione x il cappello del Completo? Grazie mille
27.02.2019 - 09:38DROPS Design answered:
Buongiorno Elena. Il cappello è il modello Baby 31-2. Buon lavoro!
27.02.2019 - 11:30
![]() Carin Ehrs wrote:
Carin Ehrs wrote:
Varför ska man använda rundsticka till koftan? Gå det inte lika bra med långa stickor?
01.02.2019 - 14:49DROPS Design answered:
Hei Carin. Det er fordi det skal strikkes over ganske mange masker, og det kan være lettere om man strikker på rundpinne. Det kan også være lettere når du senere skal dele arbeidet og sette delene på en tråd. Det er selvfølgelig ikke noe i veien for at du strikker på 2 pinner om du ønsker det, men vær da obs på høyt maskeantall og deling av arbeidet. God fornøyelse
04.02.2019 - 14:55
![]() Claudia Meischl wrote:
Claudia Meischl wrote:
Hallo, ich bin eben bei der Aufnahme der Ärmelmaschen, soll ich weiterhin in jeder 4. REIHE eine Masche abnehmen bis zum Schluss ? LG Claudia
30.01.2019 - 08:33DROPS Design answered:
Liebe Frau Meischl, die Maschen für den Ärmel schlagen Sie am Ende jeder Hinreihe (Rechtes Vorderteil)/am Ende jeder Rückreihe (linkes Vorderteil)/ am Ende jeder Hin- sowie Rückreihe (Rückenteil): (3) 4-6-6-6 (6-6) Maschen (4) 4-4-5-6 (7-8) Mal und dann (16) 19-19-18-19 (23-26) Maschen 1 Mal für jeden Ärmel. Viel Spaß beim stricken!
30.01.2019 - 09:35
![]() Hanneke wrote:
Hanneke wrote:
Als A. 1 keer in de hoogte 3 is gebreid, Dit snap ik niet, Moet het niet A.3 zijn en dan 1 keer? Maar hoogte 3?? Het gaat om de slofjes
27.01.2019 - 17:03DROPS Design answered:
Dag Hanneke,
Er stond inderdaad een typefout in; het moet zijn: Als A.3 1 keer in de hoogte is gebreid. Ik heb het nu aangepast. Hopelijk kom je er nu wel uit.
03.02.2019 - 13:19
![]() Mary wrote:
Mary wrote:
Scusate, ma nelle tecniche impiegate c'è solo il punto legaccio e le diminuzioni sono specificate solo per il cardigan. Le coste e le diminuzioni pantofola come le faccio?
21.01.2019 - 18:55DROPS Design answered:
Buonasera Mary. Le 2 coste sono coste a legaccio, quindi 4 Ferri a diritto e per diminuire lavora 2 maglie insieme a diritto a intervalli regolari. Buon lavoro!
21.01.2019 - 19:50
![]() Mary wrote:
Mary wrote:
Buongiorno, scusate non trovo i suggerimenti sulle coste e diminuzioni della pantofole (quelle di cui si parla dopo aver completato per la seconda volta A3)..Grazie
21.01.2019 - 08:39DROPS Design answered:
Buongiorno Mary, può trovare tutte le indicazioni sotto il paragrafo TECNICHE IMPIEGATE all'inizio delle spiegazioni del modello. Buon lavoro!
21.01.2019 - 10:28
![]() Claartje Hoekzema wrote:
Claartje Hoekzema wrote:
Ik kom niet helemaal uit het stukje van het minderen bij de voorbiessteek. Ik brei het vestje in maat 48/52 en heb dan dus een voorbies van 2 steken. Is het de bedoeling dat ik tússen deze 2 steken in minder of dien ik eerst de 2 steken te breien en de eerstvolgende steek te minderen? (aan het einde dan dus voor de laatste 2 steken) Alvast hartelijk dank voor uw reactie
16.01.2019 - 11:33DROPS Design answered:
Dag Claartje,
Je mindert inderdaad naast de laatste voorbiessteek. Dus aan het begin van de naald eerst 1 voorbiessteek en dan minderen, aan het eind van de naald brei je tot er 3 steken over zijn, dan minderen en dan 1 laatste voorbiessteek. (Zie ook bij 'TIP VOOR HET MINDEREN')
17.01.2019 - 09:55
![]() Barbara Joseph wrote:
Barbara Joseph wrote:
Wie funktioniert der Maschenstich, wenn abgekettet wurde?
27.12.2018 - 22:14DROPS Design answered:
Liebe Frau Joseph, Dieses Video zeigt, wie man die Schulter/Ärmelnaht macht. Viel Spaß beim stricken!
02.01.2019 - 10:13
![]() Elena wrote:
Elena wrote:
Salve, non capisco a cosa si riferiscono i numeri sotto gli schemi A1. Grazie.
11.12.2018 - 13:29DROPS Design answered:
Buongiorno Elena. Indicano la taglia (espressa in cm) a cui il diagramma fa riferimento. P.es A.1 con sotto l'indicazione 92 - 98/104, indica che quello è il diagramma da seguire se sta lavorando la taglia 2 anni oppure la taglia 3/4 anni. Buon lavoro!
11.12.2018 - 15:38
![]() MARY wrote:
MARY wrote:
Buongiorno, io non ho capito che tipo di diminuizione è prevista per il cardigan, c'è scritto di seguire i suggerimenti per le diminuizioni ma io non li trovo, inoltre per le diminuizioni bordo vorrei sapere esattamente quali maglie diminuire. grazie
08.12.2018 - 10:13DROPS Design answered:
Buonasera Mary. Abbiamo aggiunto la parte mancante. Buon lavoro!
08.12.2018 - 21:36
|
|||||||||||||||||||
Odeta#odetajacket |
|||||||||||||||||||
 |
 |
||||||||||||||||||
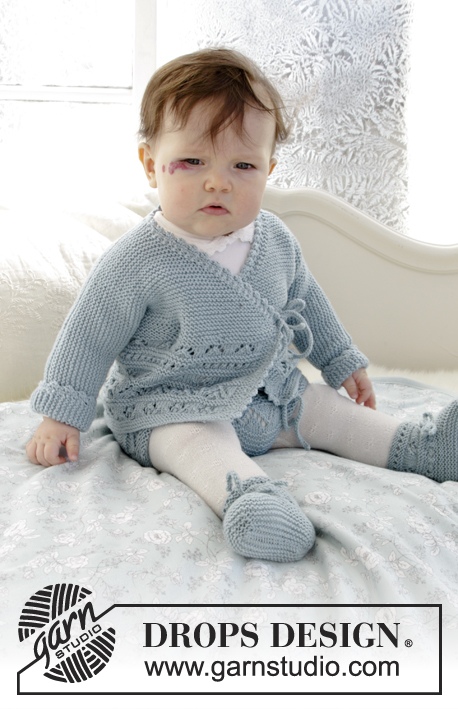
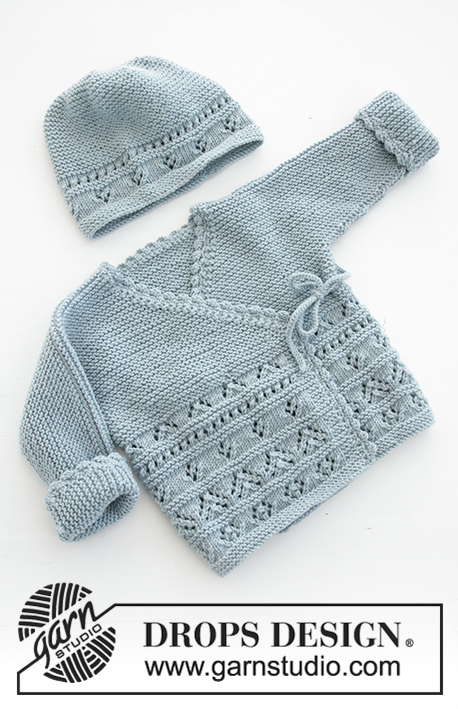
The set consists of: Knitted baby jacket and slippers with lace pattern and garter stitch. Sizes premature - 4 years. The set is worked in DROPS BabyMerino.
DROPS Baby 31-3 |
|||||||||||||||||||
|
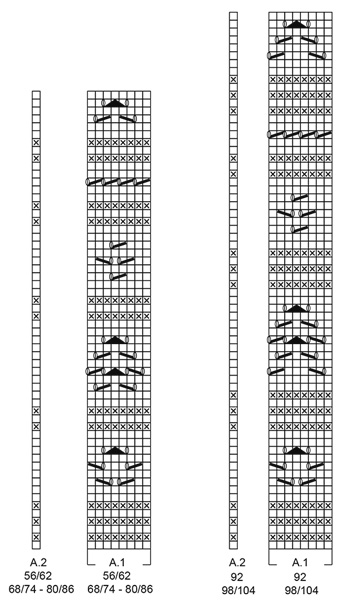
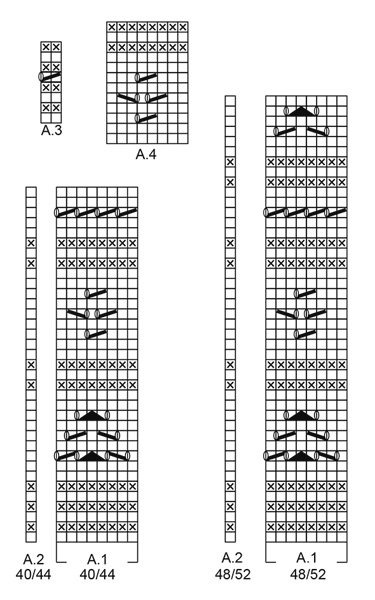
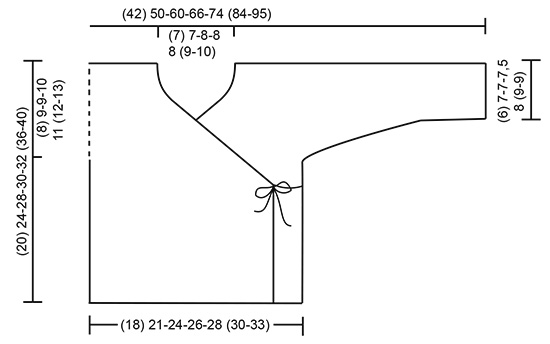
INFORMATION FOR THE PATTERN: RIDGE/GARTER STITCH (worked back and forth): 1 ridge = Knit 2 rows. PATTERN: Jacket: See diagrams A.1 and A.2. Choose diagram for your size. Slippers: See diagrams A.3 and A.4. The diagrams show all the rows in the pattern seen from the right side. DECREASE TIP (for jacket): Decrease inside the 1 band stitch in garter stitch. All decreases are made from the right side! Decrease as follows after the 1 band stitch: Slip 1 stitch as if to knit, knit 1, pass the slipped stitch over. Decrease as follows before the 1 band stitch: Knit 2 together. ---------------------------------------------------------- JACKET: The piece is worked back and forth with circular needle. The body is worked first, then stitches are cast on for sleeves and the front and back pieces are finished separately. BODY: Cast on (111) 125-145-157-173 (181-205) stitches with circular needle size 3 mm and BabyMerino. Work as follows from the right side: Work (3) 2-4-2-2 (2-2) stitches GARTER STITCH – see description above – (= band), work A.1 (= 8 stitches) over the next (104) 120-136-152-168 (176-200) stitches (= (13) 15-17-19-21 (22-25) times in width), work A.2 (= 1 stitch) and finish with (3) 2-4-2-2 (2-2) stitches garter stitch. REMEMBER THE KNITTING TENSION! On the last row in A.1 adjust the number of stitches to (112) 124-146-158-172 (182-204) stitches. When A.1 has been worked 1 time in height, continue in garter stitch to finished length. The piece measures approx. (10) 12-16-16-16 (19-19) cm. Insert 1 marker (34) 37-44-48-52 (55-62) stitches in from each side. Allow the markers to follow your work onwards, they mark the front and back pieces = (44) 50-58-62-68 (72-80) stitches on back piece. READ THE WHOLE OF THE NEXT SECTION BEFORE CONTINUING! DECREASE FOR NECK INSIDE 1 BAND STITCH IN EACH SIDE OF THE PIECE AT THE SAME TIME AS THE PIECE IS DIVIDED AND STITCHES ARE CAST ON FOR SLEEVES. DECREASE MID FRONT AS FOLLOWS: When the piece measures (10) 12-16-16-17 (20-23) cm – adjust so that the next row is worked from the right side, decrease 1 stitch for the neck inside the 1 band stitch in each side of the piece (= 2 stitches decreased) – read DECREASE TIP. Decrease like this every 2nd row a total of (18) 18-22-24-26 (28-32) times, then every 4th row a total of 2 times. THE PIECE IS NOW DIVIDED AND STITCHES ARE CAST ON FOR THE SLEEVES AS FOLLOWS: RIGHT FRONT PIECE: When the piece measures (12) 15-19-20-21 (24-27) cm, divide the piece at the 2 markers and the front and back pieces are finished separately. Adjust so that the next row is from the right side. Now work over all the stitches as far as the first marker (= right front piece). Place the remaining stitches on a thread. Cast on new stitches at the end of each row from the right side (= towards the side) for the sleeve as follows: Cast on (3) 4-6-6-6 (6-6) stitches a total of (4) 4-4-5-6 (7-8) times and then (16) 19-19-18-19 (23-26) stitches 1 time. When all the stitches are cast on for the sleeve and the decreases to neck are finished, there are (42) 52-63-70-79 (90-102) stitches on the needle for shoulder/sleeve. Work garter stitch until the piece measures (20) 24-28-30-32 (36-40) cm. Cast off. LEFT FRONT PIECE: Work over the last stitches which were placed on the thread, as far as the marker in the side. Work as for the right front piece, but in reverse. In other words, cast on stitches for the shoulder/sleeve at the end of each row from the wrong side. Continue to decrease inside the 1 band stitch at the end of each row from the right side as before (towards neck). BACK PIECE: = (44) 50-58-62-68 (72-80) stitches. Cast on new stitches at the end of each row in each side of the piece for the sleeves as follows: Cast on (3) 4-6-6-6 (6-6) stitches a total of (4) 4-4-5-6 (7-8) times and then (16) 19-19-18-19 (23-26) stitches 1 time = (100) 120-144-158-178 (202-228) stitches. When the piece measures (19) 23-27-29-31 (35-39) cm cast off the middle (16) 16-18-18-20 (22-24) stitches for neck and each shoulder/sleeve is finished separately = (42) 52-63-70-79 (90-102) stitches left on each shoulder/sleeve. Work until the piece measures (20) 24-28-30-32 (36-40) cm, adjust to match the front pieces. Cast off. Work the other shoulder/sleeve in the same way. ASSEMBLY: Sew the seams on top of sleeve with grafting stitches from the right side. Sew the seams under the sleeves edge to edge in the outermost loop of the outermost stitch. CROCHET EDGE: Crochet with hook size 2.5 mm and BabyMerino around the whole jacket opening (i.e. work from the right front piece, up along the jacket opening, around the neck and down the opening to the cast on edge on the left front piece) as follows: ROW 1: Work 1 slip stitch in the cast on edge on the right front piece, * 1 chain stitch, skip approx. 2 stitches/rows, 1 double crochet in the next stitch/row *, work from *-* to the corner where the decreases for neck started. Work the cord as follows: 1 double crochet in the tip, then work chain stitches for approx. 20-25 cm, turn and work back with 1 slip stitch in each chain stitch, then work 1 double crochet in the tip of the front piece again, continue the crochet edge around the jacket and neck to the tip on the left front piece, work cord as on the right front piece, continue working down the left front piece and finish with 1 slip stitch in the cast on edge. ROW 2: Work 1 chain stitch, 1 double crochet around the first chain stitch on the previous row, * 4 chain stitches, 1 treble crochet in the 4th chain stitch from the hook, skip 1 double crochet + 1 chain stitch + 1 double crochet, work 1 double crochet around the next chain stitch *, work from *-* (make sure you work over the cords so the cords lie underneath), finish with 1 slip stitch in the last stitch. Work rows 1 and 2 in the same way around the bottom of both sleeves (the rounds start with 1 chain stitch and finish with 1 slip stitch in the first chain stitch). Work 2 loose cords: Work chain stitches for approx. 20-25 cm, turn and work back with 1 slip stitch in each chain stitch. Cut the strand and work 1 more cord in the same way. Sew 1 cord to the inside of the right side in the side and 1 cord on the outside of the left side in the side. Make sure the two cords are at the same height on each side. ---------------------------------------------------------- SLIPPER: The slipper is worked back and forth with circular needle from mid back, top down; i.e. you first work the leg then the foot. Cast on (36) 38-40-44-48 (52-56) stitches with circular needle size 2.5 mm and BabyMerino. Work 1 stitch in GARTER STITCH – see above, A.3 (= 2 stitches) until 1 stitch remains, work 1 stitch in garter stitch . When A.3 has been worked 1 time in height, work the next row from the right side as follows: Work (2) 3-0-2-0 (2-0) stitches stocking stitch, A.4 (= 8 stitches) a total of (4) 4-5-5-6 (6-7) times in width and finish with (2) 3-0-2-0 (2-0) stitches stocking stitch. REMEMBER THE KNITTING TENSION! When A.4 has been completed 1 time in height continue with A.3 as follows: work 1 stitch in garter stitch, A.3 until 1 stitch remains, and work 1 stitch in garter stitch (the cord is later thread through this row of holes). When A.3 has been completed in height, work 2 RIDGES – see description above and decrease (6) 8-6-6-6- (10-14) stitches evenly on the last row from the right side = (30) 30-34-38-38 (42-42) stitches. Cut the strand. Now place the first (11) 11-12-13-13 (15-15) stitches and the last (11) 11-12-13-13 (15-15) stitches on two separate threads. The piece is now worked in garter stitch to finished length. Work (3) 3½-4-4½-5½ (6½-8) cm, over the middle (8) 8-10-12-12 (12-12) stitches (= mid top of slipper), cut the strand. The next row is worked as follows from the right side: Work the stitches from the one thread in the one side back onto the double pointed needles, knit up (7) 9-10-11-13 (16-21) stitches in the outermost loop of the outermost stitch along the side of the middle piece, work the (8) 8-10-12-12 (12-12) stitches on the needle (= front), knit up (7) 9-10-11-13 (16-21) stitches in the outermost loop of the outermost stitch along the other side of the middle piece and work the stitches from the other thread back onto the double pointed needles = (44) 48-54-60-64 (74-84) stitches on the needles. THE PIECE IS NOW MEASURED FROM HERE! Work a total of (2½) 3-3-4-5 (5-5) cm garter stitch over all stitches AT THE SAME TIME when you have worked approx. (1) 1½-1½-2-3 (3-3) cm, insert 1 marker (22) 24-27-30-32 (37-42) stitches in (= middle of slipper). Now decrease every 2nd row to finished length as follows: Knit 1 stitch, knit the next 2 stitches together (= 1 stitch decreased), knit until there are 2 stitches left before the marker, knit together the next 4 stitches, 2 and 2 (= 2 stitches decreased), knit until there are 3 stitches left, knit the next 2 stitches together (= 1 stitch decreased), knit 1 stitch (= 4 stitches decreased every 2nd row) = approx. (32) 36-42-48-52 (62-72) stitches. Cast off and sew the seam under the foot and up mid back in the outermost loop of the outermost stitch so the seam is flat. Work 1 more slipper in the same way. CORD: Work a cord as follows: Work chain stitches with hook size 2.5 mm and BabyMerino for approx. 30-40 cm, turn and work back with 1 slip stitch in each chain stitch. Cut and fasten the strand. Thread the cord in and out of the row of holes on the slipper (start and finish mid front of slipper). ---------------------------------------------------------- For shorts see DROPS number 31-4. ---------------------------------------------------------- |
|||||||||||||||||||
Diagram explanations |
|||||||||||||||||||
|
|||||||||||||||||||
 |
|||||||||||||||||||
 |
|||||||||||||||||||
 |
|||||||||||||||||||
Have you finished this pattern?Tag your pictures with #dropspattern #odetajacket or submit them to the #dropsfan gallery. Do you need help with this pattern?You'll find 27 tutorial videos, a Comments/Questions area and more by visiting the pattern on garnstudio.com. © 1982-2026 DROPS Design A/S. We reserve all rights. This document, including all its sub-sections, has copyrights. Read more about what you can do with our patterns at the bottom of each pattern on our site. |
|||||||||||||||||||


With over 40 years in knitting and crochet design, DROPS Design offers one of the most extensive collections of free patterns on the internet - translated to 17 languages. As of today we count 324 catalogues and 12267 patterns translated into English (UK/cm).
We work hard to bring you the best knitting and crochet have to offer, inspiration and advice as well as great quality yarns at incredible prices! Would you like to use our patterns for other than personal use? You can read what you are allowed to do in the Copyright text at the bottom of all our patterns. Happy crafting!
Post a comment to pattern DROPS Baby 31-3
We would love to hear what you have to say about this pattern!
If you want to leave a question, please make sure you select the correct category in the form below, to speed up the answering process. Required fields are marked *.