
Popular categories
Looking for a yarn?


Comments / Questions (212)
![]() Carrla Pontenagel wrote:
Carrla Pontenagel wrote:
Ik ben met het breien op 16 cm hoogte, volgens het patroon moet ik nu gaan minderen voor de halskant. Gedaan. Inmiddels staat er in het patroon dat ik op 19 cm hoogte moet beginnen met de mouwen???? Moet ik beiden tegelijk doen of eerst het een en dan het andere????
05.07.2019 - 20:16DROPS Design answered:
Dag Carla,
Inderdaad, je begint op 16 cm met minderen voor de halskant en even later op 19 cm (dus 3 cm nadat je was begonnen met het minderen voor de hals) begin je met de mouwen. Je bent dus op een gegeven moment tegelijkertijd bezig met het minderen voor de hals en het opzetten van steken voor de mouw aan de andere kant.
08.07.2019 - 10:17
![]() Piera wrote:
Piera wrote:
Buongiorno, Il cordino è attaccato allo stesso modo in entrambi i lati? Dalla foto e dallo schema sembra che il cordino sul lato sinistro del golfino sia attaccato sul fianco, ma sulle istruzioni c'è scritto di partire dalla fine del collo, cioè dove iniziano i cali e così per il cordino sul lato destro.
29.06.2019 - 17:39DROPS Design answered:
Buonasera Piera, i cordini in tutto sono 4: due all'interno e due all'esterno. Per cui deve lavorare i cordini su entrambi i davanti nel punto in cui iniziano i cali, e poi due cordini separati, come spiegato alla fine del paragrafo "bordo all'uncinetto", di cui uno verrà cucito sul lato sinistro sull'esterno del lavoro, e l'altro sul lato destro all'interno del lavoro. Buon lavoro!
29.06.2019 - 22:20
![]() Claire Frigiotti wrote:
Claire Frigiotti wrote:
Comment arriver à 63 mailles pour le côtés en diminuant de 24 mailles pour l'encolure soit 20m restantes et en ajoutant les mailles des manches 4 fois 3 =12 +6+19 on arrive à 37 mailles rajoutés soit 57 mailles? Et même si on fait 4m et 3 fois 6 m puis 19 M pour les manches on arrive à 41 M pour les manches ajouter à 20 restantes du côtés encolure on a toujours un décalage entre le nombre de m obtenue et celui du modèle. Et on se retrouve avec le même décalage pour le dos
16.06.2019 - 21:48DROPS Design answered:
Bonjour Mme Frigiotti, dans la 3ème taille, vous avez 44 m pour le devant, vous diminuez 24 m pour l'encolure (=22 x tous les 2 rangs + 2 x tous les 4 rangs) et vous montez pour la manche: 24 m (= 4 x 6 m) puis 1 x 19 m soit: 44 - 24 + 24+19= 63 m. Bon tricot!
17.06.2019 - 08:40
![]() Ivy wrote:
Ivy wrote:
Does decreasing 1 on each end of right side for 18 rows or 9 rows x 2 = 18 Would you still be decreasing while you are casting on and knitting the sleeves?
14.05.2019 - 03:48DROPS Design answered:
Dear Ivy, you decrease 1 stitch on each side a total of 18 times every row from RS (= 36 rows in total) then 2 times every 4th row (= every other row from RS), you first start to decrease on mid front then while continuing decreasing mid front divide piece when work measures (12) 15 cm and cast on new stitches for sleeve. Happy knitting!
14.05.2019 - 09:10
![]() Nunes wrote:
Nunes wrote:
Bonjour les explications ne sont pas tres claire c est dommage le modèle est tres jolie
24.04.2019 - 23:05DROPS Design answered:
Bonjour Mme Nunes, les explications peuvent vous paraître différentes de celles dont vous avez l'habitude, suivez simplement chaque étape comme expliqué. Pour toute question, vous pouvez utiliser cet espace ou bien contacter - même par mail ou téléphone - le magasin où vous avez acheté votre laine. Bon tricot!
25.04.2019 - 09:38
![]() Claudine wrote:
Claudine wrote:
Je ne comprends pas comment on monte les mailles des manches. Avez vous une vidéo
14.04.2019 - 11:23
![]() Ilse Wellershoff-Schuur wrote:
Ilse Wellershoff-Schuur wrote:
Auf einem der Bilder gibt es auch ein Mützchen... Wo gibt es dazu eine Anleitung? Oder soll man sie einfach entsprechend selbst werkeln?
24.03.2019 - 19:01DROPS Design answered:
Liebe Frau Wellershoff-Schuur, die Anleitung können Sie hier finden: https://www.garnstudio.com/pattern.php?id=8503&cid=9. Viel Spaß beim stricken!
24.03.2019 - 19:26
![]() Anna wrote:
Anna wrote:
Liebes Drops Team, werden in den Diagrammen Hin und Rückreihen gezeigt oder nur die Hinreihen? Außerdem verstehe ich nicht wofür das Diagramm a2 ist. Wenn ich 4 Maschen Blende stricke, habe ich 136 Maschen über die ich das Muster 17 mal laufen lasse (Größe 56/62) was mach ich mit der einen Masche im Diagramm a2? LG Anna
09.03.2019 - 07:51DROPS Design answered:
Liebe Anna, die Diagramme zeigen alle Reihen, dh die Hin- sowie die Rückreihen (hier lesen Sie mehr über Diagramme). A.2 macht das Muster symetrisch auf beiden Seiten: 4 M kraus rechts, 17 x A.1 (=136 M), A.2 (= 1 Masche), 4 M kraus rechts = 145 M. Bei den Rückreihen stricken Sie: 4 M kraus rechts, A.2 (= 1 M), 17 x A.1 (Diag. links nach rechts lesen), 4 M kraus rechts. Viel Spaß beim stricken!
11.03.2019 - 09:42
![]() Mieke wrote:
Mieke wrote:
Ik ben net met het vestje begonnen, en wil graag de totale (onder)breedte weten bij de kleinste maat. Bij de afbeelding staat alleen een enkele breedte vermeld, niet de totale afmeting incl onder- en overslag. Bedankt !
05.03.2019 - 13:01DROPS Design answered:
Dag Mieke,
De punt van de overslag komt bijna tot de zijnaden, dus de totale breedte is dan ongeveer 3 keer de breedte die onderaan bij de tekening staat.
05.03.2019 - 17:47
![]() Johanna wrote:
Johanna wrote:
Beim Rumpfteil für die Jacke steht es wird insgesamt 22x in jeder 2. Reihe abgenommen. Heißt das, dass ich insgesamt 22 Maschen in 11 Abnahme-Reihen abnehmen muss oder dass ich insgesamt 44 Maschen in 22 Abnahme-Reihen abnehmen muss?
05.03.2019 - 10:19DROPS Design answered:
Liebe Johann, es wird 1 Masche insgesamt 22 Mal in jeder 2. Reihe dann 2 Mal in jeder 4. Reihe abgenonmmen. Viel Spaß beim stricken!
05.03.2019 - 11:42
|
|||||||||||||||||||
Odeta#odetajacket |
|||||||||||||||||||
 |
 |
||||||||||||||||||
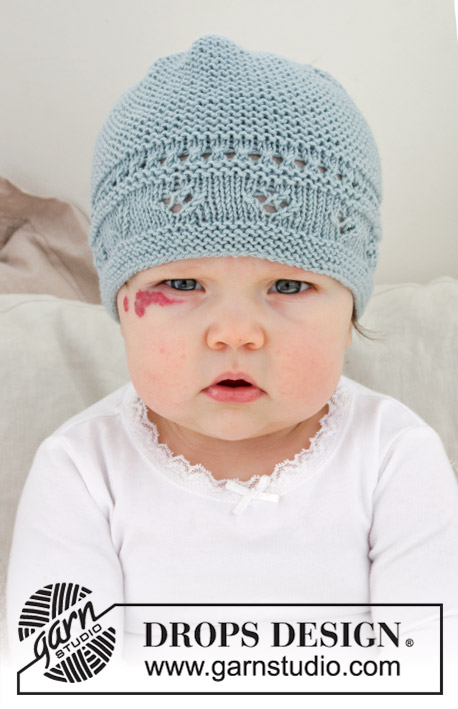
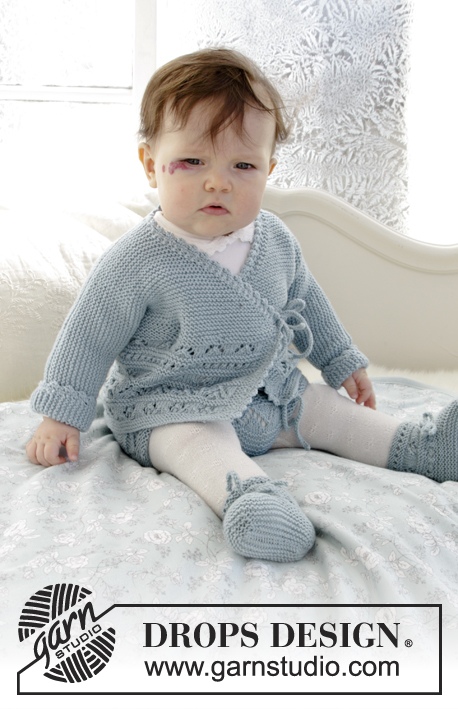
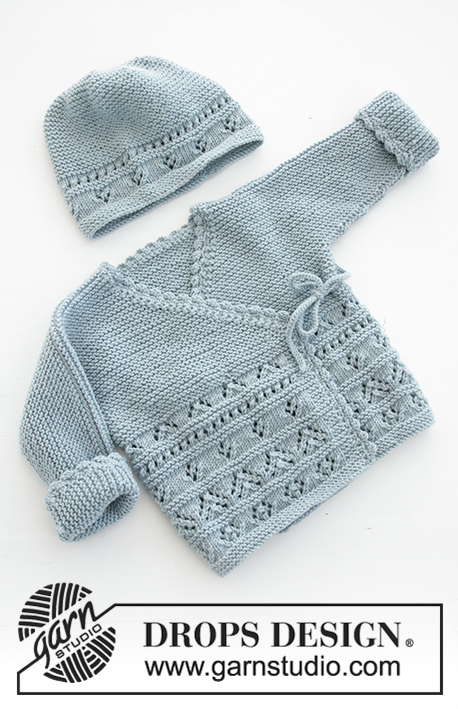
The set consists of: Knitted baby jacket and slippers with lace pattern and garter stitch. Sizes premature - 4 years. The set is worked in DROPS BabyMerino.
DROPS Baby 31-3 |
|||||||||||||||||||
|
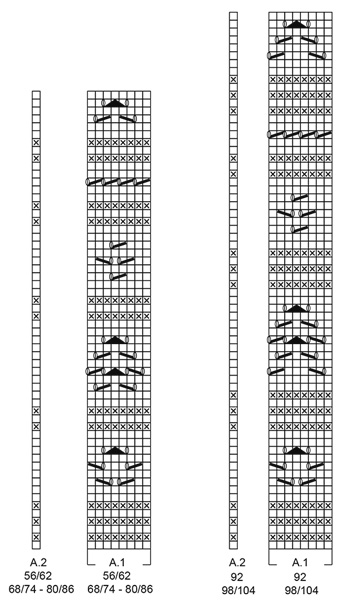
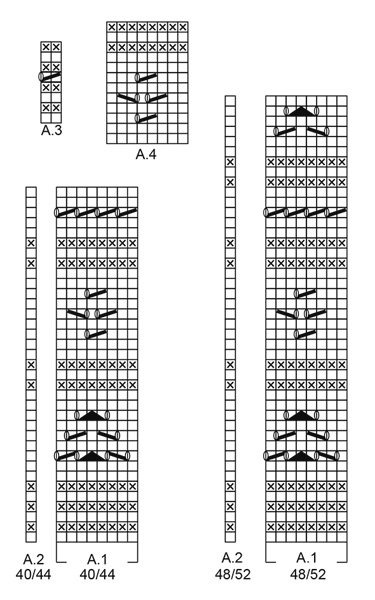
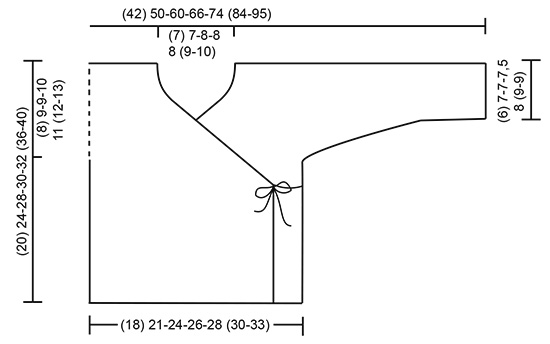
INFORMATION FOR THE PATTERN: RIDGE/GARTER STITCH (worked back and forth): 1 ridge = Knit 2 rows. PATTERN: Jacket: See diagrams A.1 and A.2. Choose diagram for your size. Slippers: See diagrams A.3 and A.4. The diagrams show all the rows in the pattern seen from the right side. DECREASE TIP (for jacket): Decrease inside the 1 band stitch in garter stitch. All decreases are made from the right side! Decrease as follows after the 1 band stitch: Slip 1 stitch as if to knit, knit 1, pass the slipped stitch over. Decrease as follows before the 1 band stitch: Knit 2 together. ---------------------------------------------------------- JACKET: The piece is worked back and forth with circular needle. The body is worked first, then stitches are cast on for sleeves and the front and back pieces are finished separately. BODY: Cast on (111) 125-145-157-173 (181-205) stitches with circular needle size 3 mm and BabyMerino. Work as follows from the right side: Work (3) 2-4-2-2 (2-2) stitches GARTER STITCH – see description above – (= band), work A.1 (= 8 stitches) over the next (104) 120-136-152-168 (176-200) stitches (= (13) 15-17-19-21 (22-25) times in width), work A.2 (= 1 stitch) and finish with (3) 2-4-2-2 (2-2) stitches garter stitch. REMEMBER THE KNITTING TENSION! On the last row in A.1 adjust the number of stitches to (112) 124-146-158-172 (182-204) stitches. When A.1 has been worked 1 time in height, continue in garter stitch to finished length. The piece measures approx. (10) 12-16-16-16 (19-19) cm. Insert 1 marker (34) 37-44-48-52 (55-62) stitches in from each side. Allow the markers to follow your work onwards, they mark the front and back pieces = (44) 50-58-62-68 (72-80) stitches on back piece. READ THE WHOLE OF THE NEXT SECTION BEFORE CONTINUING! DECREASE FOR NECK INSIDE 1 BAND STITCH IN EACH SIDE OF THE PIECE AT THE SAME TIME AS THE PIECE IS DIVIDED AND STITCHES ARE CAST ON FOR SLEEVES. DECREASE MID FRONT AS FOLLOWS: When the piece measures (10) 12-16-16-17 (20-23) cm – adjust so that the next row is worked from the right side, decrease 1 stitch for the neck inside the 1 band stitch in each side of the piece (= 2 stitches decreased) – read DECREASE TIP. Decrease like this every 2nd row a total of (18) 18-22-24-26 (28-32) times, then every 4th row a total of 2 times. THE PIECE IS NOW DIVIDED AND STITCHES ARE CAST ON FOR THE SLEEVES AS FOLLOWS: RIGHT FRONT PIECE: When the piece measures (12) 15-19-20-21 (24-27) cm, divide the piece at the 2 markers and the front and back pieces are finished separately. Adjust so that the next row is from the right side. Now work over all the stitches as far as the first marker (= right front piece). Place the remaining stitches on a thread. Cast on new stitches at the end of each row from the right side (= towards the side) for the sleeve as follows: Cast on (3) 4-6-6-6 (6-6) stitches a total of (4) 4-4-5-6 (7-8) times and then (16) 19-19-18-19 (23-26) stitches 1 time. When all the stitches are cast on for the sleeve and the decreases to neck are finished, there are (42) 52-63-70-79 (90-102) stitches on the needle for shoulder/sleeve. Work garter stitch until the piece measures (20) 24-28-30-32 (36-40) cm. Cast off. LEFT FRONT PIECE: Work over the last stitches which were placed on the thread, as far as the marker in the side. Work as for the right front piece, but in reverse. In other words, cast on stitches for the shoulder/sleeve at the end of each row from the wrong side. Continue to decrease inside the 1 band stitch at the end of each row from the right side as before (towards neck). BACK PIECE: = (44) 50-58-62-68 (72-80) stitches. Cast on new stitches at the end of each row in each side of the piece for the sleeves as follows: Cast on (3) 4-6-6-6 (6-6) stitches a total of (4) 4-4-5-6 (7-8) times and then (16) 19-19-18-19 (23-26) stitches 1 time = (100) 120-144-158-178 (202-228) stitches. When the piece measures (19) 23-27-29-31 (35-39) cm cast off the middle (16) 16-18-18-20 (22-24) stitches for neck and each shoulder/sleeve is finished separately = (42) 52-63-70-79 (90-102) stitches left on each shoulder/sleeve. Work until the piece measures (20) 24-28-30-32 (36-40) cm, adjust to match the front pieces. Cast off. Work the other shoulder/sleeve in the same way. ASSEMBLY: Sew the seams on top of sleeve with grafting stitches from the right side. Sew the seams under the sleeves edge to edge in the outermost loop of the outermost stitch. CROCHET EDGE: Crochet with hook size 2.5 mm and BabyMerino around the whole jacket opening (i.e. work from the right front piece, up along the jacket opening, around the neck and down the opening to the cast on edge on the left front piece) as follows: ROW 1: Work 1 slip stitch in the cast on edge on the right front piece, * 1 chain stitch, skip approx. 2 stitches/rows, 1 double crochet in the next stitch/row *, work from *-* to the corner where the decreases for neck started. Work the cord as follows: 1 double crochet in the tip, then work chain stitches for approx. 20-25 cm, turn and work back with 1 slip stitch in each chain stitch, then work 1 double crochet in the tip of the front piece again, continue the crochet edge around the jacket and neck to the tip on the left front piece, work cord as on the right front piece, continue working down the left front piece and finish with 1 slip stitch in the cast on edge. ROW 2: Work 1 chain stitch, 1 double crochet around the first chain stitch on the previous row, * 4 chain stitches, 1 treble crochet in the 4th chain stitch from the hook, skip 1 double crochet + 1 chain stitch + 1 double crochet, work 1 double crochet around the next chain stitch *, work from *-* (make sure you work over the cords so the cords lie underneath), finish with 1 slip stitch in the last stitch. Work rows 1 and 2 in the same way around the bottom of both sleeves (the rounds start with 1 chain stitch and finish with 1 slip stitch in the first chain stitch). Work 2 loose cords: Work chain stitches for approx. 20-25 cm, turn and work back with 1 slip stitch in each chain stitch. Cut the strand and work 1 more cord in the same way. Sew 1 cord to the inside of the right side in the side and 1 cord on the outside of the left side in the side. Make sure the two cords are at the same height on each side. ---------------------------------------------------------- SLIPPER: The slipper is worked back and forth with circular needle from mid back, top down; i.e. you first work the leg then the foot. Cast on (36) 38-40-44-48 (52-56) stitches with circular needle size 2.5 mm and BabyMerino. Work 1 stitch in GARTER STITCH – see above, A.3 (= 2 stitches) until 1 stitch remains, work 1 stitch in garter stitch . When A.3 has been worked 1 time in height, work the next row from the right side as follows: Work (2) 3-0-2-0 (2-0) stitches stocking stitch, A.4 (= 8 stitches) a total of (4) 4-5-5-6 (6-7) times in width and finish with (2) 3-0-2-0 (2-0) stitches stocking stitch. REMEMBER THE KNITTING TENSION! When A.4 has been completed 1 time in height continue with A.3 as follows: work 1 stitch in garter stitch, A.3 until 1 stitch remains, and work 1 stitch in garter stitch (the cord is later thread through this row of holes). When A.3 has been completed in height, work 2 RIDGES – see description above and decrease (6) 8-6-6-6- (10-14) stitches evenly on the last row from the right side = (30) 30-34-38-38 (42-42) stitches. Cut the strand. Now place the first (11) 11-12-13-13 (15-15) stitches and the last (11) 11-12-13-13 (15-15) stitches on two separate threads. The piece is now worked in garter stitch to finished length. Work (3) 3½-4-4½-5½ (6½-8) cm, over the middle (8) 8-10-12-12 (12-12) stitches (= mid top of slipper), cut the strand. The next row is worked as follows from the right side: Work the stitches from the one thread in the one side back onto the double pointed needles, knit up (7) 9-10-11-13 (16-21) stitches in the outermost loop of the outermost stitch along the side of the middle piece, work the (8) 8-10-12-12 (12-12) stitches on the needle (= front), knit up (7) 9-10-11-13 (16-21) stitches in the outermost loop of the outermost stitch along the other side of the middle piece and work the stitches from the other thread back onto the double pointed needles = (44) 48-54-60-64 (74-84) stitches on the needles. THE PIECE IS NOW MEASURED FROM HERE! Work a total of (2½) 3-3-4-5 (5-5) cm garter stitch over all stitches AT THE SAME TIME when you have worked approx. (1) 1½-1½-2-3 (3-3) cm, insert 1 marker (22) 24-27-30-32 (37-42) stitches in (= middle of slipper). Now decrease every 2nd row to finished length as follows: Knit 1 stitch, knit the next 2 stitches together (= 1 stitch decreased), knit until there are 2 stitches left before the marker, knit together the next 4 stitches, 2 and 2 (= 2 stitches decreased), knit until there are 3 stitches left, knit the next 2 stitches together (= 1 stitch decreased), knit 1 stitch (= 4 stitches decreased every 2nd row) = approx. (32) 36-42-48-52 (62-72) stitches. Cast off and sew the seam under the foot and up mid back in the outermost loop of the outermost stitch so the seam is flat. Work 1 more slipper in the same way. CORD: Work a cord as follows: Work chain stitches with hook size 2.5 mm and BabyMerino for approx. 30-40 cm, turn and work back with 1 slip stitch in each chain stitch. Cut and fasten the strand. Thread the cord in and out of the row of holes on the slipper (start and finish mid front of slipper). ---------------------------------------------------------- For shorts see DROPS number 31-4. ---------------------------------------------------------- |
|||||||||||||||||||
Diagram explanations |
|||||||||||||||||||
|
|||||||||||||||||||
 |
|||||||||||||||||||
 |
|||||||||||||||||||
 |
|||||||||||||||||||
Have you finished this pattern?Tag your pictures with #dropspattern #odetajacket or submit them to the #dropsfan gallery. Do you need help with this pattern?You'll find 27 tutorial videos, a Comments/Questions area and more by visiting the pattern on garnstudio.com. © 1982-2026 DROPS Design A/S. We reserve all rights. This document, including all its sub-sections, has copyrights. Read more about what you can do with our patterns at the bottom of each pattern on our site. |
|||||||||||||||||||


With over 40 years in knitting and crochet design, DROPS Design offers one of the most extensive collections of free patterns on the internet - translated to 17 languages. As of today we count 324 catalogues and 12267 patterns translated into English (UK/cm).
We work hard to bring you the best knitting and crochet have to offer, inspiration and advice as well as great quality yarns at incredible prices! Would you like to use our patterns for other than personal use? You can read what you are allowed to do in the Copyright text at the bottom of all our patterns. Happy crafting!
Post a comment to pattern DROPS Baby 31-3
We would love to hear what you have to say about this pattern!
If you want to leave a question, please make sure you select the correct category in the form below, to speed up the answering process. Required fields are marked *.