
Popular categories
Looking for a yarn?


Comments / Questions (212)
![]() Anke Crielaard wrote:
Anke Crielaard wrote:
Ik brei patroon 31-3. Ik ben bezig met het vest maat 6/9. Het patroon geeft aan: "Als A1 1 keer in de hoogte is gebreid, ga dan verder in ribbelsteek tot de gewenste lengte. Het werk meet ongeveer 16 cm". Ik heb het proeflapje gebreid en dat klopte. Maar...mijn werk meet geen 16 cm maar 25 cm..... Het telpatroon telt 58 hokjes in de hoogte, dus dat zijn 58 x 2 = 116 naalden. Als op het proeflapje 48 naalden in de hoogte 10 cm is, kunnen 116 naalden nooit 16 cm zijn...
01.09.2020 - 14:26DROPS Design answered:
Dag Anke,
In het telpatroon worden alle naalden weergegeven. Zowel de heengaande als de teruggaande naald. Dus het is niet 2 maal 58, maar 1 maal 58.
03.09.2020 - 13:35
![]() Maja wrote:
Maja wrote:
Hei! Jeg skal begynne å strikke venstre forstykke. Skal jeg da begynne fra retten ved merket, slik at jeg får felt en maske ved stolpen den runden, men ikke legger opp masker til ermer før jeg har snudd, eller skal jeg begynne fra vrangen, men da ikke få felt en maske den runden? Denne runden begynte jo i utgangspunktet fra retten på høyre forstykke og er jo ikke blitt strikket ferdig helt til venstre forstykke.
22.08.2020 - 13:02DROPS Design answered:
Hej Maja, ja du starter i den side du kom til, da du satte maskerne på en tråd. God fornøjelse!
27.08.2020 - 13:57
![]() Anna wrote:
Anna wrote:
Hi, I wonder if it is possible, when I have done the front, to pick up stitches for the sleeves from the front parte of the sleeves instead of casting on new stitches. I'd like to avoid some seams. Thank you
14.08.2020 - 00:49DROPS Design answered:
Dear Anna, in this pattern, sleeves are not worked bottom up, the stitches for sleeves are cast on on each side of back piece / on the side of front pieces - see measurement chart. Happy knitting!
14.08.2020 - 07:26
![]() Jackie wrote:
Jackie wrote:
In telpatroon A1 staat bij de uitleg van de driehoek =1 steek recht afhalen, 2 recht samen, haal de afgehaalde steek over de gebreide steken. er voor en erna moet je een omslag maken. dus meerder je elke keer 1 steek. moet het niet zijn 3 steken recht samen?
20.06.2020 - 17:25DROPS Design answered:
Dag Jackie,
Door het samenbreien minder je 1 steek en door het overhalen van de afgehaalde steek minder je ook 1 steek. In totaal dus 2 steken, welke gecompenseerd worden door de omslagen aan beide kanten.
30.06.2020 - 11:26
![]() Barbara wrote:
Barbara wrote:
I can only see a video about the first row of the crochet border. Do you have a vidoe for the second row.
08.06.2020 - 09:00DROPS Design answered:
Dear Barbara, this video shows how to crochet a similar edge, remember to always work as explained in the pattern, ie 4 chains (and not 3 chains as shown in the video) and skip 1 dc+1ch+1 dc (UK-Eng) (1 dc in the video). Happy crocheting!
08.06.2020 - 09:10
![]() Lilian Castañeda wrote:
Lilian Castañeda wrote:
Muy bien explicado muchas gracias
27.05.2020 - 03:19
![]() Mary Egan wrote:
Mary Egan wrote:
What ply is the recommended wool - 3, 4, double knitting or sport?
02.05.2020 - 17:25DROPS Design answered:
Dear Mrs Egan, this pattern is worked with DROPS Baby Merino. Happy knitting!
04.05.2020 - 12:03
![]() Gery Mol-kok wrote:
Gery Mol-kok wrote:
Ik heb een vraag ik ben nu met de gehaakte rand bezig zo ik begrijp worden de koorden op de hoek van de mindering gemaakt . Maar dan kan je hem toch niet vastknopen moet het ene koord niet in de linkerzijkant ik hoor het graag
26.04.2020 - 17:00DROPS Design answered:
Dag Gery,
Je naait de koorden beide aan de zijkanten, dus niet op de punt. En ik zag dat er een vertaalfoutje in zat: er stond aan de goed kant in plaats van aan de rechter kant. (Dat is nu aangepast.) Hopelijk kom je er nu uit.
28.04.2020 - 20:29
![]() Gery Mol-kok wrote:
Gery Mol-kok wrote:
Ik snap het al bedankt
13.04.2020 - 19:32DROPS Design answered:
Dag Gery,
Goed om te lezen. Veel breiplezier!
16.04.2020 - 12:51
![]() Gery Mol-kok wrote:
Gery Mol-kok wrote:
Maar brei je dat samen met het voorpand en is dat dan de bovenkant van de mouw en waar minder je dan ik snap het echt niet gr gery
13.04.2020 - 14:06
|
|||||||||||||||||||
Odeta#odetajacket |
|||||||||||||||||||
 |
 |
||||||||||||||||||
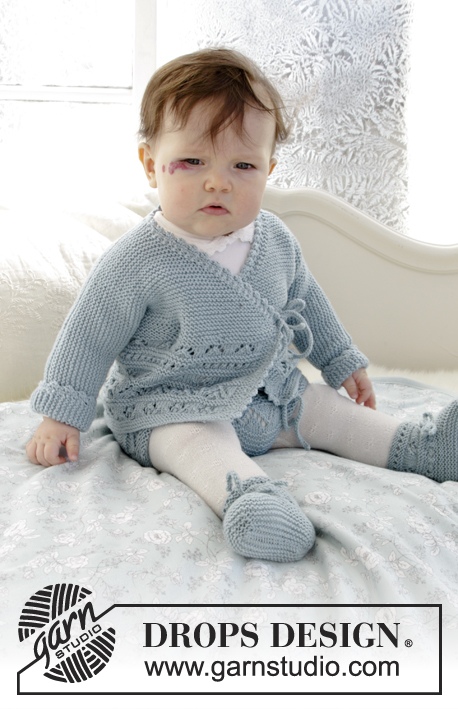
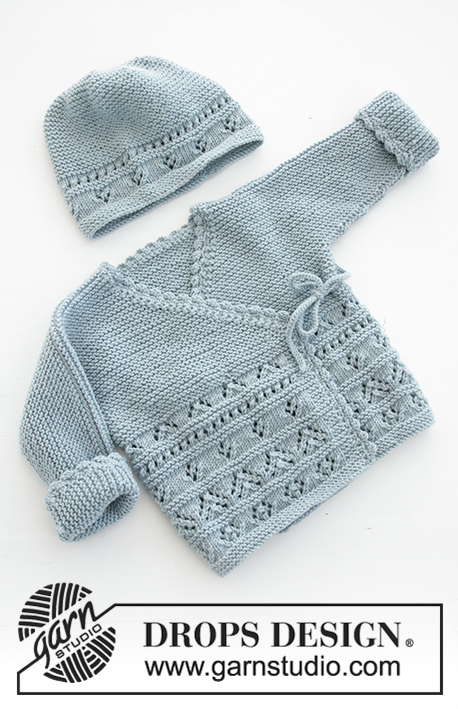
The set consists of: Knitted baby jacket and slippers with lace pattern and garter stitch. Sizes premature - 4 years. The set is worked in DROPS BabyMerino.
DROPS Baby 31-3 |
|||||||||||||||||||
|
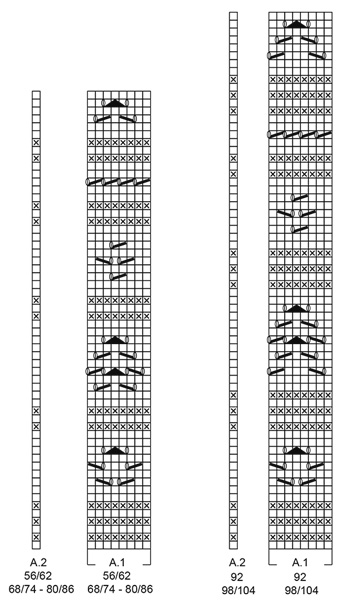
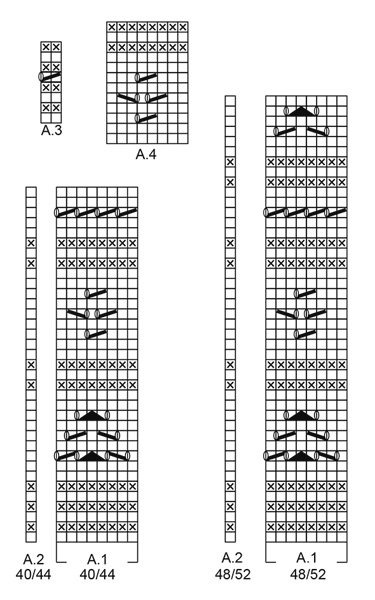
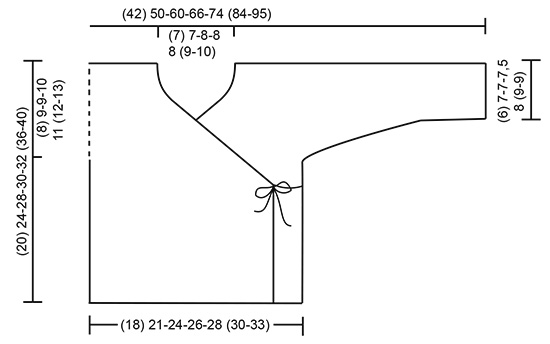
INFORMATION FOR THE PATTERN: RIDGE/GARTER STITCH (worked back and forth): 1 ridge = Knit 2 rows. PATTERN: Jacket: See diagrams A.1 and A.2. Choose diagram for your size. Slippers: See diagrams A.3 and A.4. The diagrams show all the rows in the pattern seen from the right side. DECREASE TIP (for jacket): Decrease inside the 1 band stitch in garter stitch. All decreases are made from the right side! Decrease as follows after the 1 band stitch: Slip 1 stitch as if to knit, knit 1, pass the slipped stitch over. Decrease as follows before the 1 band stitch: Knit 2 together. ---------------------------------------------------------- JACKET: The piece is worked back and forth with circular needle. The body is worked first, then stitches are cast on for sleeves and the front and back pieces are finished separately. BODY: Cast on (111) 125-145-157-173 (181-205) stitches with circular needle size 3 mm and BabyMerino. Work as follows from the right side: Work (3) 2-4-2-2 (2-2) stitches GARTER STITCH – see description above – (= band), work A.1 (= 8 stitches) over the next (104) 120-136-152-168 (176-200) stitches (= (13) 15-17-19-21 (22-25) times in width), work A.2 (= 1 stitch) and finish with (3) 2-4-2-2 (2-2) stitches garter stitch. REMEMBER THE KNITTING TENSION! On the last row in A.1 adjust the number of stitches to (112) 124-146-158-172 (182-204) stitches. When A.1 has been worked 1 time in height, continue in garter stitch to finished length. The piece measures approx. (10) 12-16-16-16 (19-19) cm. Insert 1 marker (34) 37-44-48-52 (55-62) stitches in from each side. Allow the markers to follow your work onwards, they mark the front and back pieces = (44) 50-58-62-68 (72-80) stitches on back piece. READ THE WHOLE OF THE NEXT SECTION BEFORE CONTINUING! DECREASE FOR NECK INSIDE 1 BAND STITCH IN EACH SIDE OF THE PIECE AT THE SAME TIME AS THE PIECE IS DIVIDED AND STITCHES ARE CAST ON FOR SLEEVES. DECREASE MID FRONT AS FOLLOWS: When the piece measures (10) 12-16-16-17 (20-23) cm – adjust so that the next row is worked from the right side, decrease 1 stitch for the neck inside the 1 band stitch in each side of the piece (= 2 stitches decreased) – read DECREASE TIP. Decrease like this every 2nd row a total of (18) 18-22-24-26 (28-32) times, then every 4th row a total of 2 times. THE PIECE IS NOW DIVIDED AND STITCHES ARE CAST ON FOR THE SLEEVES AS FOLLOWS: RIGHT FRONT PIECE: When the piece measures (12) 15-19-20-21 (24-27) cm, divide the piece at the 2 markers and the front and back pieces are finished separately. Adjust so that the next row is from the right side. Now work over all the stitches as far as the first marker (= right front piece). Place the remaining stitches on a thread. Cast on new stitches at the end of each row from the right side (= towards the side) for the sleeve as follows: Cast on (3) 4-6-6-6 (6-6) stitches a total of (4) 4-4-5-6 (7-8) times and then (16) 19-19-18-19 (23-26) stitches 1 time. When all the stitches are cast on for the sleeve and the decreases to neck are finished, there are (42) 52-63-70-79 (90-102) stitches on the needle for shoulder/sleeve. Work garter stitch until the piece measures (20) 24-28-30-32 (36-40) cm. Cast off. LEFT FRONT PIECE: Work over the last stitches which were placed on the thread, as far as the marker in the side. Work as for the right front piece, but in reverse. In other words, cast on stitches for the shoulder/sleeve at the end of each row from the wrong side. Continue to decrease inside the 1 band stitch at the end of each row from the right side as before (towards neck). BACK PIECE: = (44) 50-58-62-68 (72-80) stitches. Cast on new stitches at the end of each row in each side of the piece for the sleeves as follows: Cast on (3) 4-6-6-6 (6-6) stitches a total of (4) 4-4-5-6 (7-8) times and then (16) 19-19-18-19 (23-26) stitches 1 time = (100) 120-144-158-178 (202-228) stitches. When the piece measures (19) 23-27-29-31 (35-39) cm cast off the middle (16) 16-18-18-20 (22-24) stitches for neck and each shoulder/sleeve is finished separately = (42) 52-63-70-79 (90-102) stitches left on each shoulder/sleeve. Work until the piece measures (20) 24-28-30-32 (36-40) cm, adjust to match the front pieces. Cast off. Work the other shoulder/sleeve in the same way. ASSEMBLY: Sew the seams on top of sleeve with grafting stitches from the right side. Sew the seams under the sleeves edge to edge in the outermost loop of the outermost stitch. CROCHET EDGE: Crochet with hook size 2.5 mm and BabyMerino around the whole jacket opening (i.e. work from the right front piece, up along the jacket opening, around the neck and down the opening to the cast on edge on the left front piece) as follows: ROW 1: Work 1 slip stitch in the cast on edge on the right front piece, * 1 chain stitch, skip approx. 2 stitches/rows, 1 double crochet in the next stitch/row *, work from *-* to the corner where the decreases for neck started. Work the cord as follows: 1 double crochet in the tip, then work chain stitches for approx. 20-25 cm, turn and work back with 1 slip stitch in each chain stitch, then work 1 double crochet in the tip of the front piece again, continue the crochet edge around the jacket and neck to the tip on the left front piece, work cord as on the right front piece, continue working down the left front piece and finish with 1 slip stitch in the cast on edge. ROW 2: Work 1 chain stitch, 1 double crochet around the first chain stitch on the previous row, * 4 chain stitches, 1 treble crochet in the 4th chain stitch from the hook, skip 1 double crochet + 1 chain stitch + 1 double crochet, work 1 double crochet around the next chain stitch *, work from *-* (make sure you work over the cords so the cords lie underneath), finish with 1 slip stitch in the last stitch. Work rows 1 and 2 in the same way around the bottom of both sleeves (the rounds start with 1 chain stitch and finish with 1 slip stitch in the first chain stitch). Work 2 loose cords: Work chain stitches for approx. 20-25 cm, turn and work back with 1 slip stitch in each chain stitch. Cut the strand and work 1 more cord in the same way. Sew 1 cord to the inside of the right side in the side and 1 cord on the outside of the left side in the side. Make sure the two cords are at the same height on each side. ---------------------------------------------------------- SLIPPER: The slipper is worked back and forth with circular needle from mid back, top down; i.e. you first work the leg then the foot. Cast on (36) 38-40-44-48 (52-56) stitches with circular needle size 2.5 mm and BabyMerino. Work 1 stitch in GARTER STITCH – see above, A.3 (= 2 stitches) until 1 stitch remains, work 1 stitch in garter stitch . When A.3 has been worked 1 time in height, work the next row from the right side as follows: Work (2) 3-0-2-0 (2-0) stitches stocking stitch, A.4 (= 8 stitches) a total of (4) 4-5-5-6 (6-7) times in width and finish with (2) 3-0-2-0 (2-0) stitches stocking stitch. REMEMBER THE KNITTING TENSION! When A.4 has been completed 1 time in height continue with A.3 as follows: work 1 stitch in garter stitch, A.3 until 1 stitch remains, and work 1 stitch in garter stitch (the cord is later thread through this row of holes). When A.3 has been completed in height, work 2 RIDGES – see description above and decrease (6) 8-6-6-6- (10-14) stitches evenly on the last row from the right side = (30) 30-34-38-38 (42-42) stitches. Cut the strand. Now place the first (11) 11-12-13-13 (15-15) stitches and the last (11) 11-12-13-13 (15-15) stitches on two separate threads. The piece is now worked in garter stitch to finished length. Work (3) 3½-4-4½-5½ (6½-8) cm, over the middle (8) 8-10-12-12 (12-12) stitches (= mid top of slipper), cut the strand. The next row is worked as follows from the right side: Work the stitches from the one thread in the one side back onto the double pointed needles, knit up (7) 9-10-11-13 (16-21) stitches in the outermost loop of the outermost stitch along the side of the middle piece, work the (8) 8-10-12-12 (12-12) stitches on the needle (= front), knit up (7) 9-10-11-13 (16-21) stitches in the outermost loop of the outermost stitch along the other side of the middle piece and work the stitches from the other thread back onto the double pointed needles = (44) 48-54-60-64 (74-84) stitches on the needles. THE PIECE IS NOW MEASURED FROM HERE! Work a total of (2½) 3-3-4-5 (5-5) cm garter stitch over all stitches AT THE SAME TIME when you have worked approx. (1) 1½-1½-2-3 (3-3) cm, insert 1 marker (22) 24-27-30-32 (37-42) stitches in (= middle of slipper). Now decrease every 2nd row to finished length as follows: Knit 1 stitch, knit the next 2 stitches together (= 1 stitch decreased), knit until there are 2 stitches left before the marker, knit together the next 4 stitches, 2 and 2 (= 2 stitches decreased), knit until there are 3 stitches left, knit the next 2 stitches together (= 1 stitch decreased), knit 1 stitch (= 4 stitches decreased every 2nd row) = approx. (32) 36-42-48-52 (62-72) stitches. Cast off and sew the seam under the foot and up mid back in the outermost loop of the outermost stitch so the seam is flat. Work 1 more slipper in the same way. CORD: Work a cord as follows: Work chain stitches with hook size 2.5 mm and BabyMerino for approx. 30-40 cm, turn and work back with 1 slip stitch in each chain stitch. Cut and fasten the strand. Thread the cord in and out of the row of holes on the slipper (start and finish mid front of slipper). ---------------------------------------------------------- For shorts see DROPS number 31-4. ---------------------------------------------------------- |
|||||||||||||||||||
Diagram explanations |
|||||||||||||||||||
|
|||||||||||||||||||
 |
|||||||||||||||||||
 |
|||||||||||||||||||
 |
|||||||||||||||||||
Have you finished this pattern?Tag your pictures with #dropspattern #odetajacket or submit them to the #dropsfan gallery. Do you need help with this pattern?You'll find 27 tutorial videos, a Comments/Questions area and more by visiting the pattern on garnstudio.com. © 1982-2026 DROPS Design A/S. We reserve all rights. This document, including all its sub-sections, has copyrights. Read more about what you can do with our patterns at the bottom of each pattern on our site. |
|||||||||||||||||||


With over 40 years in knitting and crochet design, DROPS Design offers one of the most extensive collections of free patterns on the internet - translated to 17 languages. As of today we count 324 catalogues and 12267 patterns translated into English (UK/cm).
We work hard to bring you the best knitting and crochet have to offer, inspiration and advice as well as great quality yarns at incredible prices! Would you like to use our patterns for other than personal use? You can read what you are allowed to do in the Copyright text at the bottom of all our patterns. Happy crafting!
Post a comment to pattern DROPS Baby 31-3
We would love to hear what you have to say about this pattern!
If you want to leave a question, please make sure you select the correct category in the form below, to speed up the answering process. Required fields are marked *.