
Popular categories
Looking for a yarn?


Comments / Questions (95)
![]() Martina wrote:
Martina wrote:
Hallöchen! Bisher war die Häkelarbeit ganz gut machbar, auch wenn ich also mal öfter nochmal aufziehen musste… 😅 Ich hänge jetzt allerdings etwas mit der Beschreibung für den Ärmel-Ausschnitt…. Muster is ja 6 luftmaschen, eine feste. Wie ist das mit den „Luftmaschen bis zur Mitte und 1 für jede ausgelassene Luftmasche/feste Masche“ gemeint? 🧐
21.06.2024 - 22:23DROPS Design answered:
Liebe Martina, in diesem Video zeigen wir, wie man mit solchen Jacken Armlöcher häkelt: zählen Sie die Maschen von der Mitte der Seite bis zur Ecke und diese Maschenanzahl häkeln Sie als Luftmaschen für das 1. Armloch, und bei dem 2.Armausschnitt wird dans genauso gehäkelt aber ab die Ecke bis die Mitte von der Seite. Viel Spaß beim Häkeln!
24.06.2024 - 07:57
![]() Sunny wrote:
Sunny wrote:
I\'m wondering, is this pattern considered easy, intermediate or difficult
02.04.2024 - 16:41DROPS Design answered:
Dear Sunny, I would not call it easy, as you would need to be able to follow a diagram, and do several different stitches/stitch combinations to do teh back-pattern. However, once you got through the center-back motif, there isn't much shaping, so probably I would call this an intermediate piece. Happy Crafting!
02.04.2024 - 23:52
![]() Ann Gentleman wrote:
Ann Gentleman wrote:
I really want to make the Butterfly Queen jacket but despite trying to understand the schematic drawing I cannot see how to start and finish each row. This needs its own video, so if you can't supply this, please tell me if you know of anyone who has succeeded with this pattern, apart from the scientific person who devised the chart. I'm really upset that this is so difficult and I'm not a beginner!
23.08.2023 - 14:17DROPS Design answered:
Dar Mrs Gentleman, the beginning of rounds are explained in the diagram, for ex. work A.1 a (see matching symbol for each round), beginning with 4 chains on first round, and on 2nd round (2 different symbols) and finishing with 1slip stitch in the 3th chain from beg of round. You can also find some finished projects on Ravelry. Happy crocheting!
23.08.2023 - 16:38
![]() Miranda wrote:
Miranda wrote:
Ich habe die Jacke gestern das erste Mal ausgeführt und viel Lob kassiert. Danke für das schöne Muster wenn es auch recht kompliziert ist.
21.08.2023 - 09:58
![]() Daniela wrote:
Daniela wrote:
In lingua italiana c'è un errore nella legenda, il ventaglietto nero non è "4 cat., 3 m.alte" ma "3 maglie alte,4 cat.,3 m.alte” come nelle altre lingue
29.06.2023 - 13:11DROPS Design answered:
Buonasera Daniela, abbiamo corretto la legenda. Buon lavoro!
06.07.2023 - 16:52
![]() Connie Bach wrote:
Connie Bach wrote:
Desuden er der et tegn ^ som jeg ingen forklaring finder på ! Det tegn < er jo ikke det samme
11.04.2023 - 15:49
![]() Connie Bach wrote:
Connie Bach wrote:
Nederst i opskriften ? Små videoer der er urelevante i denne opskrift ! Jeg finder intet der fortæller om hvordan man skal gøre Intet på YouTube feks. ?
11.04.2023 - 15:46DROPS Design answered:
Hej Connie, < tegnet betyder 3 luftmasker uanset hvordan det vender. Vi skriver en video på ønskelisten og håber at vi kan få den lagt ud så hurtigt som muligt :)
13.04.2023 - 12:00
![]() Connie Bach wrote:
Connie Bach wrote:
Mega svær at følge den her opskrift ! Findes der dog ikke en video et sted, hvor man lige kan få lidt hjælp ? Diagrammerne er jo totalt uforståelige og runderne virker forkerte !
11.04.2023 - 13:03DROPS Design answered:
Hej Connie, jo vi har en video, du finder den nederst i opskriften, her kan du helt sikkert se hvordan det skal se ud :)
11.04.2023 - 15:33
![]() Irene wrote:
Irene wrote:
Just to let you know, I can confirm that I made a mistake when working the pattern and now understand where I have gone wrong. There is no need for you to respond but I thank you for all the lovely patterns produced. Many thanks
12.02.2023 - 18:33
![]() Irene wrote:
Irene wrote:
Hello, I have completed the butterfly up to the end of diagram 2 A2b/c/d, but my work is not lying flat when I lay it on a flat surface, it is forming a dish shape. /will this correct itself as I proceed or have I done something wrong please.
12.02.2023 - 17:33DROPS Design answered:
Dear Irene, if the center is higher or risen compared to the rest of the garment when laying flat, then there is an issue with gauge; the center was worked more tightly than the rest of the garment. You could try to correct this by blocking the garment (wet it slightly, and let it dry and block it). Happy crocheting!
13.02.2023 - 00:27
|
|||||||||||||||||||||||||||||||||||||||||||||||||||||||||||||||||||||||||||||||||||||
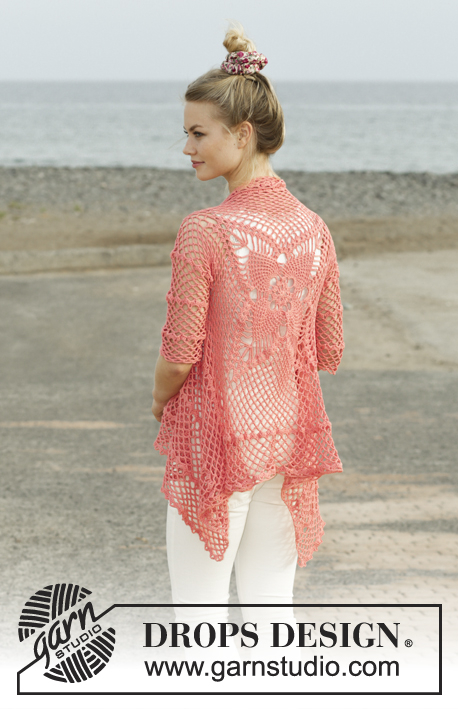
Butterfly Queen#butterflyqueenjacket |
|||||||||||||||||||||||||||||||||||||||||||||||||||||||||||||||||||||||||||||||||||||
 |
 |
||||||||||||||||||||||||||||||||||||||||||||||||||||||||||||||||||||||||||||||||||||
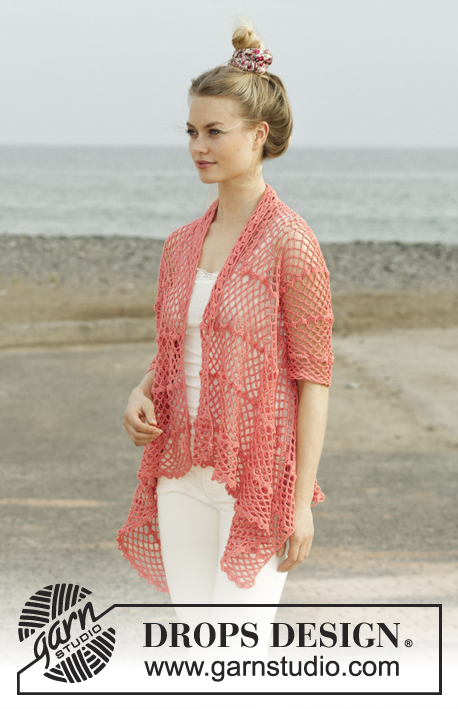
Crocheted jacket worked in a square with lace pattern. Size: S - XXXL Piece is crocheted in DROPS Flora.
DROPS 186-11 |
|||||||||||||||||||||||||||||||||||||||||||||||||||||||||||||||||||||||||||||||||||||
|
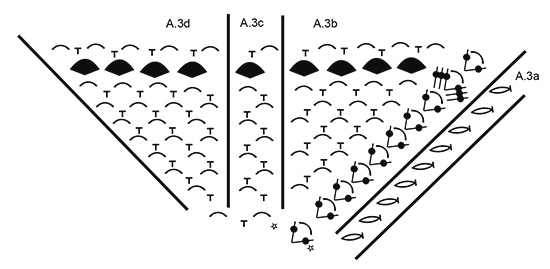
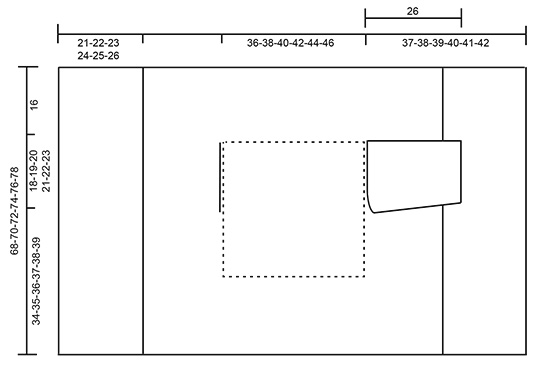
INFORMATION FOR PATTERN: PATTERN: See diagrams A.1 to A.4. CROCHET INFO (applies A.4): Replace first double crochet at beginning of row with 1 chain stitch. Replace first triple treble crochet at beginning of row with 5 chain stitches. DECREASE TIP (applies to mid under sleeve): Work 5 chain stitches, skip 1 double crochet + 1 chain space, work 1 double crochet around next chain space + 1 chain space (= 1 repetition decreased), continue pattern as before until 1 chain space remains + 1 double crochet on previous row, skip these stitches and finish with 1 double treble crochet in first chain stitch at beginning of previous row (= 1 repetition decreased). ---------------------------------------------------------- JACKET: Worked in the round from mid back on back and outwards as a square, then work back and forth on front pieces. Work sleeves back and forth from body, then sew them together under sleeve. Work 4 chain stitches on hook size 3.5 mm with Flora and form a ring with 1 slip stitch in first chain stitch. Then work pattern in the round according to diagram A.1b 4 times in total on round - diagram A.1a shows how rounds begin and end and is worked in addition to A.1b. REMEMBER THE CROCHET TENSION! When entire diagram A.1a and A.1b is cut the tread, and begin next round around chain space between last treble group worked and fasten thread with 1 slip stitch in this chain space. Now work in the round according to diagram A.2 as follows: * Work A.2b, repeat A.2c 6 times in total in width, A.2d *, repeat from *-* 4 times in total on round – diagram A.2a shows how rounds begin and end and are worked in addition to A.2b/c/d. When entire diagram A.2a and A.2b have been worked, square measures approx. 36 x 36 cm. There are now 4 corner chain spaces (1 treble crochet + 6 chain stitches + 1 treble crochet) and 14 chain spaces along each of the sides on square. READ THE REST OF BODY BEFORE CONTINUING! Continue to work as follows: * Work A.3b around corner space, repeat A.3c until 1 chain space remains before corner, work A.3d around next chain space *, repeat from *-* 4 times in total on round – diagram A.3a shows how rounds begin and end and are worked in addition to A.3b/c/d. AT THE SAME TIME when piece measures approx. 36-38-40-42-44-46 cm x 36-38-40-42-44-46 cm work armholes as follows: Work A.3 as before until first corner, work around chain space as before. Now work chain stitches until middle of next side (i.e. in the middle between first and second corner) as follows: Work 1 chain stitch for every chain stitch/double crochet skipped. Then work pattern as before until the middle between 3rd and 4th corner. Now work chain stitches until 4th corner as follows: Work 1 chain stitch for every chain stitch/double crochet skipped, work around chain space in corner and the rest of round as before. On next round work A.3 as before over all stitches again (i.e. adjust pattern over armholes so that round is correct). Continue A.3 in the round (repeat the 9 rounds vertically) until square measures 68-70-72-74-76-78 cm x 68-70-72-74-76-78 cm (i.e. approx. 16 cm from armhole in all sizes) – adjust to finish after a round with treble groups. Cut the yarn and insert 1 marker in piece (between first and second corner). FRONT PIECE: Now work back and forth between first and second corner. NOTE! Work front pieces without increases. Read CROCHET INFO! Work A.4a around corner, repeat A.4b until 1 chain space remains before corner, work A.4c around this chain space and around corner. Continue pattern as shown in diagram and repeat A.4 vertically until row with treble groups has been worked 2 times in total vertically, then repeat only rows with chain spaces until piece measures approx. 19-20-21-22-23-24 cm from marker, then work row with treble groups 1 time in all sizes. Piece now measures 21-22-23-24-25-26 cm from marker. Fasten off. Work the same way on the other side (i.e. work back and forth between third and fourth corner). SLEEVE: Work sleeve directly out from armhole on body. Work back and forth, top down and sew together when finished. Begin mid under sleeve and work as follows: Remember CROCHET INFO! Work A.4a around first chain space, repeat A.4b 15-16-17-18-19-20 times in total in width (adjust to distribute A.4b evenly along armhole, i.e. either 2 chain spaces must be worked around same chain space or skip 1 chain space), work A.4c around the last 2 chain spaces. Continue A.4 back and forth – AT THE SAME TIME when piece measures 4 cm (adjust to work next row with chain stitches/double crochets) decrease 1 repetition in each side – read DECREASE TIP. Decrease like this approx. every 8-8-8-6-6-6 cm 3-3-3-4-4-4 times in total = 12-13-14-15-16-17 chain spaces of 6 stitches after last decrease. Continue until piece measures approx. 28 cm in all sizes - finish after a row with chain spaces. Fasten off. Work the other sleeve the same way in the other side of piece. ASSEMBLY: Sew the seems under the sleeves, sew in the outermost stitches and make sure that the seam does not tighten the piece. |
|||||||||||||||||||||||||||||||||||||||||||||||||||||||||||||||||||||||||||||||||||||
Diagram explanations |
|||||||||||||||||||||||||||||||||||||||||||||||||||||||||||||||||||||||||||||||||||||
|
|||||||||||||||||||||||||||||||||||||||||||||||||||||||||||||||||||||||||||||||||||||
 |
|||||||||||||||||||||||||||||||||||||||||||||||||||||||||||||||||||||||||||||||||||||
 |
|||||||||||||||||||||||||||||||||||||||||||||||||||||||||||||||||||||||||||||||||||||
 |
|||||||||||||||||||||||||||||||||||||||||||||||||||||||||||||||||||||||||||||||||||||
 |
|||||||||||||||||||||||||||||||||||||||||||||||||||||||||||||||||||||||||||||||||||||
Have you finished this pattern?Tag your pictures with #dropspattern #butterflyqueenjacket or submit them to the #dropsfan gallery. Do you need help with this pattern?You'll find 12 tutorial videos, a Comments/Questions area and more by visiting the pattern on garnstudio.com. © 1982-2026 DROPS Design A/S. We reserve all rights. This document, including all its sub-sections, has copyrights. Read more about what you can do with our patterns at the bottom of each pattern on our site. |
|||||||||||||||||||||||||||||||||||||||||||||||||||||||||||||||||||||||||||||||||||||


With over 40 years in knitting and crochet design, DROPS Design offers one of the most extensive collections of free patterns on the internet - translated to 17 languages. As of today we count 325 catalogues and 12298 patterns translated into English (UK/cm).
We work hard to bring you the best knitting and crochet have to offer, inspiration and advice as well as great quality yarns at incredible prices! Would you like to use our patterns for other than personal use? You can read what you are allowed to do in the Copyright text at the bottom of all our patterns. Happy crafting!
Post a comment to pattern DROPS 186-11
We would love to hear what you have to say about this pattern!
If you want to leave a question, please make sure you select the correct category in the form below, to speed up the answering process. Required fields are marked *.