
Popular categories
Looking for a yarn?


Comments / Questions (23)
![]() Heidi wrote:
Heidi wrote:
Ska börja sticka a2a men förstår inte hur många masker som ska läggas ut i mönstret?
11.03.2019 - 09:21DROPS Design answered:
Hej. Där det är markerat med en svart cirkel i A2A ökar du en maska (genom att göra ett omslag mellan 2 maskor som sedan stickas vridet avigt på nästa varv). Lycka till!
14.03.2019 - 10:24
![]() Jeanette Johnsen wrote:
Jeanette Johnsen wrote:
Hei. Strikker denne jakka, men er desverre er det beregna for lite garn i hovedfarga. Er det andre som opplever dette.
23.02.2019 - 14:12DROPS Design answered:
Hei Jeanette. Så dumt at du har for lite garn i hovedfargen. Vi har ikke fått noen andre kommentarer på dette, og det stemmer overens med andre, tilsvarende gensere. Er du sikker på at du overholder strikkefastheten? om du strikker med en annen strikkefastehet kan dette påvirke garnforbruket. Det samme gjelder om du endrer lengden på feks bolen eller ermene. God fornøyelse
25.02.2019 - 14:09
![]() Wille wrote:
Wille wrote:
Er staat een fout in het telpatroon van A2A voor XL, XXL en XXXl: in de 25e toer vanaf beneden: de 3e steek van rechts moet de kleur naturel hebben, en niet lichtgrijs, zoals nu aangegeven. Jammer, nu moet ik een stuk uithalen, want het valt op.
11.01.2019 - 22:55
![]() Wille wrote:
Wille wrote:
Op 19.11.2018 kreeg ik van jullie als antwoord dat als je met de meerderingen begint na de rode boord, je met lichtgrijs begint. Maar: in de beschrijving staat dat je meteen daarna met de pas begint, waarbij een VERHOGING wordt gebreid met donkerrood! Dat betekent dus nog zo'n 6 naalden met rood. Nu ben ik in de war...moet er niet staan dat de verhoging met lichtgrijs is?
04.12.2018 - 18:38DROPS Design answered:
Dag Wille,
Je hebt gelijk, de verhoging moet volgens mij inderdaad met lichtgrijs gebreid worden; ik zal het even doorgeven aan de ontwerpafdeling ter controle.
05.12.2018 - 12:46
![]() Wille wrote:
Wille wrote:
Wanneer begin je, na de rode boord van 3 cm, met de lichtgrijze wol? meteen daarna, dus de 1 naald recht?
16.11.2018 - 11:36DROPS Design answered:
Dag Wille,
Op het moment dat je met de naald recht begint en de meerderingen begin je ook met lichtgrijs.
19.11.2018 - 08:23
![]() Maga wrote:
Maga wrote:
Guten Tag, vielen Dank für ihren Tipp. Da mir dies schon einmal passiert ist, wollte ich fragen ob es sein kann dass ich zu locker abkettet habe? vielen Dank
08.11.2018 - 16:15DROPS Design answered:
Liebe Maga, es kann sein, aber spannen/blockieren wird in allen Fällen immer eine gute Idee, damit alle Maschen schöner Ausbild bekommen ( besonders mit Farbenmuster oder Löchermuster). Viel Spaß beim stricken!
09.11.2018 - 07:52
![]() Maga wrote:
Maga wrote:
Hallo, bei meiner Jacke rollt / klappt sich das Bündchen immer wieder nach oben. Dies ist mir bereits bei einer einer Jacke passiert. Was mache ich falsch? Habt ihr einen Ratschlag/Tipp für mich? Vielen Dank.
07.11.2018 - 21:33DROPS Design answered:
Liebe Maga, Sie können die Jacke mit Stecknadeln auf einer geeigneten Unterlage spannen, anfeuchten (z.B. mit einer Sprühflasche für Blumen) und trocknen lassen, danach entfernen Sie die Stecknadeln, dann sollte sich der Rand nicht mehr rollen. Viel Spaß beim fertigstellen!
08.11.2018 - 09:07
![]() Lena wrote:
Lena wrote:
Could you tell me what the final bust measurement would be for this sweater in a size XXXL??? Thinking of making this for my daughter. Thank you
02.07.2018 - 16:50DROPS Design answered:
Dear Lena the bust size for XXXL is 138 cm. Look at the sketch at the bottom of the page. Happy knitting!
02.07.2018 - 16:52
![]() Estelle Ejdeholm wrote:
Estelle Ejdeholm wrote:
Hej! Jag skulle gärna vilja presentera några stickbeskrivningar i magasinet Hus & Hem. (Se bifogade bilder) Är det OK och hur får jag tag på beskrivningarna och högupplösta pressbilder? Stort tack på förhand, Vänligen Estelle Ejdeholm Publisher & Editor-in-Chief Segmentschef Livsstil Inredning - Mode - Antikt Egmont Publishing AB Mobil: 076-545 24 92
30.04.2018 - 13:24DROPS Design answered:
Hej Estelle, ja absolut, vi skriver til dig på onsdag :)
30.04.2018 - 15:58
![]() Nadette wrote:
Nadette wrote:
Bonjour, j'ai un doute en lisant vos explications pour le dos et devant. En taille S, dos-devant : 194 mailles. 47 mailles devant + 84 mailles dos + 47 mailles devant = 178 mailles. Pour obtenir les 194 mailles, il faut donc ajouter les 2 x 8 mailles montées sous les manches et les marqueurs de coté sont à placer à (47 + 4) mailles de chaque coté. Merci de me le confirmer.
04.02.2018 - 00:01DROPS Design answered:
Bonjour Nadette, tout à fait, ces 2 x 8 m montées sous les manches sont les mailles des côtés (sous les emmanchures) et appartiennent ainsi au dos et aux devants = 194 m. Bon tricot!
05.02.2018 - 09:36
|
||||||||||||||||
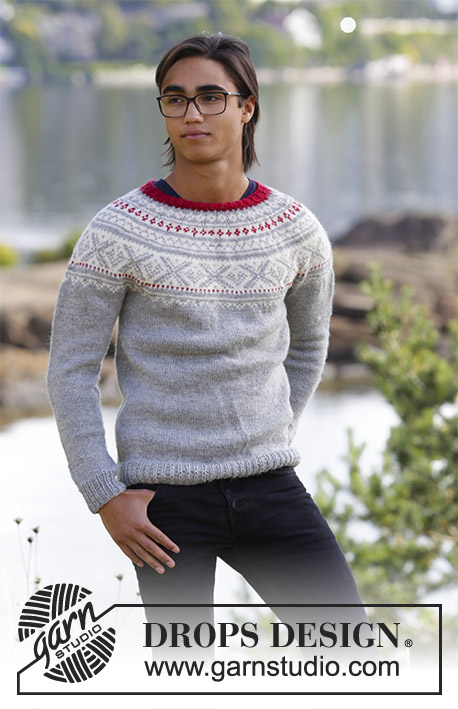
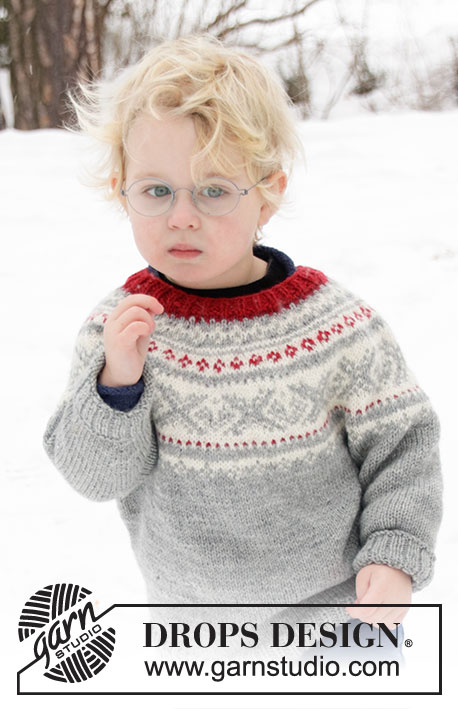
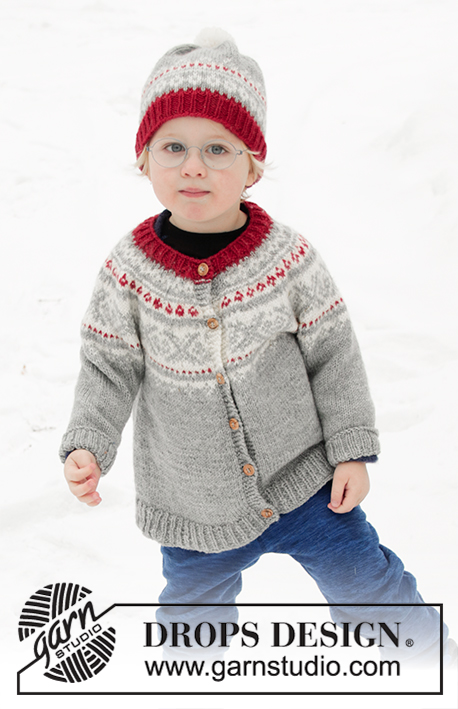
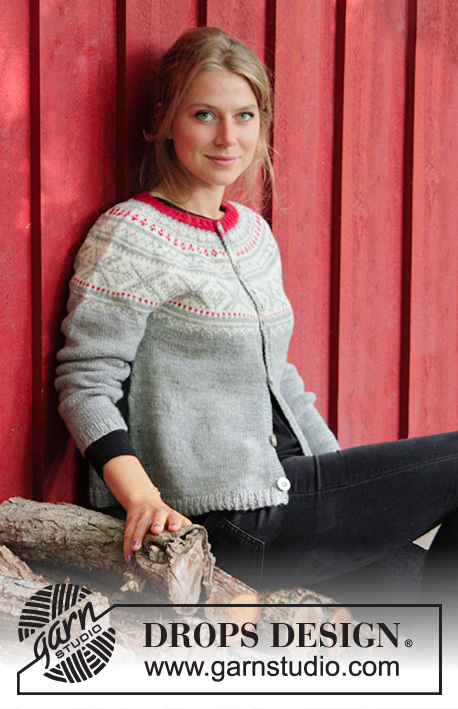
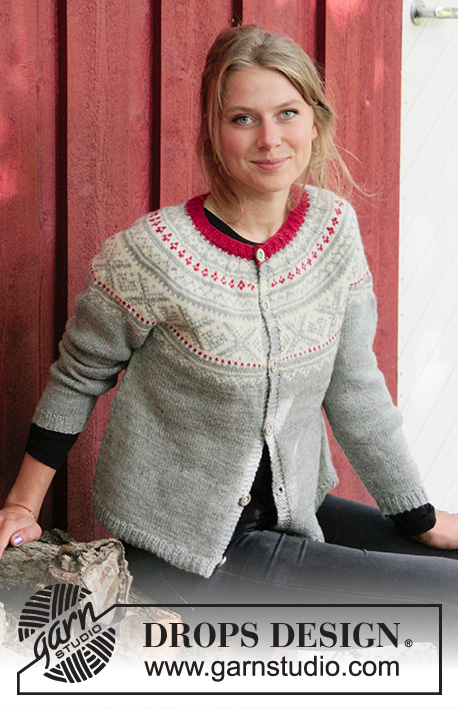
Narvik Jacket#narvikjacket |
||||||||||||||||
 |
 |
|||||||||||||||
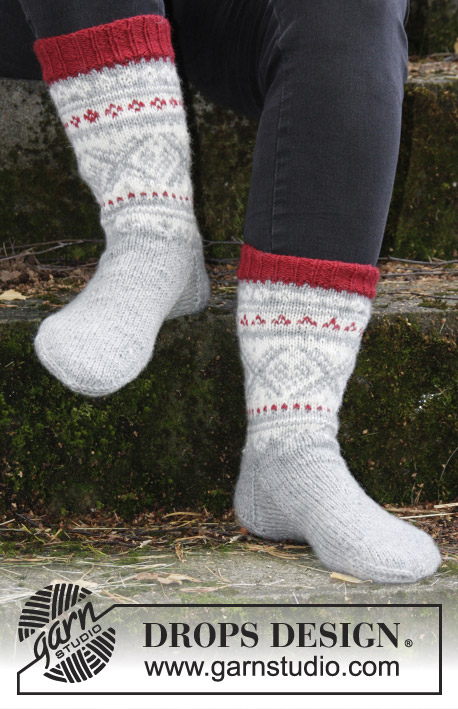
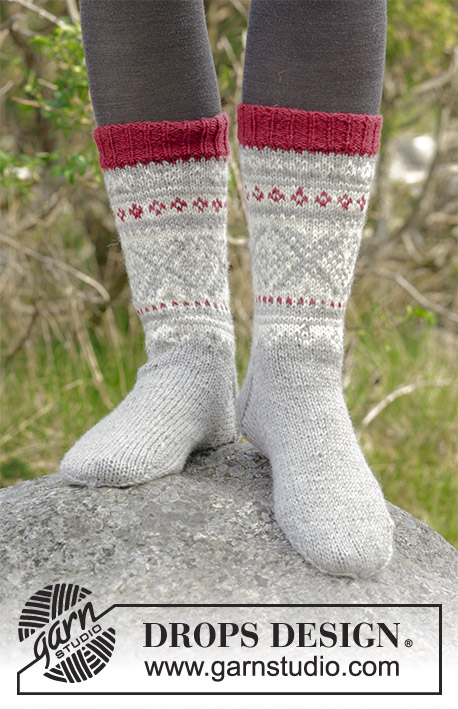
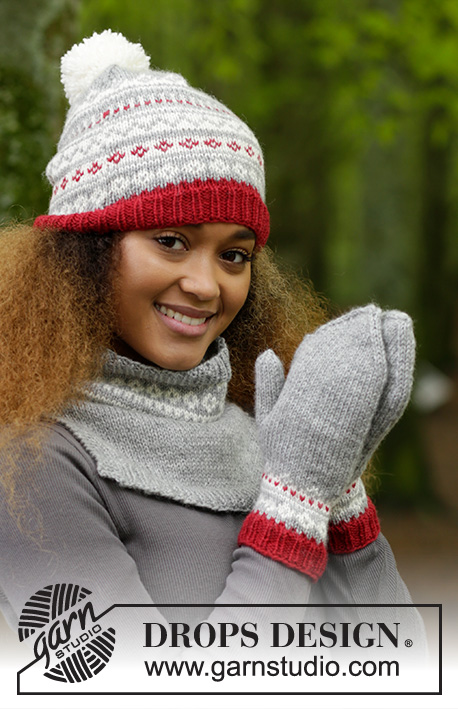
Knitted jacket with round yoke, multi-coloured Norwegian pattern and A-shape, worked top down. Sizes S - XXXL. The piece is worked in DROPS Karisma.
DROPS 183-1 |
||||||||||||||||
|
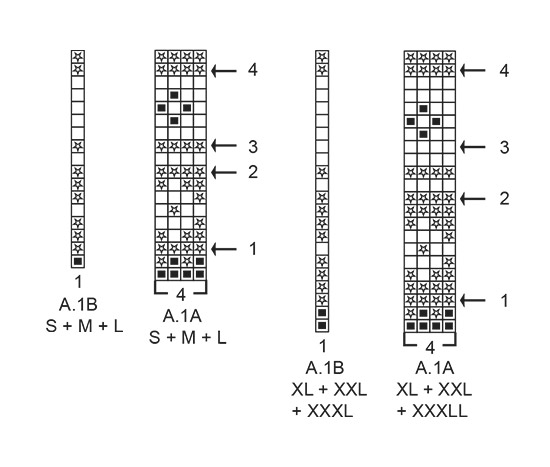
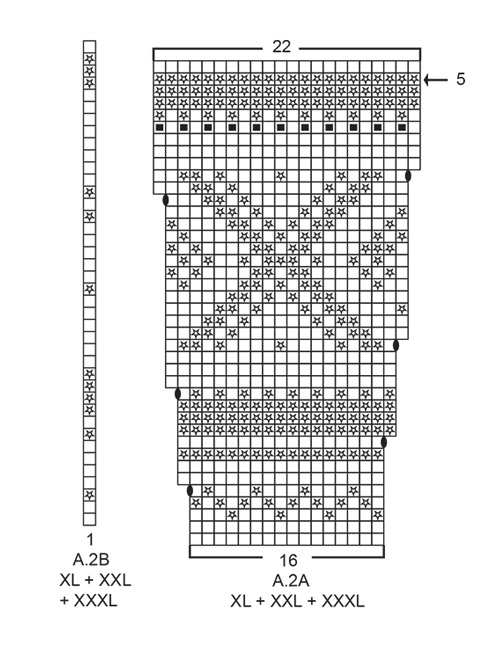
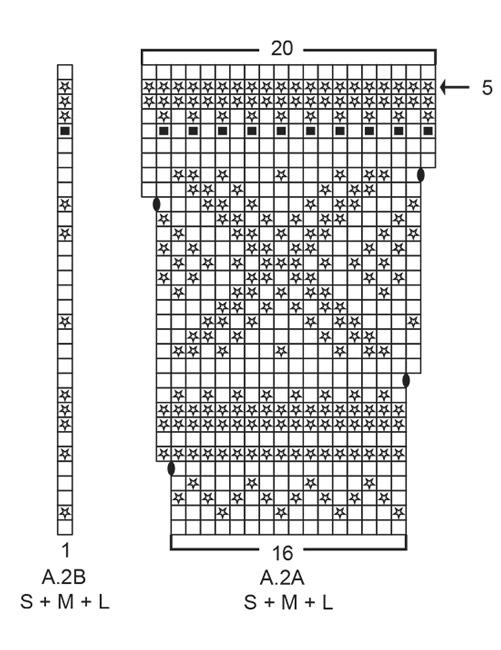
INFORMATION FOR THE PATTERN: RIDGE/GARTER STITCH (worked back and forth): 1 ridge = Knit 2 rows. INCREASE TIP-1: To work out how to increase evenly, count the total number of stitches on the needle (e.g. 107 stitches), minus the bands (e.g. 10 stitches) and divide the remaining stitches by the number of increases to be made (e.g. 28) = 3.5. In this example, increase by making 1 yarn over after alternately every 3rd and 4th stitch. Do not increase over the bands. On the next row work the yarn overs twisted to prevent holes. ELEVATION (for back of neck): Insert 1 marker mid back. Start from the right side with wine red and knit 12-13-14-15-16-17 stitches past the marker, turn, tighten the strand and purl 24-26-28-30-32-34 stitches. Turn, tighten the strand and knit 36-39-42-45-48-51 stitches, turn, tighten the strand and purl 48-52-56-60-64-68 stitches. Turn, tighten the strand and knit 60-65-70-75-80-85 stitches, turn, tighten the strand and purl to end of row (the band is knitted). PATTERN: See diagrams A.1 to A.3. Choose diagram for your size. The diagrams show all the rows in the pattern seen from the right side. The whole pattern is worked in stocking stitch. KNITTING TIP-1 (for bands): On the rows where there is a border pattern with 2 colours, use the background colour in the border to work the 5 band stitches in each side. KNITTING TIP-2: To avoid the knitting tension being tighter when working pattern, it is important that the strands do not pull at the back of the piece. You can increase a needle size when working pattern if this is a problem. INCREASE TIP-2 (for sides of body): All increases made from right side! Start 2 stitches before the marker thread, make 1 yarn over, knit 4 (the marker thread sits in the middle of these 4 stitches), make 1 yarn over (= 2 stitches increased). On the next row (wrong side) purl the yarn overs twisted to prevent holes. DECREASE TIP (for mid under sleeve): Start 3 stitches before marker thread, knit 2 together, knit 2 (the marker thread sits in the middle of these 2 stitches), slip 1 stitch as if to knit, knit 1, pass the slipped stitch over the knitted stitch (= 2 stitches decreased). BUTTONHOLES: Decrease for the buttonholes on the right band (when the garment is worn). 1 buttonhole = Work from right side until there are 3 stitches left on the needle, make 1 yarn over, knit 2 together, then knit the last stitch. On the next row knit the yarn over to leave a hole. The first buttonhole is worked when the neckline measures approx. 1½-2 cm. Then work the other 5-5-6-6-7-7 buttonholes with approx. 10-10-9-9-8½-8½ cm between each. ---------------------------------------------------------- JACKET: The piece is worked back and forth on circular needle from mid front, top down. The sleeves are worked in the round with short circular needle, top down, change to double pointed needles when necessary. NECKLINE: Cast on 107-110-116-119-122-128 stitches (including 5 band stitches in each side towards mid front) with circular needle size 3 mm and wine red. Purl 1 row (= wrong side). The next row is worked as follows from the right side: 5 band stitches in garter stitch, * knit 1, purl 2 *, repeat from *-* until there are 6 stitches left on the needle, knit 1 and finish with 5 band stitches in garter stitch. Continue the rib in this way – remember BUTTONHOLE on right band – see description above. When the rib measures 3 cm knit 1 row from the right side where you increase 28-33-39-40-41-43 stitches evenly on row – read INCREASE TIP-1 = 135-143-155-159-163-171 stitches. Continue by working yoke as described below. YOKE: Read KNITTING TIP-1 and KNITTING TIP-2! Change to circular needle size 4 mm and purl 1 row from the wrong side with knit 5 in each side for the bands. For a better fit you can now work an ELEVATION in the back of the neck – see description above. When the elevation is completed, work the next row from the right side as follows: 5 band stitches in garter stitch, work A.1A until there are 6 stitches left on the row (= 31-33-36-37-38-40 repeats of 4 stitches), work A.1B (= 1 stitch) and finish with 5 band stitches in garter stitch. Continue the pattern in this way and at the same time increase on every row marked with an arrow in A.1A as described below – read INCREASE TIP-1 (always increase on a row from the right side) and REMEMBER THE KNITTING TENSION! On the row with arrow-1 increase 28-32-36-36-36-40 stitches evenly on row = 163-175-191-195-199-211 stitches. On the row with arrow -2 increase 24-28-36-32-36-36 stitches evenly on row = 187-203-227-227-235-247 stitches. On the row with arrow -3 increase24-24-28-28-32-36 stitches evenly on row = 211-227-255-255-267-283 stitches. On the row with arrow -4 increase 24-24-28-28-32-32 stitches evenly on row = 235-251-283-283-299-315 stitches. When A.1 has been completed work the next row as follows from the right side: 5 band stitches in garter stitch, work A.2A until there are 6 stitches left on the row (= 14-15-17-17-18-19 repeats of 16 stitches), work A.2B (= 1 stitch) and finish with 5 band stitches in garter stitch. Continue the pattern in this way and increase as shown in the diagram. After the last increase in A.2A there are 291-311-351-385-407-429 stitches on the needle. Continue A.2 and increase at the same time 2-6-2-4-0-2 stitches evenly on the row with arrow-5 in A.2A = 293-317-353-389-407-431 stitches. When A.2 has been completed work the next row as follows from the right side: 5 band stitches in garter stitch, work A.3A until there are 6 stitches left on the row (= 47-51-57-63-66-70 repeats of 6 stitches), work A.3B (= 1 stitch) and finish with 5 band stitches in garter stitch. Continue the pattern in this way. AT THE SAME TIME on the row with arrow-6 in A.3A increase 5-13-5-1-3-3 stitches evenly on row = 298-330-358-390-410-434 stitches. When A.3 has been completed, the piece measures approx. 23-23-23-27-27-27 cm from the cast-on edge mid front. Continue working stocking stitch with light grey and 5 band stitches in garter stitch in each side towards mid front until the piece measures 23-25-27-29-31-33 cm from the cast-on edge mid front (if your knitting tension is right in height, this measurement is reached in size S when A.3 has been completed). The next row is worked as follows from the right side: Knit 47-51-55-61-65-70 stitches (= front piece), place the next 60-68-74-78-80-82 stitches on a thread for sleeve, cast on 8-8-10-10-12-14 new stitches on the needle (= in side under sleeve), knit 84-92-100-112-120-130 stitches (= back piece), place the next 60-68-74-78-80-82 stitches on a thread for sleeve, cast on 8-8-10-10-12-14 new stitches on needle (= in side under sleeve) and knit the remaining 47-51-55-61-65-70 stitches (= front piece). Body and sleeves are finished separately. THE PIECE IS NOW MEASURED FROM HERE! BODY: = 194-210-230-254-274-298 stitches. Insert 1 marker thread 51-55-60-66-71-77 stitches in from each side = 92-100-110-122-132-144 stitches between marker threads on the back piece. Continue with stocking stitch and light grey and 5 band stitches in garter stitch in each side towards mid front. When the piece measures 2 cm from the separation, increase 1 stitch on each side of both marker threads – read INCREASE TIP-2 (= 4 stitches increased). Increase in this way every 8th row (approx. every 3 cm) a total of 10 times in each side = 234-250-270-294-314-338 stitches on the needle. When the piece measures 30 cm from the separation purl 1 row from the wrong side where you increase 47-49-53-59-63-69 stitches evenly on row – read INCREASE TIP-1 = 281-299-323-353-377-407 stitches. Change to circular needle size 3 mm and work the next row as follows from the right side: 5 band stitches in garter stitch, * knit 1, purl 2 *, repeat from *-* until there are 6 stitches left on the row, knit 1 and finish with 5 band stitches in garter stitch. Continue the rib in this way for 3 cm. Cast off with garter stitch over garter stitch, knit over knit and purl over purl, but to avoid the cast-off edge being tight, you can make 1 yarn over after every 6th stitch AT THE SAME TIME as you cast off (the yarn overs are cast off as normal stitches). The jacket measures approx. 56-58-60-62-64-66 cm from the shoulder down. SLEEVE: Place the 60-68-74-78-80-82 stitches from the thread in the one side of the piece on short circular needle size 4 mm. In addition, knit up 1 stitch in each of the 8-8-10-10-12-14 stitches cast on under the sleeve = 68-76-84-88-92-96 stitches on needle. Insert 1 marker thread in the middle of the 8-8-10-10-12-14 stitches (= mid under sleeve). Work stocking stitch in the round with light grey. When the piece measures 3-2-2-3-2-2 cm from the separation decrease 2 stitches mid under the sleeve – read DECREASE TIP. Decrease in this way every 3-2½-2-1½-1½-1½ cm a total of 12-15-18-19-20-21 times = 44-46-48-50-52-54 stitches. When the sleeve measures 40-39-37-36-35-33 cm from the separation (shorter measurements in larger sizes due to longer yoke), knit 1 round where you increase 7-8-6-7-8-6 stitches evenly on round = 51-54-54-57-60-60 stitches. Change to double pointed needles size 3 mm. Work rib in the round (= knit 1 / purl 2) for 3 cm. Cast off with knit over knit and purl over purl, but to avoid the cast-off edge being tight, you can make 1 yarn over after every 6th stitch at the same time as you cast off (the yarn overs are cast off as normal stitches). The sleeve measures approx. 43-42-40-39-38-36 cm from the separation and down. Work the other sleeve in the same way. ASSEMBLY: Sew the buttons onto the left band. |
||||||||||||||||
Diagram explanations |
||||||||||||||||
|
||||||||||||||||
 |
||||||||||||||||
 |
||||||||||||||||
 |
||||||||||||||||
 |
||||||||||||||||
Have you finished this pattern?Tag your pictures with #dropspattern #narvikjacket or submit them to the #dropsfan gallery. Do you need help with this pattern?You'll find 34 tutorial videos, a Comments/Questions area and more by visiting the pattern on garnstudio.com. © 1982-2026 DROPS Design A/S. We reserve all rights. This document, including all its sub-sections, has copyrights. Read more about what you can do with our patterns at the bottom of each pattern on our site. |
||||||||||||||||


With over 40 years in knitting and crochet design, DROPS Design offers one of the most extensive collections of free patterns on the internet - translated to 17 languages. As of today we count 325 catalogues and 12298 patterns translated into English (UK/cm).
We work hard to bring you the best knitting and crochet have to offer, inspiration and advice as well as great quality yarns at incredible prices! Would you like to use our patterns for other than personal use? You can read what you are allowed to do in the Copyright text at the bottom of all our patterns. Happy crafting!
Post a comment to pattern DROPS 183-1
We would love to hear what you have to say about this pattern!
If you want to leave a question, please make sure you select the correct category in the form below, to speed up the answering process. Required fields are marked *.