
Popular categories
Looking for a yarn?


Comments / Questions (51)
![]() Kharen wrote:
Kharen wrote:
Pour le modele 65-21, peut-on remplacer le fil safran par de la bomull-lin? Combien de pelotes pour le débardeur uniquement en taille L?
19.04.2026 - 09:36DROPS Design answered:
Bonjour Kharen, pas vraiment car cet ensemble se tricote avec 1 seul fil Safran, et la tension est donc différente de celle de Bomull-Lin - utilisez le convertisseur pour voir les alternatives possibles pour Safran ou bien découvrez ici les modèles que vous pouvez tricoter avec un fil du groupe C (seul ou avec un autre fil), pensez à ajouter des filtres si besoin. Bon tricot!
20.04.2026 - 10:17
![]() Judy wrote:
Judy wrote:
For the cardigan cast on when you say (including 5 edge sts on each side at the center front) do you mean "in addition to" the sts cast on or are these 10 sts included in the cast on count? So for medium size, cast on 271 sts or 271+10 sts?
16.01.2026 - 16:44DROPS Design answered:
Hi Judy, for the medium size you have to cast on 271 sts. Happy knitting!
16.01.2026 - 18:20
![]() Karo wrote:
Karo wrote:
Bonjour…pour le débardeur on a « réalisation » suivi dos et devant…je ne comprend pas! Est ce 2 façons pour le réaliser? En rond ou en aller retour…? Merci
08.06.2025 - 20:14DROPS Design answered:
Bonjour Karo, vous realisez ce pull en une partie, en allers retours jusqu'aux emmanchures. Ensuite le pull est separe en 3 parties (2 devants et 1 dos) et chaque partie est tricotee separement en allers retours. Seules les manches sont realizees en rond. Bon tricot!
09.06.2025 - 08:00
![]() Roget Françoise wrote:
Roget Françoise wrote:
Bonjour Je pensais tricoter ce modèle mais, quand je vois comme cette veste tombe mal, elle semble de travers... La photo est terrible. C est une contre publicité. En plus cette couleur verte sur un autre vert qui ne va pas avec. Je regrette mais je ne la ferai pas. Cordialement
05.06.2025 - 17:51
![]() Roget wrote:
Roget wrote:
Bonjour Paragraphe : "bordure au crochet " "sauter 2 m/ rangs" > que veut dire "/rangs" ? Merci de votre aide Cordialement Françoise Roget
05.06.2025 - 10:23DROPS Design answered:
Bonjour Mme Roget, vous devez sauter 2 mailles (dans le sens de la largeur) ou bien sauter 2 rangs (dans le sens de la hauteur) entre 2 mailles serrées. Bonne continuation!
05.06.2025 - 14:23
![]() Roget wrote:
Roget wrote:
Bonjour Modèle gioia /coloris taupe Pourriez-vous me dire quels boutons prendre pour le coloris taupe??? Merci d avance Cordialement
19.05.2025 - 19:30DROPS Design answered:
Bonjour Mme Roget, contactez votre magasin - même par mail ou téléphone - pour toute assistance au choix de la couleur la plus appropriée. Bon tricot!
20.05.2025 - 09:20
![]() Una wrote:
Una wrote:
Hi is there an option to add very short sleeves to the inside top. Can you advise another pattern suitable to adapt from? Thank you
28.04.2025 - 01:04DROPS Design answered:
Dear Una, you will find some top patterns with short sleeves here - add/edit filters if needed - one of them could be helpful. Happy knitting!
28.04.2025 - 09:10
![]() Ann wrote:
Ann wrote:
Waarom 251 steken opzetten terwijl het M1 patroon telkens uit 10 steken bestaat en er 2 x 5 kantsteken zijn. Is er dan geen even aantal steken nodig? Wat gebeurt er anders met die ene steek? Bedankt,
09.04.2025 - 20:10DROPS Design answered:
Dag Ann,
Die ene steek brei je in de eerste steek van het telpatroon.
13.04.2025 - 09:49
![]() Dianne Blust wrote:
Dianne Blust wrote:
The diagram at bottom of pattern show numbers, but are these cm or inches? If cm then an extra large is only 40” bust?
07.04.2025 - 19:42DROPS Design answered:
Hi Dianne, If you are using the UK English site, the measurements will be in cm. If you change to the US version, you will get all the measurements in inches. Click on the language box at the top of the pattern to change to US English. Happy crafting!
08.04.2025 - 06:52
![]() Lisa wrote:
Lisa wrote:
Bei der Anleitung vom Top muß es sicher Ndl.Nr. 3,5 heißen: stricken. Zu Rundstr. Ndl. Nr. ,5 wechseln du M1, 4 Mal in der höhe stricken. Mit Glattstr. weiterfahren. LG
04.04.2025 - 06:25
|
||||||||||||||||
Gioia Cardigan#gioiacardigan |
||||||||||||||||
 |
 |
|||||||||||||||
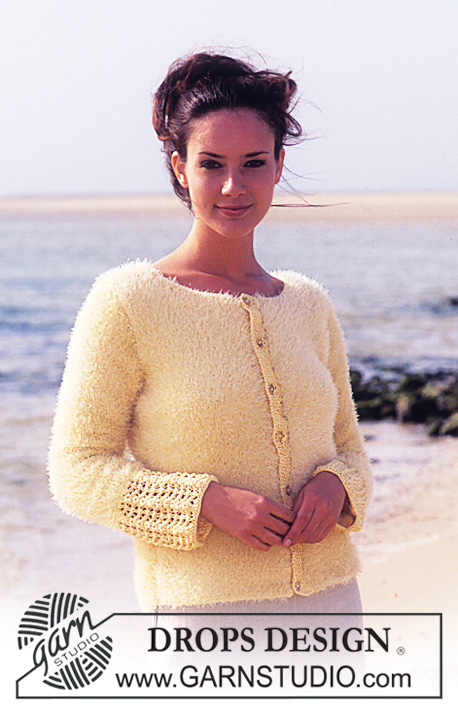
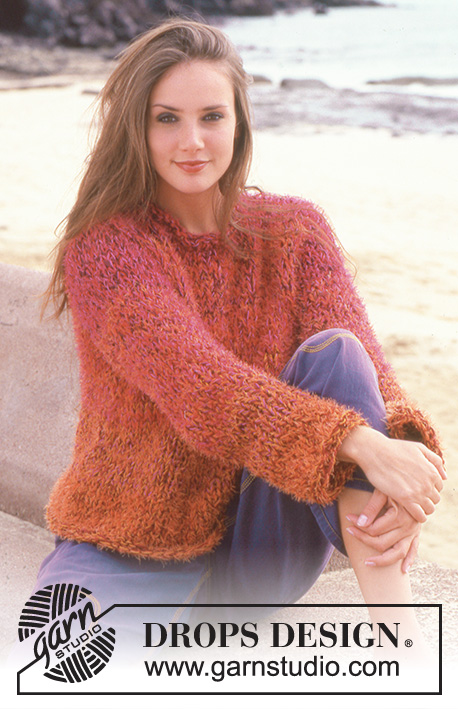
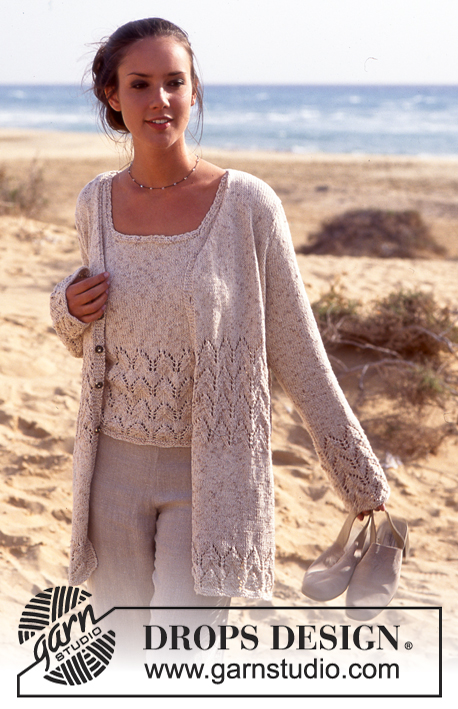
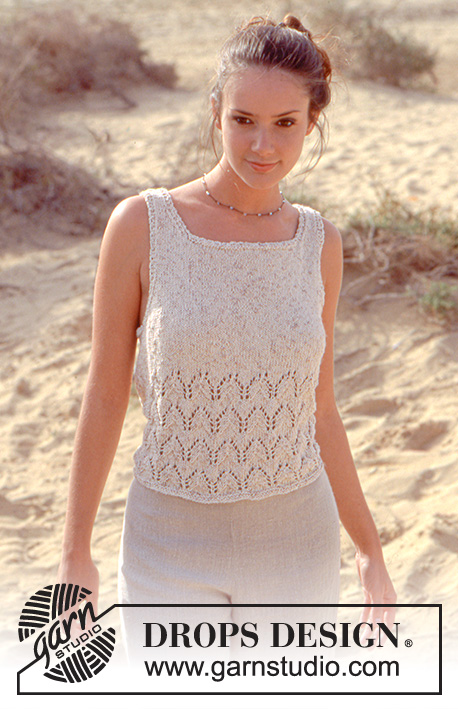
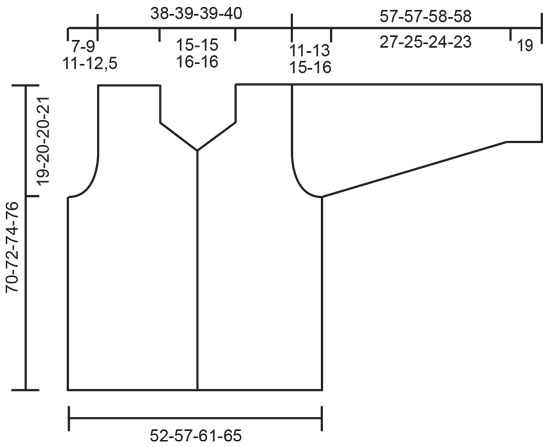
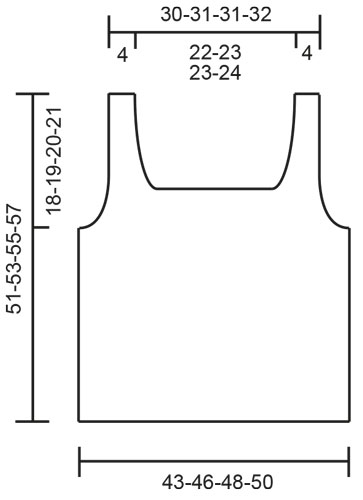
DROPS jacket and top in Safran with lace pattern and crochet edges.
DROPS 65-21 |
||||||||||||||||
|
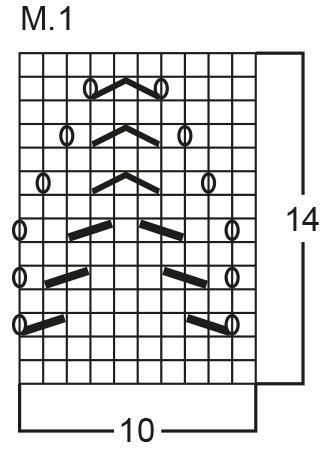
Knitting tension: 23 stitches x 30 rows with needle size 3.5 mm and stocking stitch = 10 x 10 cm. Remember needle size is only a guide! Pattern: See diagram - M.1, 1 diagram = 1 repeat. Pattern in diagram is seen from the right side. Ridge/Garter stitch (in the round): 1 ridge = 2 rounds. Knit 1 round and purl 1 round. Ridge/Garter stitch (back and forth on needle): 1 ridge = Knit 2 rows. Decrease tip: All decreases are worked from the right side. Decrease as follows after the 2 edge stitches: Slip 1 stitch, K 1, pass slipped stitch over. Decrease as follows before 2 edge stitches: K2 together. Buttonhole: 1 buttonhole = Cast off third and fourth band stitch on right front piece, cast on 2 new stitches over the cast off stitches on next row. Work buttonholes when piece measures: 26-27-28-29 cm, 33-34-35-36 cm, 39-40-42-43 cm, 46-47-49-50 cm and 52-53-55-56 cm. Crochet edge: Work with hook size 3 mm inside the 1 garter stitch edge stitch as follows: 1 double crochet, * 3 chain stitches, skip 2 stitches/rows, 1 double crochet *, repeat from *-*. ----------------------------------------------------------- Body: Jacket is worked back and forth with circular needle from mid front. Cast on 251-271-291-311 stitches (incl. 5 band stitches in each side towards mid front) with circular needle size 3 mm and beige tweed, work 2 ridges. Change to circular needle size 3.5 mm and work M.1 two times in height, but the bands are worked in garter stitch upwards. Remember the knitting tension! Continue with stocking stitch (band stitches continued in garter stitch). When piece measures 26-27-28-29 cm work M.1 four times in height - at the same time work buttonholes on right band - see description above. After M.1 continue with stocking stitch. When piece measures 51-52-54-55 cm work next row as follows: 61-66-71-76 stitches front piece, cast off 8 stitches for armhole, 113-123-133-143 stitches back piece, cast off 8 stitches for armhole, 61-66-71-76 stitches front piece. Each piece is finished separately. Left front piece: = 61-66-71-76 stitches. Continue to decrease for armholes every 2nd row: 4 stitches x 0-0-1-1, 3 stitches x 2-2-3-3, 2 stitches x 2-4-3-5, 1 stitch x 3-3-3-3. At the same time when piece measures 53-54-56-57 cm cast off the 5 band stitches for neckline. Continue decreasing to neck every 2nd row inside the 2 edge stitches worked in garter stitch - see Decrease tip: 1 stitch x 17-17-18-18. After all decreases for armholes and neck, there are 26-27-26-27 stitches left on shoulder. Right front piece: Worked as left, but remember buttonhole on right band. Back piece: = 113-123-133-143 stitches. Continue to decrease for armholes in each side as for front piece = 87-89-89-91 stitches. When piece measures 68-70-72-74 cm work 1 ridge over the middle 35-35-37-37 stitches. On next row cast off the middle 33-33-35-35 stitches for neck. Continue to decrease inside the 2 edge stitches worked in garter stitch - see Decrease tip: 1 stitch on next row towards neck = 26-27-26-27 stitches left on shoulder. Cast off when piece measures 70-72-74-76 cm. Sleeve: Cast on 60-60-60-60 stitches with double pointed needles size 3 mm and beige tweed, work 2 ridges. Change to double pointed needles size 3.5 mm and work M.1 four times in height. Then continue with stocking stitch - at the same time after M.1 increase mid under sleeve: 2 stitches x 9-12-12-15 for: Size S: Every 9th round. Sizes M + L: Every 6th round. Size XL: Alternately every 4th and 5th round = 78-84-84-90 stitches. When piece measures 46-44-43-42 cm cast off 6 stitches mid under sleeve and finish working back and forth on needle. Continue to decrease to sleeve cap every 2nd row: 2 stitches x 3-3-2-2, 1 stitch x 8-11-16-18, 2 stitches x 3-3-2-2, 3 stitches x 1-1-1-1. Cast off, sleeve measures approx. 57-57-58-58 cm. Assembly: Sew shoulder seams. Work Crochet edge - see description above - along bands and around neck. Sew in sleeves and sew on buttons. DROPS Top in Safran with lace pattern and crochet edges. Sizes: S - M - L - XL Materials: DROPS Safran Moulinè from Garnstudio 200-200-250-250 g colour no 44, beige tweed. DROPS Circular needle sizes 3 and 3.5 mm DROPS Crochet hook size 3 mm ------------------------------------------------------------ Knitting tension: 23 stitches x 30 rows with needle size 3.5 mm and stocking stitch = 10 x 10 cm. Remember needle size is only a guide! Pattern: See diagram - M.1, 1 diagram = 1 repeat. Pattern in diagram is seen from the right side. Ridge/Garter stitch (in the round): 1 ridge = 2 rounds. Knit 1 round and purl 1 round. Ridge/Garter stitch (back and forth on needle): 1 ridge = Knit 2 rows. Decrease tip: All decreases are worked from the right side. Decrease as follows after the 2 edge stitches: Slip 1 stitch, K 1, pass slipped stitch over. Decrease as follows before the 2 edge stitches: K2 together. Crochet edge: Work with hook size 3 mm inside the 1 garter stitch edge stitch as follows: 1 double crochet, * 3 chain stitches, skip 2 stitches/rows, 1 double crochet *, repeat from *-*. --------------------------------------------------------- Body: Cast on 200-210-220-230 stitches with circular needle size 3 mm and beige tweed and work 2 ridges. Change to circular needle size 3.5 mm and work M.1 four times in height. Remember the knitting tension! Continue with stocking stitch. When piece measures 33-34-35-36 cm, work next round as follows: Purl 16-16-18-20 stitches (= under sleeve), knit 84-89-92-95 stitches, purl 16-16-18-20 stitches (= under sleeve), knit 84-89-92-95 stitches. On next round cast off the 12-12-14-16 purl stitches in each side for armholes. Front and back pieces are now finished separately. Front piece: = 88-93-96-99 stitches. Continue to decrease for armholes inside the 2 edge stitches - which are worked in garter stitch - every 2nd row - see Decrease tip: 1 stitch x 10-11-12-13 = 68-71-72-73 stitches. When piece measures 41-42-43-44 cm, purl 1 row (seen from right side) over the middle 42-43-42-43 stitches. On next row cast off the middle 38-39-38-39 stitches for neck. Continue decreasing to neck inside the 2 edge stitches - worked in garter stitch - every 2nd row - see Decrease tip: 1 stitch x 6-7-8-8. There are now 9-9-9-9 stitches left on each shoulder, these are worked in stocking stitch with 2 stitches garter stitch in each side until piece measures 51-53-55-57 cm, cast off. Back piece: = 88-93-96-99 stitches. Finished as for front piece. Assembly: Sew shoulder seams. Work Crochet edge - see description above - around armholes and neck. |
||||||||||||||||
Diagram explanations |
||||||||||||||||
|
||||||||||||||||
 |
||||||||||||||||
 |
||||||||||||||||
 |
||||||||||||||||
Have you finished this pattern?Tag your pictures with #dropspattern #gioiacardigan or submit them to the #dropsfan gallery. Do you need help with this pattern?You'll find 28 tutorial videos, a Comments/Questions area and more by visiting the pattern on garnstudio.com. © 1982-2026 DROPS Design A/S. We reserve all rights. This document, including all its sub-sections, has copyrights. Read more about what you can do with our patterns at the bottom of each pattern on our site. |
||||||||||||||||


With over 40 years in knitting and crochet design, DROPS Design offers one of the most extensive collections of free patterns on the internet - translated to 17 languages. As of today we count 324 catalogues and 12290 patterns translated into English (UK/cm).
We work hard to bring you the best knitting and crochet have to offer, inspiration and advice as well as great quality yarns at incredible prices! Would you like to use our patterns for other than personal use? You can read what you are allowed to do in the Copyright text at the bottom of all our patterns. Happy crafting!
Post a comment to pattern DROPS 65-21
We would love to hear what you have to say about this pattern!
If you want to leave a question, please make sure you select the correct category in the form below, to speed up the answering process. Required fields are marked *.