DROPS Ribbon
DROPS Ribbon
45% Cotton, 45% Viscose, 10% Linen
Discontinued
find alternatives
DROPS Safran
DROPS Safran
100% Cotton
from 1.30 £ /50g
DROPS SS24

Cairo

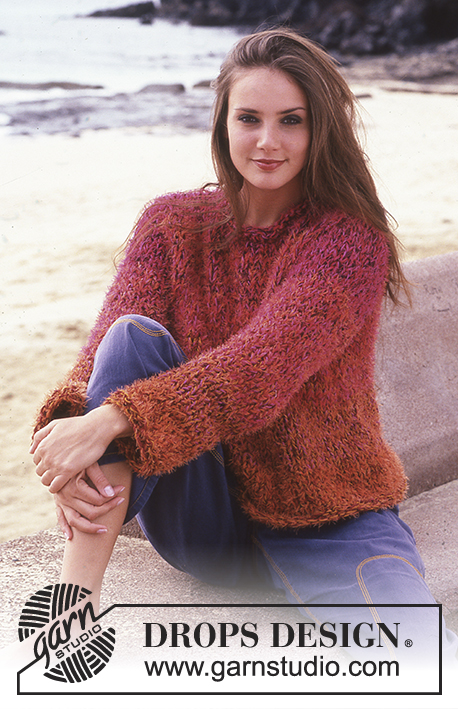
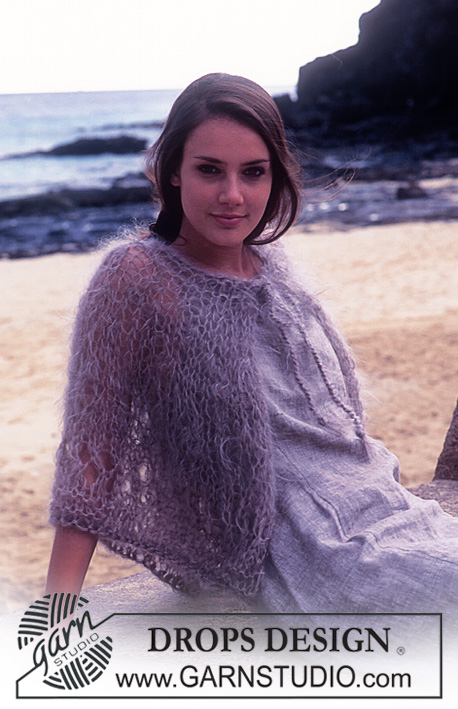
DROPS Sweater with lace pattern in Ribbon. Scarves with lace pattern in Safran.

DROPS 65-2
SWEATER:

Sizes: Small/Medium - Medium/Large - Extra Large
Finished measurements: 104-114-124 cm

Materials: DROPS RIBBON from Garnstudio
45% cotton, 45% viscose, 10% linen, 50 g./78 m.
650-750-800 g col. no. 02, natural.

DROPS 5 mm needles, or size needed to obtain correct gauge.

Alternate yarns:
* DROPS BOMULL-LIN, 53% Egyptian cotton, 47% linen, 50 g./85 m
* DROPS PARIS, 100% cotton, 50 g/75 m

-------------------------------------------------------

Alternative Yarn – See how to change yarns here
Yarn Groups A to F – Use the same pattern and change the yarn here
Yarn usage using an alternative yarn – Use our yarn converter here

-------------------------------------------------------

DROPS Ribbon
DROPS Ribbon
45% Cotton, 45% Viscose, 10% Linen
Discontinued
find alternatives
DROPS Safran
DROPS Safran
100% Cotton
from 1.30 £ /50g

Pattern instructions

NOTE: This pattern is written in British English. All measurements in charts are in cm. For conversion from cm to inches - click here. There are different terms for crocheting in British and American English. If this pattern includes crochet, click for "crochet terms" here. For this pattern in American English, please click here.
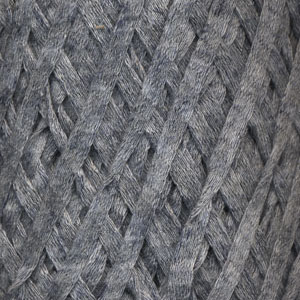
SWEATER:

Gauge: 17 sts x 22 row in stockinette st = 10 x 10 cm.

Garter st, when knitting flat: Knit all sts, all rows.

Pattern: See charts. 1 chart = 1 repeat. The pattern is seen from the right side.

Tip for decreasing: All decs for the neck opening are done on the right side of the work.
Dec as follows before 3 edge sts: slip 1, K 1, psso.
Dec as follows after 3 edge sts: K 2 tog.

Knitting tip: Ribbon has a tendency to twist when it is knit; untwist as you go along for best results.

FRONT
Cast on 91-99-107 sts. Knit 4 rows garter st, then P 1 row. Establish pattern on the next row as follows (right side row): K 1 (edge st knit in garter st throughout), 1 repeat of Pattern 1, 10-11-12 repeats of Pattern 2, 1 repeat of Pattern 3, K 1 (edge st knit in garter st throughout). Knit pattern as established for 3 repeats (36 rows). Knit Pattern 4 once, then repeat Pattern 5 to finished dimensions.
When the work measures 50-52-54 cm, bind off for armholes at each side every other row: 3 sts 2-2-2 times, 2 sts 2-4-5 times, 1 st 3-2-3 times = 65-67-69 sts.
When the work measures 55-57-59 cm, knit garter st over the center 9-9-9 sts for 2 rows. On the next row bind off the center 5 sts for the neck. Then knit the 3 edge sts at each neck edge in garter st and dec 1 st at each neck edge inside the 3 edge sts 8-8-9 times every other row, then 3-3-3 times every 4th row = 21-22-22 sts remain on each shoulder. Bind off when the work measures 70-73-76 cm.

BACK
Cast on and knit as for the front. Bind off for armholes as on the front = 65-67-69 sts. When the work measures 67-70-73 cm, knit garter st over the center 25-25-27 sts for 4 rows. On the next row, bind off the center 21-21-23 sts for the neck. Then knit the 3 edge sts at each neck edge in garter st and dec 1 st inside the 3 edge sts at each neck edge on the next row = 21-22-22 sts remain on each shoulder. Bind off when the work measures 70-73-76 cm.

SLEEVE
Cast on 43-43-43 sts. Knit 4 rows of garter st, then P 1 row. Establish pattern on the next row as follows (right side row): K 1 (edge st knit in stockinette st throughout), 1 repeat of Pattern 1, 4-4-4 repeats of Pattern 2, 1 repeat of Pattern 3, K 1 (edge st knit in stockinette st throughout). Knit pattern as established for 2 repeats (24 rows). Knit Pattern 4 once, then repeat Pattern 5 to finished dimensions. At the same time, when the work measures 9-9-9 cm, inc 1 st at each side inside the edge st 11-12-14 times every 3-3-2.5 cm = 65-67-71 sts.
When the work measures 46-45-44 cm, bind off at each side for sleeve cap every other row: 3 sts 1-1-1 time, 2 sts 2-2-2 times, 1 st 6-8-9 times, 2 sts 2-2-2 times and then 3 sts at each side until the work measures 57-58-58 cm. Bind off.

ASSEMBLY
Sew the shoulder seams. Sew in the sleeves. Sew side- and sleeve seam in one using the edge st as a seam allowance.


SCARF:

Sizes: Measurements: 75 x 44 cm

Materials: DROPS SAFRAN from Garnstudio
100% Egyptian cotton, 50 g/160 m./174 yards
150 g color no. 18, natural

DROPS 3 mm needles, or size needed to obtain correct gauge.

Gauge: 20 sts x 34 rows in lace pattern = 10 x 10 cm.

Pattern: See Pattern 6 chart. The pattern is seen from the right side.


SCARF
Cast on 3 sts. Knit according to the chart. Then continue in pattern as established, increasing until there are 150 sts on the needles - the work now measures approx. 44 cm in length. Knit 2 rows of garter st, bind off.
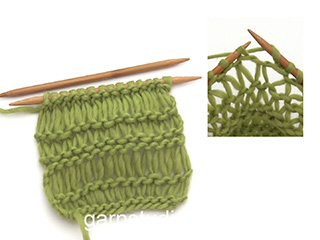
This pattern has been corrected.

Updated online: 08.11.2023
Diagram M.6 has been updated.

Diagram

symbols = K
symbols = K 2 tog, yo.
symbols = yo, slip 1, K 1, pass the slipped st over (psso)
symbols = yo, slip 1, K 2 tog, psso, yo
symbols = P
symbols = K 1, yo.
symbols = K 1, yo 2 times.
symbols = sts between the yarn overs are purled (seen from the right side) at the same time as the yarn overs are released = long sts.
symbols = yo
diagram
diagram
diagram
diagram

Each of our patterns has specific tutorial videos to help you.

Do you have a question? See a list of frequently asked questions (FAQ)

Knitting tension is what determines the final measurements of your work, and is usually measured per 10 x 10 cm. It is provided like so: number of stitches in width x number of rows in height - eg: 19 stitches x 26 rows = 10 x 10 cm.

The knitting tension is very individual; some people knit/crochet loosely while others work tightly. You adjust the knitting tension with the needle size, which is why the suggested needle size is only meant as a guide! You need to adjust this (up or down) to ensure that YOUR knitting tension matches the knitting tension provided in the pattern. If you work with a different knitting tension than provided you will have a different yarn consumption, and your work will have different measurements than what the pattern suggests.

The knitting tension also determines which yarns can replace each other. As long as you achieve the same knitting tension you can replace one yarn with another.

See DROPS lesson: How to measure your tension/gauge

See DROPS video: How to make a gauge tension swatch

The required amount of yarn is provided in grams, eg: 450 g. To calculate how many balls you’ll need you first need to know how many grams are in 1 ball (25g, 50g or 100g). This information is available if you click on the individual yarn quality on our pages. Divide the amount required with the amount of each ball. For example, if each ball is 50g (the most common amount), the calculation will be as follows: 450 / 50 = 9 balls.

The important thing when changing from one yarn to another is that the knitting/crochet tension remains the same. This is so that the measurements of the finished piece will be the same as on the sketch provided. It is easier to achieve the same knitting tension using yarns from the same yarn group. It is also possible to work with multiple strands of a thinner yarn to achieve the knitting tension of a thicker one. Please try our yarn converter. We recommend you to always work a test swatch.

Please NOTE: when changing yarn the garment might have a different look and feel to the garment in the photo, due to individual properties and qualities of each yarn.

See DROPS lesson: Can I use a different yarn than the one mentioned in the pattern?

All our yarns are categorised into yarn groups (from A to F) according to thickness and knitting tension – group A contains the thinnest yarns and group F the thickest. This makes it easier for you to find alternative yarns to our patterns, should you wish to switch yarn. All yarns within the same group have a similar knitting tension and can easily replace each other. However, different yarn qualities have different structures and properties which will give the finished work a unique look and feel.

Click here for an overview of the yarns in each yarn group

At the top of all our patterns you’ll find a link to our yarn calculator, which is a helpful tool should you wish to use a different yarn than suggested. By filling in the yarn quality you wish to replace, the amount (in your size) and number of strands, the calculator will present good alternative yarns with the same knitting tension. Additionally it will tell you how much you’ll require in the new qualities and whether you’ll need to work with multiple strands. Most skeins are 50g (some are 25g or 100g).

If the pattern is worked with multiple colours, every colour will have to be calculated separately. Similarly, if the pattern is worked with several strands of different yarns (for example 1 strand Alpaca and 1 strand Kid-Silk) you will have to find alternatives for each, individually.

Click here to see our yarn calculator

Since different yarns have different qualities and textures we have chosen to keep the original yarn in our patterns. However, you can easily find options among our available qualities by using our yarn calculator, or simply pick a yarn from the same yarn group.

It is possible that some retailers still have discontinued yarns in stock, or that someone has a few skeins at home that they would like to find patterns for.

The yarn calculator will provide both alternative yarn as well as required amount in the new quality.

If you think it's hard to decide what size to make, it can be a good idea to measure a garment you own already and like the size of. Then you can pick the size by comparing those measures with the ones available in the pattern's size chart.

You'll find the size chart at the bottom of the pattern.

See DROPS lesson: How to read size chart

The needle size provided in the pattern serves only as a guide, the important thing is to follow the knitting tension. And since knitting tension is very individual, you will have to adjust the needle size to ensure that YOUR tension is the same as in the pattern – maybe you’ll have to adjust 1, or even 2 needle sizes, up or down to achieve the correct tension. For this, we recommend that you work test swatches.

Should you work with a different knitting tension than the one provided, the measurements of the finished garment might deviate from the measurement sketch.

See DROPS lesson: How to measure your tension/gauge

See DROPS video: How to make a tension/gauge swatch

Working a garment top-down provides more flexibility and room for personal adjustment. For example it is easier to try the garment on while working, as well as making adjustments to length of yoke and shoulder caps.

The instructions are carefully explaining every step, in the correct order. Diagrams are adjusted to the knitting direction and are worked as usual.

The diagram depicts all rows/rounds, and every stitch seen from the right side. It is read from bottom to top, from right to left. 1 square = 1 stitch.

When working back and forth, every other row is worked from the right side and every other row is worked from the wrong side. When working from the wrong side, the diagram will have to be worked reversed: from left to right, knit stitches are purled, purl stitches are knit etc.

When working in the round every round is worked from the right side and the diagram are worked from right to left on all rounds.

See DROPS lesson: How to read knitting diagrams

The diagram depicts all rows/rounds, and every stitch seen from the right side. It is worked from bottom to top, from right to left.

When working back and forth every other row is worked from the right side: from right to left and every other row is worked from the wrong side: from left to right.

When working in the round, every row in the diagram are worked from the right side, from right to left.

When working a circular diagram you start in the middle and work your way outwards, counter clockwise, row by row.

The rows usually start with a given number of chain stitches (equivalent to the height of the following stitch), this will either be depicted in the diagram or explained in the pattern.

See DROPS lesson: How to read crochet diagrams

Instructions for working several diagrams after each other on the same row/round, will often be written like so: “work A.1, A.2, A.3 a total of 0-0-2-3-4 times". This means you work A.1 once, then A.2 is worked once, and A.3 is repeated (in width) the number of times provided for your size – in this case like so: S = 0 times, M = 0 times, L=2 times, XL= 3 times and XXL = 4 times.

The diagrams are worked as usual: begin with the first row in A.1, then work the first row in A.2 etc.

See DROPS lesson: How to read knitting diagrams

See DROPS lesson: How to read crochet diagrams

The total width of the garment (from wrist-to-wrist) will be larger in the larger sizes, despite the actual sleeves being shorter. The larger sizes have longer sleeve caps and wider shoulders, so there will be a good fit in all sizes.

The measurement sketch/schematic drawing provides information regarding the full length of the garment. If it’s a jumper or a jacket the length is measured from the highest point on the shoulder closest to the neckline, and straight down to the bottom of the garment. It is NOT measured from the tip of shoulder. Similarly, the length of yoke is measured from the highest point on the shoulder and down to where yoke is split into body and sleeves.

On a jacket measures are never taken along bands, unless specifically stated. Always measure inside band stitches when measuring the length.

See DROPS lesson: How to read a schematic drawing

Diagrams are often repeated on the round or in height. 1 repeat is the diagram the way it appears in the pattern. If it says to work 5 repeats of A.1 in the round, then you work A.1 a total of 5 times after/next to each other in the round. If it says to work 2 repeats of A.1 vertically/in height you work the entire diagram once, then begin again at the start and work the entire diagram one more time.

Chain stitches are slightly narrower than other stitches and to avoid working the cast-on edge too tight, we simply chain more stitches to begin with. The stitch count will be adjusted on the following row to fit the pattern and measurement sketch.

The rib edge is more elastic and will contract slightly compared to, for example, stocking stitch. By increasing before the rib edge, you avoid a visible difference in width between the rib edge and the rest of the body.

It’s very easy to cast off too tightly, and by making yarn overs while casting off (and simultaneously casting these off) you avoid a too tight cast off edge.

See DROPS video: How to bind off with yarn overs (yo)

To achieve an even increase (or decrease) you can increase on, for example: every 3rd and 4th row alternately, like so: work 2 rows and increase on the 3rd row, work 3 rows and increase on the 4th. Repeat this until the increase is complete.

See DROPS lesson: Increase or decrease 1 st on every 3rd and 4th row alternately

Should you prefer to work in the round instead of back and forth, you may of course adjust the pattern. You’ll need to add steeks mid-front (usually 5 stitches), and follow the instructions. When you would normally turn and work from the wrong side, simply work across the steek and continue in the round. At the end you’ll cut the piece open, pick up stitches to work bands, and cover the cut edges.

See DROPS video: How to knit steeks and cut open

Should you prefer to work back and forth instead of in the round, you may of course adjust the pattern so you work the pieces separately and then assemble them at the end. Divide the stitches for the body in 2, add 1 edge stitch in each side (for sewing) and work the front and back pieces separately.

See DROPS lesson: Can I adapt a pattern for circular needles into straight needles?

Pattern repeats can vary slightly in the different sizes, in order to get the correct proportions. If you’re not working the exact same size as the garment in the photo, yours might deviate slightly. This has been carefully developed and adjusted so that the complete impression of the garment is the same in all sizes.

Make sure to follow instructions and diagrams for your size!

If you have found a pattern you like which is available in women’s size it’s not very difficult to convert it to men’s size. The biggest difference will be the length of sleeves and body. Start working on the women size that you think would fit across the chest. The additional length will be worked right before you cast off for the armhole/sleeve cap. If the pattern is worked top-down you can add the length right after the armhole or before the first decrease on sleeve.

Regarding additional yarn amount, this will depend on how much length you add, but it is better with a skein too many than too few.

All yarns will have excess fibres (from production) that might come off as lint or shedding. Brushed yarns (ie hairier yarns) have more of these loose, excess fibres, causing more shedding.

Shedding also depends on what is worn under or over the garment, and whether this pulls at the yarn fibres. It’s therefore not possible to guarantee that there will be no shedding

Below are some tips on how to get the best result when working with hairier yarns:

1. When the garment is finished (before you wash it) shake it vigorously so the looser hairs come off. NOTE: do NOT use a lint roller, brush or any method that pulls at the yarn.

2. Place the garment in a plastic bag and put it in your freezer - the temperature will cause the fibres to become less attached to each other, and excess fibres will come off easier.

3. Leave in the freezer for a few hours before taking it out and shaking it again.

4. Wash the garment according to the instructions on the yarn label.

Pilling is a natural process that happens to even the most exclusive of fibers. It's a natural sign of wear and tear that is hard to avoid, and that is most visible in high friction areas of your garment like a sweater's arms and cuffs.

You can make your garment look as new by removing the pilling, using a fabric comb or a pill/lint remover.

Still can't find the answer you need? Then scroll down and leave your question so one of our experts can try to help you. This will be done normally within 5 to 10 working days.
In the meantime, you can read the questions and answers that others have left to this pattern or join the DROPS Workshop on Facebook to get help from fellow knitters/crocheters!

You might also like...

Post a comment to pattern DROPS 65-2

We would love to hear what you have to say about this pattern!

If you want to leave a question, please make sure you select the correct category in the form below, to speed up the answering process. Required fields are marked *.

Comments / Questions (20)

country flag Iris Remund wrote:

Anleitung Ärmel: Nach der Zunahme steht nur : nach ???? und nun kommen die Abnahmen. Nach wieviel cm beginne ich mit der Abnahme? èberhaupt ist dieser Teil der Anleitung sehr verwirrend

14.03.2024 - 22:52

DROPS Design answered:

Liebe Frau Remund, es fehlt 46-45-44, dh nach 46-45-44 cm beginnen Sie die Abketten in jeder Seite, danke für den Hinweis, es wird korrigiert. Viel Spaß beim Stricken!

15.03.2024 - 09:26

country flag Nicole wrote:

Kopftuch Diagramm M6: wie arbeite ich nach der Reihe 36 bzw 37 weiter? Ich dachte mit Reihe 30, aber dann fehlt jeweils eine Masche. Ich komme nicht weiter...

04.09.2023 - 22:12

DROPS Design answered:

Liebe Nicole, beginnen Sie mit der 21. Reihe vom Anfang und nehmen Sie am Anfang + am Ende der Reihe genauso zu und dazwischen stricken Sie das Lochmuster wie zuvor. Viel Spaß beim stricken!

05.09.2023 - 13:17

country flag Kolibri wrote:

Liebe Helferinnen, bitten schauen Sie sich die 28. Reihe an, da müssten am Ende der Reihe auch 3 Maschen zusammengestrickt werden, damit das Muster symmetrisch ist. Vielen Dank für die vielen Anleitungen. Ich lebe in Uruguay und holle mir immer wieder Anregungen auf ihrer Seite.

23.04.2023 - 20:06

country flag Elisabeth Vaardal wrote:

Jeg forstår ikke M1 x1, M2x10,11 og 12, M3 x1. Hvordan gjøres dette?

18.10.2022 - 09:58

DROPS Design answered:

Hei Elizabeth, Dette er gjentagelse av de forskjellige diagrammene i bredden på raden. Avhengig av hvilken størrelse du strikker gjentar du M.2 enten 10, 11 eller 12 ganger, med M.1 og M.3 strikket 1 gang på hver side. Håper dette hjelper og god fornøyelse!

19.10.2022 - 07:06

country flag Martha wrote:

On the first chart, the K2 tog, yo and yo, slip, k, psso are shown over two squares/stitches. Except in rows 6 and 12 where they appear in only one square. How is this done differently? If it isn’t different, I don’t have enough stitches at the end of the row. Thank you!

09.08.2020 - 18:42

DROPS Design answered:

Dear Martha, on row 6, you work yo, slip 1, K 2 tog, psso, yo = you decrease 2 sts compensated by 2 yarn overs - on row 12 you will work K2 tog, YO in M.1, yo, slip 1, K 2 tog, psso, yo in each M.2 and yo, slip 1 as if to k, k1 psso in M.3. Happy knitting!

10.08.2020 - 09:35

country flag Martha wrote:

Instructions for M.1, M.2, M.3 chart say to repeat 3 times for 36 rows. Does this mean ALL rows are shown in chart or just RIGHT SIDE rows? If just right side rows are shown then I would knit a total of 72 rows after 3 repeats. And what about 2 other charts... Your response to one question asked indicates that M.4/M.5 chart shows right sides only. So that would equal 144 rows in total? And what about M.6 chart? Thanks for your help!

08.08.2020 - 15:59

DROPS Design answered:

Hi Martha, The pattern is worked from both the right side and wrong side (all rows). The diagram is read from left to right when working from the wrong side. Happy knitting!

10.08.2020 - 06:53

country flag Janit wrote:

The stitch guide says nothing about knit right side or purl wrong side so I’m assuming it’s just knit? And working 99 stitches with 2 edge stitches gives me 97 working stitches.... so when working pattern 4 and 5 for 6 stitch repeat my working stitches are not matching up to the pattern stitches. Example. Pattern 4 - edge stitch. Then pattern purl knit purl repeat across end on knit, then edge stitch. This does not work across the 99 stitches on needle

26.07.2020 - 13:27

DROPS Design answered:

Dear Janit, diagram shows the pattern seen from RS, ie a knit stitch in diagram should be knitted from RS and purled from WS, a purl st in diagram should be purled from RS and knited from WS. Work the 99 stitches with M.4/M.5 as follows: 1 edge st in garter st, repeat the 6 sts in M.4/M.5 a total of 16 times, work now the first stitch in diagram (pattern will be now symetrical on each side) and finish with 1 edge st in garter st. Happy knitting!

29.07.2020 - 10:56

country flag Véronique De SAN FELICIANO wrote:

Bonjour, je n'arrive pas à tricoter le rang 6 de M1 M2 et M3 pourriez-vous me le détailler s'il vous plait ?

04.09.2019 - 21:52

DROPS Design answered:

Bonjour Mme De San Feliciano, au rang 6 des diagrammes, tricotez les 2 dernières mailles de M.1 avec la première m de M.2 (= le 2ème jeté = 1ère m du premier M.2), puis, tricotez les 2 dernières mailles de M.2 avec la 1ère m du M.2 suivant (de M.3 à la fin). Bon tricot!

05.09.2019 - 09:28

country flag De San Feliciano Veronique wrote:

Bonjour , pouvez-vous me dire s'il-vous-plait si les diagrammes M.4 et M.5 sont representés avec tous les rangs ou seulement les rangs endroits ? si non merci de me dire comment se tricotent les rangs envers ..... cordialement

21.08.2019 - 13:36

DROPS Design answered:

Bonjour Mme De San Feliciano, les diagrammes montrent tous les rangs, commencez en bas à droite et lisez de droite à gauche sur l'endroit; de gauche à droite sur l'envers - plus d'infos ici; Bon tricot!

21.08.2019 - 15:12

country flag Françoise wrote:

Diagramme M2 6ème rang au début le signe deux mailles ensembles 1 jeté et à la fin 1 jeté 1 surjet. Dans le diagramme les signes ne correspondent pas ce qui fait décaler le motif..

03.04.2018 - 18:09

DROPS Design answered:

Bonjour Françoise, au 6ème rang, tricotez les 2 dernières m de M.1 ensemble avec la 1ère m de M.2 (= le jeté après le surjet double est la nouvelle première m de M.2), lorsque vous répétez M.2, tricotez les 2 dernières m de M.2 avec la 1ère m du M.2 suivant (puis la 1ère m de M.3). Vous devez toujours avoir le même nombre de mailles dans chaque diagramme. Bon tricot!

04.04.2018 - 08:39